1. 빌더(Builder) 패턴 : 동일한 프로세스를 거쳐 다양한 구성의 인스턴스를 만드는 방법
(복잡한) 객체를 만드는 프로세스를 독립적으로 분리할 수 있다.

Before
App
public class App {

    public static void main(String[] args) {
        TourPlan shortTrip = new TourPlan();
        shortTrip.setTitle("오레곤 롱비치 여행");
        shortTrip.setStartDate(LocalDate.of(2021, 7, 15));


        TourPlan tourPlan = new TourPlan();
        tourPlan.setTitle("칸쿤 여행");
        tourPlan.setNights(2);
        tourPlan.setDays(3);
        tourPlan.setStartDate(LocalDate.of(2020, 12, 9));
        tourPlan.setWhereToStay("리조트");
        tourPlan.addPlan(0, "체크인 이후 짐풀기");
        tourPlan.addPlan(0, "저녁 식사");
        tourPlan.addPlan(1, "조식 부페에서 식사");
        tourPlan.addPlan(1, "해변가 산책");
        tourPlan.addPlan(1, "점심은 수영장 근처 음식점에서 먹기");
        tourPlan.addPlan(1, "리조트 수영장에서 놀기");
        tourPlan.addPlan(1, "저녁은 BBQ 식당에서 스테이크");
        tourPlan.addPlan(2, "조식 부페에서 식사");
        tourPlan.addPlan(2, "체크아웃");
    }
}
TourPlan
public class TourPlan {

    private String title;

    private int nights;

    private int days;

    private LocalDate startDate;

    private String whereToStay;

    private List<DetailPlan> plans;

    public TourPlan() {
    }

    public TourPlan(String title, int nights, int days, LocalDate startDate, String whereToStay, List<DetailPlan> plans) {
        this.title = title;
        this.nights = nights;
        this.days = days;
        this.startDate = startDate;
        this.whereToStay = whereToStay;
        this.plans = plans;
    }

    @Override
    public String toString() {
        return "TourPlan{" +
                "title='" + title + '\'' +
                ", nights=" + nights +
                ", days=" + days +
                ", startDate=" + startDate +
                ", whereToStay='" + whereToStay + '\'' +
                ", plans=" + plans +
                '}';
    }
+) getter, setter 추가
DetailPlan
public class DetailPlan {

    private int day;

    private String plan;

    public DetailPlan(int day, String plan) {
        this.day = day;
        this.plan = plan;
    }

    public int getDay() {
        return day;
    }

    public void setDay(int day) {
        this.day = day;
    }

    public String getPlan() {
        return plan;
    }

    public void setPlan(String plan) {
        this.plan = plan;
    }

    @Override
    public String toString() {
        return "DetailPlan{" +
                "day=" + day +
                ", plan='" + plan + '\'' +
                '}';
    }
}
Before: 기존 설계의 문제점
1. 복잡한 객체 생성:
- TourPlan 객체를 생성하기 위해 setter 메서드를 여러 번 호출해야 하며, 생성 과정이 장황함.
- 필수 값과 선택 값을 구분하기 어렵고, 잘못된 순서로 설정될 가능성이 있음.
2.가독성 저하:
- App 클래스에서 TourPlan 객체를 생성할 때 코드가 길고 읽기 어려움.
3. 유지보수 어려움:
- TourPlan의 필드가 추가되거나 변경되면, 객체 생성 로직도 수정해야 함.
4. 객체 생성의 일관성 부족:
- 특정 필드를 설정하지 않거나 잘못된 값을 설정해도 컴파일러가 잡아주지 못함.
After : 빌더 패턴 적용
빌더 패턴으로 개선된 설계

- 빌더 패턴은 객체 생성 과정을 캡슐화하여, 복잡한 객체 생성 로직을 간결하고 일관되게 처리할 수 있도록 개선한다.
설계 변경
- TourPlanBuilder 인터페이스:
public interface TourPlanBuilder {

    TourPlanBuilder nightsAndDays(int nights, int days);

    TourPlanBuilder title(String title);

    TourPlanBuilder startDate(LocalDate localDate);

    TourPlanBuilder whereToStay(String whereToStay);

    TourPlanBuilder addPlan(int day, String plan);

    TourPlan getPlan();

}- TourPlan 객체를 생성하는 데 필요한 메서드를 정의.
- 체이닝(Chaining) 방식을 지원하여 메서드를 연결해서 호출할 수 있음.
("체이닝 방식"은 메서드 호출을 연결하여 코드의 간결성과 가독성을 높이는 빌더 패턴의 중요한 특징이다. 각 메서드가 this를 반환함으로써 다음 메서드를 이어서 호출할 수 있게 해준다.)
- DefaultTourBuilder 구현체:
public class DefaultTourBuilder implements TourPlanBuilder {

    private String title;

    private int nights;

    private int days;

    private LocalDate startDate;

    private String whereToStay;

    private List<DetailPlan> plans;

    @Override
    public TourPlanBuilder nightsAndDays(int nights, int days) {
        this.nights = nights;
        this.days = days;
        return this;
    }

    @Override
    public TourPlanBuilder title(String title) {
        this.title = title;
        return this;
    }

    @Override
    public TourPlanBuilder startDate(LocalDate startDate) {
        this.startDate = startDate;
        return this;
    }

    @Override
    public TourPlanBuilder whereToStay(String whereToStay) {
        this.whereToStay = whereToStay;
        return this;
    }

    @Override
    public TourPlanBuilder addPlan(int day, String plan) {
        if (this.plans == null) {
            this.plans = new ArrayList<>();
        }

        this.plans.add(new DetailPlan(day, plan));
        return this;
    }

    @Override
    public TourPlan getPlan() {
        return new TourPlan(title, nights, days, startDate, whereToStay, plans);
    }
}- TourPlanBuilder를 구현하여 실제 TourPlan 객체를 생성.
- 내부적으로 값을 설정하고, getPlan() 메서드를 통해 최종적으로 완성된 객체를 반환.
- TourDirector:
public class TourDirector {

    private TourPlanBuilder tourPlanBuilder;

    public TourDirector(TourPlanBuilder tourPlanBuilder) {
        this.tourPlanBuilder = tourPlanBuilder;
    }

    public TourPlan cancunTrip() {
        return tourPlanBuilder.title("칸쿤 여행")
                .nightsAndDays(2, 3)
                .startDate(LocalDate.of(2020, 12, 9))
                .whereToStay("리조트")
                .addPlan(0, "체크인하고 짐 풀기")
                .addPlan(0, "저녁 식사")
                .getPlan();
    }

    public TourPlan longBeachTrip() {
        return tourPlanBuilder.title("롱비치")
                .startDate(LocalDate.of(2021, 7, 15))
                .getPlan();
    }
}
- 빌더 패턴의 Director 역할로, 미리 정의된 템플릿(예: cancunTrip, longBeachTrip)에 따라 객체를 생성.
- 클라이언트 코드(App):
- 클라이언트는 TourDirector를 사용해 미리 정의된 템플릿에 따라 간단히 객체를 생성.
public class App {

    public static void main(String[] args) {
        TourDirector director = new TourDirector(new DefaultTourBuilder());
        TourPlan tourPlan = director.cancunTrip();
        TourPlan tourPlan1 = director.longBeachTrip();
    }
}
빌더 (Builder) 패턴의 장점과 단점
장점
1) 만들기 복잡한 객체를 순차적으로 만들 수 있다.
2) 복잡한 객체를 만드는 구체적인 과정을 숨길 수 있다.
3) 동일한 프로세스를 통해 각기 다르게 구성된 객체를 만들 수도 있다.
4) 불완전한 객체를 사용하지 못하도록 방지할 수 있다.
단점
1) 원하는 객체를 만들려면 빌더부터 만들어야 한다.
2) 구조가 복잡해 진다. (트레이드 오프)
빌더 패턴, 실무에서는?
1. 실무에서의 사용 사례
1.1 자바 8 Stream.Builder API
- Java 8의
StreamAPI에서 빌더 패턴이 활용된다. - 역할:
Stream.Builder를 사용해 스트림을 점진적으로 구성.
예제:
Stream<String> stream = Stream.<String>builder()
    .add("Java")
    .add("Python")
    .add("Kotlin")
    .build();

stream.forEach(System.out::println);특징:
- 메서드 체이닝(
add)을 통해 스트림 요소를 추가. - 마지막에
build()호출로 스트림 생성.
1.2 StringBuilder
StringBuilder는 문자열을 효율적으로 조합하기 위한 클래스이다.- 질문:
StringBuilder가 빌더 패턴일까?- 답변: 부분적으로 빌더 패턴을 따르지만, 빌더 패턴의 엄격한 정의에는 해당하지 않음.
StringBuilder는 문자열 조합에 특화된 클래스로, 단일 책임만 수행.
예제:
StringBuilder sb = new StringBuilder();
sb.append("Hello, ")
  .append("world!")
  .append(" How are you?");
System.out.println(sb.toString());특징:
- 메서드 체이닝을 활용하여 문자열을 조합.
- 내부적으로 가변 배열을 사용해 효율적인 문자열 조작을 지원.
1.3 롬복의 @Builder
- Lombok의
@Builder는 빌더 패턴 구현을 자동화하는 애노테이션이다. - 역할: 복잡한 객체 생성 코드를 간소화.
예제:
@Getter
@Builder
public class User {
    private String name;
    private int age;
    private String email;
}

public class Main {
    public static void main(String[] args) {
        User user = User.builder()
                .name("John Doe")
                .age(30)
                .email("john.doe@example.com")
                .build();
        System.out.println(user);
    }
}특징:
- 롬복이 빌더 클래스를 자동으로 생성해줌.
- 필드가 많거나 선택적인 값이 많은 객체를 생성할 때 매우 유용.
1.4 스프링에서의 빌더
1.4.1 UriComponentsBuilder
- 역할: URL을 유연하고 간결하게 생성.
예제:
String url = UriComponentsBuilder.fromHttpUrl("http://example.com")
    .path("/api")
    .queryParam("name", "John")
    .queryParam("age", 30)
    .build()
    .toUriString();

System.out.println(url);
// Output: http://example.com/api?name=John&age=30특징:
- 메서드 체이닝을 통해 URL을 동적으로 생성.
- 쿼리 파라미터, 경로 등을 간결하게 추가 가능.
1.4.2 MockMvcWebClientBuilder
- 역할: 테스트 환경에서
MockMvc와WebClient를 연결하기 위한 빌더.
예제:
MockMvc mockMvc = MockMvcBuilders.standaloneSetup(new MyController()).build();
WebClient webClient = MockMvcWebClientBuilder.mockMvcSetup(mockMvc).build();특징:
- 테스트에서
MockMvc를 사용하여 HTTP 요청을 시뮬레이션. MockMvcWebClientBuilder를 통해MockMvc와WebClient를 연결.
1.5 기타 빌더
- JavaMailSenderBuilder: 이메일 발송 설정을 위한 빌더.
- RestTemplateBuilder:
RestTemplate의 초기화 및 커스터마이징.
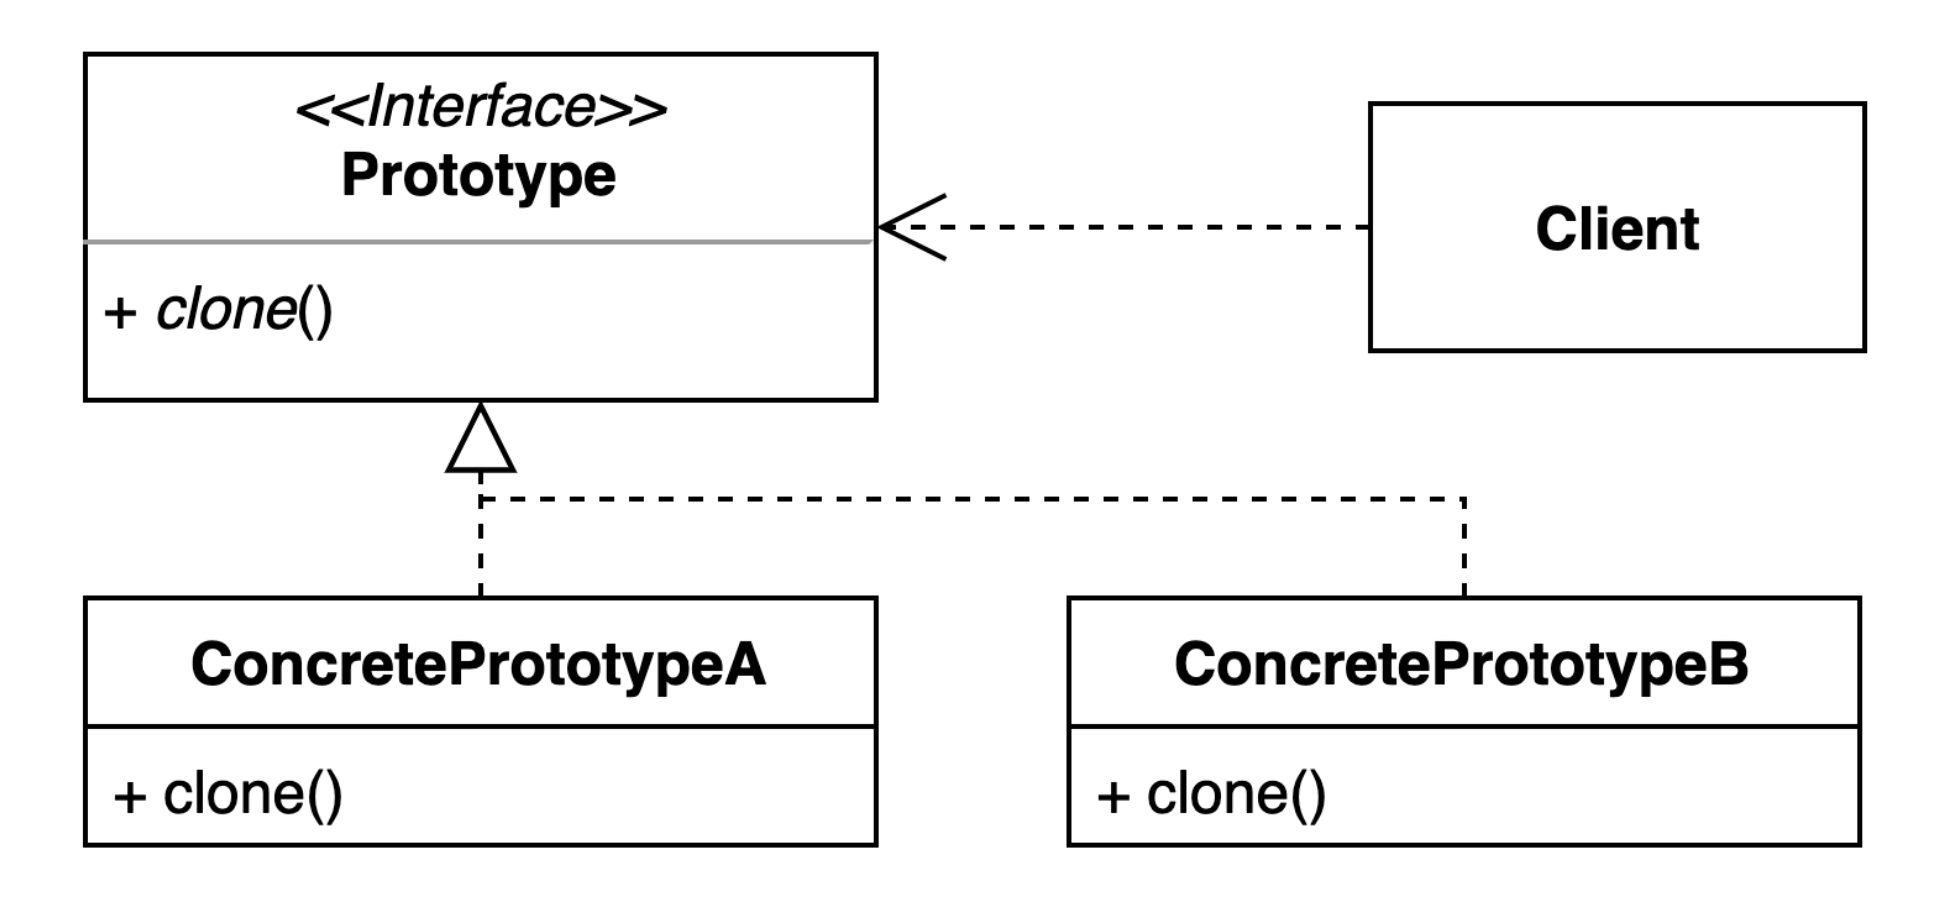
2. 프로토타입 (Prototype) 패턴 : 기존 인스턴스를 복제하여 새로운 인스턴스를 만드는 방법
- 복제 기능을 갖추고 있는 기존 인스턴스를 프로토타입으로 사용해 새 인스턴스를 만들 수
있다. - Java의 Cloneable 인터페이스와 clone() 메서드가 이를 구현하는 데 자주 사용된다.
Before
Before 코드에서는 프로토타입 패턴이 적용되지 않았다.
객체를 복제하는 기능 없이, 수동으로 각 객체를 생성하고 초기화해야 한다.
1. 주요 클래스
1) GithubRepository
GithubRepository는 GitHub의 저장소(repository).- 주요 속성:
user: 저장소의 소유자.name: 저장소 이름.
- 이 클래스는
GithubIssue객체에서 참조된다.
public class GithubRepository {

    private String user;
    private String name;

    public String getUser() {
        return user;
    }

    public void setUser(String user) {
        this.user = user;
    }

    public String getName() {
        return name;
    }

    public void setName(String name) {
        this.name = name;
    }
}
2) GithubIssue
-
GithubIssue는 특정 저장소에 등록된 GitHub 이슈(issue)를 나타낸다. -
주요 속성:
id: 이슈의 고유 ID.title: 이슈 제목.repository: 해당 이슈가 속한GithubRepository.
-
이 클래스는
getUrl()메서드를 통해 이슈의 GitHub URL을 동적으로 생성한다.
public class GithubIssue {

    private int id;
    private String title;
    private GithubRepository repository;

    public GithubIssue(GithubRepository repository) {
        this.repository = repository;
    }

    public int getId() {
        return id;
    }

    public void setId(int id) {
        this.id = id;
    }

    public String getTitle() {
        return title;
    }

    public void setTitle(String title) {
        this.title = title;
    }

    public GithubRepository getRepository() {
        return repository;
    }

    public String getUrl() {
        return String.format("https://github.com/%s/%s/issues/%d",
                repository.getUser(),
                repository.getName(),
                this.getId());
    }
}
3) App
App클래스는 실행을 위한 클라이언트 코드이다.- 이 클래스에서
GithubRepository와GithubIssue객체를 생성하고 초기화한다.
public class App {

    public static void main(String[] args) {
        GithubRepository repository = new GithubRepository();
        repository.setUser("whiteship");
        repository.setName("live-study");

        GithubIssue githubIssue = new GithubIssue(repository);
        githubIssue.setId(1);
        githubIssue.setTitle("1주차 과제: JVM은 무엇이며 자바 코드는 어떻게 실행하는 것인가.");

        String url = githubIssue.getUrl();
        System.out.println(url);
    }
}
2 Before 코드의 한계
-
복제 기능 없음:
- 객체를 복제하려면, 새로운 객체를 생성하고 모든 속성을 수동으로 설정해야 한다.
- 동일한 구조의 객체를 여러 개 생성하려면 코드가 중복된다.
예를 들어, 동일한
GithubIssue를 복제하려면 다음과 같은 방식으로 모든 속성을 수동으로 복사해야 한다:GithubIssue clonedIssue = new GithubIssue(repository); clonedIssue.setId(githubIssue.getId()); clonedIssue.setTitle(githubIssue.getTitle()); -
Deep Copy 구현 없음:
GithubRepository가 다른 객체에서 공유될 경우, 원본 객체와 복제 객체가 동일한 참조를 가진다.- 이는 원본 객체가 변경될 경우, 복제 객체에도 영향을 미치는 문제를 발생시킨다.
예:
repository.setUser("newUser"); // 원본 변경 System.out.println(githubIssue.getUrl()); // 복제 객체도 영향을 받음 -
객체 생성 복잡성:
- 각 필드를 setter로 수동 설정해야 하므로, 코드가 장황하고 오류 가능성이 증가한다.
-
객체 비교 어려움:
- 동일한 속성을 가진 객체인지 비교하려면, 각 필드를 하나씩 비교해야 한다.
After 설계

- 프로토타입 패턴을 적용하여 객체 복제를 구현.
- 기존 객체를 기반으로 새로운 객체를 생성하므로, 객체 생성 과정이 간소화되고 효율적.
After 코드의 주요 변경점
1.
Cloneable인터페이스 구현
GithubIssue
public class GithubIssue implements Cloneable {

    private int id;

    private String title;

    private GithubRepository repository;

    public GithubIssue(GithubRepository repository) {
        this.repository = repository;
    }

    public int getId() {
        return id;
    }

    public void setId(int id) {
        this.id = id;
    }

    public String getTitle() {
        return title;
    }

    public void setTitle(String title) {
        this.title = title;
    }

    public GithubRepository getRepository() {
        return repository;
    }

    public String getUrl() {
        return String.format("https://github.com/%s/%s/issues/%d",
                repository.getUser(),
                repository.getName(),
                this.getId());
    }

    @Override
    protected Object clone() throws CloneNotSupportedException {
        GithubRepository repository = new GithubRepository();
        repository.setUser(this.repository.getUser());
        repository.setName(this.repository.getName());

        GithubIssue githubIssue = new GithubIssue(repository);
        githubIssue.setId(this.id);
        githubIssue.setTitle(this.title);

        return githubIssue;
    }

    @Override
    public boolean equals(Object o) {
        if (this == o) return true;
        if (o == null || getClass() != o.getClass()) return false;
        GithubIssue that = (GithubIssue) o;
        return id == that.id && Objects.equals(title, that.title) && Objects.equals(repository, that.repository);
    }

    @Override
    public int hashCode() {
        return Objects.hash(id, title, repository);
    }
}
코드 분석
1. GithubRepository 복제:
- GithubIssue 객체는 GithubRepository를 참조 필드로 가지고 있다.
- 복제 과정에서 새로운 GithubRepository 객체를 생성하고, 기존 저장소의 user와 name 값을 복사한다.
2. 새로운 GithubIssue 객체 생성:
- 복제된 GithubRepository를 기반으로 새로운 GithubIssue 객체를 생성.
- 기존 GithubIssue의 id와 title도 복사하여 새 객체에 설정한다.
2. Deep Copy 구현:
- 원본 객체(GithubIssue)와 복제된 객체는 동일한 데이터(id, title, repository 내용)를 가지지만, 서로 다른 메모리 주소에 저장된다.
- 이는 복제된 객체가 원본 객체와 독립적으로 동작할 수 있도록 보장한다.
GithubIssue클래스는Cloneable인터페이스를 구현하고,clone()메서드를 오버라이드하여 객체를 복제한다.
public class GithubIssue implements Cloneable {
    @Override
    protected Object clone() throws CloneNotSupportedException {
        GithubRepository repository = new GithubRepository();
        repository.setUser(this.repository.getUser());
        repository.setName(this.repository.getName());

        GithubIssue githubIssue = new GithubIssue(repository);
        githubIssue.setId(this.id);
        githubIssue.setTitle(this.title);

        return githubIssue;
    }
}
3.
equals()및hashCode()구현
- 객체 비교 시 ID, 제목, 리포지토리를 기준으로 비교할 수 있도록
equals()와hashCode()를 재정의.
@Override
public boolean equals(Object o) {
    if (this == o) return true;
    if (o == null || getClass() != o.getClass()) return false;
    GithubIssue that = (GithubIssue) o;
    return id == that.id && Objects.equals(title, that.title) && Objects.equals(repository, that.repository);
}

@Override
public int hashCode() {
    return Objects.hash(id, title, repository);
}
App 클래스의 동작
App
public class App {

    public static void main(String[] args) throws CloneNotSupportedException {
        GithubRepository repository = new GithubRepository();
        repository.setUser("whiteship");
        repository.setName("live-study");

        GithubIssue githubIssue = new GithubIssue(repository);
        githubIssue.setId(1);
        githubIssue.setTitle("1주차 과제: JVM은 무엇이며 자바 코드는 어떻게 실행하는 것인가.");

        String url = githubIssue.getUrl();
        System.out.println(url);

        GithubIssue clone = (GithubIssue) githubIssue.clone();
        System.out.println(clone.getUrl());

        repository.setUser("Keesun");

        System.out.println(clone != githubIssue); //true
        System.out.println(clone.equals(githubIssue)); //true
        System.out.println(clone.getClass() == githubIssue.getClass()); //true
        System.out.println(clone.getRepository() == githubIssue.getRepository()); //true (deep copy)

        System.out.println(clone.getUrl());
    }

}
Before
GithubIssue객체를 생성하고 각 필드를 수동으로 설정.- 복제를 지원하지 않으므로 동일한 데이터로 새 객체를 생성하려면 반복적인 작업이 필요.
GithubIssue githubIssue = new GithubIssue(repository);
githubIssue.setId(1);
githubIssue.setTitle("1주차 과제: JVM은 무엇이며 자바 코드는 어떻게 실행하는 것인가.");
After
- 기존 객체를 복제하여 새로운 객체를 생성.
clone()메서드를 호출하여 간단히 복제 가능.
GithubIssue clone = (GithubIssue) githubIssue.clone();After 코드의 주요 동작
-
객체 복제
clone()메서드를 통해 기존GithubIssue객체를 복제.- 내부적으로 Deep Copy가 구현되어, 복제된 객체가 원본 객체와 독립적으로 동작.
-
독립적인 변경
- 복제된 객체(
clone)는 원본 객체(githubIssue)와 독립적인 속성을 가짐. - 예:
repository.setUser("Keesun")로 변경해도 복제된 객체는 영향을 받지 않음.
- 복제된 객체(
-
객체 비교
clone != githubIssue: 복제된 객체는 원본 객체와 다른 메모리 주소를 가짐.clone.equals(githubIssue): 객체 내용(ID, 제목, 리포지토리 등)은 동일하므로equals()는 true.
출력 결과
https://github.com/whiteship/live-study/issues/1
https://github.com/whiteship/live-study/issues/1
true    // clone != githubIssue (다른 객체)
true    // clone.equals(githubIssue) (내용 동일)
true    // clone.getClass() == githubIssue.getClass() (동일 클래스)
true    // clone.getRepository() == githubIssue.getRepository() (Deep Copy로 구현)
https://github.com/Keesun/live-study/issues/1
프로토타입 패턴의 장단점
장점
-
복잡한 객체 생성 간소화:
- 기존 객체를 기반으로 새로운 객체를 복제하므로, 객체 생성 과정이 간단.
-
객체 생성 비용 절감:
- 객체를 복제하여 생성하므로, 초기화 작업이 복잡하거나 비용이 많이 드는 경우 유리.
-
유연성:
- 원본 객체와 복제 객체가 독립적으로 동작하도록 구현 가능(Deep Copy).
-
객체 일관성 유지:
- 복제된 객체는 원본과 동일한 구조와 상태를 유지할 수 있음.
단점
-
구현 복잡성:
- Deep Copy를 구현하려면 복제 로직을 수동으로 작성해야 함.
- 순환 참조(Circular Reference)가 있는 경우, 복제 로직이 더 복잡해질 수 있음.
-
Cloneable 인터페이스의 한계:
- Java의 기본
Cloneable인터페이스는 복제 로직에 대한 명확한 지침을 제공하지 않음. - 대부분의 경우
clone()메서드를 직접 오버라이드해야 함.
- Java의 기본
-
상속 관계의 어려움:
- 복잡한 상속 구조에서는
clone()메서드 구현이 어려울 수 있음.
- 복잡한 상속 구조에서는
실무에서 프로토타입 패턴
프로토타입 (Prototype) 패턴: 실무에서의 활용
프로토타입 패턴은 복잡한 객체를 효율적으로 복제하여 생성하는 데 유용한 패턴으로, 실무에서도 다양한 방식으로 활용된다. 이 패턴은 자바의 clone() 메서드, Cloneable 인터페이스, 그리고 객체 매핑 라이브러리 등을 통해 구현된다.
1. 자바의 clone() 메서드와 Cloneable 인터페이스
1.1 Cloneable 인터페이스
Cloneable은 객체를 복제하기 위한 마커 인터페이스이다.Cloneable을 구현하지 않으면,clone()메서드 호출 시CloneNotSupportedException이 발생한다.
1.2 clone() 메서드
- 자바의
Object클래스에서 기본적으로 제공되며, 객체를 복제하는 역할을 한다. clone()메서드는 기본적으로 얕은 복사(Shallow Copy)를 수행한다.
예제:
public class Person implements Cloneable {
    private String name;
    private int age;

    public Person(String name, int age) {
        this.name = name;
        this.age = age;
    }

    @Override
    protected Object clone() throws CloneNotSupportedException {
        return super.clone(); // 얕은 복사
    }

    @Override
    public String toString() {
        return "Person{name='" + name + "', age=" + age + "}";
    }
}

public class Main {
    public static void main(String[] args) throws CloneNotSupportedException {
        Person original = new Person("John", 30);
        Person cloned = (Person) original.clone();

        System.out.println(original); // Person{name='John', age=30}
        System.out.println(cloned);   // Person{name='John', age=30}
        System.out.println(original == cloned); // false (다른 객체)
    }
}
2. Shallow Copy와 Deep Copy
2.1 Shallow Copy (얕은 복사)
- 참조 필드를 복제하지 않고 원본 객체의 참조를 공유한다.
- 기본적으로
clone()메서드는 얕은 복사를 수행한다.
문제점:
- 원본 객체의 참조 필드가 변경되면, 복제된 객체에도 영향을 미친다.
예제:
class Address {
    String city;

    Address(String city) {
        this.city = city;
    }
}

class Employee implements Cloneable {
    String name;
    Address address;

    Employee(String name, Address address) {
        this.name = name;
        this.address = address;
    }

    @Override
    protected Object clone() throws CloneNotSupportedException {
        return super.clone(); // 얕은 복사
    }
}

public class Main {
    public static void main(String[] args) throws CloneNotSupportedException {
        Address address = new Address("New York");
        Employee original = new Employee("Alice", address);
        Employee cloned = (Employee) original.clone();

        cloned.address.city = "San Francisco";

        System.out.println(original.address.city); // San Francisco (원본도 영향 받음)
    }
}
2.2 Deep Copy (깊은 복사)
- 참조 필드를 새 객체로 복제하여, 원본과 복제 객체가 완전히 독립적으로 동작하도록 구현한다.
- Deep Copy는 수동으로 구현해야 한다.
예제:
class Employee implements Cloneable {
    String name;
    Address address;

    Employee(String name, Address address) {
        this.name = name;
        this.address = address;
    }

    @Override
    protected Object clone() throws CloneNotSupportedException {
        // Deep Copy
        Employee cloned = (Employee) super.clone();
        cloned.address = new Address(this.address.city);
        return cloned;
    }
}
3. ModelMapper
3.1 ModelMapper란?
- ModelMapper는 객체 간의 데이터를 자동으로 매핑(mapping)하는 라이브러리이다.
- 객체 복제뿐만 아니라, DTO 변환과 같은 작업에서도 많이 활용된다.
3.2 ModelMapper를 활용한 객체 복제
- ModelMapper는 내부적으로 Deep Copy를 수행한다.
- 새로운 객체를 생성하고 데이터를 복사하므로, 원본과 복제된 객체가 독립적으로 동작한다.
예제:
import org.modelmapper.ModelMapper;

class Person {
    private String name;
    private int age;

    // Getter, Setter, Constructor
}

public class Main {
    public static void main(String[] args) {
        ModelMapper modelMapper = new ModelMapper();

        // 원본 객체
        Person original = new Person("Alice", 25);

        // 복제된 객체
        Person cloned = modelMapper.map(original, Person.class);

        System.out.println(original); // Person{name='Alice', age=25}
        System.out.println(cloned);   // Person{name='Alice', age=25}
        System.out.println(original == cloned); // false (다른 객체)
    }
}
3.3 실무에서의 장점
- Deep Copy를 자동으로 처리:
- 참조 필드가 포함된 복잡한 객체도 자동으로 복제 가능.
- 객체 간 데이터 변환:
- DTO와 Entity 간의 데이터 변환 작업을 간소화.
- 구조가 유사한 객체 복제:
- 클래스 구조가 유사하면, 매핑 설정 없이도 데이터를 복제 가능.
4. 실무에서 프로토타입 패턴의 활용
4.1 객체 생성 비용이 클 때
- 데이터베이스 연결, 네트워크 요청 등 초기화 작업이 무거운 객체를 복제하여 효율적으로 생성.
- 예: 스프링 빈 프로토타입 스코프
4.2 DTO 변환
- ModelMapper 또는 MapStruct와 같은 매핑 도구를 사용하여 Entity와 DTO 간 데이터를 복제.
4.3 테스트 환경
- Mock 객체나 데이터 초기화를 위해 객체를 복제.
4.4 캐싱
- 동일한 데이터 구조를 가진 객체를 반복적으로 생성하지 않고, 복제하여 사용.