✏️ Authentik이란?
authentik은 오픈소스 IDP 시스템이다.
◼︎ 특징
- SSO 지원
: 한 번 로그인하면 여러 서비스에서 자동으로 로그인됨 - MFA 지원
: OTP, 지문 인식, 보안 키 등 추가 인증 방식 제공 - 리버스 프록시 기능
: 기존 웹사이트에 추가 보안 기능을 적용할 수 있음
◼︎ Core Concept - Flows & Stages
Flows & Stages는 Authentik의 주요 기능 중 하나로, 인증 흐름을 설계할 수 있게 해준다.
Flows
: 사용자의 인증, 등록, 복구 등 특정 작업을 수행할 때 거치는 일련의 단계를 정의한 설계도
각 Flow는 여러 개의 Stage로 구성된다.
주요 Flows 예시
- Authentication: 사용자 인증을 위한 Flow
- Enrollment: 신규 사용자 등록을 위한 Flow
- Recovery: 계정 복구를 위한 Flow
Stages
: Flow 내에서 하나의 검증 또는 논리 단계
각 Stage는 사용자 입력, 검증, 리디렉션 등의 역할을 수행한다.
주요 Stages 예시
- Identification Stage: 사용자 식별 (예: 사용자명 또는 이메일 입력)
- Password Stage: 비밀번호 입력 및 검증
- Authenticator Validation Stage: 2단계 인증 기기 검증
관리자는 원하는 순서로 Stage를 조합해 Flow를 설계할 수 있으며, 각 단계마다 policy를 걸어 사용자 유형에 따라 흐름을 다르게 구성하는 것도 가능하다.
예를 들어, 사용자가 로그인할 때 단순히 ID와 비밀번호만 입력하도록 구성할 수도 있고, 특정 사용자 그룹에 한해 2단계 인증을 추가할 수도 있다.
✏️ Authentik의 OAuth 2.0
Authentik은 두 가지 역할을 할 수 있다.
-
OAuth 2.0 제공자(OP, OpenID Provider) → IDP 역할
- Authentik이 인증을 담당하는 "로그인 제공자" 역할을 한다.
- 예를 들어, 사용자가 웹 애플리케이션에 로그인할 때, Authentik이 사용자 인증을 수행하고, 애플리케이션에 정보를 제공한다.
OAuth 2.0 소비자(RP, Relying Party) → 외부 IDP 사용
- Authentik이 외부 서비스(Google, GitHub 등)와 연동하여 로그인할 수 있도록 한다.
- 즉, 사용자가 Authentik을 거쳐 외부 OAuth 제공자를 이용해 로그인할 수 있다.
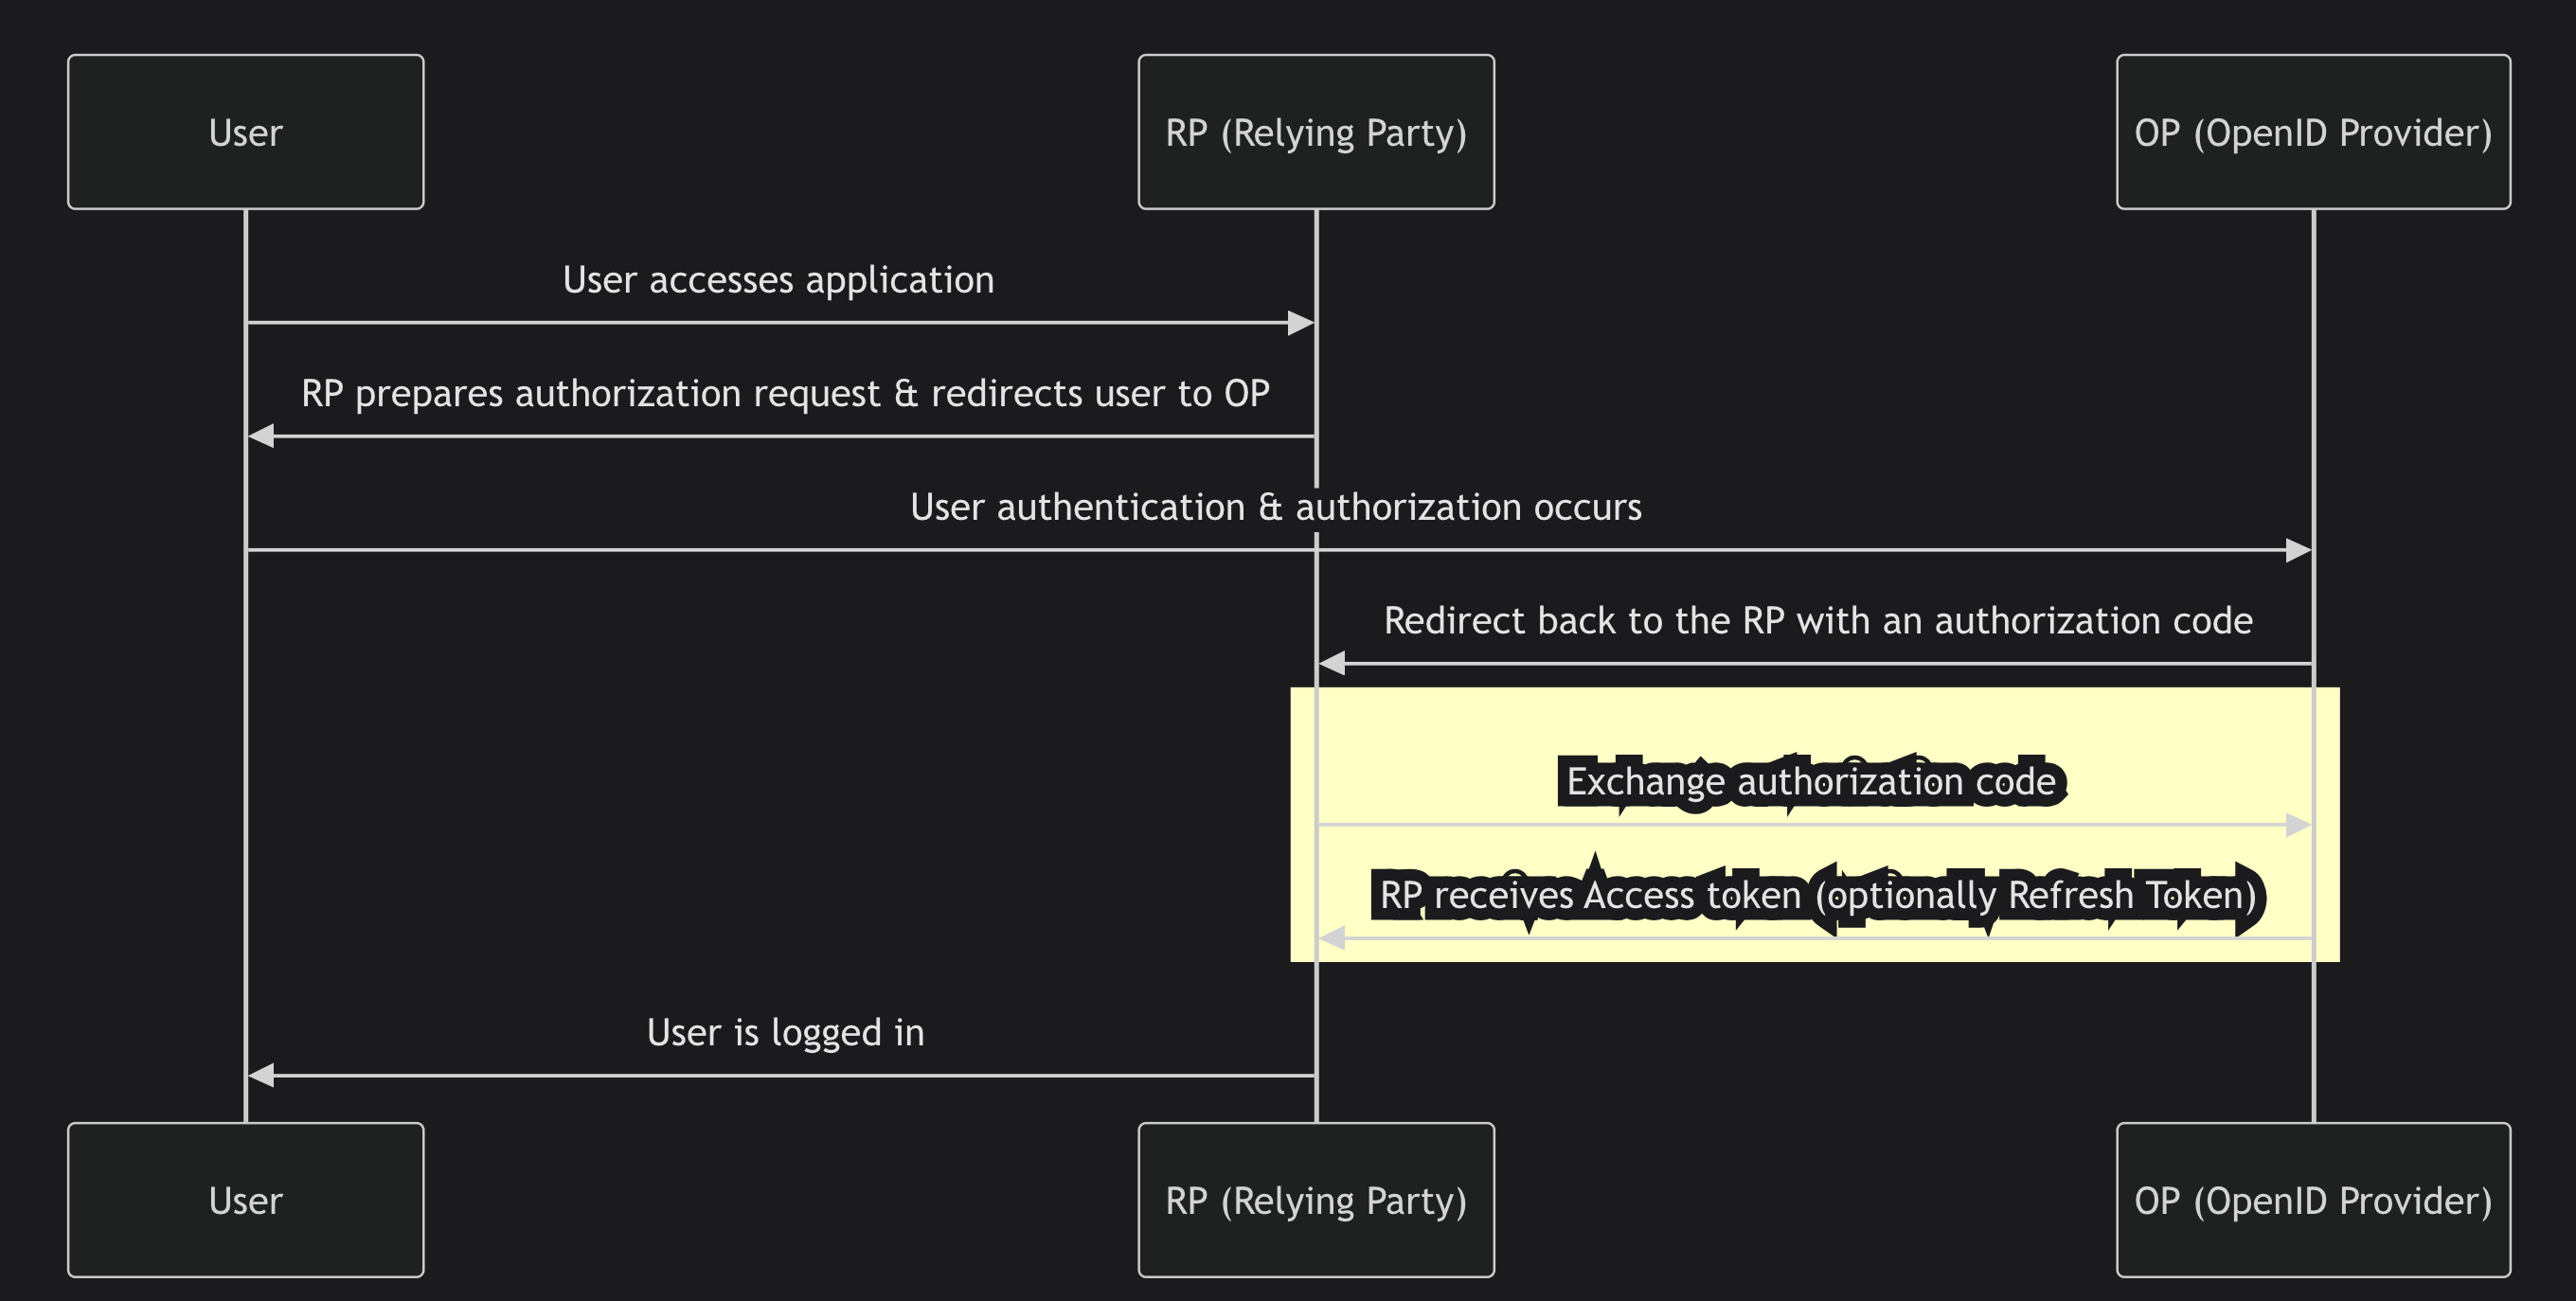
◼︎ 인증 과정
OAuth 2.0의 기본적인 인증 흐름은 다음과 같다.
1. 사용자가 애플리케이션(RP) 에 접속한다.
2. RP는 Authentik(OP) 로 사용자를 보낸다.
3. 사용자가 Authentik에서 로그인하면, 인증 코드가 RP로 반환된다.
4. RP는 이 인증 코드를 사용하여 Access Token을 요청한다.
5. OP(Authentik)는 Access Token(및 Refresh Token) 을 RP에 전달한다.
6. RP는 Access Token을 사용하여 사용자 정보를 요청할 수 있다.
✏️ Authentik 적용 방법(로컬)
Authentik을 어플리케이션에 적용하는 방법은 이 포스팅에 잘 설명되어 있다.
<출처: IT-SVR 달소 - 오픈소스 Authntik 로 SSO 서버 자체 구축하기.>
필자가 위의 과정을 따라하면서 발생했던 오류 몇가지들을 아래에 적어두었다.
1. Authentik Permission Denied
docker-compose up으로 Authentik을 실행시키면 다음과 같은 에러 로그가 뜬다.
worker-1      | chown: changing ownership of '/media/public': Permission denied
worker-1      | chown: changing ownership of '/media': Permission denied
worker-1      | chown: changing ownership of '/certs': Permission denied
이 에러 로그가 뜨면, authentik에 처음 접속했을 때 Not Found가 리턴되면서 다음 과정으로 넘어갈 수 없다.
해결방법 :
docker-compose.yml파일에서user: root를 제거한다.
2. Redirect URI Error
authentik에 접속해서 Provider를 만들 때, Redirect URI를 요구하는 필드가 있다.
Redirect URI 필드는 자신이 사용하는 라이브러리에 맞게 조정해줘야 한다.
ex) NextAuth는 /api/auth/callback/{providerId} 패턴을 사용한다.
NextAuth에서는 OAuth 2.0 및 OpenID Connect (OIDC) 인증을 처리할 때, 자동으로 callback 엔드포인트를 생성한다.
기본적으로 모든 OAuth Provider는 callback 경로를 /api/auth/callback/{providerId} 형태로 생성한다.
- 로컬에서 authentik을 돌리는 경우, provider를 생성할 때 다음과 같이 넣어주면 된다.
http://localhost:3000/api/auth/callback/authentik
import NextAuth from "next-auth";
import AuthentikProvider from "next-auth/providers/auth0"; // OIDC 사용 가능

export const authOptions = {
    providers: [
        AuthentikProvider({
            id: "authentik",  // 이 값이 중요한 부분!
            name: "Authentik",
            clientId: process.env.AUTHENTIK_CLIENT_ID,
            clientSecret: process.env.AUTHENTIK_CLIENT_SECRET,
            issuer: process.env.AUTHENTIK_ISSUER,
        }),
    ],
};


const handler = NextAuth(authOptions);
export { handler as GET, handler as POST };
3. api/auth/signin?error=oauthsignin
정말 고치는데 오랜 시간이 걸렸다.
결론은 AUTHENTIK_ISSUER 환경변수의 문제였다.

왜 이걸 이제야 봤을까...
AUTHENTIK_ISSUER 환경변수의 끝에 있는 슬래시를 제거했더니 잘 동작했다.
⚠️ 백엔드 환경변수에 issuer를 저장할 때는 슬래시를 포함시켜야 한다.
✏️ Authentik refresh token 사용방법
Authentik의 공식 문서
Starting with authentik 2024.2, applications only receive an access token. To receive a refresh token, both applications and authentik must be configured to request the offline_access scope. In authentik this can be done by selecting the offline_access Scope mapping in the provider settings.
Authentik에서는 기본적으로 refresh token을 발급해주지 않는다.
refresh token을 발급하기 위해서는 authentik의 provider 설정을 바꿔줘야 한다.
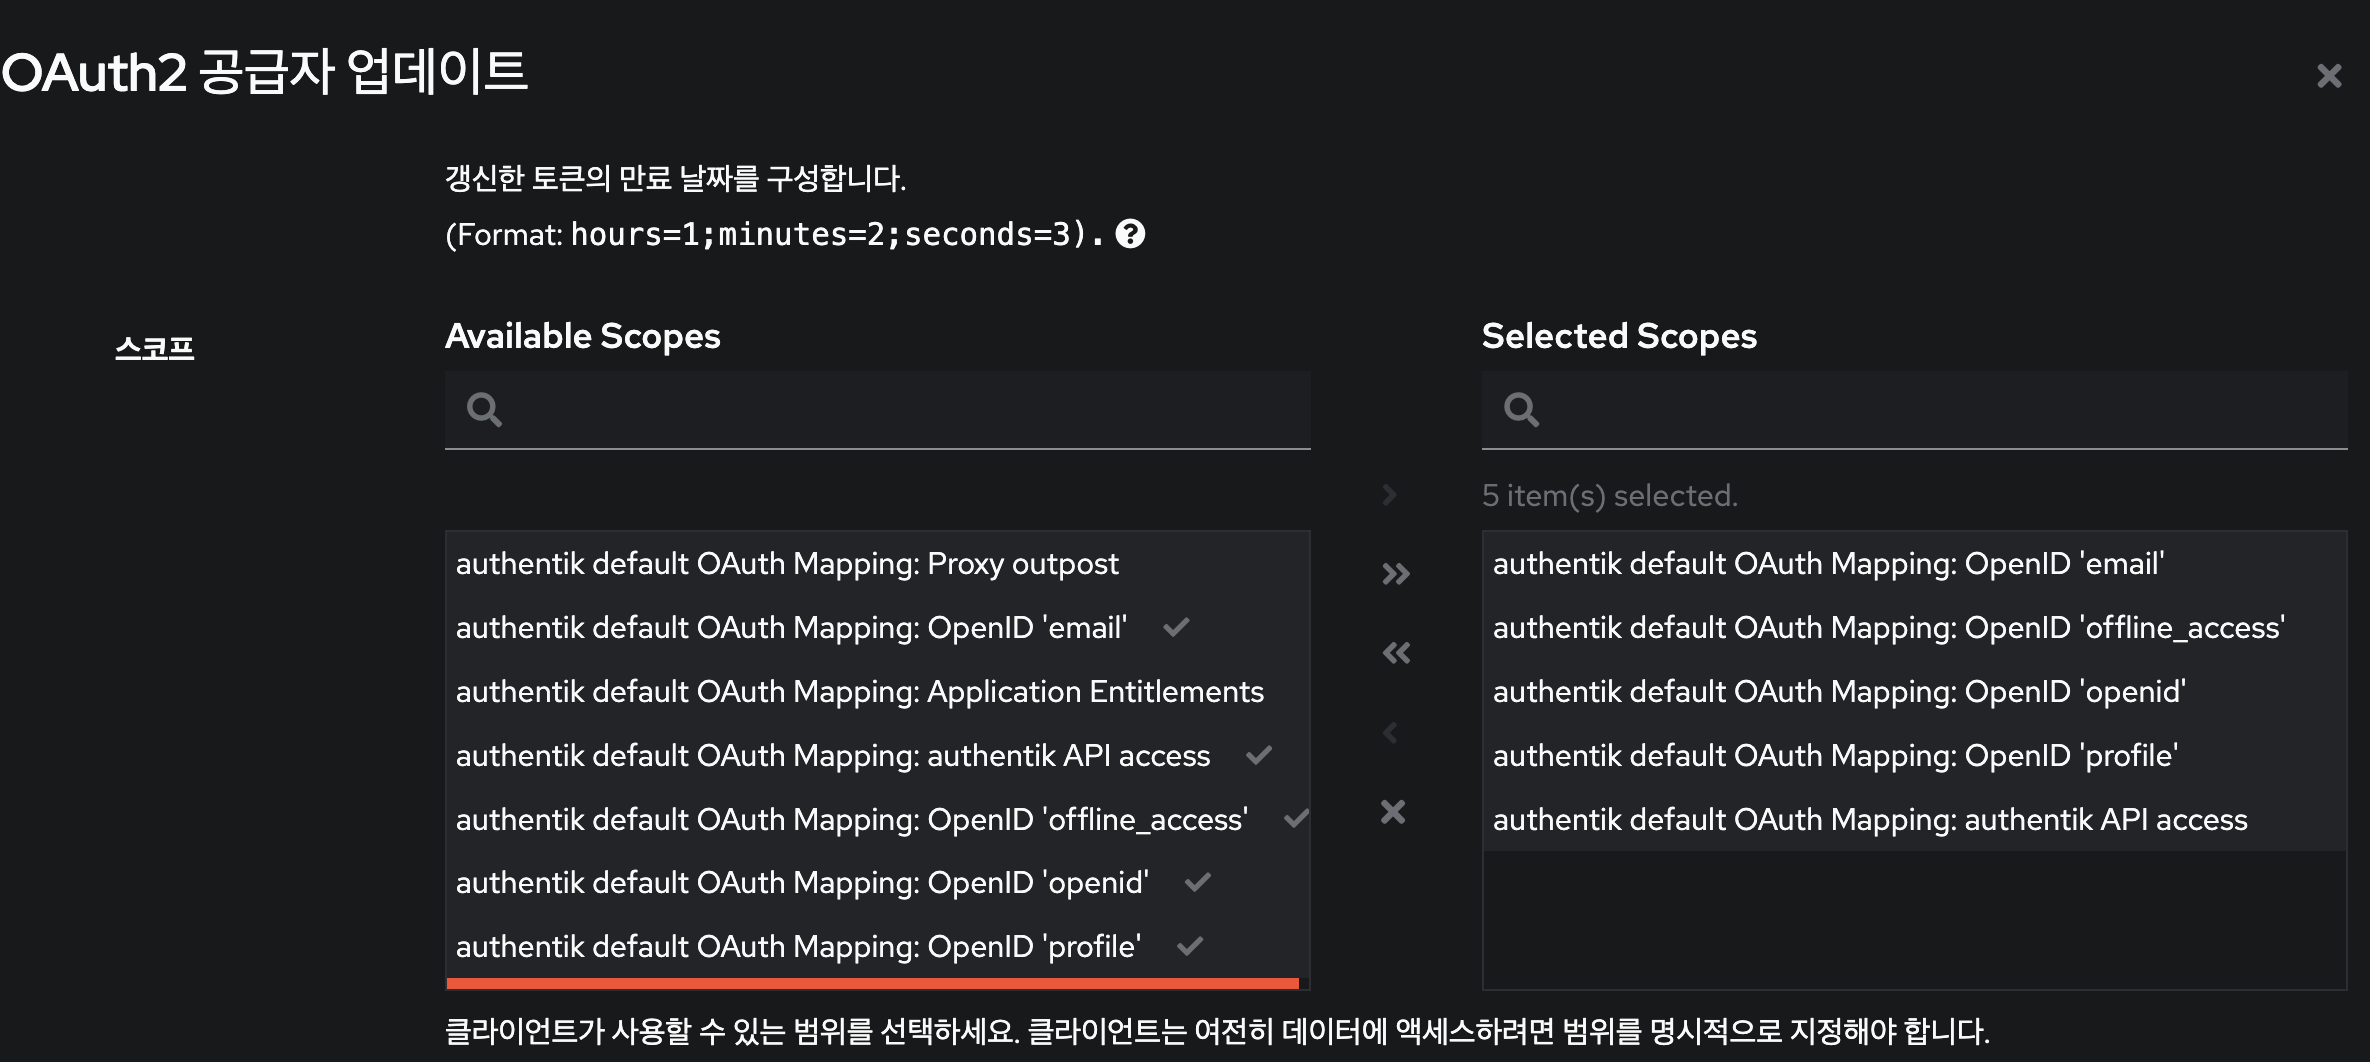
Authentik 관리자로 로그인 한뒤, 아래의 과정을 수행한다.
[공급자 - 수정 - 고급 프로토콜 설정 - offline_access 추가]
그런 다음, authorization 관련 코드를 수정한다.
전체 코드:
import NextAuth, { NextAuthOptions } from 'next-auth';
import AuthentikProvider from 'next-auth/providers/authentik';

const authOptions: NextAuthOptions = {
  providers: [
    AuthentikProvider({
      id: 'authentik',
      name: 'authentik',
      authorization: {
        params: {
          scope: 'openid email profile offline_access', // ✅ refresh token 받기 위해 필요
        },
      },
      clientId: process.env.AUTHENTIK_CLIENT_ID,
      clientSecret: process.env.AUTHENTIK_CLIENT_SECRET,
      issuer: process.env.AUTHENTIK_ISSUER,
      profile(profile) {
        return {
          id: profile.sub,
          name: profile.name,
          email: profile.email,
        };
      },
    }),
  ],
  session: {
    strategy: 'jwt',
    maxAge: 60 * 60 * 24 * 30, // 30일
  },
  callbacks: {
    async jwt({ token, account, profile }) {
      if (account) {
        return {
          ...token,
          access_token: account.access_token,
          expires_at: account.expires_at as number,
          refresh_token: account.refresh_token, // ✅ refresh token 저장
          uid: profile.sub,
        };
      } else if (Date.now() < (token.expires_at as number) * 1000) {
        return token;
      } else {
        if (!token.refresh_token) throw new TypeError('Missing refresh_token');

        try {
          const response = await fetch(process.env.AUTHENTIK_TOKEN, {
            method: 'POST',
            body: new URLSearchParams({
              client_id: process.env.AUTHENTIK_CLIENT_ID!,
              client_secret: process.env.AUTHENTIK_CLIENT_SECRET!,
              grant_type: 'refresh_token',
              refresh_token: token.refresh_token,
            }),
          });

          const refreshed = await response.json();

          if (!response.ok) throw refreshed;

          return {
            ...token,
            access_token: refreshed.access_token,
            expires_at: Math.floor(Date.now() / 1000 + refreshed.expires_in),
            refresh_token: refreshed.refresh_token ?? token.refresh_token,
          };
        } catch (error) {
          console.error('Error refreshing access_token', error);
          token.error = 'RefreshTokenError';
          return token;
        }
      }
    },
    async session({ session, token }) {
      session.accessToken = token.access_token as string;
      session.refreshToken = token.refresh_token as string;
      session.user.id = token.uid as string;
      session.user.email = token.email as string;
      session.user.name = token.name as string;
      return session;
    },
  },
};

const handler = NextAuth(authOptions);
export { handler as GET, handler as POST };
수정 내용은 아래와 같다.
1. offline_access 스코프 추가
authorization: {
  params: {
    scope: 'openid email profile offline_access',
  },
}- offline_access는 OAuth 2.0 표준 스코프로, Authentik에 refresh token 발급을 요청할 수 있도록 명시하는 필수 스코프이다.
- 이 값이 없으면, refresh_token이 아예 반환되지 않는다.
2. 최초 로그인 시 refresh_token 저장
refresh_token: account.refresh_token- 로그인 후 받은 account.refresh_token을 JWT에 명시적으로 저장해야, 이후 access token이 만료되었을 때 이를 사용해 갱신할 수 있다.
3. access token 만료 시 자동 갱신 로직 추가
// 토큰이 유효한 경우는 그대로 유지:
else if (Date.now() < (token.expires_at as number) * 1000) {
	return token
}
// 만료된 경우:
if (!token.refresh_token) throw new TypeError("Missing refresh_token");
const response = await fetch(process.env.AUTHENTIK_TOKEN, {
method: "POST",
body: new URLSearchParams({
client_id: process.env.AUTHENTIK_CLIENT_ID!,
client_secret: process.env.AUTHENTIK_CLIENT_SECRET!,
grant_type: "refresh_token",
refresh_token: token.refresh_token as string,
}),
})- access token이 만료됐을 때, 저장해둔 refresh_token을 이용해 새로운 access token을 발급받는다.
- grant_type은 반드시 'refresh_token'이어야 한다.
✏️ Authentik을 사용하여 UID 추출하는 방법
Authentik은 OIDC및 OAuth2 인증 시스템을 제공할 때, JWT를 활용하여 인증 정보를 관리/전달 한다.
◼︎ JWT란?
JWT
: 인증 및 권한 부여를 위해 사용되는 토큰 기반 인증 방식이다.
JWT는 헤더, 페이로드, 서명으로 구성되며, 사용자의 인증 정보를 안전하게 포함할 수 있다.
JWT에 대한 포스팅
Authentik에서 JWT를 사용하는 방식은 아래와 같다.
-
사용자가 로그인하면 Authentik이 인증을 처리
- 사용자의 정보(UID, 이메일, 역할 등)를 담은 JWT 토큰을 발급한다.
-
클라이언트가 JWT를 서버에 전달
- API 요청 시 JWT 토큰을 Authorization 헤더에 포함하여 서버로 보낸다.
-
서버(Hono)가 JWT를 검증
- 서버는 Authentik의 공개키를 사용하여 JWT 서명을 검증한다.
JWT를 검증할 때 비대칭 암호화(RS256) 또는 대칭 암호화(HS256)을 사용할 수 있다.
어떤 방식이 사용되느냐에 따라 Public Key 또는 Secret Key가 사용된다.
- 비대칭 서명 (RS256) → Public Key 사용
- Private Key(개인키) → Authentik이 JWT를 서명할 때 사용
- Public Key(공개키) → 서버(Hono)가 JWT의 서명을 검증할 때 사용
- 대칭 서명 (HS256) → Secret Key 사용
- 이 경우 Private Key 없이, Secret Key 하나만 사용하여 JWT를 검증한다.
◼︎ Authentik에서 UID 추출하기 (v8 환경)
클라이언트는 요청 시 JWT 토큰을 Authorization 헤더에 포함하여 서버에 전달해야 한다.
Authentik은 비대칭 서명 방식을 사용하기 때문에 JWKS(JSON Web Key Set) 를 통해 Authentik의 공개키를 가져와야 한다.
JWKS란? JSON Web Key Set의 약자로, JWT의 서명을 검증할 수 있는 공개키를 포함하는 JSON 형식의 데이터 구조이다.
1. jose 라이브러리 설치
V8 환경에서 비대칭 암호화 방식으로 JWT를 검증하려면 jose 라이브러리를 사용해야 한다.
npm install josejose 라이브러리는 JSON Web Token (JWT)과 관련된 기능을 제공하는 모듈로, RSA, ECDSA 등의 비대칭 암호화 방식을 포함하여 JWT를 생성하고 검증할 수 있다.
2. JWKS를 활용한 JWT 검증 미들웨어 작성
import { MiddlewareHandler } from 'hono';
import { jwtVerify, createRemoteJWKSet } from 'jose';

const AUTHENTIK_JWKS_URL = 'https://your-authentik-domain/.well-known/jwks.json';
const JWKS = createRemoteJWKSet(new URL(AUTHENTIK_JWKS_URL));

export const authMiddleware: MiddlewareHandler = async (c, next) => {
    try {
        const authHeader = c.req.header('Authorization');
        if (!authHeader || !authHeader.startsWith('Bearer ')) {
            return c.json({ error: 'Unauthorized' }, 401);
        }

        const token = authHeader.split(' ')[1]; // Bearer <token>
        const { payload } = await jwtVerify(token, JWKS, { algorithms: ['RS256'] });

        if (!payload.sub) {
            return c.json({ error: 'Invalid token' }, 401);
        }

        c.set('uid', payload.sub); // 검증된 UID 저장
        await next();
    } catch (error) {
        return c.json({ error: 'Authentication failed' }, 401);
    }
};-
jwtVerify(token, JWKS, { algorithms: ['RS256'] })는 JWKS에서 공개키를 가져와 JWT의 서명을 검증하는 함수이다. -
createRemoteJWKSet는 원격 JWKS(JSON Web Key Set)를 가져와 JWT의 서명을 검증하는 데 사용된다.- URL을 기반으로 JWKS를 가져옴
- JWT의
kid(Key ID)를 확인 → JWT 헤더에 포함된kid값과 일치하는 공개키를 찾음.
3. 미들웨어를 라우터에 적용
미들웨어를 라우터에 적용하여, 모든 요청에서 인증을 거치도록 한다.
adminRouter.ts
import { Hono } from 'hono';
import { changePlanByAdmin } from '../controllers/admin-controller';
import { authMiddleware } from '../middleware/authMiddleware';

const adminRouter = new Hono();

adminRouter.use('*', authMiddleware);
adminRouter.post('/changePlanByAdmin', changePlanByAdmin);

export default adminRouter;
이제 클라이언트는 Authorization 헤더에 JWT를 포함하여 요청을 보내고, 서버는 jose 라이브러리를 사용하여 JWKS 기반의 공개키 검증 방식으로 JWT를 검증할 수 있다.