4줄 요약
velog와 github.io 포스팅을 자동으로 백업/동기화하는 툴을 만들었습니다.
- Velog → GitHub.io 자동 동기화: Velog에 올린 글을 그대로 github.io 블로그에도 반영
- 기존 글 백업: Velog에 이미 작성된 글들을 한 번에 가져오기
- 수정 사항 반영: Velog 글을 수정하면 GitHub Pages에도 자동 업데이트
서론
약 1년 8개월 동안 Velog를 메인 블로그로 사용해왔습니다.
글을 쓰기 편리하고 개발자 커뮤니티가 잘 형성되어 있다는 큰 장점이 있습니다.
그런데 글이 쌓이다 보니 몇 가지 아쉬움이 생겼습니다.
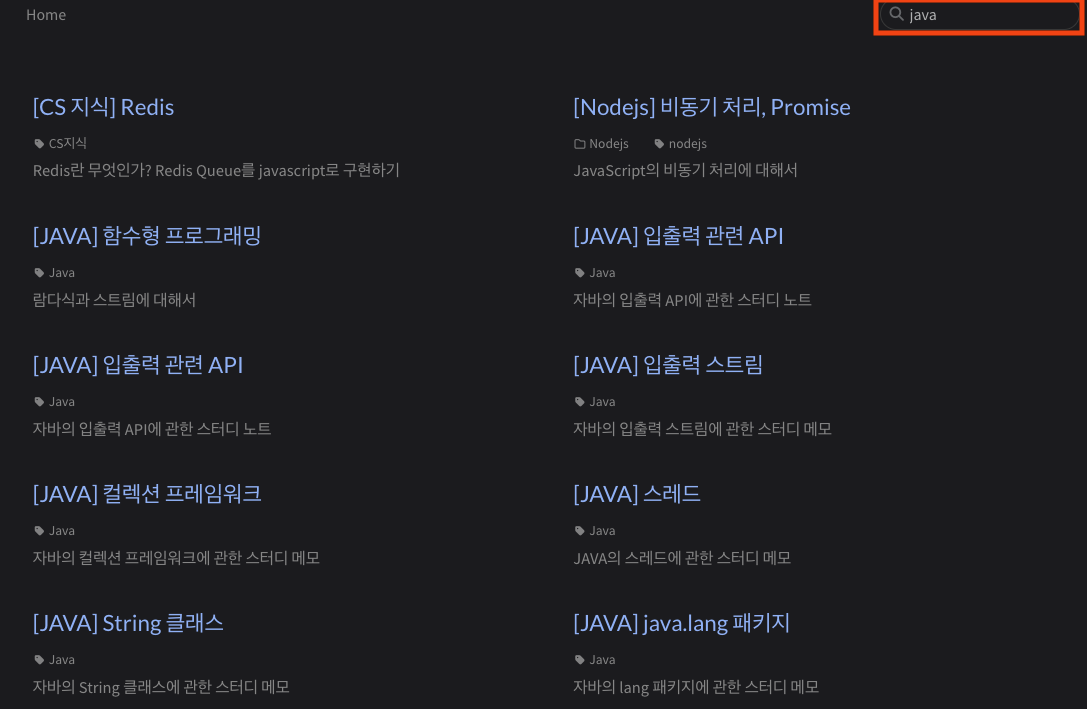
1. 검색 문제
- Velog 내부 검색 품질이 아쉬웠습니다.
- 예를 들어, 제가 직접 작성한 글 중에 제목에 JAVA가 들어간 글이 몇 개나 있는데, 정작 Velog 검색창에 JAVA를 입력하면 아무 결과도 나오지 않았습니다. (저만 그런건지는 모르겠습니다)

2. 부실한 통계 기능
- Velog에는 기본 제공되는 조회수 외에 상세 통계가 부족합니다.
- 크롬 익스텐션을 활용하면 통계를 볼 수는 있지만, 매번 일일이 돌려야 해서 불편했어요.
3. 광고 불가능
- Velog는 플랫폼 특성상 광고를 붙일 수 없어서, 수익화가 사실상 불가능합니다.
- 포스팅 조회수가 많지는 않지만...광고 붙여보고 싶어요..
그럼에도 불구하고 Velog는 글을 작성하기 편리하고, 개발자 독자층이 많다는 장점이 큽니다. 그래서 저는 Velog와 github.io를 동시에 운영하기로 했습니다.
본론
이를 위해 만든 도구가 바로 velog-sync 입니다.
- velog-sync는 Velog와 GitHub Pages(github.io) 블로그를 자동으로 동기화해주는 CLI 도구입니다.
- 한 번 글을 Velog에 업로드하면, 동일한 글이 내 GitHub Pages에도 자동으로 반영됩니다.
이 도구를 만들면서 제가 목표로 한 점은
Velog의 편리함 + GitHub Pages의 독립성두 가지를 동시에 누리는 것이었습니다. 따라서, 글을 두 번 작성할 필요 없이 Velog에 글을 쓰면 알아서 github.io에도 동기화됩니다.
■ velog-sync 사용 준비물
velog-sync를 사용하기 위해서는 다음 두 가지가 필요합니다.
1. Jekyll 테마의 gitHub.io 블로그
- velog-sync는 Velog 글을 Markdown 파일로 변환해서 github.io 리포지토리 내의 폴더에 업로드합니다.
- 따라서 미리
username.github.io저장소를 만들어 두고, Jekyll 테마(저는 chirpy를 사용했습니다.) 테마를 적용해 두는 것이 좋아요.
준비가 안 되어 있다면 아래의 부록으로 설명해두었으니, 참고하시면 좋을 것 같습니다.
부록으로 이동하기
2. GitHub Personal Access Token (PAT)
- GitHub 저장소에 velog-sync가 자동으로 push하기 위해 인증 토큰이 필요합니다.
- GitHub → Settings → Developer settings → Personal Access Tokens에서 생성할 수 있습니다.
- 권한은 최소한 repo (저장소 쓰기 권한)만 체크해도 충분합니다.
■ 사용방법
Step1. 설치
- Velog-Sync 저장소를 Fork 합니다.
- GitHub 페이지에서 Fork 버튼을 눌러 본인 계정으로 저장소를 복사하세요.
- https://github.com/jaewon-ju/velog-sync
- fork한 저장소를 로컬로 클론합니다.
- 로컬 디렉토리에서 아래와 같은 커맨드를 입력하세요.
git clone https://github.com/<your-username>/velog-sync
cd velog-sync- 이제 본인 리포지토리 Settings → Secrets → Actions 에서
GH_PAT_FOR_GHIO를 등록합니다.
GitHub 리포지토리 → Settings → Secrets and variables → Actions → New repository secret

이름: GH_PAT_FOR_GHIO

값: 본인 GitHub Personal Access Token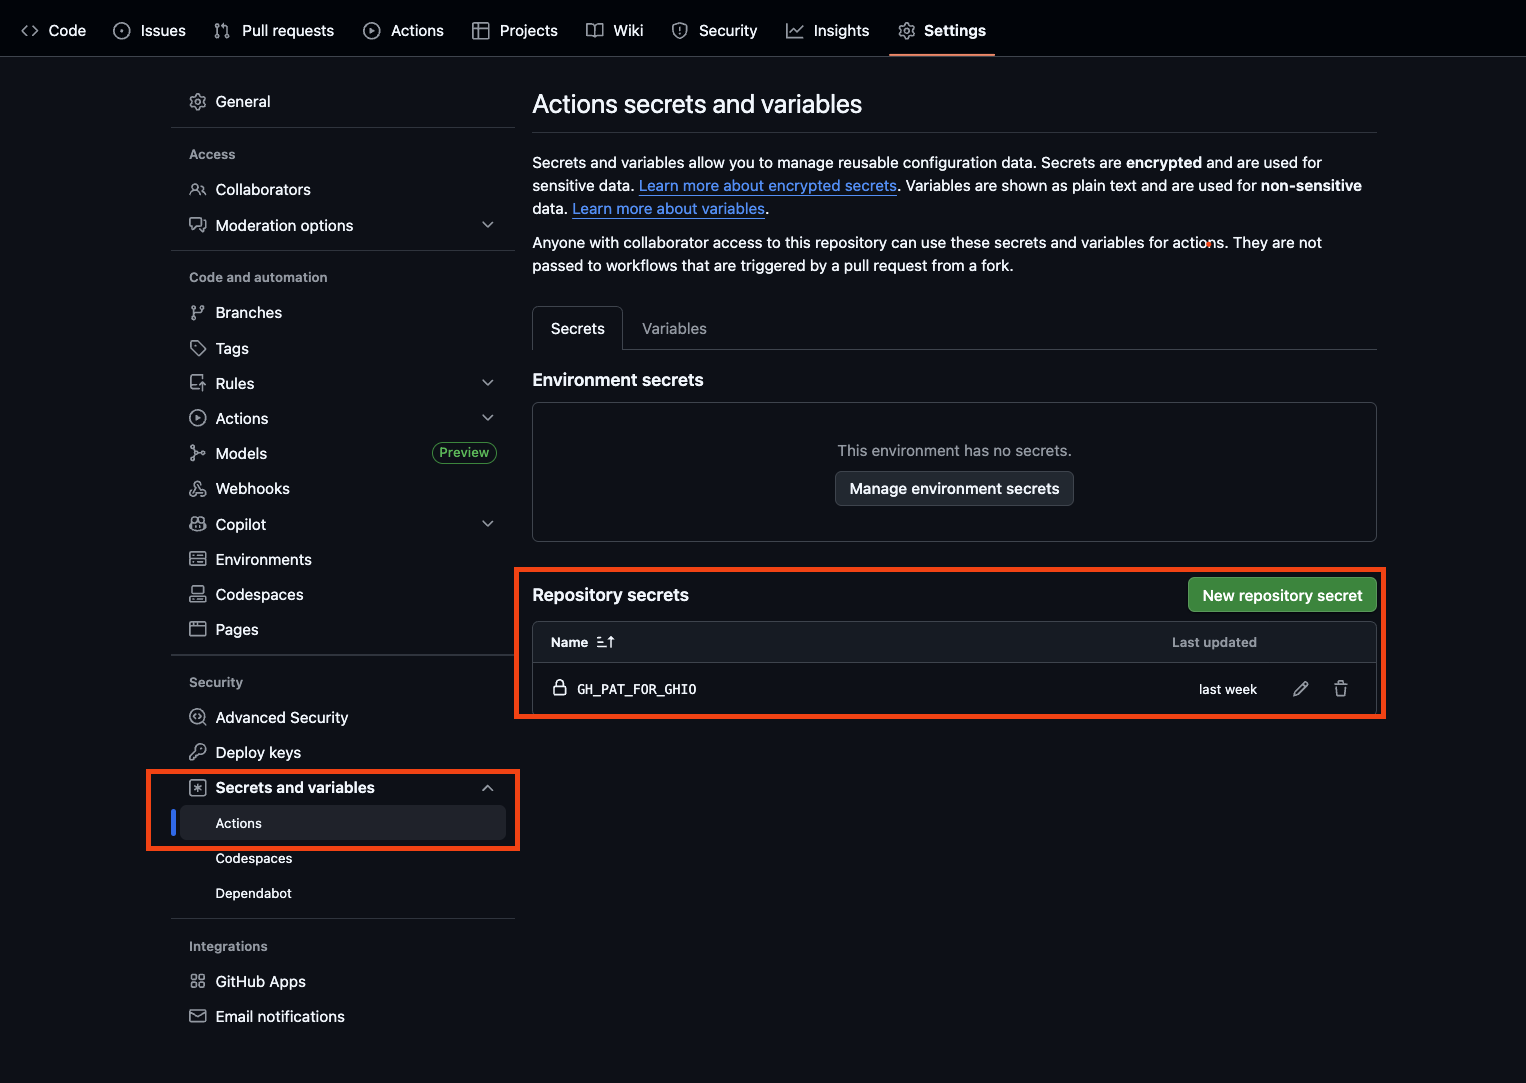
Step2. 초기 설정
처음 velog-sync를 사용할 때는, 내 Velog 계정과 github.io 리포지토리 정보를 알려줘야 합니다.
velog-sync init
# 위 커맨드 실행 후 오류가 발생하면 npm link를 한 뒤 다시 실행해보세요
실행하면 터미널에서 차례대로 질문이 나옵니다 👇

-
Velog 주소 또는 아이디:
- https://velog.io/@username 형식 전체 주소, 또는 username 만 입력해도 됩니다.
-
github.io 리포지토리 URL
-
github.io 리포지토리 절대 경로
- 내 컴퓨터에 클론 받아둔 블로그 폴더의 경로
- 예: /Users/projects/myname.github.io
-
포스트 디렉토리 (기본값: _posts)
- myname.github.io 프로젝트에서, 포스팅 마크다운들을 저장하는 폴더 이름을 작성해주시면 됩니다. 여기에 자동으로 velog 포스팅이 업로드됩니다.
- Jekyll 블로그라면 보통 _posts를 그대로 쓰면 됩니다.
-
푸시할 브랜치 (기본값: main)
- 저장소의 기본 브랜치명을 입력하세요.
- 그냥 엔터 누르셔도 됩니다.
-
Git author 정보 (선택사항)
- 커밋 시 사용할 user.name과 user.email
- 그냥 엔터 누르셔도 됩니다.
-
커밋 메시지 템플릿 (선택사항)
- 커밋 메시지를 커스텀할 수 있습니다.
- 그냥 엔터 누르셔도 됩니다.
중요: 여기까지 진행한 후 push하면, GitHub Actions (.github/workflows/velog-sync.yml)이 자동으로 활성화됩니다.
즉, 이제 velog에 글을 작성하면 github.io에도 똑같이 글이 업로드 됩니다.(매일 오전 9시마다 복사)
Step3. (선택) 로컬에서 수동 실행
Actions 자동 실행이 잘 동작하지만, 원한다면 로컬에서도 직접 동기화를 실행할 수 있습니다:
velog-sync sync명령어를 실행하면 다음 단계를 거칩니다:
1. 내 계정(@username)의 최신 글 목록을 가져옵니다.
2. 이미 저장된 글과 비교해서 새 글/수정된 글을 자동으로 판별합니다.
3. Velog 글을 _posts 디렉토리에 Markdown 파일로 저장합니다.
4. 새 글/수정된 글을 자동으로 커밋합니다.
■ 결과물

velog-sync는 매일 00시(UTC 기준)에 velog 포스팅을 긁어서, 추가/수정된 포스팅을 github.io 리포지토리에 push 해줍니다.
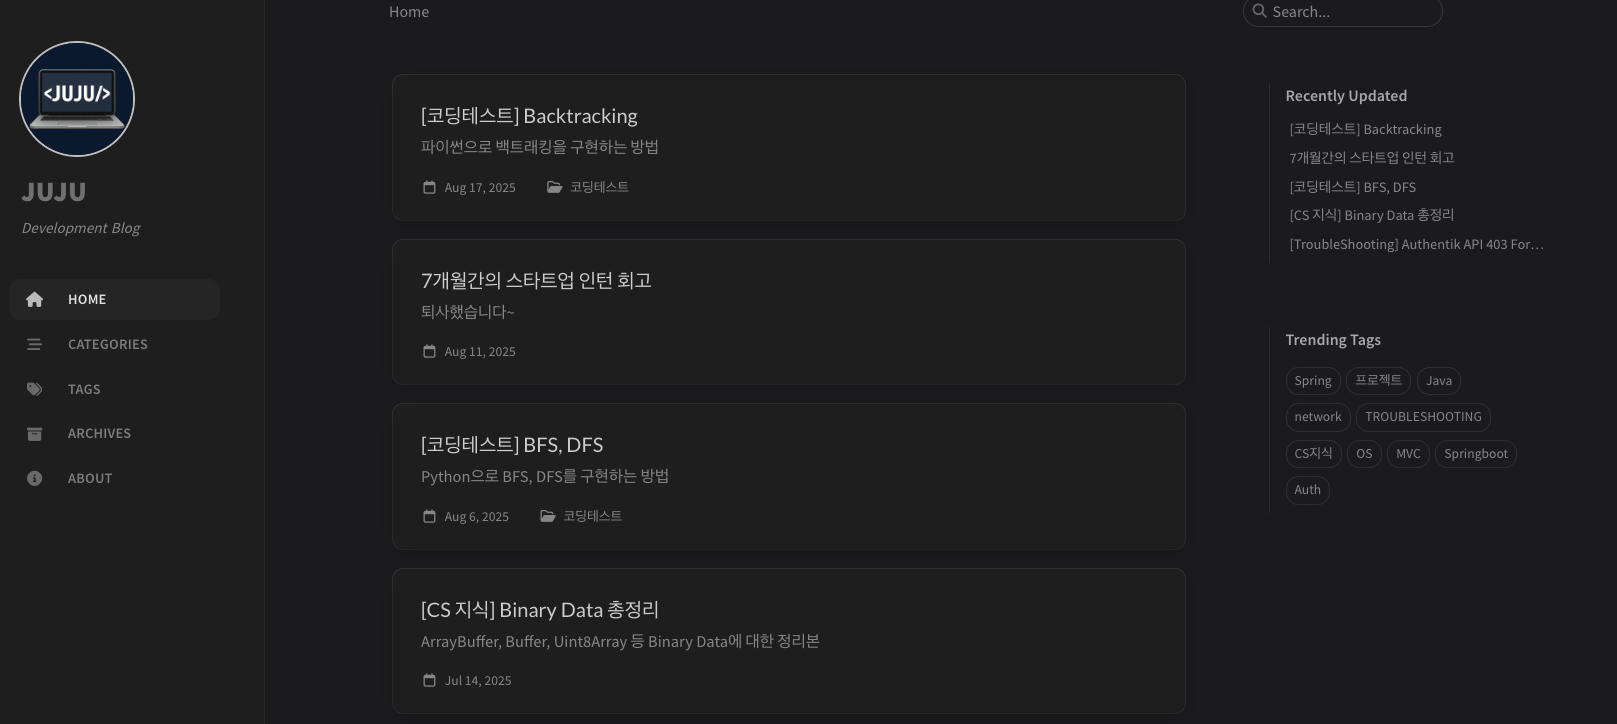
따로 관리하지 않아도, velog에 글을 쓰면 자동으로 내 github.io에 동기화됩니다.
찾는 글이 있으면 github.io에서 검색하면 됩니다.
결론
다른 사용자에게 github 리포지토리를 공개하고, 서비스를 공유하는 것이 처음이라 오류가 있을 수 있습니다😓
댓글 남겨주시면 빠르게 패치하도록 하겠습니다.
원하시는 기능이 있다면 알려주세요!
pull request도 언제든 환영입니다!
- Velog 글 안의 이미지는 모두 다운로드하여 블로그 저장소(assets/posts/)에 저장됩니다.
- 따라서 Velog CDN이 변하더라도 내 블로그에는 영향을 주지 않습니다.
부록: Jekyll 테마 gitHub.io 블로그 만들기
간단하게 정리해두었습니다!
먼저 구글 검색으로 관련 가이드를 찾아보시고, 작동하지 않을 경우 이 가이드라인을 참고해 설정해보시기 바랍니다.
1. GitHub 리포지토리 만들기
-
이름: 사용자명.github.io
- 예: jaewon-ju.github.io
-
이 리포지토리는 GitHub Pages에서 개인 사이트 도메인으로 자동 인식됩니다.
→ https://사용자명.github.io
2. 로컬 프로젝트 생성 및 원격 연결
로컬에서 프로젝트 폴더 생성:
mkdir <폴더명>
cd <폴더명>
git init
원격 리포지토리 연결:
git remote add origin https://github.com/<사용자명>/<리포지토리명>초기 커밋 후 푸시:
git add .
git commit -m "Initial commit"
git branch -M main
git push -u origin main
3. Jekyll 테마 다운로드 및 적용
- http://jekyllthemes.org/ 에서 마음에 드는 테마를 고릅니다.
- 해당 테마 리포지토리를 클론하거나, ZIP으로 다운로드 후 압축 해제합니다.
- 테마 폴더 내용을 프로젝트 루트에 복사/붙여넣기 합니다.
3. macOS에서 Jekyll 환경 세팅
brew install rbenv ruby-build

echo 'eval "$(rbenv init -)"' >> ~/.zshrc
source ~/.zshrc

rbenv install 3.3.0
rbenv global 3.3.0
4. 의존성 설치
프로젝트 루트에서 아래 명령어 실행:
bundle install
bundle update
이후 다시 한 번:
bundle install5. GitHub Actions 워크플로우 파일 생성
- 루트에
.github/workflows디렉토리 만들기
mkdir -p .github/workflows- 그 안에 pages-deploy.yml 파일 작성
.github/workflows/pages-deploy.yml
name: Deploy to GitHub Pages

on:
  push:
    branches: [main]

jobs:
  deploy:
    runs-on: ubuntu-latest
    permissions:
      contents: write # 격리 커밋 푸시를 위해 필요

    steps:
      - name: Checkout Repository
        uses: actions/checkout@v4

      - name: Setup Ruby
        uses: ruby/setup-ruby@v1
        with:
          ruby-version: "3.3"

      - name: Install Dependencies
        run: |
          gem install bundler
          bundle install

      # 🔁 빌드 실패 시 문제 파일(_posts/*.md)만 _quarantine/로 이동 후 재시도
      - name: Build Jekyll Site (auto-quarantine)
        run: |
          set -eo pipefail
          mkdir -p _quarantine

          git config user.name "github-actions[bot]"
          git config user.email "github-actions[bot]@users.noreply.github.com"

          success=0
          quarantined=0
          max_attempts=10   # 필요시 6~10으로 여유

          for i in $(seq 1 $max_attempts); do
            echo "==> Jekyll build attempt #$i"
            if bundle exec jekyll build --trace 2>build.err; then
              success=1
              break
            fi

            offender=$(grep -oE "$GITHUB_WORKSPACE/_posts/[^:]+\.md" build.err | head -n1 || true)
            if [ -z "$offender" ]; then
              echo "No offending post detected. Full error follows:"
              cat build.err
              exit 1
            fi

            reason=$(grep -m1 "Error" build.err || true)
            echo "Error reason: $reason" # 에러 원인 출력

            base=$(basename "$offender")
            echo "⚠️  Quarantining failing post: $base"
            git mv "$offender" "_quarantine/$base" || mv "$offender" "_quarantine/$base"
            git commit -m "ci: quarantine failing post $base" || true
            git push origin HEAD:main || true

            quarantined=1
            # 바로 다음 루프로 넘어가 재빌드
          done

          # 루프가 끝났는데 마지막이 격리로 종료되었을 수 있으니 한 번 더 시도
          if [ $success -ne 1 ] && [ $quarantined -eq 1 ]; then
            echo "==> Final build after last quarantine"
            if bundle exec jekyll build --trace 2>build.err; then
              success=1
            fi
          fi

          if [ $success -ne 1 ]; then
            echo "Build failed after quarantine attempts."
            cat build.err
            exit 1
          fi

      - name: Deploy to GitHub Pages
        uses: peaceiris/actions-gh-pages@v3
        with:
          github_token: ${{ secrets.GITHUB_TOKEN }}
          publish_dir: ./_site
그다음 push
git commit -am "[feat] actions setting"
git push
6. GitHub Pages 설정 변경
- GitHub 저장소 → Settings → Pages 로 이동
- Deploy from a branch → gh-pages 브랜치 선택
7. 권한 설정 확인
- 리포지토리 → Settings → Actions → General
Workflow permissions 항목에서 Read and write permissions 체크 - Allow GitHub Actions to create and approve pull requests 옵션 활성화
8. 완료
이제 커밋 후 main 브랜치에 푸시하면, GitHub Actions가 자동으로 실행되어 _site 폴더가 gh-pages 브랜치로 배포됩니다.
잠시 후 https://사용자명.github.io 에 접속해 사이트를 확인할 수 있습니다.

딱 필요해서 찾아보고있었는데 감사합니다.