들어가며
위 이미지 같은 화면을 만들기 위해 이중 RecyclerView를 사용해보려고 한다.
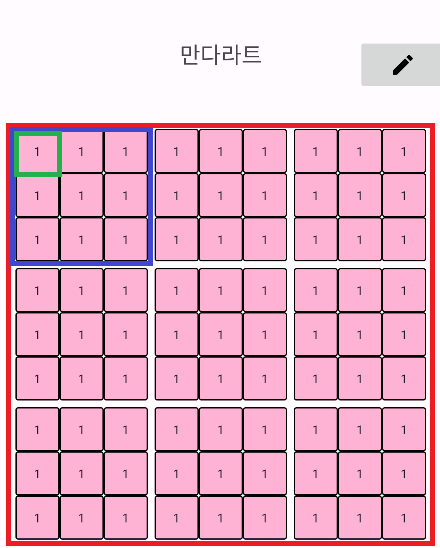
용어 정리
빨간 박스 - 만다라트 (Mandalart, Mdl)
파란 박스 - 매트릭스 (Matrix9, m9)
초록 박스 - 칸 (OneSection, os)
코드
파일정리
해당 화면을 구사하기 위해 아래와 같은 파일이 필요하다.
xml 파일
layout
1. activity_main.xml - 메인 화면
2. one_section.xml - 칸 구성 화면
3. matrix_9.xml - 매트릭스 구성 화면
drawable
1. bg_one_section.xml - 칸 꾸미기용
코틀린 파일
- NumberData.kt - 숫자 관리용 파일 (반드시 필요하진 않음)
- OneSectionData.kt - 칸 데이터
- Matrix9Data.kt - 매트릭스 데이터
- MandalartData.kt - 만다라트 데이터
- SubMdlAdapter.kt - 매트릭스 RecyclerView에 대한 Adapter
- MainMdlAdapter.kt - 만다라트 RecyclerView에 대한 Adapter
- MainActivity.kt - 메인액티비티
파일 상세
activity_main.xml
<?xml version="1.0" encoding="utf-8"?>
<androidx.constraintlayout.widget.ConstraintLayout
	xmlns:android="http://schemas.android.com/apk/res/android"
    xmlns:app="http://schemas.android.com/apk/res-auto"
    xmlns:tools="http://schemas.android.com/tools"
    android:layout_width="match_parent"
    android:layout_height="match_parent"
    tools:context=".MainActivity">

    <LinearLayout
        android:layout_width="match_parent"
        android:layout_height="match_parent"
        android:gravity="center|top"
        android:orientation="vertical"
        >

        <LinearLayout
            android:layout_width="match_parent"
            android:layout_height="50dp"
            android:orientation="horizontal"
            android:layout_gravity="center"
            android:gravity="center"
            android:weightSum="1"
            android:layout_marginTop="50dp"
            android:layout_marginBottom="30dp"
            >
            <Space
                android:layout_width="0dp"
                android:layout_height="match_parent"
                android:layout_weight="0.2"
                />
            <TextView
                android:id="@+id/title"
                android:layout_width="0dp"
                android:layout_height="match_parent"
                android:layout_weight="0.6"
                android:text="@string/mandalart"
                android:textSize="20sp"
                android:textAlignment="center"
                />
            <ImageButton
                android:id="@+id/btn_edit"
                android:layout_width="0dp"
                android:layout_height="match_parent"
                android:layout_weight="0.2"
                android:src="@drawable/baseline_edit_24"
                />
        </LinearLayout>

        <androidx.recyclerview.widget.RecyclerView
            android:id="@+id/main_grid"
            android:layout_width="wrap_content"
            android:layout_height="wrap_content"
            android:layout_gravity="center"
            android:overScrollMode="never"
        />

	</LinearLayout>
</androidx.constraintlayout.widget.ConstraintLayout>
만다라트가 될 RecyclerView 작성
one_section.xml
<?xml version="1.0" encoding="utf-8"?>

    <EditText
        xmlns:android="http://schemas.android.com/apk/res/android"
        xmlns:tools="http://schemas.android.com/tools"
        android:id="@+id/txt_oneSection"
        android:layout_width="40dp"
        android:layout_height="40dp"
        android:gravity="center"
        android:textSize="11sp"
        android:background="@drawable/bg_one_section"
        tools:ignore="MissingConstraints"
        android:autofillHints="내용" />
칸에 글을 적어 넣어야 하기 때문에 EditText로 작성
matrix_9.xml
<?xml version="1.0" encoding="utf-8"?>
    <androidx.recyclerview.widget.RecyclerView
        xmlns:android="http://schemas.android.com/apk/res/android"
        xmlns:tools="http://schemas.android.com/tools"
        android:id="@+id/grid_matrix"
        android:layout_width="wrap_content"
        android:layout_height="wrap_content"
        android:columnCount="3"
        tools:ignore="MissingConstraints"
        android:padding="3dp"
        />
이중 RecyclerView를 해야하기 때문에 매트릭스용 RecyclerView 작성
bg_one_section.xml
<?xml version="1.0" encoding="utf-8"?>
<selector xmlns:android="http://schemas.android.com/apk/res/android">
    <item>
        <shape>
            <solid android:color="@color/pink"/>
            <stroke android:width="1dp" android:color="@color/black"/>
            <corners android:radius="2dp"/>
        </shape>
    </item>
</selector>
칸 꾸미기용으로 one_section.xml의 EditText에 background로 선언됨
NumberData.kt
package com.jaewon.mymandalart.data

data class NumberData(
    var MANSTART: Int = 0,
    var MANCENTER: Int = 4,
    var MANEND: Int = 8
)
숫자 관리용 - 9x9 만다라트 기준
OneSectionData.kt
package com.jaewon.mymandalart.data

data class OneSectionData(
    var text : String = "",
    var checked : Boolean = false,
    var isCenter : Boolean = false,
    var isEditable : Boolean = false,
    var m9Num : Int,
    var osNum : Int,
)
칸에 관련된 데이터 작성
Matrix9Data.kt
package com.jaewon.mymandalart.data

data class Matrix9Data(
    var osList : MutableList<OneSectionData> = mutableListOf(),
    var isCenter : Boolean = false,
    var m9Num : Int
)
매트릭스에 관련된 데이터 작성
※중요※ osList - 해당 매트릭스에 들어갈 칸의 데이터 리스트
MandalartData.kt
package com.jaewon.mymandalart.data

data class MandalartData(
    var m9List: MutableList<Matrix9Data> = mutableListOf(),
    val ND: NumberData = NumberData()
) {
    fun initMan() {
        with(m9List) {
            for (i in ND.MANSTART..ND.MANEND) {
                val newOSList = mutableListOf<OneSectionData>()
                with(newOSList) {
                    for (j in ND.MANSTART..ND.MANEND) {
                        var center = false
                        if (j==ND.MANCENTER) center = true
                        add(
                            OneSectionData(
                            "1",
                            false,
                                isCenter = center,
                                m9Num = i,
                                osNum = j
                            )
                        )
                    }
                }
                add(Matrix9Data(newOSList, m9Num = i))
            }
        }
    }
}
만다라트에 관련된 데이터 작성
※중요※ m9List - 해당 만다라트에 들어갈 매트릭스의 데이터 리스트
initMan() - Mandalart 데이터 초기화 하는 함수, 임시로 텍스트를 전부 1로 채움
SubMdlAdapter.kt
package com.jaewon.mymandalart.adapter

import …

class SubMdlAdapter : RecyclerView.Adapter<SubMdlAdapter.SubMdlViewHolder>() {
    var osList = mutableListOf<OneSectionData>()

    override fun onCreateViewHolder(parent: ViewGroup, viewType: Int): SubMdlViewHolder {
        return SubMdlViewHolder(OneSectionBinding
            .inflate(LayoutInflater.from(parent.context),parent,false))
    }

    override fun getItemCount(): Int {
        return osList.size
    }

    override fun onBindViewHolder(holder: SubMdlViewHolder, position: Int) {
        holder.bind(osList[position])
    }

    class SubMdlViewHolder(private val binding: OneSectionBinding) : RecyclerView.ViewHolder(binding.root) {

        @SuppressLint("SetTextI18n", "ResourceAsColor")
        fun bind(osData: OneSectionData) {
            binding.txtOneSection.setText(osData.text)
            binding.txtOneSection.isFocusable = osData.isEditable
            binding.txtOneSection.isFocusableInTouchMode = osData.isEditable
        }

    }
}
매트릭스에 칸을 넣는 Adapter
bind 부분에서 EditText와 OneSectionData를 연결
MainMdlAdapter.kt
package com.jaewon.mymandalart.adapter

import …

class MainMdlAdapter : RecyclerView.Adapter<MainMdlAdapter.MainMdlViewHolder>() {
    var m9List = mutableListOf<Matrix9Data>()


    override fun onCreateViewHolder(parent: ViewGroup, viewType: Int): MainMdlViewHolder {
        return MainMdlViewHolder(Matrix9Binding
            .inflate(LayoutInflater.from(parent.context),parent,false))
    }

    override fun getItemCount(): Int {
        return m9List.size
    }


    override fun onBindViewHolder(holder: MainMdlViewHolder, position: Int) {
        holder.bind(m9List[position])
    }

    class MainMdlViewHolder(private val binding: Matrix9Binding) : RecyclerView.ViewHolder(binding.root) {
        @SuppressLint("SetTextI18n")
        fun bind(m9Data: Matrix9Data) {
            val subMdlAdapter = SubMdlAdapter()

//            subMdlAdapter.m9Num = m9Data.m9Num
            subMdlAdapter.osList = m9Data.osList
            binding.gridMatrix.apply {
                adapter = subMdlAdapter
                layoutManager = GridLayoutManager(binding.gridMatrix.context, 3)
            }

        }


    }
}
만다라트에 매트릭스를 넣는 Adapter
bind 부분에서 subMdlAdapter의 osList 선언, 매트릭스 RecyclerView에 subMdlAdapter 연결
MainActivity.kt
package com.jaewon.mymandalart

import …

class MainActivity : AppCompatActivity() {

    private lateinit var binding: ActivityMainBinding
    private lateinit var mainMdlAdapter: MainMdlAdapter
    private lateinit var gridManager: GridLayoutManager
    private lateinit var mandalartData : MandalartData

    ⁝


    override fun onCreate(savedInstanceState: Bundle?) {
        super.onCreate(savedInstanceState)
        binding = ActivityMainBinding.inflate(layoutInflater)
        val view = binding.root
        setContentView(view)
        mandalartData = MandalartData()
        mandalartData.initMan()
        mainMdlAdapter = MainMdlAdapter()


        gridManager = GridLayoutManager(this, 3)
        setMan()

        ⁝

        }

    private fun setMan(){
        binding.mainGrid.apply {
            mainMdlAdapter.m9List = mandalartData.m9List
            layoutManager = gridManager
            adapter = mainMdlAdapter
        }
    }
    fun updateMan(){
        binding.mainGrid.adapter?.notifyDataSetChanged()
        binding.mainGrid.adapter?.notifyItemRangeChanged(0,8)
    }

    ⁝
}
MandalartData를 선언 후 초기화
MainMdlAdapter 생성 후 m9List 선언, 만다라트 RecyclerView와 연결
updateMan() - MandalartData의 내용을 변경후 호출하면 화면에 적용됨
이상으로