스프링과 JPA 기반 웹 애플리케이션 개발 #24 로그인 로그아웃 테스트
해당 내용은 인프런, 스프링과 JPA 기반 웹 애플리케이션 개발의 강의 내용을 바탕으로 작성된 내용입니다.
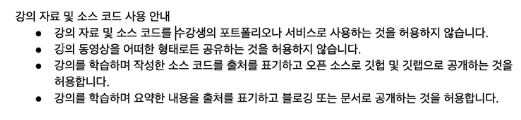
강의를 학습하며 요약한 내용을 출처를 표기하고 블로깅 또는 문서로 공개하는 것을 허용합니다 라는 원칙 하에 요약 내용을 공개합니다. 출처는 위에 언급되어있듯, 인프런, 스프링과 JPA 기반 웹 애플리케이션 개발입니다.
제가 학습한 소스코드는 https://github.com/n00nietzsche/jakestudy_webapp 에 지속적으로 업로드 됩니다. 매 커밋 메세지에 강의의 어디 부분까지 진행됐는지 기록해놓겠습니다.
로그인 로그아웃 테스트
- 폼 서브밋 요청 (
POST)는 반드시.with(csrf())를 추가할 것 .andExpect(authenticated())또는.andExpect(unauthenticated())로 인증 여부를 확인할 수 있다.- 리다이렉트 응답은
.andExpect(status().is3xxRedirection())으로 확인한다. - 리다이렉트 URL은
.andExepct(redirectUrl())로 확인할 수 있다. - JUnit5의
@BeforeEach와AfterEach - 임의로 로그인된 사용자가 필요할 경우에는
@WithMockUser를 이용하자.
MainControllerTest 클래스 작성
@SpringBootTest
@AutoConfigureMockMvc
class MainControllerTest {

    // 테스트할 때는 `@RequiredArgsConstructor`와 같은 애노테이션으로 의존성 주입이 불가능하다.
    @Autowired
    MockMvc mockMvc;
    @Autowired
    AccountService accountService;
    @Autowired
    AccountRepository accountRepository;

    final String testEmail = "jakeseo@jakeseo.com";
    final String testPassword = "jakeseo123";
    final String testNickname = "jakeSeo";
...@SpringBootTest애노테이션을 통하여 스프링 컨테이너 테스트 환경을 구축@AutoConfigureMockMvc을 이용하여 mvc 기능들 테스트- 의존성 주입은
@Autowired로 받아야 한다.- 테스트 클래스 특성상
@RequiredArgsConstructor애노테이션으로 의존성 주입 불가 (절차가 꼬임)
- 테스트 클래스 특성상
BeforeEach() 메소드 작성
    @BeforeEach
    void beforeEach() {
        SignUpForm signUpForm = new SignUpForm();
        signUpForm.setEmail(testEmail);
        signUpForm.setPassword(testPassword);
        signUpForm.setNickname(testNickname);
        accountService.signUpAndSendEmail(signUpForm);
    }
가입된 회원이 있어야 해서 beforeEach() 메소드를 통해 매 테스트 전 회원 가입을 하는 로직을 넣었다.
    @AfterEach
    void afterEach() {
        accountRepository.deleteAll();
    }
매 테스트 이후 가입된 회원은 지워준다.
loginWithEmail() 이메일로 로그인 성공
    @DisplayName("이메일로 로그인 성공")
    @Test
    void loginWithEmail() throws Exception {
        mockMvc.perform(post("/login")
                    .param("username", testEmail)
                    .param("password", testPassword)
                    .with(csrf()))
                .andExpect(status().is3xxRedirection())
                .andExpect(redirectedUrl("/"))
                .andExpect(authenticated().withUsername(testNickname));
    }
이전과 비교했을 때 그다지 특별한 코드는 없는데, 폼을 제출하는 것과 같은 로직의 테스트를 수행할 때는 항상 .with(csrf())를 잊지말자.
loginWithNickname() 닉네임으로 로그인 성공
    @DisplayName("닉네임으로 로그인 성공")
    @Test
    void loginWithNickname() throws Exception {
        mockMvc.perform(post("/login")
                .param("username", testNickname)
                .param("password", testPassword)
                .with(csrf()))
                .andExpect(status().is3xxRedirection())
                .andExpect(redirectedUrl("/"))
                .andExpect(authenticated().withUsername(testNickname));
    }
loginFail() 로그인 실패
    void loginFail() throws Exception {
        mockMvc.perform(post("/login")
                .param("username", testNickname)
                .param("password", "asdfaitua4o98")
                .with(csrf()))
                .andExpect(status().is3xxRedirection())
                .andExpect(redirectedUrl("/login?error"))
                .andExpect(unauthenticated());
    }
logout() 로그아웃
    @DisplayName("정상 로그인 및 로그아웃")
    @WithAccount
    @Test
    void logout() throws Exception {
        mockMvc.perform(get("/"))
                .andExpect(authenticated());

        mockMvc.perform(post("/logout")
                .with(csrf()))
                .andExpect(status().is3xxRedirection())
                .andExpect(redirectedUrl("/"))
                .andExpect(unauthenticated());
    }
여기서는 @WithAccount라는 새로운 애노테이션을 만들어서 사용했다.
@WithAccount 애노테이션
@Retention(RetentionPolicy.RUNTIME)
@WithSecurityContext(factory = WithAccountSecurityContextFactory.class)
public @interface WithAccount {

}
이 애노테이션은 특정한 SpringSecurityContext 내에서 테스트가 진행되도록 도와주는 애노테이션이다.
SpringSecurityContext를 만들어주는 factory는 아래의 WithAccountSecurityContextFactory에서 정의하고 있다.
WithAccountSecurityContextFactory 클래스
@RequiredArgsConstructor
public class WithAccountSecurityContextFactory implements WithSecurityContextFactory<WithAccount> {

    private final AccountService accountService;

    @Override
    public SecurityContext createSecurityContext(WithAccount withAccount) {
        String nickname = "test";
        String password = "test1234";
        String email = "test@test.com";

        // 회원 가입
        SignUpForm signUpForm = new SignUpForm();
        signUpForm.setEmail(email);
        signUpForm.setPassword(password);
        signUpForm.setNickname(nickname);
        accountService.signUpAndSendEmail(signUpForm);

        // Authentication 만들기 및 SecurityContext 에 넣어주기
        UserDetails principal = accountService.loadUserByUsername(nickname);
        UsernamePasswordAuthenticationToken authenticationToken = new UsernamePasswordAuthenticationToken(principal, principal.getPassword(), principal.getAuthorities());
        // 빈 시큐리티 컨텍스트 만들고, 거기에 AuthenticationToken 넣기
        SecurityContext context = SecurityContextHolder.createEmptyContext();
        context.setAuthentication(authenticationToken);

        return context;
    }
}
위 클래스는 WithSecurityContextFactory를 오버라이드하여 @WithSecurityContext 애노테이션의 factory 엘리먼트로서 활용하기 위해 작성되었다.
WithSecuritContextFactory는 어떤 애노테이션에 붙여서 사용할 것인지에 대해 제네릭 타입을 이용하여 애노테이션 타입을 주입받는다.
그리고 주입받는 애노테이션 타입 엘리먼트에서 필요한 값들을 꺼내 쓸 수 있다. 그런데 나는 @WithAccount 애노테이션에 엘리먼트를 받지 않아서, 따로 어떤 값을 꺼내 쓰진 않았다.
로직은 간단히 회원 가입을 한 이후에, 해당 계정을 UserDetailsService를 상속하여 UserDetails를 반환하는 .loadUserByUsername() 메소드로 불러와 UserDetails 타입인 principal에 넣어주었다.
이후에 해당 UserDetails를 이용하여 UsernamePasswordAuthenticationToken을 만들었고, 해당 토큰을 SecurityContextHolder.createEmptyContext()를 통해 만든 빈 컨텍스트에 .setAuthentication() 메소드를 통해 넣어주었다.