스프링과 JPA 기반 웹 애플리케이션 개발 #34 알림 설정
해당 내용은 인프런, 스프링과 JPA 기반 웹 애플리케이션 개발의 강의 내용을 바탕으로 작성된 내용입니다.
강의를 학습하며 요약한 내용을 출처를 표기하고 블로깅 또는 문서로 공개하는 것을 허용합니다 라는 원칙 하에 요약 내용을 공개합니다. 출처는 위에 언급되어있듯, 인프런, 스프링과 JPA 기반 웹 애플리케이션 개발입니다.
제가 학습한 소스코드는 https://github.com/n00nietzsche/jakestudy_webapp 에 지속적으로 업로드 됩니다. 매 커밋 메세지에 강의의 어디 부분까지 진행됐는지 기록해놓겠습니다.
알림 설정
- 알림 설정
- 특정 웹 서비스 이벤트(스터디 생성, 참가 신청 결과, 참여중인 스터디)에 대한 정보를 이메일로 받을지 웹 알림 메세지로 받을지 선택하는 기능이다. 물론 둘 다 받을 수도 있다.
- 부트 스트랩
AccountService
setNotifications() 메소드 추가
    public void setNotifications(Account loginAccount, NotificationsForm notificationsForm) {
        loginAccount.setStudyCreatedByEmail(notificationsForm.isStudyCreatedByEmail());
        loginAccount.setStudyEnrollmentResultByEmail(notificationsForm.isStudyEnrollmentResultByEmail());
        loginAccount.setStudyUpdatedByEmail(notificationsForm.isStudyUpdatedByEmail());
        loginAccount.setStudyCreatedByWeb(notificationsForm.isStudyCreatedByWeb());
        loginAccount.setStudyEnrollmentResultByWeb(notificationsForm.isStudyEnrollmentResultByWeb());
        loginAccount.setStudyUpdatedByWeb(notificationsForm.isStudyUpdatedByWeb());
    }
그야말로 개 노가다..
NotificationsForm
@Data
@NoArgsConstructor
// Form backing object
// Account 와 같은 도메인 엔티티 객체에 직접 Valid 에 관한 내용을 넣어줄 수 없다.
// 또한 Account 와 같은 도메인 엔티티 객체를 `@ModelAttribute`를 위해 사용할 수도 없다.
public class NotificationsForm {
    private boolean studyCreatedByEmail;
    private boolean studyCreatedByWeb;
    private boolean studyEnrollmentResultByEmail;
    private boolean studyEnrollmentResultByWeb;
    private boolean studyUpdatedByEmail;
    private boolean studyUpdatedByWeb;

    public NotificationsForm(Account account) {
        setStudyCreatedByEmail(account.isStudyCreatedByEmail());
        setStudyCreatedByWeb(account.isStudyCreatedByWeb());
        setStudyEnrollmentResultByEmail(account.isStudyEnrollmentResultByEmail());
        setStudyEnrollmentResultByWeb(account.isStudyEnrollmentResultByWeb());
        setStudyUpdatedByEmail(account.isStudyUpdatedByEmail());
        setStudyUpdatedByWeb(account.isStudyUpdatedByWeb());
    }
}
이것도 개 노가다였다.
위와 같이 도메인 클래스에 있는 일부 내용을 포함하여 도메인 객체 값 설정에 도움을 주는 클래스를 Form Backing Object라고 칭하는 것 같다.
찾아보니 도메인 객체 값 설정이 아니라 그냥 웹에서 Form 형태로 날아오는 데이터들을 받아주는 것을 통틀어
form backing object라고 하는듯 하다.
Account 같은 도메인 객체를 이용하여 직접 @Valid에 관한 내용을 넣어주는 것도 올바른 설계가 아니라고 보고 (DB에 대한 검증만 해야 하는 것으로 생각한다.), @ModelAttribute에 들어가는 것도 올바르다고 보지 않는다. (Account에 대한 모든 정보를 받는 것이 아니기 때문)
어찌됐든 위와 같은 이유로 Form backing object를 이용하여 더 깔끔한 설계를 할 수 있다고 생각한다.
SettingsController
여러 클래스 추가
    @GetMapping(NOTIFICATIONS_MAPPING_PATH)
    public String updateNotificationsForm(
            @LoginAccount Account loginAccount,
            Model model
    ) {
        model.addAttribute(loginAccount);
        model.addAttribute(new NotificationsForm(loginAccount));

        return NOTIFICATIONS_MAPPING_PATH;
    }

    @PostMapping(NOTIFICATIONS_MAPPING_PATH)
    public String updateNotifications(
            @LoginAccount Account loginAccount,
            // 빈 생성자 없으면 @ModelAttribute 가 제대로 동작하지 않음
            // `@ModelAttribute` 애노테이션은 빈 생성자로 먼저 해당 객체를 생성한 이후에
            // setter 로 초기화 하는 방식이라서 빈 생성자 있어야 함
            // 시간있을 때 `@ModelAttribute` 동작 방식 뜯어보기
            @Valid @ModelAttribute NotificationsForm notificationsForm,
            RedirectAttributes redirectAttributes,
            Errors errors,
            Model model

    ) {
        // 누군가 프론트를 악의적으로 조작했을 때를 대비하여
        if(errors.hasErrors()) {
            return NOTIFICATIONS_MAPPING_PATH;
        }

        accountService.setNotifications(loginAccount, notificationsForm);
        redirectAttributes.addFlashAttribute("message", "알림 설정을 변경하였습니다.");

        return "redirect:/" + NOTIFICATIONS_MAPPING_PATH;
    }
위에서 생성한 form backing object와 같은 것을 사용할 때는 항상 빈 생성자를 만들어주도록 해야한다. 왜냐하면 스프링 프레임워크의 @ModelAttribute 애노테이션은 빈 생성자가 없으면 에러를 내뿜기 때문이다.
@ModelAttribute는 내부적으로 빈 생성자로 먼저 객체 생성을 한 뒤에 setter를 이용하여 값을 넣어준다. 생성할 때 인자가 있는 생성자에 인자를 전부 넣는 방식이 아니다.
Model Attribute에 대한 공식문서 설명 잠깐
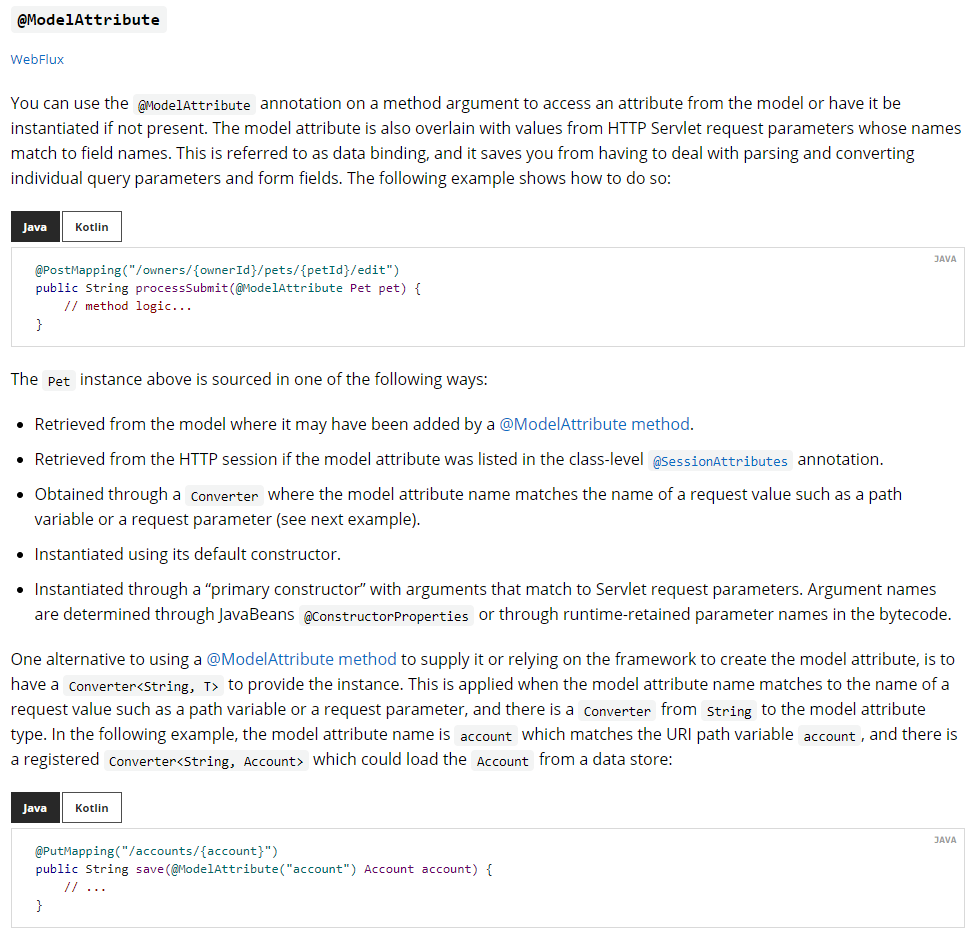
모델로부터 애트리뷰트에 접근하거나 혹은 존재하지 않는 경우 해당 애트리뷰트를 초기화하기 위해 메소드 아규먼트 위에서 @ModelAttribute 애노테이션을 사용할 수 있다.
모델 애트리뷰트의 일치하는 필드 이름을 갖고 있는 HTTP 서블릿 리퀘스트 파라미터들이 해당 필드를 채운다. 이러한 것을 데이터 바인딩이라는 이름으로 부른다. 이러한 작업을 해줌으로써 개별 파라미터들을 폼 필드에 맞게 파싱하고 컨버팅하는 귀찮은 작업을 생략할 수 있도록 해준다.
예제 코드는 아래와 같다.
@PostMapping("/owners/{ownerId}/pets/{petId}/edit")
public String processSubmit(@ModelAttribute Pet pet) {
    // method logic...
}
위의 Pet 인스턴스는 다음 방식 중 하나로 제공된다.
@ModelAttribute메소드에 의해 추가되었는지 검색된다.- 만일, 클래스 레벨
@SessionAttributes애노테이션 내부에 모델 애트리뷰트가 기재되었다면, HTTP session으로부터 검색된다. path variable혹은request parameter와 같이 요청 값의 이름이 일치하는Converter를 통해 얻어진다.- 기본 생성자를 이용해 인스턴스화 된다.
- 서블릿 리퀘스트 파라미터에 일치하는 "primary constructor" 를 통해 인스턴스화 된다. 인자 이름들은 JavaBeans
@ConstructorProperties혹은 바이트코드 내부 런타임에서 유지된 파라미터 이름들을 통해 결정된다.
모델 애트리뷰트를 제공하기 위해 @ModelAttribute 메소드를 사용하거나 모델 애트리뷰트를 생성하기 위해 프레임워크에 의존하는 것에 대한 다른 대안은 인스턴스를 제공하기 위해 Converter<String, T> 를 사용하는 것이다. 모델 애트리뷰트 이름이 path variable, request parameter와 같은 요청 값의 이름에 일치할 때 적용된다. String으로부터 Model attribute 타입으로 만드는 Converter가 있다. 아래의 예에서 모델 애트리뷰트 이름은 account이고, URI path variable과 일치한다. 그리고 Account를 데이터 저장소로부터 불러올 수 있는 등록된 Converter<String, Account>가 존재한다.
@PutMapping("/accounts/{account}")
public String save(@ModelAttribute("account") Account account) {
    // ...
}
모델 애트리뷰트 인스턴스가 얻어진 이후에, 데이터 바인딩이 적용된다. WebDataBinder 클래스가 서블릿 리퀘스트 파라미터 이름(쿼리 파라미터들과 폼 필드들)과 타겟 오브젝트의 필드를 일치시킨다. 매칭 필드는 타입 변환이 적용된 이후에 필요한 경우에 생성된다. Data Binder와 Validation을 통해 커스터마이징이 가능하다.
데이터 바인딩 과정에서 에러가 날 수 있다. 기본 값으로는 BindException이 발생한다. 하지만, 컨트롤러 메소드에서 에러를 체크하기 위해 BindingResult 인자를 @ModelAttribute 옆에 추가할 수 있다.
@PostMapping("/owners/{ownerId}/pets/{petId}/edit")
public String processSubmit(@ModelAttribute("pet") Pet pet, BindingResult result) {
    if (result.hasErrors()) {
        return "petForm";
    }
    // ...
}BindingResult를@ModelAttribute옆에 추가한 모습이다.
때때로, 데이터 바인딩 없이 모델 애트리뷰트에 접근하길 원할 수도 있다. 그러한 경우에는, Model을 컨트롤러에 주입하고 직접 접근하거나 @ModelAttribute(binding=false)로 세팅하면 된다.
@ModelAttribute
public AccountForm setUpForm() {
    return new AccountForm();
}

@ModelAttribute
public Account findAccount(@PathVariable String accountId) {
    return accountRepository.findOne(accountId);
}

@PostMapping("update")
public String update(@Valid AccountForm form, BindingResult result,
        @ModelAttribute(binding=false) Account account) {
    // ...
}@ModelAttribute(binding=false)를 세팅한 모습이다.
javax.validation.Valid 애노테이션 혹은 스프링의 @Validated 애노테이션을 추가함으로써 데이터 바인딩 이후에 자동 검증을 적용할 수 있다. 빈 검증, 스프링 검증.
@PostMapping("/owners/{ownerId}/pets/{petId}/edit")
public String processSubmit(@Valid @ModelAttribute("pet") Pet pet, BindingResult result) {
    if (result.hasErrors()) {
        return "petForm";
    }
    // ...
}
위와 같이 하면 된다. 이건 프로젝트에서 지겹게 썼으니 생략.
스프링 공식문서 읽다가 팁
자바 도큐먼트 형식의 공식문서를 읽으면, 아래쪽에 쭉 내리다보면 이 클래스에 대한 연관된 모든 메소드들의 디테일을 알 수 있는 부분이 좋은 것 같다.
결국
createAttribute()라는 추상 메소드가 구현에 따라 다르지만no-args constructor혹은primary constructor를constructAttribute()추상 메소드로 넘겨주고,constructAttribute()메소드가 주어진 생성자를 이용하여 애트리뷰트 인스턴스를 생성한다. 이후로bindRequestParameter(),resolveConstructorArgument등과 같은 과정이 쭉쭉 진행된다.
notifications.html
<!DOCTYPE html>
<html lang="en"
      xmlns:th="http://www.thymeleaf.org"
      xmlns:sec="http://www.thymeleaf.org/extras/spring-security">
<head>
    <title>알림 설정</title>
    <th:block th:replace="fragments :: headLibraryInjection"></th:block>
</head>

<body class="bg-light">

<th:block th:replace="fragments :: main-nav"></th:block>
<div th:replace="fragments :: email-verify-alarm"></div>

<div class="container">
    <!-- row의 기본은 col-12만큼의 크기를 갖는다.-->
    <div class="row mt-5 justify-content-center">
        <div class="col-2">
            <div th:replace="fragments :: settings-menu(currentMenu='notifications')"></div>
        </div>

        <div class="col-8">
            <div th:if="${message}" class="alert alert-info alert-dismissible fade show mt-3" role="alert">
                <span th:text="${message}">메시지</span>
                <button type="button" class="close" data-dismiss="alert" aria-label="Close">
                    <span aria-hidden="true">x</span>
                </button>
            </div>
            <div class="row">
                <h2 class="col-sm-12">알림 설정</h2>
            </div>
            <div class="row mt-3">
                <form class="needs-validation col-12" action="#" th:action="@{/settings/notifications}"
                      th:object="${notificationsForm}" method="post" novalidate>
                    <div class="card mb-3">
                        <div class="card-body">
                            <h5 class="card-title mb-3">주요 활동 지역 & 관심 주제 스터디 생성 알림</h5>
                            <h6 class="card-subtitle mb-2 text-muted"><a href="#">주요 활동 지역</a>에 <a href="#">관심있는 주제</a>의 스터디가 생성되었을 때 알림을 발송합니다.</h6>
                            <div class="form-group mb-0">
                                <div class="custom-control custom-switch">
                                    <input type="checkbox" class="custom-control-input" id="studyCreatedByEmail" th:field="*{studyCreatedByEmail}">
                                    <label class="custom-control-label" for="studyCreatedByEmail">이메일로 받기</label>
                                </div>

                                <div class="custom-control custom-switch">
                                    <!-- th:field 의 바인딩에 대해 찾아보고 정리하기 -->
                                    <input type="checkbox" class="custom-control-input" id="studyCreatedByWeb" th:field="*{studyCreatedByWeb}">
                                    <label class="custom-control-label" for="studyCreatedByWeb">웹으로 받기</label>
                                </div>
                            </div>
                        </div>
                    </div>

                    <div class="card mb-3">
                        <div class="card-body">
                            <h5 class="card-title mb-3">스터디 신청 결과 알림</h5>
                            <h6 class="card-subtitle mb-2 text-muted"><a href="#">스터디 참가 신청</a> 결과 알림을 받을 방법을 설정하세요.</h6>
                            <div class="form-group mb-0">
                                <div class="custom-control custom-switch">
                                    <input type="checkbox" class="custom-control-input" id="studyEnrollmentResultByEmail" th:field="*{studyEnrollmentResultByEmail}">
                                    <label class="custom-control-label" for="studyEnrollmentResultByEmail">이메일로 받기</label>
                                </div>

                                <div class="custom-control custom-switch">
                                    <input type="checkbox" class="custom-control-input" id="studyEnrollmentResultByWeb" th:field="*{studyEnrollmentResultByWeb}">
                                    <label class="custom-control-label" for="studyEnrollmentResultByWeb">웹으로 받기</label>
                                </div>
                            </div>
                        </div>
                    </div>

                    <div class="card mb-3">
                        <div class="card-body">
                            <h5 class="card-title mb-3">관심 스터디 알림</h5>
                            <h6 class="card-subtitle mb-2 text-muted"><a href="#">관심있는 스터디</a>에 대한 알림을 받을 방법을 설정하세요.</h6>
                            <div class="form-group mb-0">
                                <div class="custom-control custom-switch">
                                    <input type="checkbox" class="custom-control-input" id="studyUpdatedByEmail" th:field="*{studyUpdatedByEmail}">
                                    <label class="custom-control-label" for="studyUpdatedByEmail">이메일로 받기</label>
                                </div>

                                <div class="custom-control custom-switch">
                                    <input type="checkbox" class="custom-control-input" id="studyUpdatedByWeb" th:field="*{studyUpdatedByWeb}">
                                    <label class="custom-control-label" for="studyUpdatedByWeb">웹으로 받기</label>
                                </div>
                            </div>
                        </div>
                    </div>

                    <div class="form-group">
                        <button class="btn btn-primary btn-block" type="submit"
                                aria-describedby="submitHelp">수정하기
                        </button>
                    </div>
                </form>
            </div>
        </div>
    </div>
    <th:block th:replace="fragments :: footer"></th:block>
</div>

<script th:replace="fragments :: form-validation"></script>
</body>
</html>
딱히 특별한 건 없다.