스프링과 JPA 기반 웹 애플리케이션 개발 #59 스터디 설정 - 배너 (+필터와 인터셉터의 차이 + 필터와 인터셉터로 권한 관리), + 스프링 부트의 파일 업로드 step by step으로 배우기)
스프링과 JPA 기반 웹 애플리케이션 개발
스프링과 JPA 기반 웹 애플리케이션 개발 #59 스터디 설정 - 배너
해당 내용은 인프런, 스프링과 JPA 기반 웹 애플리케이션 개발의 강의 내용을 바탕으로 작성된 내용입니다.
강의를 학습하며 요약한 내용을 출처를 표기하고 블로깅 또는 문서로 공개하는 것을 허용합니다 라는 원칙 하에 요약 내용을 공개합니다. 출처는 위에 언급되어있듯, 인프런, 스프링과 JPA 기반 웹 애플리케이션 개발입니다.
제가 학습한 소스코드는 https://github.com/n00nietzsche/jakestudy_webapp 에 지속적으로 업로드 됩니다. 매 커밋 메세지에 강의의 어디 부분까지 진행됐는지 기록해놓겠습니다.
스터디 설정 - 배너
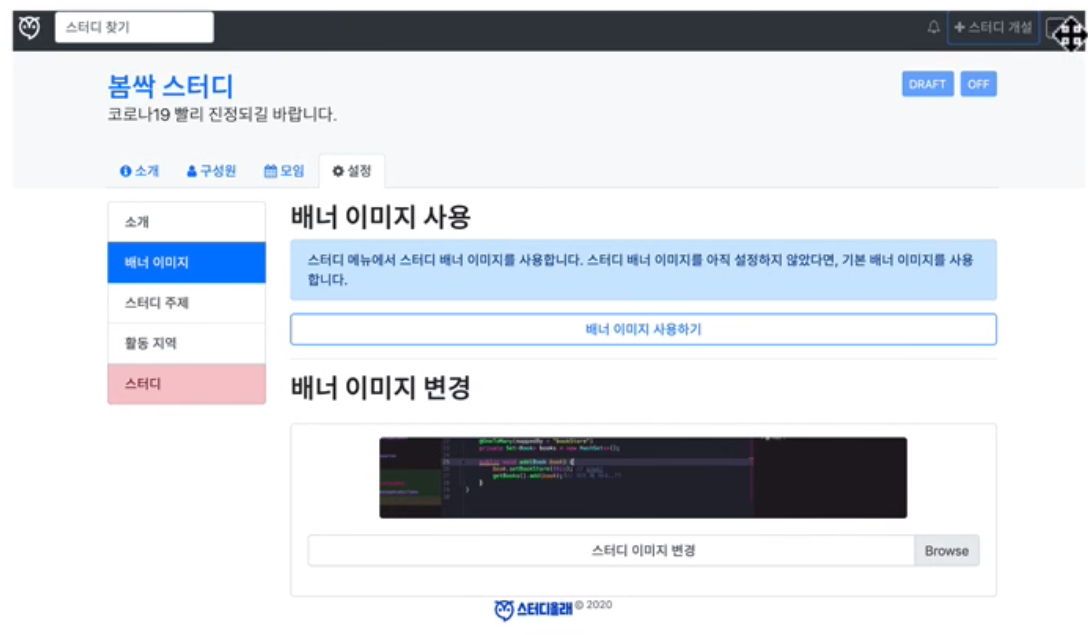
- 기본 이미지를 제공한다.
public String getImage() {
  return
}- 서버 요청 크기를 설정한다.
# 톰캣 기본 요청 사이즈는 2MB의 파일이 한계이다. 그것보다 더 큰 요청을 받고 싶은 경우 이 값을 조정해야 한다.
server.tomcat.max-http-form-post-size=5MB- 이미지 파일 업로드시 고려할 점
- 이미지 파일인지 확인해야 한다. (이미지가 아닌 파일을 업로드 하려는 건 아닌지 확인해야 함)
- 이미지의 크기를 확인해야 한다. (너무 큰 이미지를 업로드하지 않도록 해야 한다.)
스프링 부트 파일 업로드에 필요한 절차
properties파일에 첨부파일이 저장될 장소 입력하기
1.2.properties에서 저장소에 대한 정보를 가져오는 클래스인StorageProperties생성하기- 리소스 핸들러 적용하기
- 파일 정보를 담을 클래스 만들기
- 파일 저장 중 발생하는 예외에 대한 Exception 만들기
- 파일 저장하는 인터페이스(
FileStorageService) 및 서비스 정의하기 - 컨트롤러 및 서비스에서 정의한 파일 저장 서비스를 이용하여 파일 저장 로직 정의하기
- 프론트 HTML에서 input 박스를 이용해 파일 전달하기
Properties 관련 작업
Properties 파일에 첨부파일이 저장될 장소 입력하기
storage.location=uploads
storage.webLocation=/uploads
위와 같이 설정해주었다.
storage.location=uploads의 의미는 실제 파일을 프로젝트의 루트 디렉토리 밑의uploads라는 디렉토리에 저장하겠다는 뜻이다.storage.webLocation=/uploads의 의미는 내가 업로드한 파일을도메인/uploads/이미지이름으로 접근하겠다는 뜻이다.- ex)
localhost:8080/uploads/my_profile.jpg
- ex)
실수하기 쉬운 부분
위 설정에서 중요한 것은 절대 src 내부에 경로를 만들지 말아야 한다는 것이다. src 내부에 경로를 만들게 되면 특이한 현상을 경험할 수 있는데, 파일을 업로드한 이후에 바로 접근이 안되고, 서버를 재부팅해야만 해당 파일에 접근할 수 있는 현상이 생길 수 있다.
특히 .../resources/static/images와 같은 경로를 사용하면 더욱 이러한 현상이 발생하기 쉽다.
왜냐하면 톰캣 때문인데, 우리가 프로젝트에 있는 @SpringBootApplication 애노테이션이 붙은 클래스를 실행할 때, 톰캣은 해당 프로젝트를 배포한다. 배포되는 디렉토리는 우리가 소스코드를 수정하고 여러가지 로직을 만들고, HTML을 만들어놓고, CSS, JS 등을 저장해놓는 공간과 다르게 분리된다.
우리가 프로젝트를 실행할 때, 프로젝트 최상위에 target이라는 디렉토리가 새로 생기며 내부에 배포 형태의 새로운 파일들이 위치하게 된다. classes 디렉토리를 보면 우리가 작성한 .java 파일이 컴파일된 .class 파일이 생성되어 있다.
classes 디렉토리 내부에 com, META-INF, static, templates 와 같은 디렉토리들이 또 따로 새롭게 배포되어 해당 자리를 차지하게 된다. 파일의 내용도 같고, 마치 src 디렉토리에 있던 내용들이 복사된 것처럼 위치하게 된다.
그런데 이러한 상황에서 배포 전의 \src\main\resources\static\...와 같은 경로에 파일을 넣게 되면, 웹 서버가 바라보는 곳은 배포 후의 \target\classes\static\... 인데 서로 일치하지 않게 된다. 하지만 서버가 재시작되면 배포 전의 디렉토리의 내용이 복사되기 때문에 사진 첨부가 정상적으로 적용된다.
위와 같은 실수를 안하려면 그냥 내부
src디렉토리 말고 다른 경로에uploads디렉토리를 생성하면 되는데, 나는 그 위치를 프로젝트 루트의uploads디렉토리로 잡았다.
StorageProperties
@Data
@Component
@ConfigurationProperties("storage")
public class StorageProperties {
    String location;
    String webLocation;
}
위와 같이, StorageProperties를 만들어놓으면 빈에서 편하게 properties에 있는 내용들으 가져올 수 있으며, 단순, getProperties() 메소드를 사용하는 것보다 코드의 가독성도 높아진다.
리소스 핸들러 관련 작업
리소스 핸들러 적용하기
핸들러 혹은 인터셉터는 WebMvcConfigurer를 상속하여 구성하면 된다.
@Configuration
@RequiredArgsConstructor
public class WebMvcConfig implements WebMvcConfigurer {
    ...

    private final StorageProperties storageProperties;

    @Override
    public void addResourceHandlers(ResourceHandlerRegistry registry) {
        /**
         * 파일 업로드의 경우, 이와 같이 리소스 핸들러를 넣는 것이 최선 같다.
         */
        registry.addResourceHandler(storageProperties.getWebLocation() + "/**" )
                .addResourceLocations("file:" + Paths.get("uploads").toAbsolutePath() + "/");
        WebMvcConfigurer.super.addResourceHandlers(registry);
    }
}ResourceHandlerRegistry의 .addResourceHandler() 메소드에는 웹에서 해당 리소스를 접근할 때 열어줄 URL에 대해 작성해주는 것이고, .addResourceLocations() 메소드에는 해당 리소스 자원들이 실제로 존재하는 파일시스템 내부의 위치를 작성해주는 것이다.
new File(storageProperties.getLocation()).getAbsolutePath() + "/" 와 같이 작성하여 프로젝트의 루트 디렉토리의 uploads 디렉토리 경로를 설정해줄 수 있다.
여기서 storageProperties에 작성된 문자열을 가져옴으로써, 추후에 properties 파일만 변경하여도 파일 업로드 경로가 바뀔 수 있도록 설정한다.
파일 관련 클래스 작업
파일 정보를 저장할 FileVO 만들기
@Data
public class FileVO {
    private String uid;
    private String originalName;
    private String fileName;
    private String uri;
    private long size;

    public void setUri(String webLocation) {
        this.uri = webLocation + "/" + this.uid + getFileExtension();
    }

    public void setRandomUid() {
        this.uid = UUID.randomUUID().toString();
    }

    public String getFileExtension() {

        if(this.originalName == null || this.originalName.equals("")) {
            throw new StorageException("파일 이름이 없습니다.");
        }

        Pattern pattern = Pattern.compile("\\.(jpg|png|bmp|gif|jpeg)", Pattern.CASE_INSENSITIVE);
        Matcher matcher = pattern.matcher(this.originalName);

        if(matcher.find()) {
            return matcher.group();
        }

        return "";
    }
}
파일을 저장할 때 서버는 일반적으로 단순히 파일 이름만 갖고 있지는 않다. 필요에 따라 파일에 대한 다양한 정보를 가지고 있을 수 있다.
- 만든 날짜
- 수정 날짜
- 파일의 유형
- 파일의 확장자
- 파일의 변형된 이름
- 파일의 원래 이름
- 파일의 작성자
- 파일의 소유자 등 많은 정보를 포함할 수 있다.
이 예제에서 나는 간단하게 5가지 정보를 저장했다.
- 파일의 고유 ID (
uid) - 파일의 원본 이름 (
originalName) - 파일의 실제 이름 (
fileName) - 파일을 웹에서 가져올 수 있는 주소 (
uri) - 파일의 크기 (
size)
파일 관련 예외처리를 담당할 Excpetion 클래스 작성
public class StorageException extends RuntimeException {
    public StorageException(String message) {
        super(message);
    }
    public StorageException(String message, Throwable cause) {
        super(message, cause);
    }
}
public class FileNotFoundException extends StorageException {
public FileNotFoundException(String message) {
super(message);
}
public FileNotFoundException(String message, Throwable cause) {
super(message, cause);
}
}파일 저장 인터페이스 정의하기
public interface FileStorageService {
    void init();
    FileVO save(MultipartFile file);
    Stream<Path> loadAll();
    Path load(String filename);
    Resource loadAsResource(String filename);
    void deleteAll();
    String getWebLocation();
    Path getRootLocation();
}
일반적으로 사용될만한 메소드들을 정의해놓는다.
파일 저장 서비스 정의하기
@Service
public class FileStorageServiceImpl implements FileStorageService {

    private final Path rootLocation;
    private final StorageProperties storageProperties;

    public FileStorageServiceImpl(StorageProperties storageProperties) {
        rootLocation = Paths.get(storageProperties.getLocation());
        this.storageProperties = storageProperties;
    }

    @Override
    @PostConstruct
    public void init() {
        try {
            // createDirectory 와 createDirectories 가 다르니 헷갈리지 말아야 함
            // 설명 잘 읽고 정리해보기
            Files.createDirectories(rootLocation);
        } catch (IOException e) {
            throw new StorageException("업로드 폴더를 생성할 수 없습니다. 에러 내용: " + e.getMessage());
        }
    }

    @Override
    public FileVO save(MultipartFile file) {
        FileVO fileVO = new FileVO();
        String filename = StringUtils.cleanPath(file.getOriginalFilename());
        fileVO.setOriginalName(file.getOriginalFilename());

        try {
            if(file.isEmpty()) {
                throw new StorageException("빈 파일을 저장할 수 없습니다. " + filename);
            }
            if(filename.contains("..")) {
                throw new StorageException("상대 경로로 현재 디렉토리 밖에 저장할 수 없습니다. " + filename);
            }

            try(InputStream inputStream = file.getInputStream()) {
                fileVO.setUid(UUID.randomUUID().toString());
                fileVO.setFileName(fileVO.getUid() + fileVO.getFileExtension());

                fileVO.setSize(Files.copy(
                        inputStream
                        , this.rootLocation.resolve(fileVO.getFileName())
                        , StandardCopyOption.REPLACE_EXISTING
                ));
            }
        } catch (IOException e) {
            throw new StorageException("파일을 저장할 수 없습니다. 에러 내용: " + e.getMessage());
        }

        fileVO.setUri(getWebLocation());

        return fileVO;
    }

    @Override
    public Stream<Path> loadAll() {
        try {

            return Files.walk(this.rootLocation, 1)
                    .filter(path -> !path.equals(this.rootLocation))
                    .map(this.rootLocation::relativize);

        } catch (IOException e) {
            e.printStackTrace();
        }
        return null;
    }

    @Override
    public Path load(String filename) {
        return rootLocation.resolve(filename);
    }

    @Override
    public Resource loadAsResource(String filename) {
        try {
            Path file = load(filename);
            Resource resource = new UrlResource(file.toUri());

            if(resource.exists() && resource.isReadable()) {
                return resource;
            }
            else {
                throw new FileNotFoundException("파일을 읽을 수 없습니다.");
            }
        } catch (MalformedURLException e) {
            throw new FileNotFoundException("잘못된 경로입니다. 에러 내용: " + e.getMessage());
        }
    }

    @Override
    public void deleteAll() {
        FileSystemUtils.deleteRecursively(rootLocation.toFile());
    }

    @Override
    public String getWebLocation() {
        return storageProperties.getWebLocation();
    }

    @Override
    public Path getRootLocation() {
        return this.rootLocation;
    }
}
init 메소드
    @Override
    @PostConstruct
    public void init() {
        try {
            // createDirectory 와 createDirectories 가 다르니 헷갈리지 말아야 함
            // 설명 잘 읽고 정리해보기
            Files.createDirectories(rootLocation);
        } catch (IOException e) {
            throw new StorageException("업로드 폴더를 생성할 수 없습니다. 에러 내용: " + e.getMessage());
        }
}@PostConstruct애노테이션을 통해서, 해당 빈이 생성되기 이전 타이밍에init()메소드의Files.createDirectories()를 수행하여 미리 디렉토리를 생성한다..createDirectory()와.createDirectories()는 잘 구분해야 한다..createDirectory()는 하나의 디렉토리만 생성한다..createDirectories()는 상위 디렉토리가 존재하지 않는다면 상위 디렉토리까지 생성한다..createDirectories()는 내가 생성하려는 디렉토리가 이미 있어도 예외를 던지지 않는다.
save 메소드
    @Override
    public FileVO save(MultipartFile file) {
        FileVO fileVO = new FileVO();
        String filename = StringUtils.cleanPath(file.getOriginalFilename());
        fileVO.setOriginalName(file.getOriginalFilename());

        try {
            if(file.isEmpty()) {
                throw new StorageException("빈 파일을 저장할 수 없습니다. " + filename);
            }
            if(filename.contains("..")) {
                throw new StorageException("상대 경로로 현재 디렉토리 밖에 저장할 수 없습니다. " + filename);
            }

            try(InputStream inputStream = file.getInputStream()) {
                fileVO.setRandomUid();
                fileVO.setFileName(fileVO.getUid() + fileVO.getFileExtension());

                fileVO.setSize(Files.copy(
                        inputStream
                        , this.rootLocation.resolve(fileVO.getFileName())
                        , StandardCopyOption.REPLACE_EXISTING
                ));
            }
        } catch (IOException e) {
            throw new StorageException("파일을 저장할 수 없습니다. 에러 내용: " + e.getMessage());
        }

        fileVO.setUri(getWebLocation());

        return fileVO;
}Files.copy()메소드를 통해MultipartFile타입으로 들어온file파라미터의 스트림을 물리 저장소에 저장한다.cleanPath()는 파일 이름에 Path가 어렵게 들어갔을 때를 대비하여 작성했다.

위는 로드 존슨이 작성한 cleanPath 테스트이다.
프론트 HTML input 작업
<form action="#"
                          th:if="${study.isUsingBanner()}"
                          th:action="@{'/study/' + ${study.path} + '/settings/banner'}"
                          enctype="multipart/form-data"
                          method="post"
                          novalidate>

                        <div class="card text-center mb-3">
                            <div class="card-header">
                                배너 이미지
                            </div>
                            <div id="new-profile-image" class="mt-3" style="display: none;"></div>
                            <div class="card-body">
                                <div class="custom-file">
                                    <input type="file" class="custom-file-input" accept="image/*" name="bannerImage" id="bannerImageFile">
                                    <label class="custom-file-label" for="bannerImageFile">배너 이미지 변경</label>
                                </div>
                            </div>
                        </div>

                        <div class="form-group">
                            <button
                                    class="btn btn-primary btn-block"
                                    type="submit"
                                    aria-describedby="submitHelp"
                            >
                                이미지 등록하기
                            </button>
                        </div>
                    </form>
위와 같이 작성하였다. 첨부한 파일 이름과 미리보기가 나오도록 좀 변경해야 할 것 같다.
필터와 인터셉터로 권한 관리하기
Study/Settings에서 권한 관리의 필요성
모든 스터디에서 세팅과 관련된 권한을 관리할 수 있는 사용자는 매니저 뿐이다. 그래서 컨트롤러에서 매번 권한 체크를 해주었는데, 이번 기회에 인터셉터를 추가해서 권한 관리 코드를 줄였다.
StudyManagerCheckInterceptor
@Component
@RequiredArgsConstructor
public class StudyManagerCheckInterceptor implements HandlerInterceptor {

    private final StudyService studyService;
    private final StudyRepository studyRepository;

    @Override
    public boolean preHandle(HttpServletRequest request, HttpServletResponse response, Object handler) throws Exception {
        UserAccount userAccount = (UserAccount) SecurityContextHolder.getContext().getAuthentication().getPrincipal();
        Account loginAccount = userAccount.getAccount();

        String uri = request.getRequestURI();
        String patternString = "(?<=\\/study\\/)[^/]+";
        Pattern pattern = Pattern.compile(patternString, Pattern.CASE_INSENSITIVE);
        Matcher matcher = pattern.matcher(uri);

        if(matcher.find()){
            String uriStudyPath = matcher.group();
            Study study = studyRepository.findByPath(uriStudyPath);
            studyService.checkIfManager(study, loginAccount);
        }

        return HandlerInterceptor.super.preHandle(request, response, handler);
    }

    @Override
    public void postHandle(HttpServletRequest request, HttpServletResponse response, Object handler, ModelAndView modelAndView) throws Exception {
        HandlerInterceptor.super.postHandle(request, response, handler, modelAndView);
    }

    @Override
    public void afterCompletion(HttpServletRequest request, HttpServletResponse response, Object handler, Exception ex) throws Exception {
        HandlerInterceptor.super.afterCompletion(request, response, handler, ex);
    }
}
접근하려는 스터디를 Path를 통해 정규식으로 가져오고, 인증 정보에서 현재 로그인된 사용자 계정을 가져와서 이전에 작성해두었던 studyService.checkIfManager() 메소드를 통해 관리자인지 확인한다.
인터셉터 추가 (WebMvcConfigurer)
@RequiredArgsConstructor
public class WebMvcConfig implements WebMvcConfigurer {

    private final StudyManagerCheckInterceptor studyManagerCheckInterceptor;
    private final StorageProperties storageProperties;

    @Override
    public void addInterceptors(InterceptorRegistry registry) {
        registry.addInterceptor(studyManagerCheckInterceptor).addPathPatterns("/study/*/settings/**");
        WebMvcConfigurer.super.addInterceptors(registry);
    }
레퍼런스