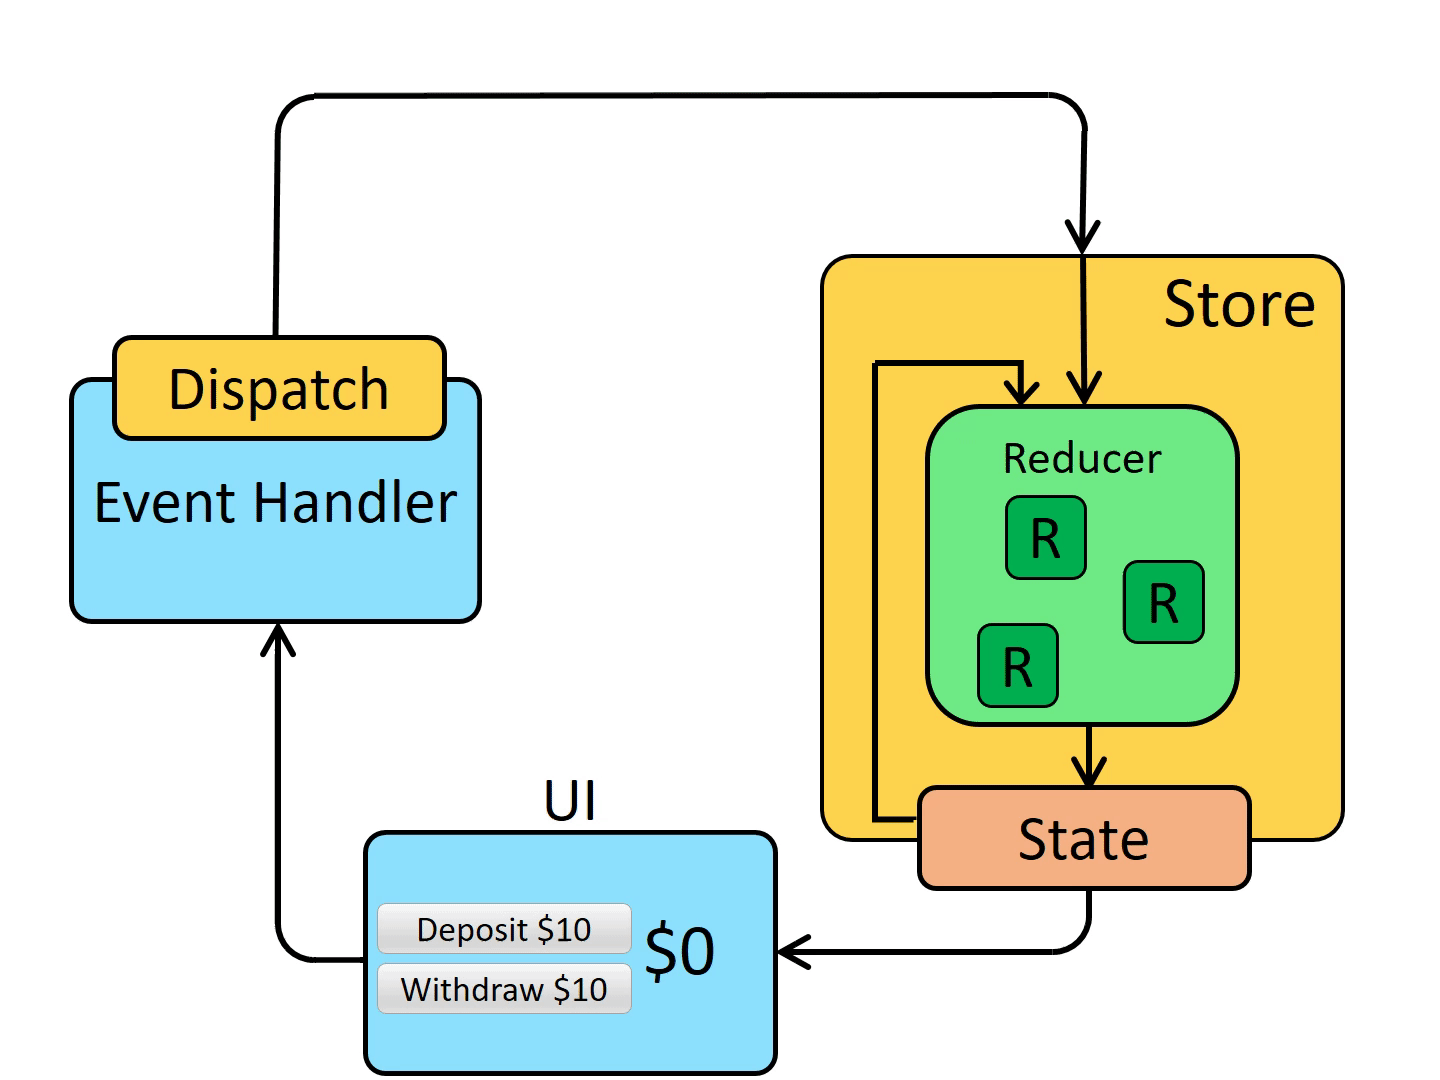
기존에 동화책을 생성할 때 react-redux를 사용해서 표지와 삽화들을 저장했었다. 하지만 Redux-toolkit을 사용하는 게 더 편리할 것 같아서 바꿔보았다. 우선 Redux의 개념부터 짚고 가자.
Redux란?
어플리케이션의 상태(state)를 관리하기 위한 오픈소스 JavaScript 라이브러리다.
바닐라JS, React, Vue 등 JS 환경이라면 어디서든 사용 가능하다.
기존의 useState를 사용해서 상태를 저장해도 될텐데 redux를 왜 사용하는 것일까?
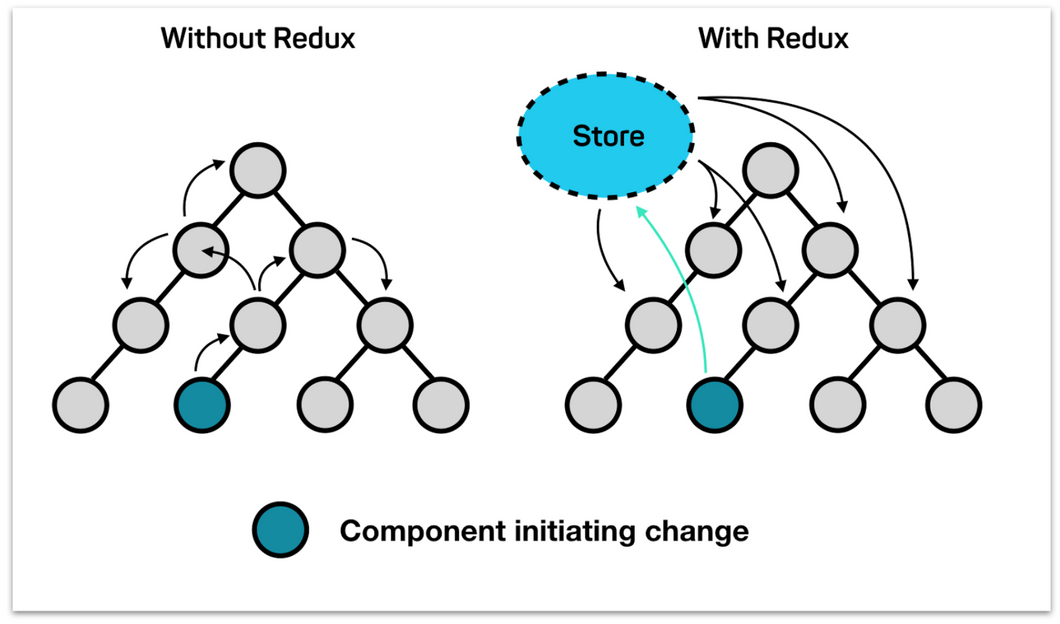
바로 props drilling 문제 때문이다. React를 사용하다보면 부모 컴포넌트가 자식 컴포넌트에게 props를 넘겨주는 일이 많은데, 이런식으로 계속 자식에게 props를 넘겨주다보면 코드가 복잡해지고 유지보수가 어려워진다. 예를 들어 부모 컴포넌트의 state를 증손주가 사용해야한다면 어떨까? 증손주에게 이 state를 넘겨주기 위해서는 자식과 손주에게도 넘겨줘야한다. 자식과 손주는 이 state를 사용하지도 않는데 말이다.
하지만 redux를 사용하면 훨씬 간편해진다. redux를 사용하면 store라는 곳에 각종 state들을 저장하게 되는데, 그러면 각 컴포넌트들은 부모 컴포넌트를 통하지 않고도 직접 state에 접근할 수 있게 된다. 따라서 몇대를 걸쳐 props를 전달할 필요도 없고 코드도 간결해진다.
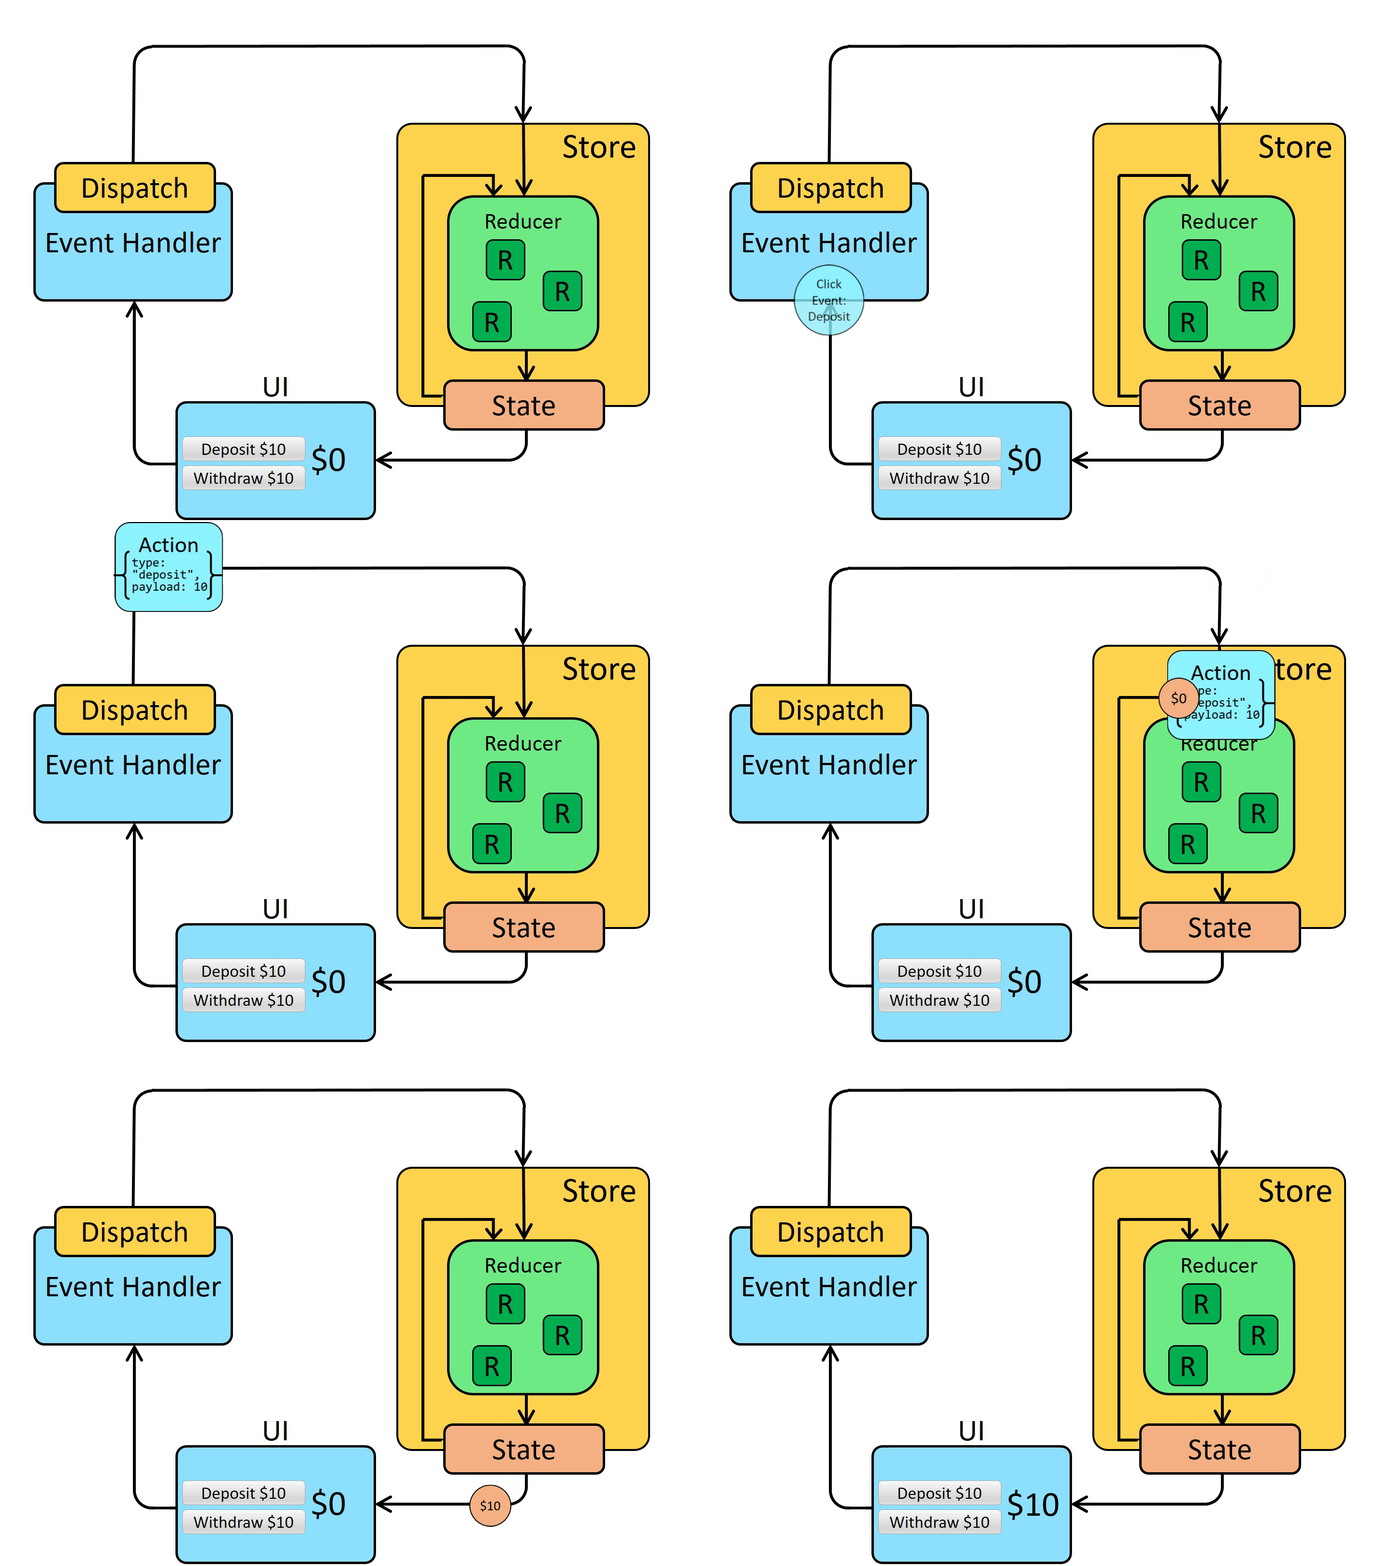
위 사진은 redux의 작동원리를 간단하게 표현한 것이다. 우선 store에 각종 state들을 저장할 수 있는데, store에는 state를 변경할 수 있는 reducer라는 함수가 존재한다. 사용자가 화면의 버튼을 클릭하는 등 UI에서 이벤트가 발생하면, Event Handler를 통해 dispatch라는 함수를 호출하게 된다. dispatch는 reducer에게 action을 전달하게 되는데, 여기서 action은 state에 대해 어떤 행위를 취할 것인지를 결정한다. 그러면 reducer는 전달받은 action의 종류에 따라 적절하게 state를 변경한다. (참고로 불변성을 유지하기 위해 state를 변경한다기 보다는 새로운 state를 만들어서 반환한다고 보면 된다.) 또한 UI는 useSelector 훅을 통해 저장된 state를 구독하고 화면에 띄울 수 있다.
사실 이렇게만 말하면 잘 이해가 되지 않을 것이다. 아래 코드를 보면서 구체적으로 알아보자.
React-redux
react-redux는 react에서 사용하기 좀더 편리한 redux라고 생각하면 된다.
action
{
  type: "ADD_TODO",
  data: {
    id: 0,
    text: "운동하기"
  }
}
할일을 추가하는 action의 예시이다. action은 하나의 객체로 표현되고, type 필드를 반드시 가지고 있어야 한다. type 필드는 액션의 이름이라고 보면 된다. type 외에도 자유롭게 필드를 작성할 수 있다. 위의 예시에서는 id가 0이고 내용이 "운동하기"라는 정보를 전달한다.
action creator
const addTodo = (data) => {
  return {
    type: "ADD_TODO",
    data,
  }
}
action을 발생시킬때마다 매번 이렇게 객체를 작성하다보면 실수하기가 쉽다. 이를 방지하기 위해 Action Creator(액션 생성 함수)를 관리할 수도 있다.
reducer
const initialState = {
  name: "",
  age: 0,
};

function reducer(currentState = initialState, action) {
  const newState = { ...currentState }; //불변성 위해 복사해서 사용

  switch (action.type) {
    case "SET_NAME": //이름 변경 액션
      newState.userName = "jamie";
      break;
    case "INCREASE_AGE": //나이 증가 액션
      newState.age += action.step;
      break;

    case "DECREASE_AGE": //나이 감소 액션
      newState.age -= action.step;
      break;
  }

  return newState;
}
먼저 initialState라는 초기 상태를 정의한다. name과 age라는 state가 있다고 하자.
그리고 현재의 state와 action을 인자로 받는 reducer라는 함수를 정의한다.
reducer는 인자로 받은 action의 type에 따라 적절히 상태를 변경한다. 불변성을 유지하기 위해 현재의 state를 복사한 newState를 만들고, newState를 적절히 변경한 뒤 newState를 반환한다.
store
export const store = createStore(reducer)createStore 함수에 reducer를 넣어주어 store를 만든다.
참고로 store는 애플리케이션에 단 하나만 존재해야 한다.
dispatch
const dispatch = useDispatch();
...
const onClickButton = () => {
  dispatch({type: "INCREASE_AGE", step: 2});
}
useDispatch 훅을 이용해 dispatch 함수를 받아온다. 이벤트가 발생하면 dispatch에 action을 인자로 전달하여 state를 변경한다. 위의 경우 나이를 2살 증가시키는 action을 발생시킨다.
subscribe (useSelector)
const age = useSelector((state)=>state.age)useSelector를 통해 state를 구독하여 UI에 사용할 수 있다.
Provider
function App() {
  <Provider store={store}>
    ...
  </Provider>
}
앱의 최상단을 Provider로 감싸줘야 하는 것에 주의하자.
Redux-toolkit
redux를 좀 더 편하게 사용할 수 있는 라이브러리라고 보면 된다.
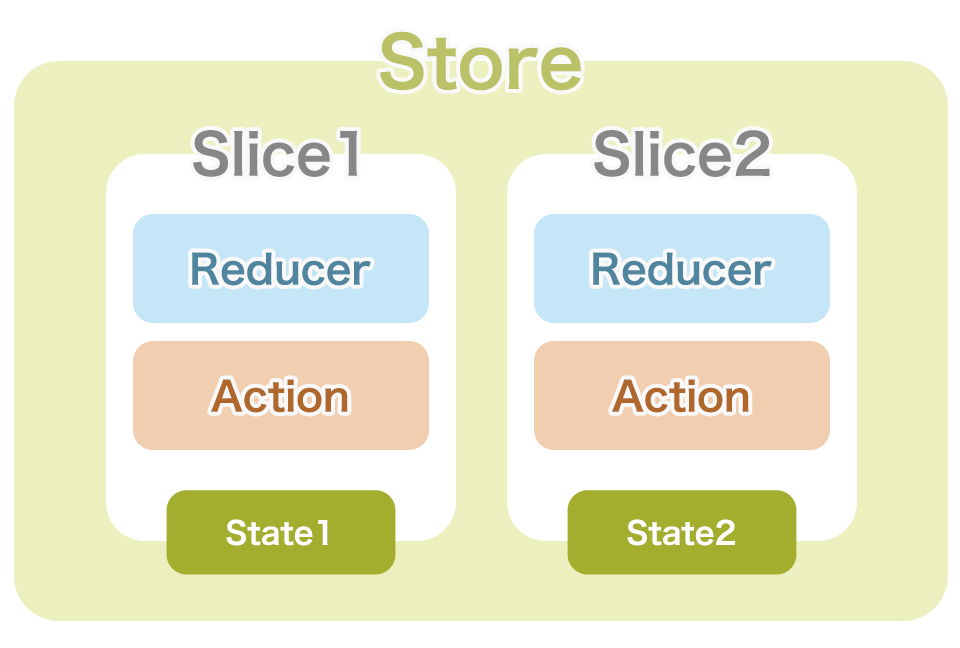
react-redux는 하나의 거대한 store에 모든 state를 저장하지만, redux-toolkit에서는 store 안에 여러 slice들을 두고 그 안에 state를 저장한다. 관련된 state들은 같은 slice 안에 두면 된다.
실제 Be My Story에 사용된 코드를 보면서 무엇이 다른지 더 알아보자.
userSlice.js
import { createSlice } from "@reduxjs/toolkit";

export const userSlice = createSlice({
  name: "userSlice",
  initialState: { userName: "", profileImg: "" },
  reducers: {
    setUserName: (state, action) => {
      state.userName = action.payload.userName;
    },
    setProfileImg: (state, action) => {
      state.profileImg = action.payload.profileImg;
    },
  },
});

export const { setUserName, setProfileImg } = userSlice.actions;
bookSlice.js
import { createSlice } from "@reduxjs/toolkit";

export const bookSlice = createSlice({
  name: "bookSlice",
  initialState: { coverUrl: "", images: [] },
  reducers: {
    reset: (state, action) => {
      state.userName = "";
      state.coverUrl = "";
      state.images = Array.from({ length: 15 }, () => "");
    },
    setCover: (state, action) => {
      state.coverUrl = action.payload.coverUrl;
    },
    setImages: (state, action) => {
      console.log(action.payload.imgUrl);
      state.images[action.payload.pageNum] = action.payload.imgUrl;
    },
    sortImages: (state, action) => {
      state.images.sort(function (a, b) {
        return a.pageNum - b.pageNum;
      });
      console.log("newImages", state.images);
    },
  },
});

export const { reset, setCover, setImages, sortImages } = bookSlice.actions;
createSlice 함수를 사용하여 userSlice와 bookSlice를 생성한다. 인자로 객체를 넣어주는데, name 필드는 해당 슬라이스의 이름을 의미한다. initialState와 reducers도 정의하는데, 복수형인 reducers인 것에 주의하자. 또한 redux-toolkit에서는 react-redux와는 다르게 불변성을 신경쓰지 않고 상태를 마음껏 변경해도 된다!
store.js
import { combineReducers, configureStore } from "@reduxjs/toolkit";
import { bookSlice } from "./bookSlice";
import { userSlice } from "./userSlice";

const store = configureStore({
  reducer: {
    book: bookSlice.reducer,
    user: userSlice.reducer,
  }
});

export default store;
각 슬라이스의 reducer를 합쳐서 하나의 reducer로 만든 뒤 configureStore 함수를 사용해서 store를 만든다.
dispatch & action
dispatch({type: "userSlice/setUserName", userName: userName});액션의 이름은 '슬라이스이름/액션타입'으로 설정하면 된다.
또는 아래 코드처럼 action creator를 사용할 수도 있다.
dispatch(userSlice.actions.setUserName({ userName: userName }));react-redux에서는 action creator 함수를 직접 정의해서 사용했어야 했는데, redux-toolkit에서는 '슬라이스이름.actions.액션이름'을 통해 액션을 생성할 수 있다. 위 코드에서는 userSlice의 액션인 setUserName을 발생시킨다. 인자로 전달한 객체 안의 userName은 reducer에서 action.payload.userName처럼 접근하면 된다.
useSelector
const userName = useSelector((state)=>state.user.userName);'state.슬라이스이름.필드명'으로 작성한다.
redux-persist
새로고침을 하거나 페이지를 이동했다가 돌아오면 state가 초기화돼버리는 상황이 발생한다. 이를 방지하기 위해서는 redux-persist를 사용해야 한다.
store.js
import { combineReducers, configureStore } from "@reduxjs/toolkit";
import { bookSlice } from "./bookSlice";
import { userSlice } from "./userSlice";
import storage from "redux-persist/lib/storage";
import persistReducer from "redux-persist/es/persistReducer";

const persistConfig = {
  key: "root",
  storage,
  blacklist: [],
};

const reducers = combineReducers({
  book: bookSlice.reducer,
  user: userSlice.reducer,
});

const persistedReducer = persistReducer(persistConfig, reducers);

const store = configureStore({
  reducer: persistedReducer,
});

export default store;
persistConfig는 저장 방식을 정의한다. key값으로는 'root'를 사용하고, 저장소는 localStorage를 사용한다는 뜻이다. sessionStorage를 사용하고 싶다면 storage 대신 session을 쓰면 된다. persist에서 제외할 슬라이스의 리스트는 blacklist에 적으면 된다. 반대로 persist할 슬라이스의 리스트를 whitelist에 작성할 수도 있다.
각 슬라이스의 리듀서를 combineReducers 함수로 합쳐서 하나의 reducers로 만든다.
이렇게 정의한 persistConfig와 reducers를 가지고 persistReducer를 이용하여 persistedReducer를 만든다.
store를 만들때 이 persistedReducer를 넣어주면 된다.
index.js
let persistor = persistStore(store);

const root = ReactDOM.createRoot(document.getElementById("root"));
root.render(
  <Provider store={store}>
    <PersistGate loading={null} persistor={persistor}>
      <BrowserRouter>
        <App />
      </BrowserRouter>
    </PersistGate>
  </Provider>
);
persistStore를 통해 store를 persist 시키자.
Provider 안의 컴포넌트를 PersistGate로 감싸주자. loading={null}은 저장된 상태를 불러오는 동안 상태를 null로 두겠다는 의미다.