
📌 React Router
리액트의 라이브러리
페이지 요청시 신규 페이지를 불러오지 않고 사용자가 입력한 URL을 감지하여 해당 URL에 맞는 데이터를 하나의 페이지 안에서 렌더링하여 보여준다
참고 : https://reactrouter.com/en/main
리액트 라우터 설치하기
$npm install react-router-dom리액트 라우터 사용하기
- 리액트 라우터 생성하기
path : 경로
element : 해당 경로에서 보여질 화면
errorElement : 해당 경로를 찾을 수 없을 때 보여질 화면
이 모든 것들을 담아 객체형태로 작성해준다
//App.js

import { createBrowserRouter } from "react-router-dom";

const router = createBrowserRouter([
  {
	path : '/',
	element : <div>Home</div>,
	errorElement : <div>Page Not Found</div>
  },
  {
  	path : '/product',
	element : <div>Product</div>,
	errorElement : <div>Page Not Found</div>
  }
]);- 리액트 라우터 적용하기
// App.js
import { RouterProvider } from "react-router-dom";
const App( ) => {
return <RouteProvider router = { router } />;
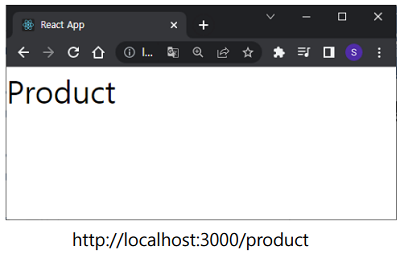
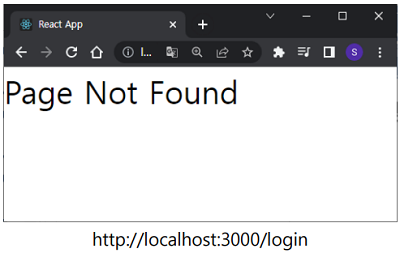
}- 실행해보기
기본 경로에 /product 혹은 /login 을 덧붙여서 입력해보면 화면이 전환되는 것을 알 수 있다
login은 설정되지 않은 경로이기 때문에 Page Not Found가 나타난다
- 컴포넌트로 수정하기
<div> 태그로 감싸진 부분은 컴포넌트 형태로 작성하는 것이 좋다
//App.js 컴포넌트 형태로 수정
import { createBrowserRouter, RouterProvider } from "react-router-dom";
// 모든 컴포넌트 import 해주기
const router = createBrowserRouter([
{
path : '/',
element : <Home/>
errorElement : <NotFound/>
},
{
path : '/product',
element : <Product/>,
errorElement : <NotFound/>
}
]);
const App( ) => {
return <RouteProvider router = { router } />;
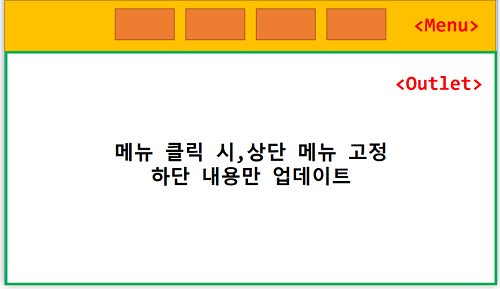
}Outlet 컴포넌트
리액트에서 기본으로 제공되는 컴포넌트
경로 이동시 새로고침을 하지 않고 화면이 업데이트 될 부분을 나타낸다
children : 컴포넌트 내부에 있는 컴포넌트에 나타낼 값
{index:true, element:} → index:true는 path:'/' 와 같은 뜻 (첫 화면, 메인)
//App.js

import { createBrowserRouter, RouterProvider } from "react-router-dom";
// 모든 컴포넌트 import 해주기

const router = createBrowserRouter([
  {
	path : '/',
	element : <Root/>
	errorElement : <NotFound/>,
    children : [
      {index : true, element : <Home/>},
      {path: "/product", element: <Product/>}
    ]
  }
]);

const App( ) => {
  return <RouteProvider router = { router } />;
}
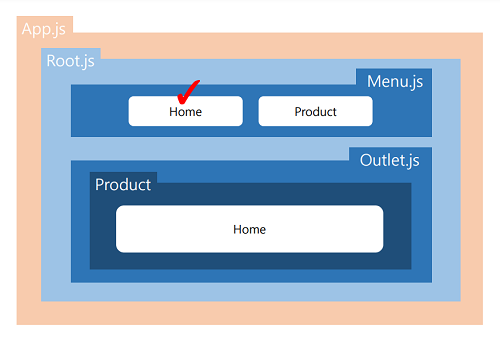
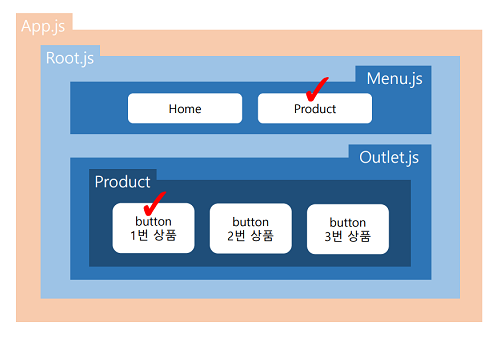
Root 컴포넌트를 생성하여 그 안에 <Menu/>, <Outlet/> 컴포넌트 생성
// Root.js

import {Outlet} from "react-router-dom";
// 모든 컴포넌트 import 해주기

const Root = () => {
 return (
  <div>
    <Menu />
    <Outlet />
  </div>
 );
};
Link 컴포넌트
리액트에서는 경로이동을 위해 <a>태그가 아닌 <Link>태그를 사용한다
<a> vs <Link>
-
<a href='경로'>
HTML에서 경로를 이동할 수 있게 해주는 태그
브라우저가 페이지를 새로 불러오기 때문에 새로고침이 일어난다
(새로고침 → 전체 리렌더링 → 지정해둔 변수값이 초기화 될 수 있음) -
<Link to='경로'>
React에서 경로를 이동할 수 있게 해주는 태그
History API를 통해 브라우저 주소의 경로만 변경 시켜 화면을 전환해준다 (새로고침X)
+) CSS 적용시 a로 접근 가능
// Menu.js

import { Link } from "react-router-dom";

const Menu = () => {
 return (
  <div>
    <Link to="/">Home</Link>
    <Link to="/product">Product</Link>
  </div>
 );
};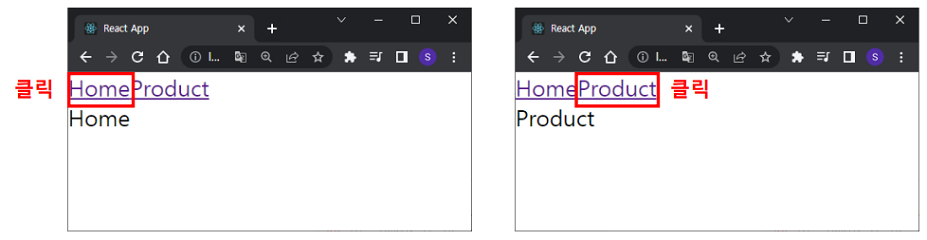
실행시 화면 새로고침 없이 내용만 변경되는 것을 알 수 있다
📌 useNavigate( )
페이지 방문 기록을 쉽게 관리해주는 React hooks
내장 함수를 사용하여 뒤로가기, 앞으로가기, 특정 페이지로 이동하기가 가능하다
사용방법
const navigate = useNavigate( );
function goHome( ){
	navigate('이동할 경로')
}
적용↓
App.js 내부의 children에 객체 추가
<ProductInfo/> 컴포넌트 생성 (제품 상세 설명에 대한 내용을 작성하면 된다)
// App.js
const router = createBrowserRouter([
{
path : '/',
element : <Root/>
errorElement : <NotFound/>,
children : [
{index : true, element : <Home/>},
{path: '/product', element : <Product/>},
{path: '/product/:productId', element : <ProductInfo/> }
]
}
]);
}
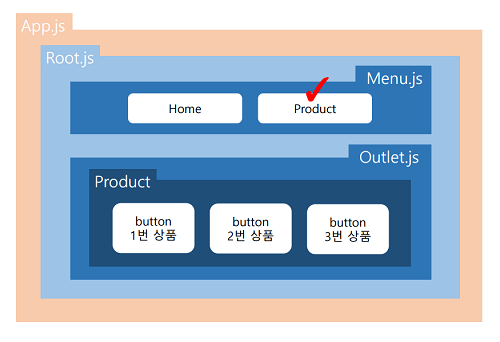
// Product.js
const Product = () => {
const [productId, setProductId] = useState("");
const navigate = useNavigate();
const clickHandler = (e) => {
setProductId(e.target.value);
navigate(`/product/${productId}`);
};
return (
<>
<button onClick={clickHandler} value="p001">1번 제품</button>
<button onClick={clickHandler} value="p002">2번 제품</button>
<button onClick={clickHandler} value="p003">3번 제품</button>
</>
);
};→ button 클릭
→ 해당 button의 value값을 productId 값으로 갱신 (useState 사용)
→ navigate() 를 사용해 이동할 경로를 지정
ex) /product/p001
/product/p002
/product/p003
🚨 여기서 잠깐! 🚨
useState()를 이용한 상태 업데이트는 비동기적이기 때문에 변경사항이 즉시 반영되지 않는다
따라서 버튼을 2번 클릭해야 실행이 되는데
useEffect() 을 사용하면 보완이 가능하다
useEffect()을 사용한 코드수정
→ productId의 값이 변경될 때에만 navigate의 경로가 변경되어 리렌더링 된다
// Product.js

const Product = () => {
  const [productId, setProductId] = useState("");
  const navigate = useNavigate();
  const clickHandler = (e) => {
    setProductId(e.target.value);
  };

  useEffect(() => {
    navigate(`/product/${productId}`);
  }, [productId])

  return (
    <>
      <button onClick={clickHandler} value="p001">1번 제품</button>
      <button onClick={clickHandler} value="p002">2번 제품</button>
      <button onClick={clickHandler} value="p003">3번 제품</button>
    </>
  );
};
📌 useParams( )
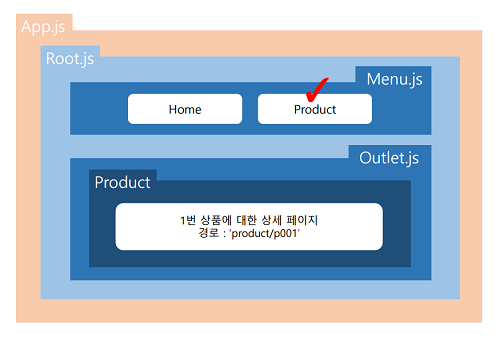
URL에 포함되어 있는 파라미터 값을 가져와서 사용할 수 있도록 해주는 React hooks
사용방법
- 데이터 전달
📌유의점 : path의 경로에 꼭 :(콜론)+값 형태로 작성해줘야 한다
//App.js

{ path : '/prouct/:productId', element : <ProductInfo/>}- 전달받은 데이터 사용
// ProductInfo.js

const ProductInfo = () => {
const { productId } = useParams();
 return(
  <div>
    {productId} 제품 상세 페이지
  </div>
 )
};
📌 그럼 리액트 라우터는 왜 사용할까?
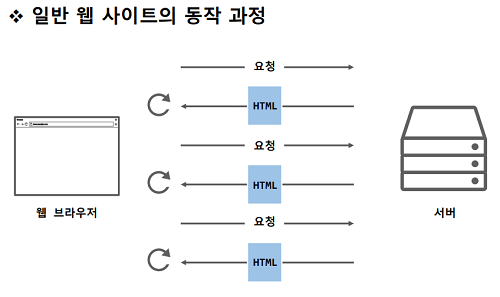
일반적인 웹사이트
웹 브라우저에서 새로운 페이지 요청시 서버는 계속해서 새로운 HTML을 로딩해 페이지를 갱신해준다
이 과정에서 서버는 많은 요청을 감당하느라 로딩이 느려진다
이를 보완한 것이
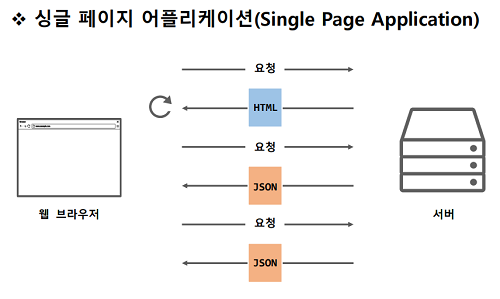
SPA (Single Page Application)
자바스크립트 코드로 웹문서 생성
웹 브라우저에서 새로운 페이지 요청시 서버는 JS 혹은 JSON 으로 페이지를 갱신해준다
페이지 전환 속도가 훨씬 빠르며 주소가 변경되어도 서버에 추가로 웹 문서를 요청하는 작업이 필요 없다
(신규 페이지를 불러오지 않고, 하나의 페이지 안에서 필요한 데이터만 가져오는 형식)
단, 모두 JS로 제어하기 때문에 프로젝트 규모가 커지면 파일도 커지며 (유지보수의 어려움)
페이지 로딩시, 사용자가 실제로 방문하지 않을 수도 있는 페이지의 스크립트까지 불러와야한다
📌 전체적인 구조
새싹DT 기업연계형 프론트엔드 실무 프로젝트 과정 8주차 블로그 포스팅