
안녕하세요, 단테입니다.
Next.js 13 master course - 라우팅의 두번째 강의를 시작하겠습니다.
차례

금일 다룰 주제는 아래와 같습니다.
- 라우팅 그룹
- 페이지 네비게이션
라우팅 그룹
Next.js13의 라우팅 그룹은 url path에는 노출되지 않지만, 코드를 작성하는 개발자가 관련있는 세그먼트를 한데 묶어 관리하고 싶을 때 사용하는 방법입니다.

이러한 그루핑 기법을 통해 url path에 영향을 미치지 않고도 앱의 도메인(관심사)에 따라 관련 코드를 다르게 관리할 수 있습니다.

실제로 어떻게 사용하는지 살펴보겠습니다.
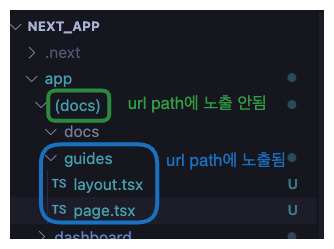
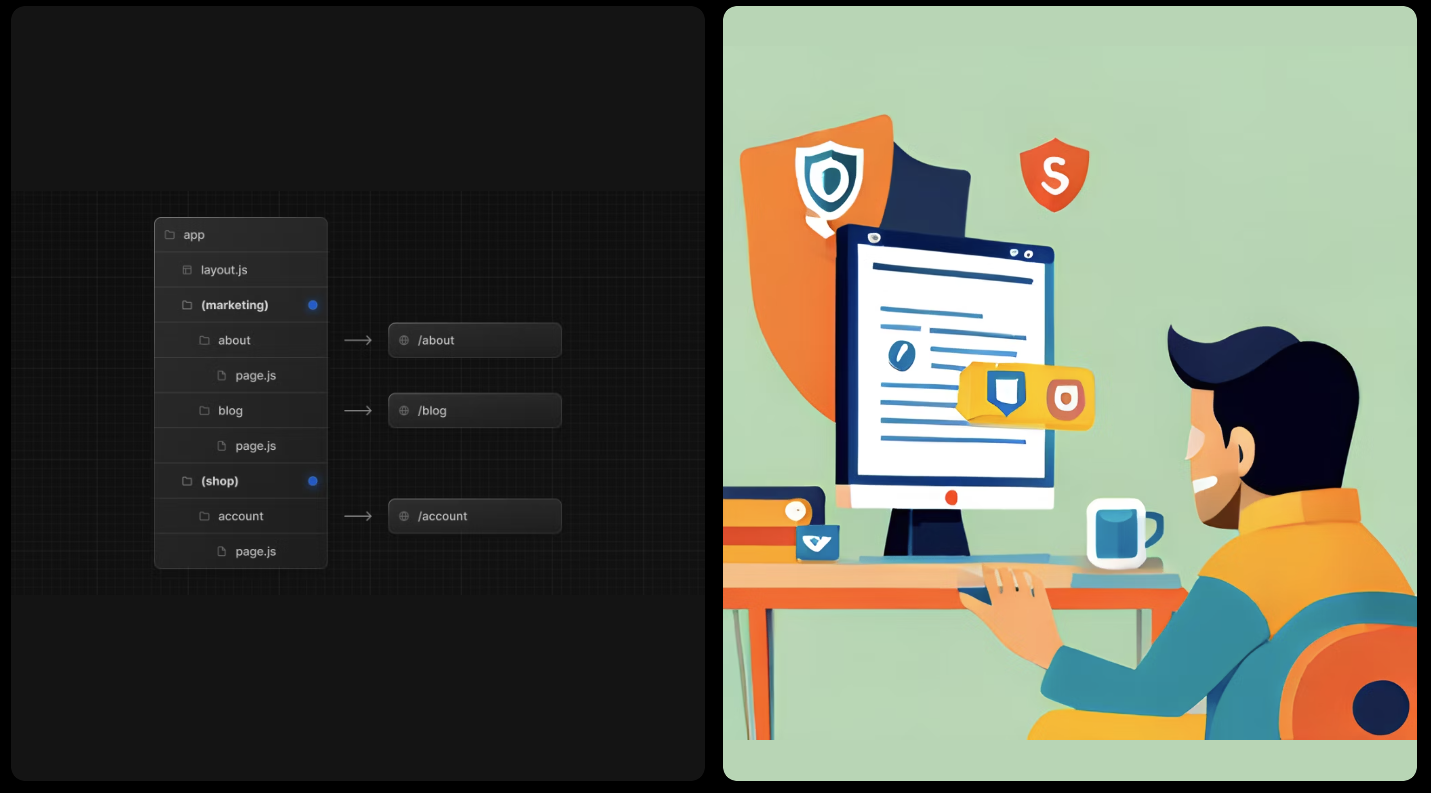
우리가 만드는 페이지의 안내창구 역할을 하는 페이지를 localhost:3000/guides 라는 url path 라는 경로로 노출하고 싶다고 가정합니다.
초록색 영역이 라우팅 그룹을 생성한 모습이며
파란색 영역이 생성한 라우팅 그룹 하위에서 url path로 노출하기 위한 세그먼트입니다.
위와 같이 app 디렉토리 하위에 docs라고 하는 디렉토리를 () 소괄호 기호로 감쌌습니다. 그리고 하위에 다시 guides 세그먼트를 생성했습니다.
이렇게 했을때 url path에 노출되는 부분과 노출되지 않는 부분은 아래와 같습니다.
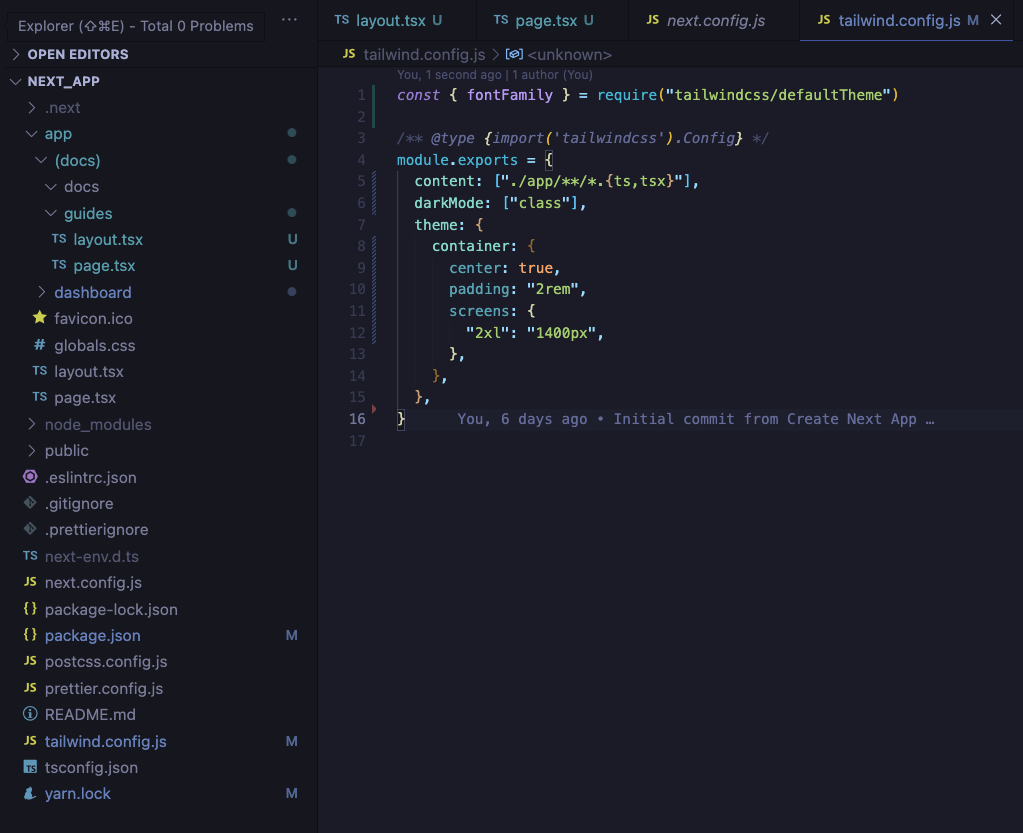
그리고 이전 강의에서 배웠던 layout.tsx, page.tsx를 실제로 tailwind를 이용해 작성해볼텐데요,
먼저 프로젝트 루트에 다음과 같이 tailwind.config.js를 작성합니다.
const { fontFamily } = require("tailwindcss/defaultTheme")

/** @type {import('tailwindcss').Config} */
module.exports = {
  content: [
    "./app/**/*.{ts,tsx}",
  ],
  darkMode: ["class"],
  theme: {
    container: {
      center: true,
      padding: "2rem",
      screens: {
        "2xl": "1400px",
      },
    },
  },
}
app/(docs)guides/layout.tsx와 app/(docs)/guides/page.tsx의 모습입니다.
// app/(docs)guides/layout.tsx
import { ReactNode } from "react"

type LayoutProps = {
  children: ReactNode
}

const Layout = ({ children }: LayoutProps) => {
  return (
    <div className="flex flex-col min-h-screen">
      <header className="bg-primary py-4">
        <div className="container mx-auto">
          {/* Your header content goes here */}
        </div>
      </header>
      <main className="flex-grow container mx-auto">{children}</main>
      <footer className="bg-primary py-4">
        <div className="container mx-auto">
          {/* Your footer content goes here */}
        </div>
      </footer>
    </div>
  )
}

export default Layout
// app/(docs)/guides/page.tsx
const Page = () => {
return (
<div className="py-8">
<h1 className="text-3xl font-bold mb-4">
How to Use Next.js 13 App Directory Catch-All Routes
</h1>
<p className="text-lg">
Next.js 13 introduced a new feature called "app directory catch-all
routes" that allows you to create dynamic routes based on the file
system in the `pages` directory. Here's how you can use it:
</p>
<h2 className="text-2xl font-bold mt-8 mb-4">
Step 1: Create the App Directory
</h2>
<p className="text-lg">
In your Next.js project, create a new directory called `app` in the root
directory. This is where you'll define your app-specific pages and
catch-all routes.
</p>
<h2 className="text-2xl font-bold mt-8 mb-4">
Step 2: Define the Catch-All Route
</h2>
<p className="text-lg">
Inside the `app` directory, create a file named `[...slug].js` (or
`[...slug].tsx` if you're using TypeScript). This file will act as the
catch-all route and handle all dynamic routes under the `app` directory.
</p>
<p className="text-lg">
Here's an example of how you can define the catch-all route file:
</p>
<pre className="bg-gray-200 p-4 rounded-lg mt-4">
<code className="text-sm font-mono text-gray-800">
{`// pages/app/[...slug].js\n\n`}
{`import React from "react";\n\n`}
{`const AppPage = ({ query }) => {\n`}
{` // Access the dynamic route parameters from the query object\n`}
{` const { slug } = query;\n\n`}
{` return (\n`}
{` <div>\n`}
{` <h1>{slug.join("/")}</h1>\n`}
{` {/* Render your app-specific content here */}\n`}
{` </div>\n`}
{` );\n`}
{`};\n\n`}
{`export default AppPage;\n`}
</code>
</pre>
<h2 className="text-2xl font-bold mt-8 mb-4">
Step 3: Accessing the Dynamic Route Parameters
</h2>
<p className="text-lg">
Inside the catch-all route file, you can access the dynamic route
parameters by destructuring the `query` object passed as a prop to the
page component. In the example above, we're accessing the `slug`
parameter, which will be an array of path segments. You can use it to
render your app-specific content dynamically based on the route.
</p>
<h2 className="text-2xl font-bold mt-8 mb-4">
Step 4: Add Content and Functionality
</h2>
<p className="text-lg">
You can now add your app-specific content and functionality within the
catch-all route component. This can include fetching data, rendering
components, and handling user interactions.
</p>
<h2 className="text-2xl font-bold mt-8 mb-4">Step 5: Test and Deploy</h2>
<p className="text-lg">
Once you've defined your catch-all route and added your app-specific
content, you can test it locally by running your Next.js app. You can
navigate to different dynamic routes under the `app` directory and see
the content rendered dynamically.
</p>
<p className="text-lg">
When you're ready, you can deploy your Next.js app with the catch-all
routes to a hosting provider of your choice. Make sure your hosting
provider supports Next.js 13 or later.
</p>
<p className="text-lg mt-8">
That's it! You've successfully set up and used Next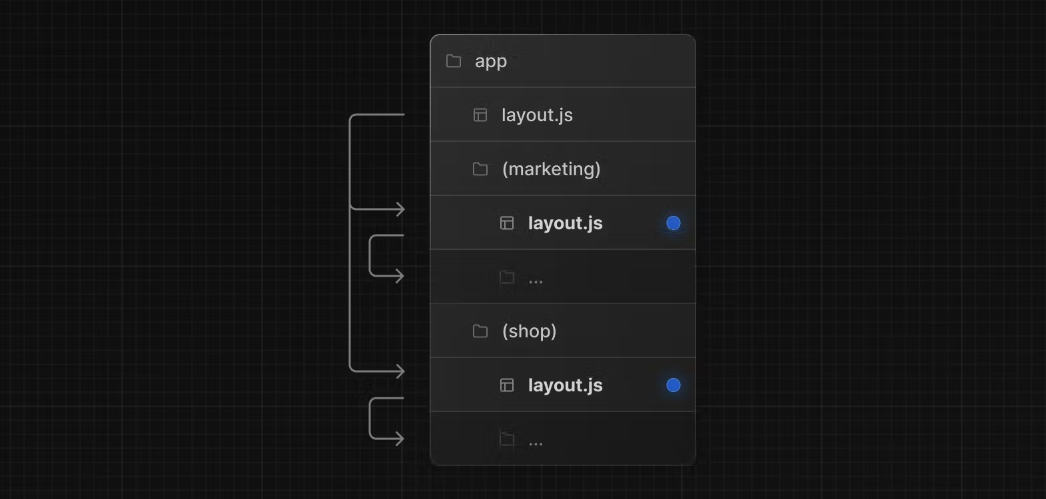
.js 13 app directory
catch-all routes. You can now create dynamic routes under the `app`
directory and render app-specific content based on those routes.
</p>
</div>
)
}
export default Page
page.tsx에서는 아래에서 배울 catch all routes에 대한 내용을 담아보았습니다.📝📝📝
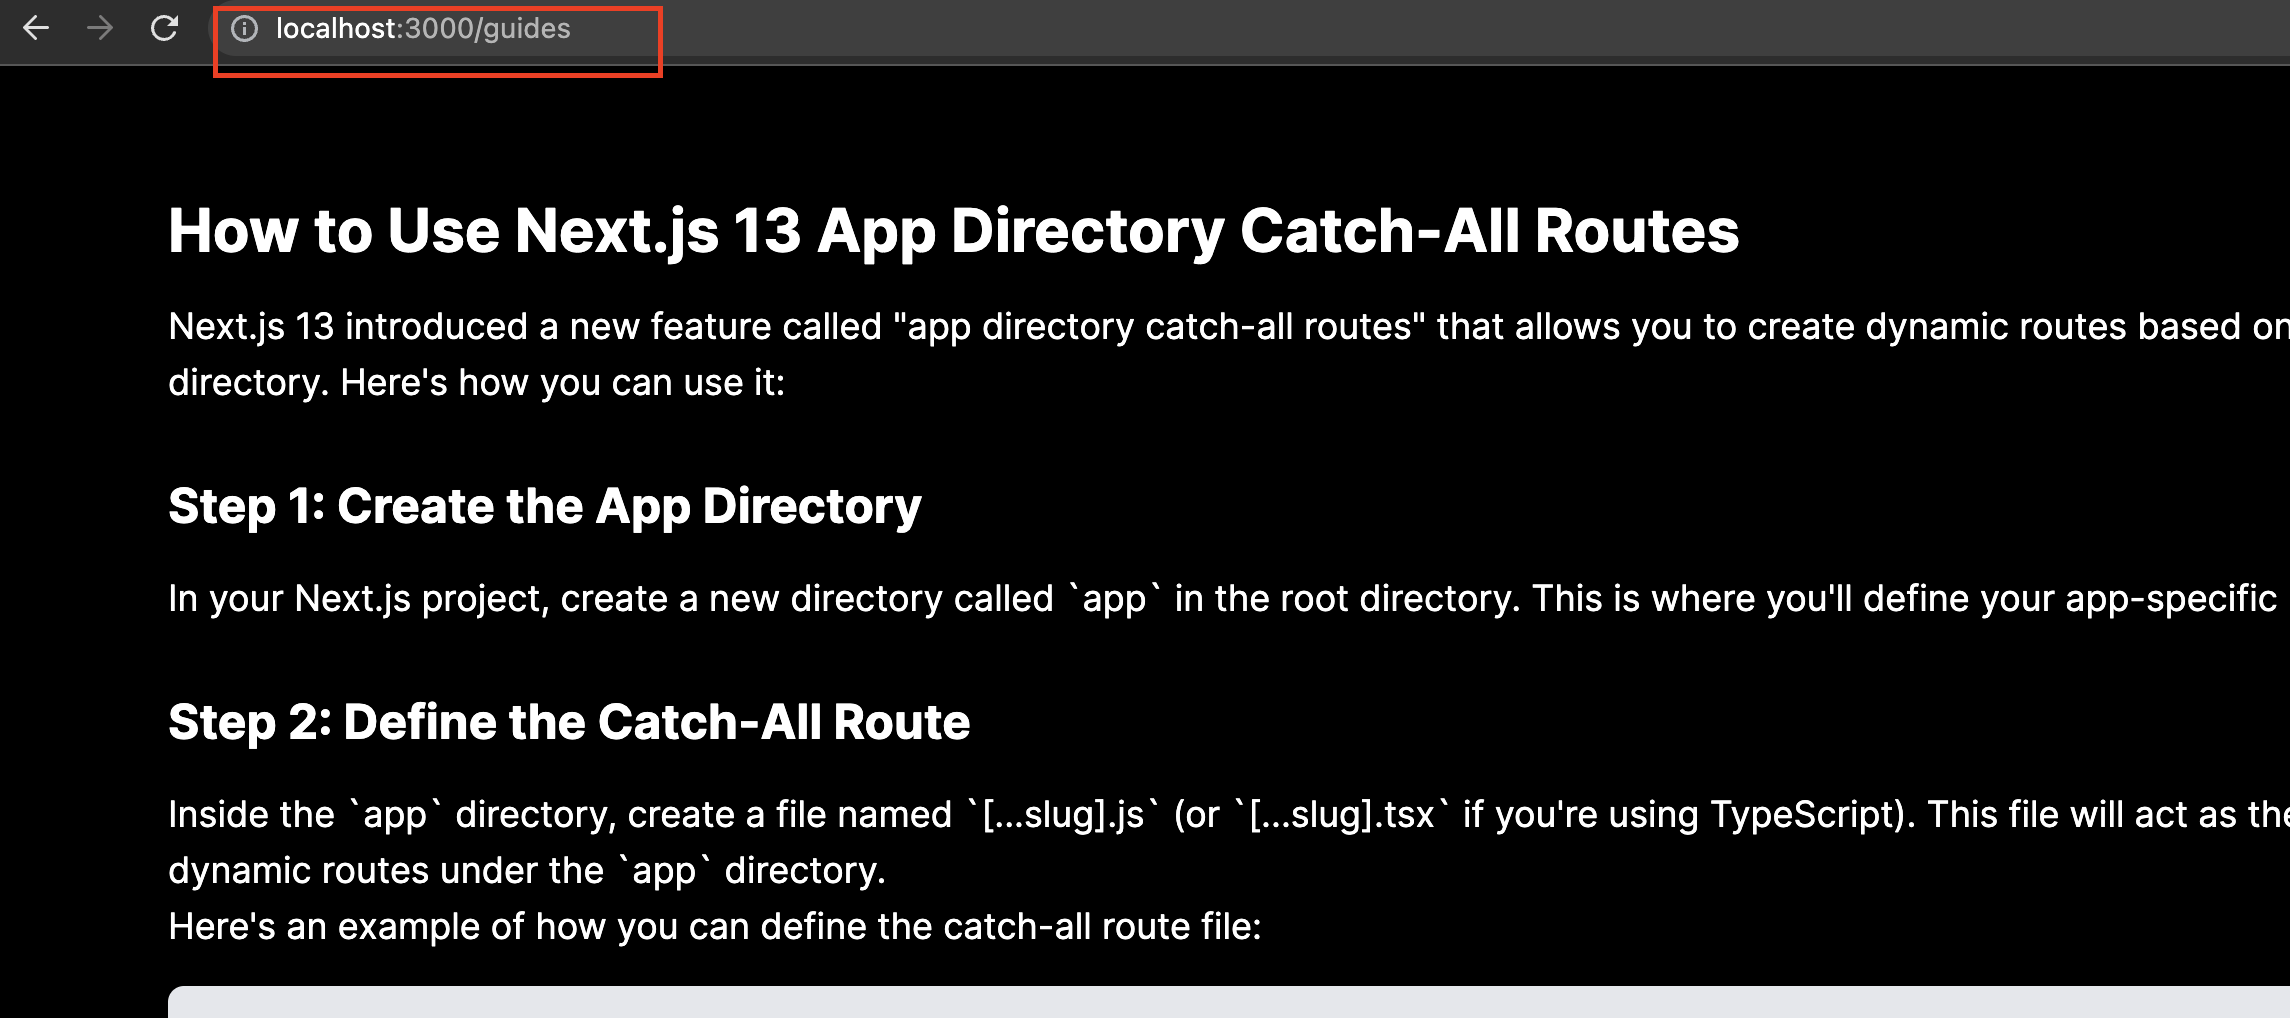
이렇게 작성을 한 후 localhost:3000/guides로 접속해보면, (docs) 하위 폴더에 생겼음에도 불구하고 url path에는 라우팅 그룹이 노출되지 않음을 알 수 있습니다.
왜 사용할까요?
앞서서도 이야기헀지만 라우팅 그룹의 장점에 대해 다시 이야기해보겠습니다.
예를 들어 개발자가 인증이나 사용자 관리와 같이 대쉬보드와 같은 앱의 주요 기능과는 다른 구성요소에 대해 작업해야할 수 있습니다. 이런 경우 라우팅 그룹을 사용하면 코드를 체계적이고 모듈식으로 유지하여 탐색과 유지관리를 용이하게 할 수 있습니다.
또한 동일한 url path 계층을 가지고 있더라도 완전히 다른 layout을 구성할 수 있게 도와줍니다.
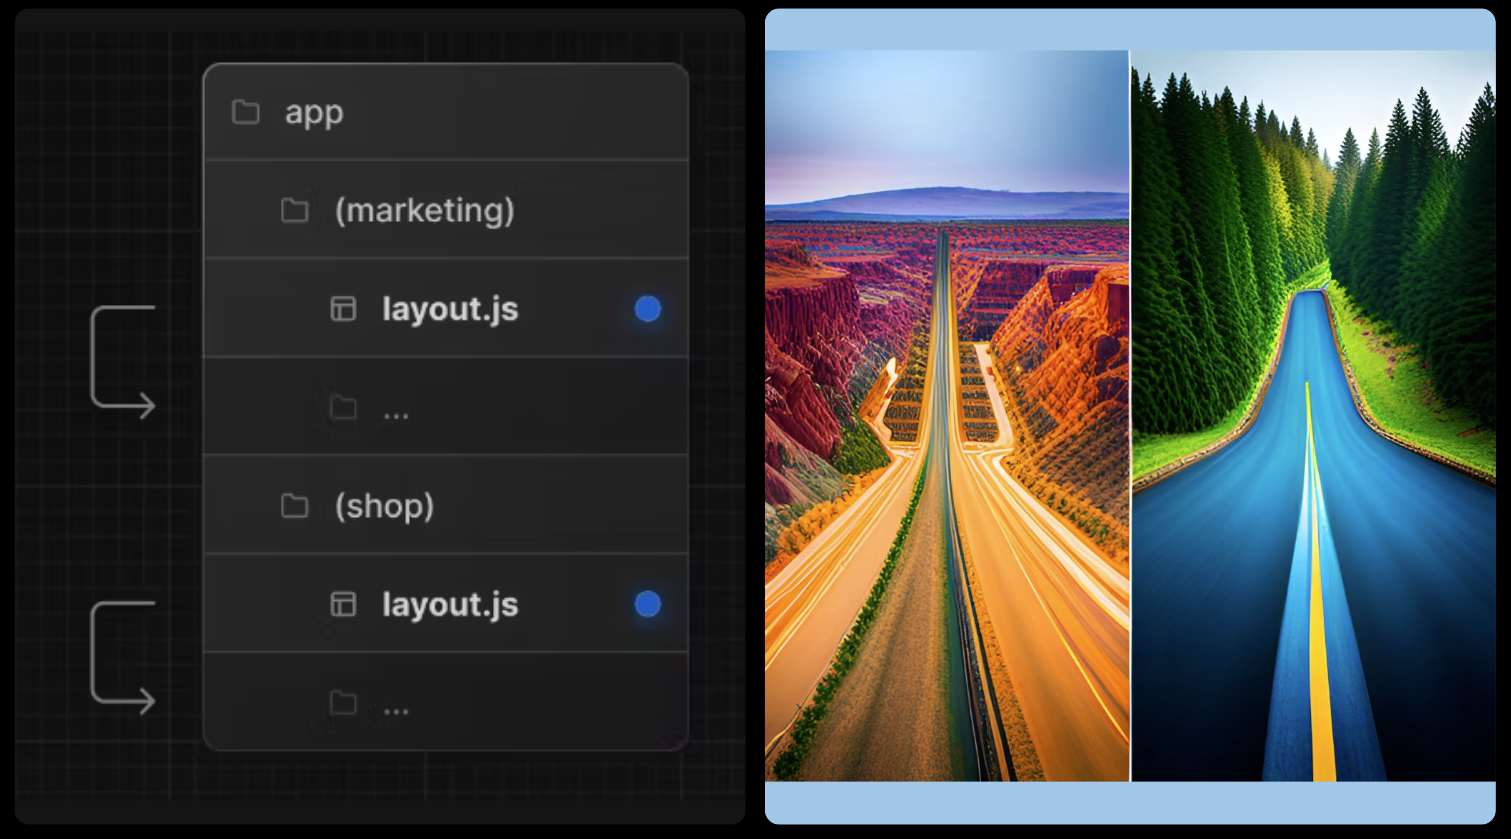
위 그림에서 (marketing)과 (shop)은 모두 동일한 계층의 url path를 가지고 있으나 필요에 따라 완전히 다른 layout.js를 적용시킬 수 있습니다.
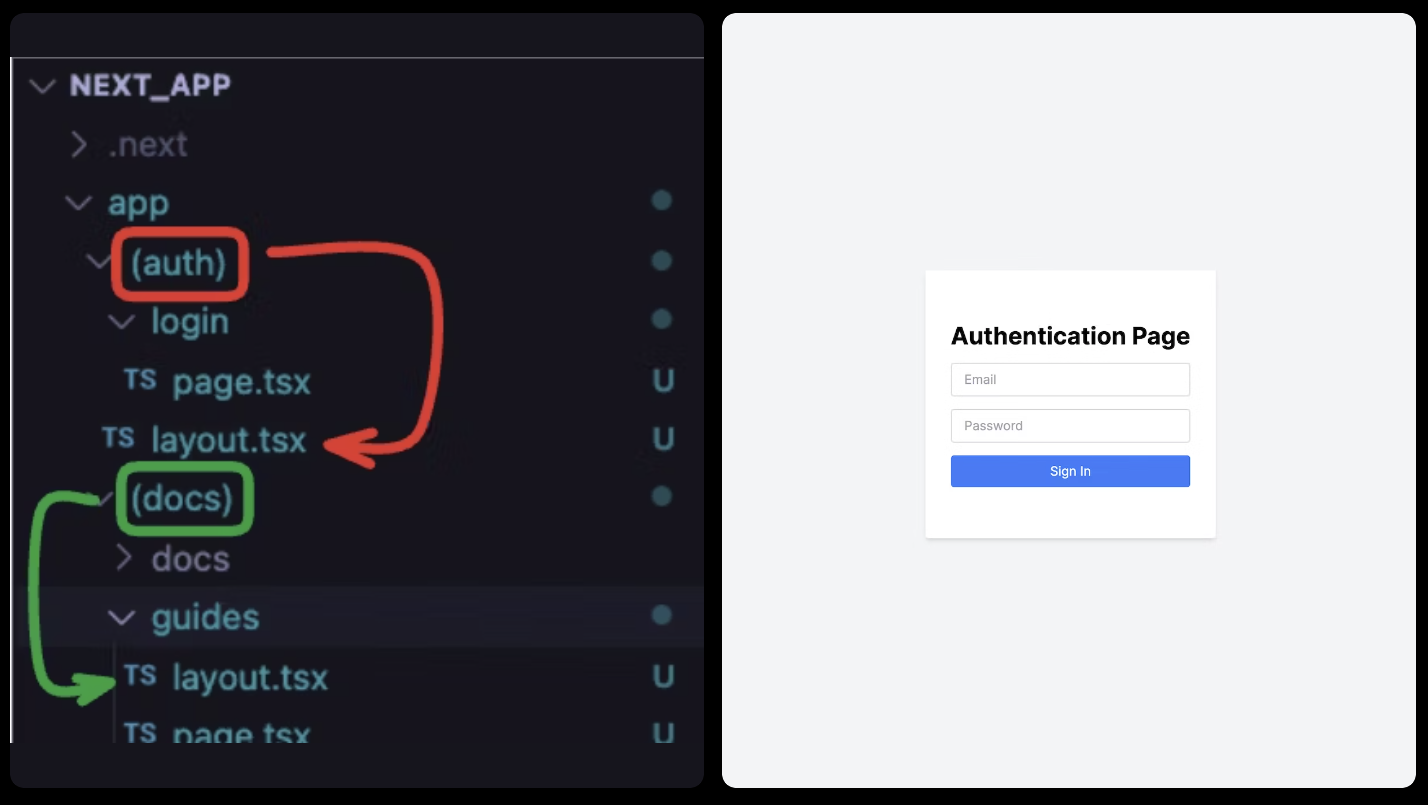
위와 같이 (auth) 그룹 라우팅을 만들고 그 아래 login 세그먼트를 만들었습니다.
app/(auth)/login/page.tsx에서 만든 페이지는 localhost:3000/login 으로 접속이 가능해질 것입니다.
// app/(auth)/layout.tsx
import { ReactNode } from "react"

type LayoutProps = {
  children: ReactNode
}

const AuthLayout = ({ children }: LayoutProps) => {
  return (
    <div className="flex flex-col min-h-screen items-center justify-center bg-gray-100 text-black">
      <div className="bg-white p-8 rounded shadow-md">{children}</div>
    </div>
  )
}

export default AuthLayout
// app/(auth)/login/layout.tsx

const AuthPage = () => {
  return (
    <div className="py-8">
      <h1 className="text-3xl font-bold mb-4">Authentication Page</h1>
      <div className="flex flex-col space-y-4">
        <input
          type="email"
          placeholder="Email"
          className="px-4 py-2 border border-gray-300 rounded"
        />
        <input
          type="password"
          placeholder="Password"
          className="px-4 py-2 border border-gray-300 rounded"
        />
        <button className="px-4 py-2 bg-blue-500 text-white rounded">
          Sign In
        </button>
      </div>
    </div>
  )
}

export default AuthPage
페이지 네비게이션
Next.js의 네비게이션은 똑똑하게 동작하여 페이지 전체를 다시 리렌더링 하는 작업을 최소화 합니다.
페이지간 네비게이션 하는 작업은 크게 두 가지 도구를 통해 수행할 수 있습니다.
- Link Component
- useRouter hook
Link Component
<img width="600px"src="https://velog.velcdn.com/images/jay/post/89dad4ae-8196-4676-931d-26282b3f53b7/image.png" alt="link each region" />
<Link> 컴포넌트는 a 태그를 Next.js에서 래핑한 컴포넌트입니다.
import Link from 'next/link';

export default function Page() {
  return <Link href="/dashboard">Dashboard</Link>;
}
우와 같이 Link 컴포넌트를 사용해 페이지간 이동이 가능합니다.
우리는 root layout에서 각 페이지로 네비게이션을 할 수 있는 헤더 컴포넌트를 만들어 실습해보겠습니다.
app/layout.tsx를 다음과 같이 변경합니다.
root layout에 적용했으니 모든 페이지를 대상으로 적용되겠죠?
import { Inter } from "next/font/google"
import Link from "next/link"
import "./globals.css"

const inter = Inter({ subsets: ["latin"] })

export const metadata = {
  title: "Create Next App",
  description: "Generated by create next app",
}

const links: Array<{ href: string; key: string }> = [
  {
    href: "/",
    key: "home",
  },
  {
    href: "/dashboard",
    key: "dashboard",
  },
  {
    href: "/guides",
    key: "guides",
  },

  {
    href: "/login",
    key: "login",
  },
]

export default function RootLayout({
  children,
}: {
  children: React.ReactNode
}) {
  return (
    <html lang="en">
      <body className={inter.className}>
        {/* <div style={{ color: "orange" }}>/app/layout.tsx 적용</div> */}
        <header>
          <div>
            <ul className="flex bg-slate-500">
              {links.map(({ href, key }) => (
                <li className="flex-auto">
                  <Link href={href} key={key}>
                    {key}
                  </Link>
                </li>
              ))}
            </ul>
          </div>
        </header>
        {children}
      </body>
    </html>
  )
}
이 중 아래 부분은 무시합니다. 폰트와 메타데이터를 변경하기 위해 적용한 것으로 나중에 알아보겠습니다.
const inter = Inter({ subsets: ["latin"] })
export const metadata = {
title: "Create Next App",
description: "Generated by create next app",
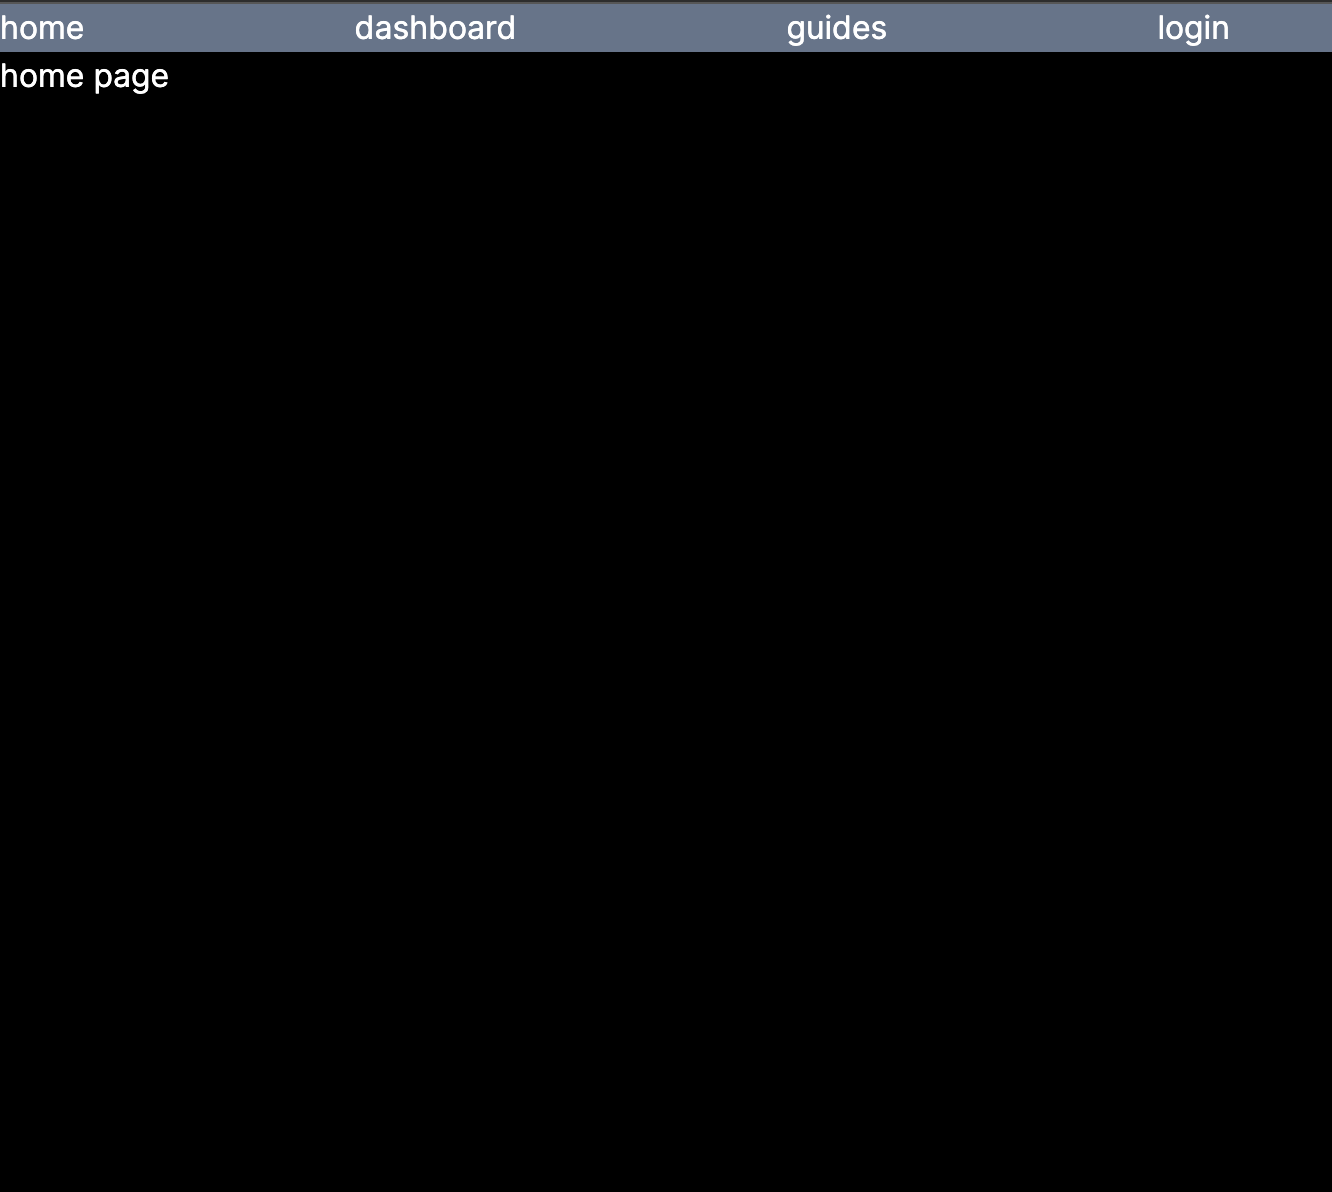
}app/page.tsx는 이렇게 생겼습니다.
export default function Home() {
  return <div>home page</div>
}
각 파일을 수정후 / url path로 이동하니 아래와 같이 헤더가 생겼습니다.
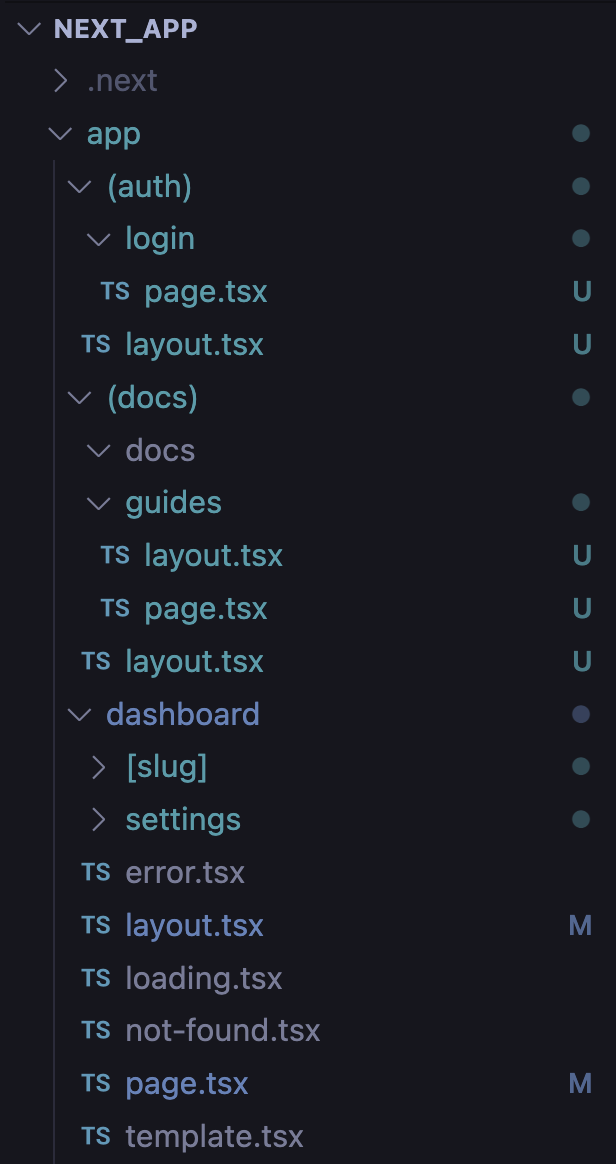
현재까지의 프로젝트 디렉토리의 모습입니다.
prefetch가 동작하는지 살펴보겠습니다. Link 컴포넌트에 클릭 이벤트를 발생시키지 않고 호버링만 했는데도, 해당 페이지에서 사용하는 파일을 미리 다운로드 받아올 수 있습니다.
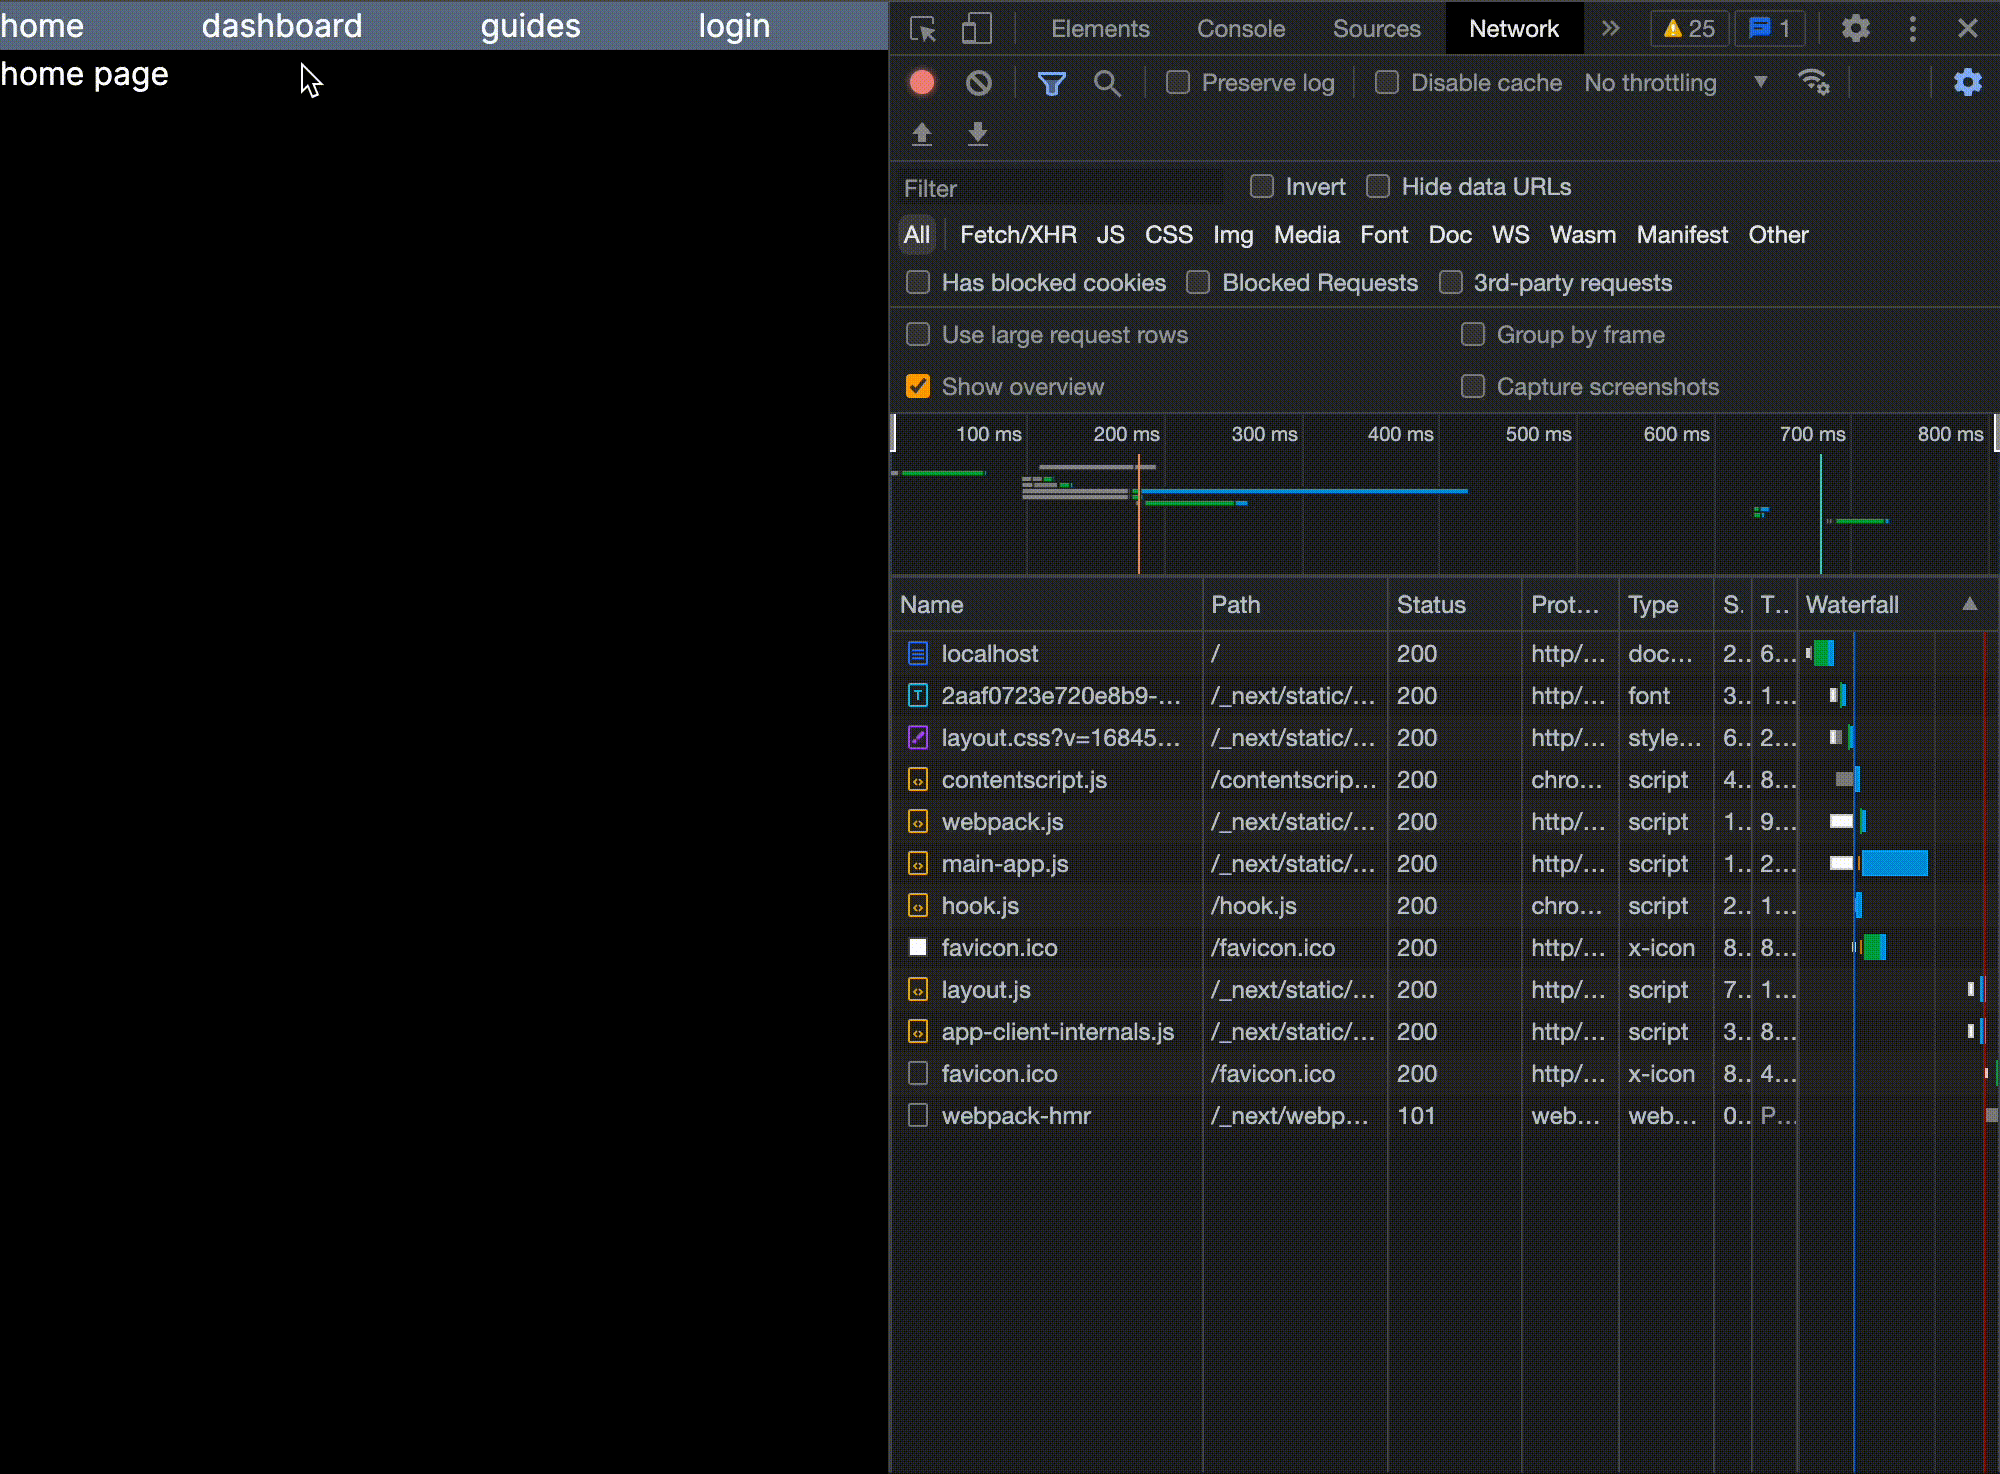
Link 태그에 호버를 했을 때 각 페이지를 실행시키기 위한 정적 파일 리소스 다운로드가 네트워크 탭에 쌓이는 모습
usePathname
필수적으로 알아야 할 api는 아닙니다만 현재 우리 페이지는
루트 레이아웃 파일을 직접 보지 않는 한 어느 링크 태그가 동작한 상태인지 알기 어렵습니다.
현재 어떤 링크를 사용하고 있는지 tailwind와 usePathname을 통해 표기해보겠습니다.
usePathname은 현재 접속중인 url path의 이름을 알려주는 훅입니다. 사용해보겠습니다.
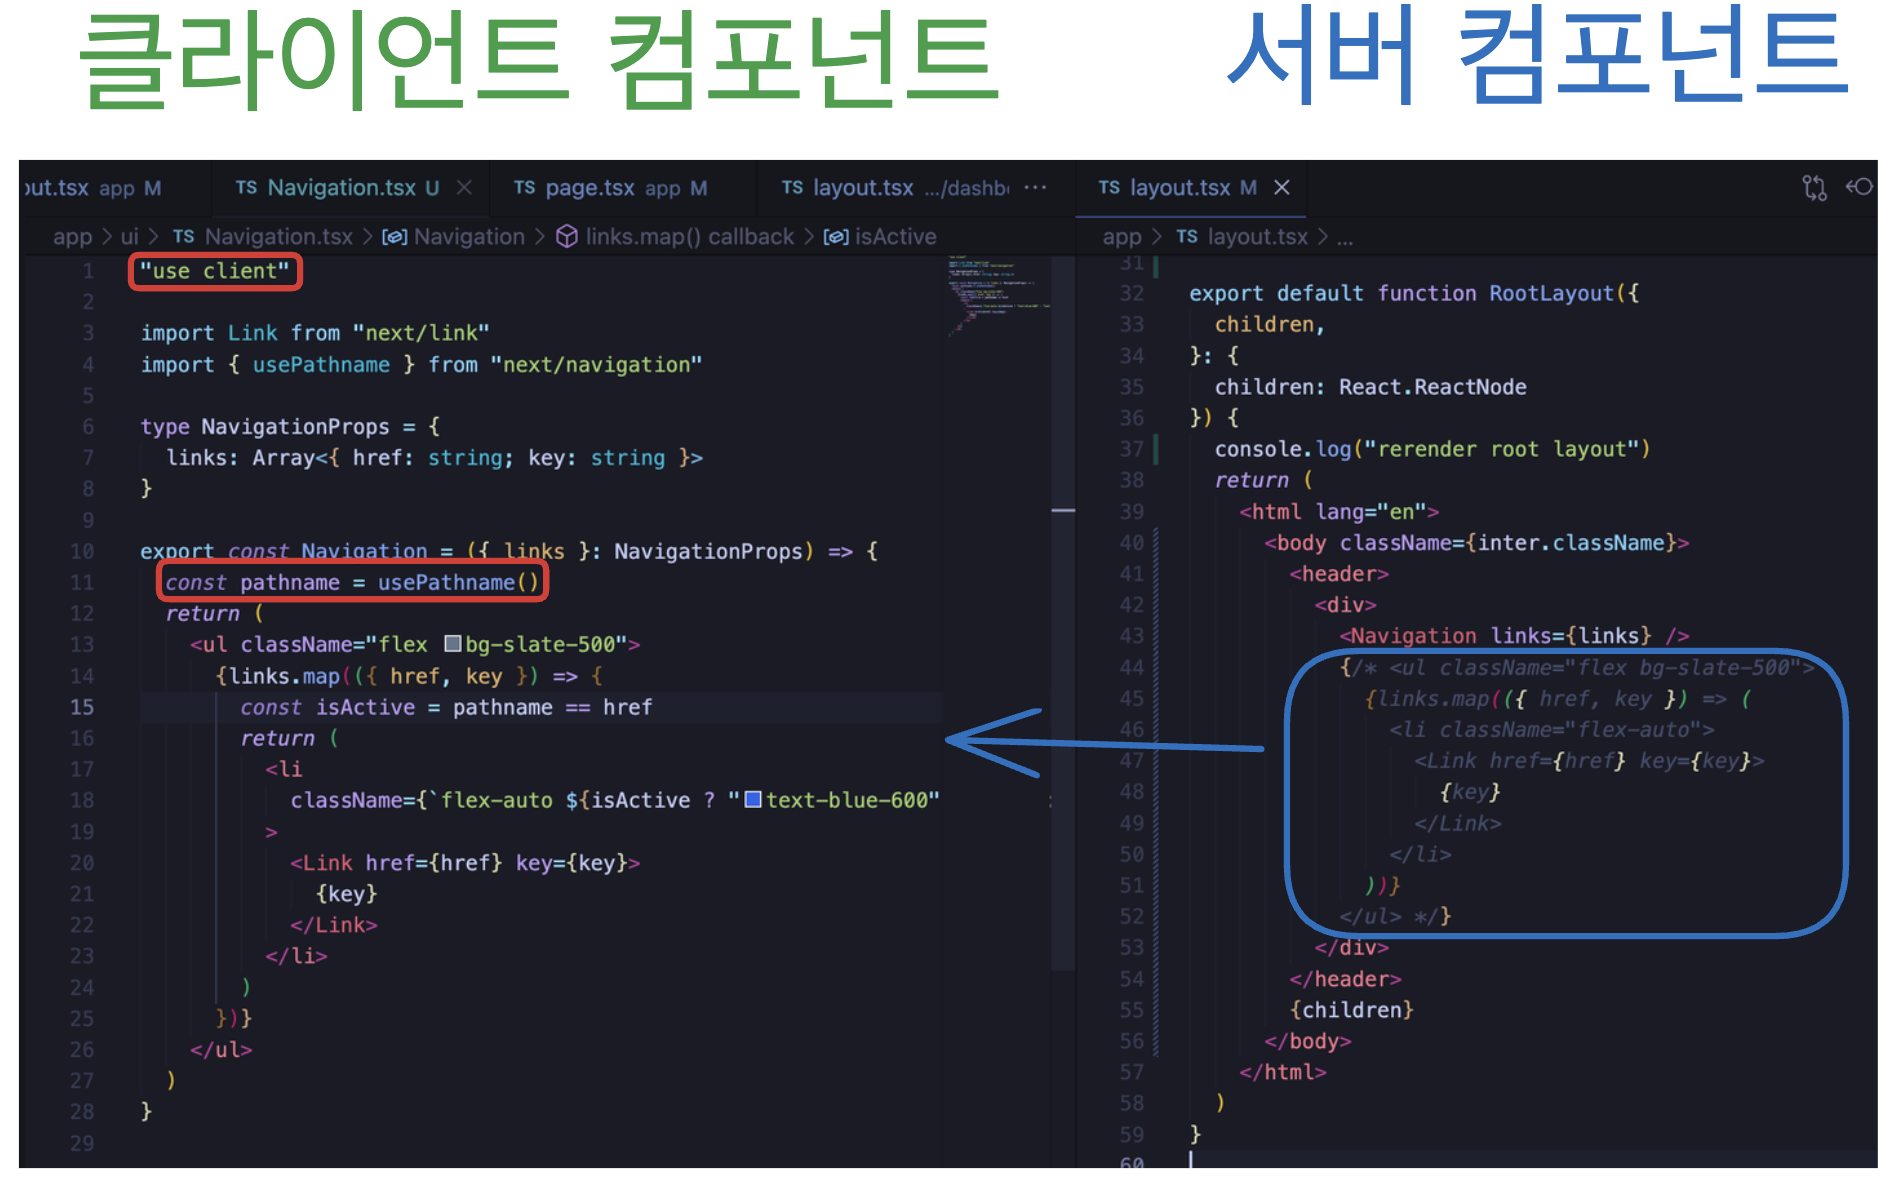
app 디렉토리 하위에 ui 디렉토리를 만들었습니다. 우리가 사용하는 클라이언트 컴포넌트는 ui 디렉토리에 생성할 것입니다. url path로 사용할 것이 아니고 클라이언트 컴포넌트를 저장할 디렉토리로 사용할 것이기 때문에 세그먼트라고 부르지 않고 디렉토리라고 부릅니다.
app/ui/Navigation.tsx 파일을 생성합니다.
"use client"

import Link from "next/link"
import { usePathname } from "next/navigation"

type NavigationProps = {
  links: Array<{ href: string; key: string }>
}

export const Navigation = ({ links }: NavigationProps) => {
  const pathname = usePathname()
  return (
    <ul className="flex bg-slate-500">
      {links.map(({ href, key }) => {
        const isActive = pathname == href
        return (
          <li
            className={`flex-auto ${isActive ? "text-blue-600" : "text-white"}`}
          >
            <Link href={href} key={key}>
              {key}
            </Link>
          </li>
        )
      })}
    </ul>
  )
}
여기서 🔥생소한 키워드🔥가 등장했습니다.
"use client";는 next.js에게 이 컴포넌트가 서버 컴포넌트가 아니라 클라이언트 컴포넌트라는 것을 알려줍니다.
use*로 시작하는 리엑트 훅은 이 클라이언트 컴포넌트 내부에서만 사용되어야 하며 서버 컴포넌트에서는 실행시킬 수 없습니다.
usePathname을 통해 현재 pathname을 확인하고 방문한 페이지의 url path가 동일할 때 링크의 색상을 다르게 해주었습니다.
그리고 기존에 링크 컴포넌트들이 있던 root/layout.tsx에서는 위 클라이언트 컴포넌트를 가져다가 사용하는 코드로 수정하겠습니다. 주석친 부분은 Navigation.tsx로 옮겨간 부분입니다.
...


export default function RootLayout({
  children,
}: {
  children: React.ReactNode
}) {
  console.log("rerender root layout")
  return (
    <html lang="en">
      <body className={inter.className}>
        <header>
          <div>
            <Navigation links={links} />
            {/* <ul className="flex bg-slate-500">
              {links.map(({ href, key }) => (
                <li className="flex-auto">
                  <Link href={href} key={key}>
                    {key}
                  </Link>
                </li>
              ))}
            </ul> */}
          </div>
        </header>
        {children}
      </body>
    </html>
  )
}
useRouter()
앞서 설명했듯이 useRouter는 리엑트 훅이기 떄문에 클라이언트 컴포넌트에서만 사용이 가능합니다.
useRouter는 push나 refresh와 같은 api를 사용할 수 있습니다.
Link 태그가 선언적인 방법으로 페이지간 네비게이션을 가능하게 한다면, useRouter훅을 이용해서는 버튼 클릭 뿐만이 아닌 특정한 상황에서도 페이지 네비게이션을 사용할 수 있게 합니다.
router.push
programmatic한 방법으로 네비게이션을 할 수 있다는 이야기는, Link 태그가 선언적인 방법으로 Link 태그 자체만을 이용해 네비게이션을 수행해야 한다면, useRouter는 router.push를 이용해 필요한 태그 혹은 상황에 맞춰 네비게이션 로직을 적용시킬 수 있다는 말입니다.
다음과 같이 app/ui 하위에 LinkButton.tsx를 만들고 네비게이션 기능을 제공하는 LinkButton을 만들어보겠습니다.
// app/ui/LinkButton.tsx
"use client"

import { useRouter } from "next/navigation"

export default function LinkButton({ to }: { to: string }) {
  const router = useRouter()

  return (
    <button type="button" onClick={() => router.push(to)}>
      Dashboard
    </button>
  )
}
router.replace
클라이언트 사이드 네비게이션을 이용한 라이브러리인 react-router-dom을 사용해보신 분들이라면 useRouter훅에 익숙하실 겁니다.
이러한 useRouter 훅은 내부적으로 history api를 사용하는데 replace는 browser history stack을 쌓지 않아 네비게이션 후 뒤로가기를 눌러도 이전 페이지로 이동되지 않습니다.
router.refresh
현재 라우트를 기준으로 페이지를 새로고침합니다. data도 다시 받아오고 서버컴포넌트도 다시 리렌더링 합니다.
실습
앞서 만들었던 LinkButton을 refresh, replace 할 수 있게 변경한 다음 push, replace, refresh가 어떻게 다른지 테스트 해보겠습니다.
"use client"

import { useRouter } from "next/navigation"

type LinkButtonProps = {
  to: string
  replace?: boolean
  refresh?: boolean
  children: React.ReactNode
}

export default function LinkButton({
  to,
  replace,
  refresh,
  children,
}: LinkButtonProps) {
  const router = useRouter()

  const navigate = replace
    ? router.replace
    : refresh
    ? router.refresh
    : router.push

  return (
    <button
      type="button"
      onClick={() => navigate(to)}
      className="flex-auto m-3"
    >
      {children}
    </button>
  )
}
replace, fresh를 prop로 받습니다.
push
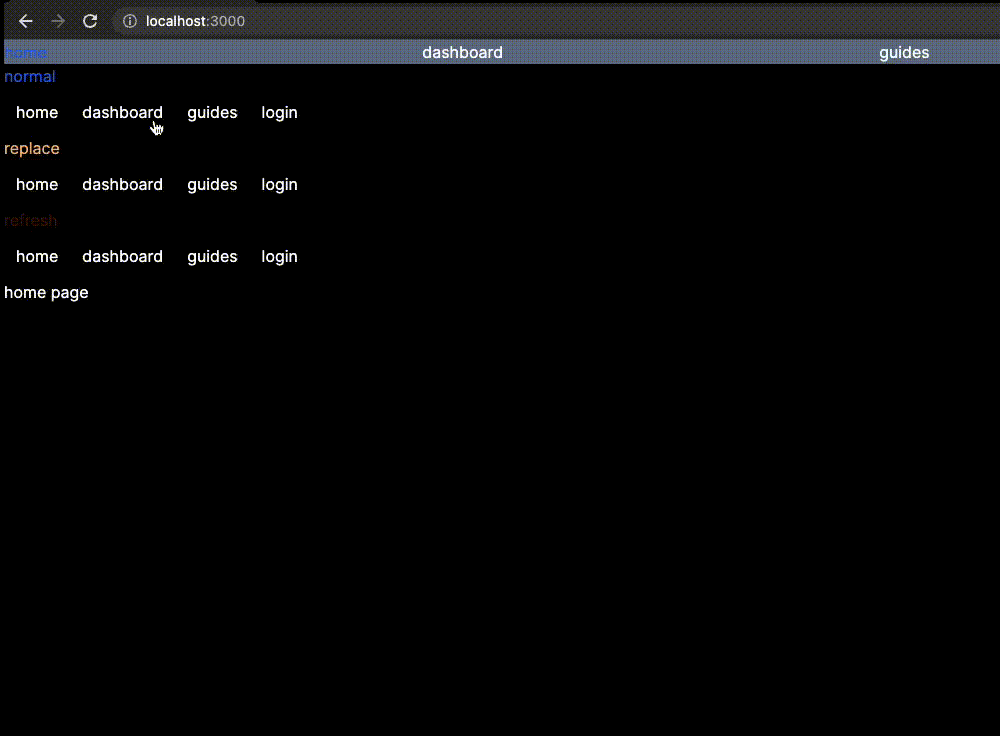
router.push 사용시 history stack이 쌓여 뒤로 가기를 눌러 이전 페이지로 이동할 수 있습니다.
replace
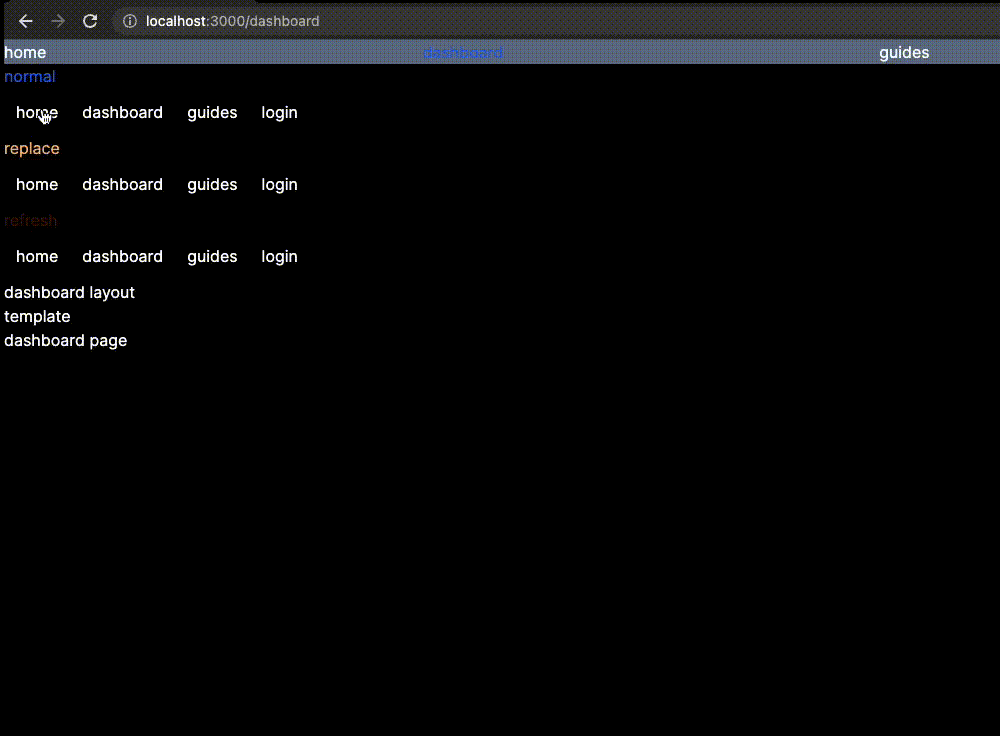
dashboard로 먼저 push로 이동한 후 replace를 눌렀을때 history api stack이 쌓이지 않아 guides등의 이전에 이동한 페이지로 이동하지 않습니다.
refresh

특정 페이지로 이동하지 않고 현 페이지를 유지하며 페이지를 리프레쉬 합니다.
수고하셨습니다.
오늘은 라우팅 그룹과 페이지 네비게이션에 대해 알아보았습니다. 다음 강의에서는 catch all routes와 각 세그먼트에서 생성할 수 있는 special files에 대해 알아보겠습니다. 감사합니다.

마지막에 ui/LinkButton 컴포넌트를 app/layout.tsx에서 어떻게 적용 시켜야 하나요??