
아니 영상이 있다고?!
글을 시작하며
안녕하세요, 단테입니다.
지난 포스팅에서는 css-in-js, css modules를 보며 기존에 존재하던 두 주류 스타일링 기술에 대해 알아보고 css-in-js의 대표 라이브러리 emotion js를 사용하며 겪을 수 있는 불편함에 대해 알아보고 기본적인 vanilla extract style api를 소개했습니다.
오늘은 지난 포스팅에서 전부 못한 styling API 소개와 함께 디자인 시스템 구축을 위한 theme 작성에 어떻게 vanilla extract를 적용할 수 있는지 알아보겠습니다.
styling api
media queries
@media 키 값에 media 쿼리를 한 곳에 모아 작성할 수 있습니다.
import { style } from '@vanilla-extract/css';

const myStyle = style({
  '@media': {
    'screen and (min-width: 768px)': {
      padding: 10
    },
    '(prefers-reduced-motion)': {
      transitionProperty: 'color'
    }
  }
});
위 코드는 아래처럼 변환됩니다. vanilla extract에서 작성하는 미디어쿼리는 파일의 제일 마지막에 추가되기 때문에 다른 스타일보다 우선순위가 높게 적용됩니다.
@media screen and (min-width: 768px) {
  .styles_myStyle__1hiof570 {
    padding: 10px;
  }
}
@media (prefers-reduced-motion) {
  .styles_myStyle__1hiof570 {
    transition-property: color;
  }
}
selectors
vanilla extract의 selector는 두 가지의 형태가 있습니다.
simple pseudo selectors
hoverf, first-of-type, before과 같은 간단한 pseudo selector는 style 함수 내부에서 1-depth level로 선언할 수 있습니다.
import { style } from '@vanilla-extract/css';

const myStyle = style({
  ':hover': {
    color: 'pink'
  },
  ':first-of-type': {
    color: 'blue'
  },
  '::before': {
    content: ''
  }
});
.styles_myStyle__1hiof570:hover {
color: pink;
}
.styles_myStyle__1hiof570:first-of-type {
color: blue;
}
.styles_myStyle__1hiof570::before {
content: "";
}complex
복잡한 형태의 selector는 selectors 키 값에서 선언할 수 있습니다.
style 태그 내부에서 사용되는 selector는 단일 엘리먼트를 대상으로 작성되어야 하며 current element를 의미하는 & 글자와 함께 사용되어야 합니다.
// styles.css.ts
import { style } from '@vanilla-extract/css';

const link = style({
  selectors: {
    '&:hover:not(:active)': {
      border: '2px solid aquamarine'
    },
    'nav li > &': {
      textDecoration: 'underline'
    }
  }
});
// css
.styles_link__1hiof570:hover:not(:active) {
border: 2px solid aquamarine;
}
nav li > .styles_link__1hiof570 {
text-decoration: underline;
}편리한 점은, 이전에 미리 선언해둔 부모 클래스를 selector 내부에서 변수 참조할 수 있다는 점이며
import { style } from '@vanilla-extract/css';

export const parent = style({});

export const child = style({
  selectors: {
    [`${parent}:focus &`]: {
      background: '#fafafa'
    }
  }
});
한 가지 조심해야 하는 점은 selectors에 선언한 구문의 타겟 엘리먼트가 현재 엘리먼트가 아닌 다른 엘리먼트를 가르키는 경우는 유효하지 않는 selector로 간주됩니다.
import { style } from '@vanilla-extract/css';

const invalid = style({
  selectors: {
    // ❌ ERROR: Targetting `a[href]`
    '& a[href]': {...},

    // ❌ ERROR: Targetting `.otherClass`
    '& ~ div > .otherClass': {...}
  }
});
아래 예제에서 보듯이 child 엘리먼트를 대상으로 한 selector를 작성하고 싶을 경우
parent에서 selector를 작성하는 것이 아닌, child 클래스 변수에서 parent를 참조하는 방식으로 selector를 작성해야 합니다.
import { style } from '@vanilla-extract/css';

// Invalid example:
export const child = style({});
export const parent = style({
  selectors: {
    // ❌ ERROR: Targetting `child` from `parent`
    [`& ${child}`]: {...}
  }
});

// Valid example:
export const parent = style({});
export const child = style({
  selectors: {
    [`${parent} &`]: {...}
  }
});
만약 특정 클래스가 아닌 일반적인 a 태그를 선택하고 싶다면, globalStyle 을 사용해야 합니다.
import { style, globalStyle } from '@vanilla-extract/css';

export const parent = style({});

globalStyle(`${parent} a[href]`, {
  color: 'pink'
});
// css
.styles_parent__1hiof570 a[href] {
color: pink;
}cross browsing
특정 브라우저에서 동작하지 않는 css 속성에 fallback style를 작성하고 싶을 경우 다음과 같이 array형식으로 선언합니다.
import { style } from '@vanilla-extract/css';

export const myStyle = style({
  // In Firefox and IE the "overflow: overlay" will be
  // ignored and the "overflow: auto" will be applied
  overflow: ['auto', 'overlay']
});
이는 아래처럼 변환됩니다. 브라우저에서 이해할 수 없는 css 속성은 무시되기 때문에 overlay를 이해할 수 없는 Firefox, IE에서는 둘째줄이 무시됩니다.
// css
.styles_myStyle__1hiof570 {
  overflow: auto;
  overflow: overlay;
}
Theming
테마는 확장 가능한 스타일 규약을 미리 정의해두는 것입니다. 이를 테면 primary라는 색상은 light theme에서는 #000000 색상이 될 수 있지만 dark theme에서는 #ffffff가 될 수도 있는 것이지요. 즉 특정 테마를 하나 추가한다고 했을 때 테마에 정의해둔 색상 변수들은 새로운 테마의 색상들과 일대일 매칭되며 light theme에 borderColor라는 색상이 추가된다면 dark theme에도 borderColor라는 색상이 존재해야 합니다.
이전 포스팅에서 emotion을 이용해 간단한 light theme를 작성했습니다. 가장 간단한 예시로 color, 그리고 response 구간을 결정하는 device 테마 값을 정의했으며 이를 emotion의 styled api를 사용해 template literal 구문에서 달러 사인($)을 이용해 변수 참조했습니다.
vanilla extract에서는 어떻게 테마 시스템을 정의할 수 있을까요?
createTheme
vanilla extract에서는 테마를 만드는 가장 직관적인 api인 createTheme를 제공합니다.
createTheme은 global scope에 css variables를 선언하는 것과 동일한 역할을 합니다.
다음 예제 코드를 보면 createTheme으로 선언한 스타일이 실제 css로 어떻게 변환되는지를 볼 수 있습니다.
// theme.css.ts
import { createTheme } from '@vanilla-extract/css';

export const [themeClass, vars] = createTheme({
  color: {
    brand: 'blue'
  },
  font: {
    body: 'arial'
  }
});
위 코드는 아래와 같이 변환됩니다.
.theme_themeClass__z05zdf0 {
  --color-brand__z05zdf1: blue;
  --font-body__z05zdf2: arial;
}
theme contract
이렇게 선언된 테마는 vars 변수로 외부에서 참조될 수 있으며, 또 다른 스타일을 선언하는데 사용되기도 합니다.
export const brandText = style({
  color: vars.color.brand,
  fontFamily: vars.font.body
});
.theme_brandText__z05zdf3 {
color: var(--color-brand__z05zdf1);
font-family: var(--font-body__z05zdf2);
}brandText와 같은 type scale(typography style 종류)의 일종을 선언하는 예시 코드를 위에서 볼 수 있습니다.
위에서 vars 변수를 사용해 color style을 입히는 것을 볼 수 있는데요, 여기서 vars는 vanilla extract에서 theme contract라고 부릅니다. compile된 js는 아래와 같은 모습을 띕니다.
import './theme.css';

export const vars = {
  color: {
    brand: 'var(--color-brand__l520oi1)'
  },
  font: {
    body: 'var(--font-body__l520oi2)'
  }
};

export const themeClass = 'theme_themeClass__l520oi0';
근데 왜 theme contract라고 부를까요? 그 이유는 앞서 선언한 vars 변수가 또 다른 theme를 선언할 때 사용되기 때문입니다.
밑에서 새롭게 만들어진 otherThemeClass는 앞서 선언한 themeClass의 변수와 다른 이름을 가진 변수를 생성하는 것이 아닌 동일한 이름의 css variable에 다른 값을 가지게 됩니다.
import { createTheme } from '@vanilla-extract/css';

export const [themeClass, vars] = createTheme({
  color: {
    brand: 'blue'
  },
  font: {
    body: 'arial'
  }
});

export const otherThemeClass = createTheme(vars, {
  color: {
    brand: 'red'
  },
  font: {
    body: 'helvetica'
  }
});
.theme_themeClass__z05zdf0 {
--color-brand__z05zdf1: blue;
--font-body__z05zdf2: arial;
}
.theme_otherThemeClass__z05zdf3 {
--color-brand__z05zdf1: red;
--font-body__z05zdf2: helvetica;
}theme contract를 사용하게 되면 누락된 테마 키/밸류를 추적할 수 있어 도움이 됩니다.
위에서 선언한 themeClass와 otherThemeClass는 아래와 같이 js로 컴파일 됩니다.
/ Example result of the compiled JS
import './theme.css';

export const vars = {
  color: {
    brand: 'var(--color-brand__l520oi1)'
  },
  font: {
    body: 'var(--font-body__l520oi2)'
  }
};

export const themeClass = 'theme_themeClass__l520oi0';

export const otherThemeClass =
  'theme_otherThemeClass__l520oi3';
theme code splitting?
css도 코드 스플리팅이 필요하다는 사실 알고 계셨나요?
createTheme api를 사용해서 간편하게 theme를 선언할 수 있으나 단순함과 비교되는 하나의 트레이드 오프가 있습니다.
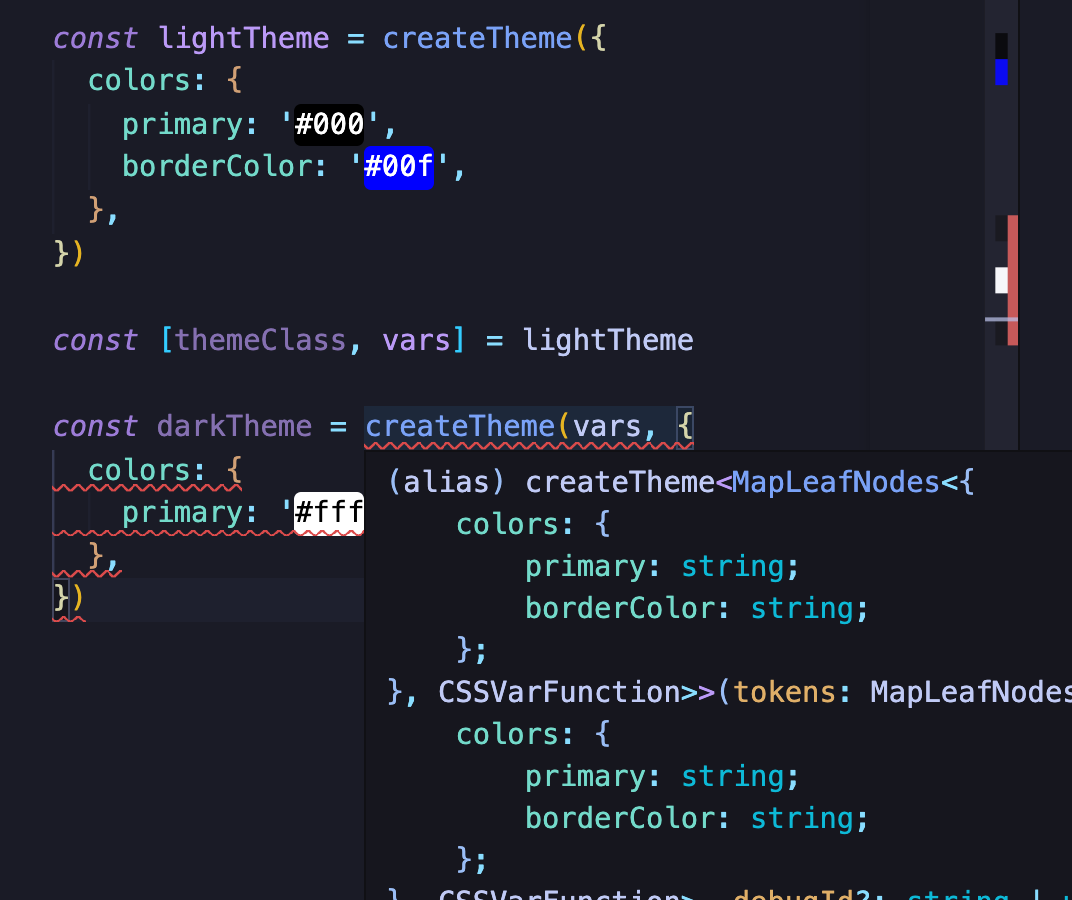
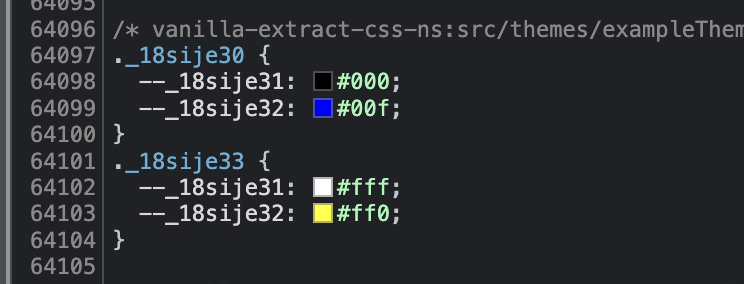
createTheme를 사용해 vanilla theme (제가 방금 만들어낸 말입니다.)를 먼저 만들었다면,
여기서 사용된 theme contract를 사용해 다른 테마를 생성하기 위해서는 이 바닐라 테마를 항상 참조시켜야 합니다. light theme, dark theme 둘 중 하나만 사용하는 앱도 바닐라 테마에 해당하는 css를 항상 앱에서 로딩시켜야 한다는 단점이 있는 것입니다.
다음처럼 darkTheme만 사용하여 스타일링을 하더라도 lightTheme에 선언했던 스타일까지 함께 불러와지는 것을 볼 수 있습니다.
createThemeContract
이러한 문제점을 피하고 싶다면, createThemeContract api를 사용할 수 있습니다.
createTheme를 통해 선언된 코드로 인해 css가 생성됨과는 다르게 createThemeContract는 css를 생성하지 않습니다. 정적 타이핑을 위한 contract를 만든다고 생각할 수 있습니다.
import { createThemeContract } from '@vanilla-extract/css';

export const vars = createThemeContract({
  color: {
    brand: ''
  },
  font: {
    body: ''
  }
});
No CSS created - 위의 vars를 생성하더라도 아무런 css도 생성되지 않습니다.
createThemeContract로 파생된 theme contract를 사용해 생성한다면 바닐라 테마로 만들었던 darkTheme와 다르게 앱에서 사용되는 특정 테마만 css 코드에 포함시킬 수 있게 됩니다.
예제 코드를 통해 살펴보겠습니다.
먼저 createThemeContract로 theme를 생성할때 사용할 theme contract를 만듭니다. createTheme를 사용해 만들었던 바닐라 테마와는 다르게 스타일 값을 사용한 것이 아닌 타입 추론만 가능하게 '' 값만 넣은 것을 알 수 있습니다.
// createThemeContract.css.ts
 import { createThemeContract } from '@vanilla-extract/css'

export const vars = createThemeContract({
  colors: {
    primary: '',
    borderColor: '',
  },
})
createThemeContract의 리턴 값인 vars를 사용해 테마를 선언할 때, createTheme에서 누락된 테마가 있는 것을 자동 추론 해주기 때문에 테마를 누락할 염려가 없습니다.

// redTheme.css.ts
import { createTheme } from '@vanilla-extract/css'
import { vars } from './createThemeContract.css'

export const redThemeClass = createTheme(vars, {
  colors: {
    primary: 'red',
    borderColor: 'black',
  },
})
위와 같이 redTheme만 앱에서 사용할 경우 createTheme만 사용할 때와는 다르게 번들링 파일에 redTheme에 대한 스타일 코드만 생성된 것을 확인할 수 있습니다.
css 코드 스플리팅이 정상적으로 적용된 것을 보여줍니다.

Dynamic Theming
vanilla extract의 Themeing 기법 중 가장 재밌는 부분을 소개합니다.
이를테면 사내 디자인 시스템을 만드는 목적 뿐 아니라 여러 테마를 제공하는 특정 컴포넌트의 세트를 제공한다고 가정해봅시다.
이 경우 사용자 정의 테마에 따라 컴포넌트의 스타일만 미리 정의해둔 테마 변수에 따라 결정되고 결정되는 값은 사용자가 정할 수도 있습니다.
이를테면 아래와 같은 CocktailProvider가 있다고 가정합시다.
이 CocktailProvider는 미리 바텐더가 제공하는 기본 레시피도 있지만, 고유의 칵테일 조합법을 가지고 있는 사람또한 손쉽게 칵테일을 제조할 수 있게 도와줍니다.
export const App = () => (
  <CocktailProvider theme={darkTheme()} {...etc}>
    {/* Your Cocktail */}
  </CocktailProvider>
);
사용자가 원하는 칵테일의 색이 기본적으로 제공하는 푸른색의 계열이 아니라면, 다음처럼 컴파일 타임이 아닌 런타임에 유저에게 주입할 수 있는 선택지를 제공해야 합니다.
export const App = () => (
  <CocktailProvider
    theme={darkTheme({
      accentColor: '#7b3fe4',
      accentColorForeground: 'white',
      borderRadius: 'small',
      fontStack: 'system',
      overlayBlur: 'small',
    })}
    {...etc}
  >
    {/* Your App */}
  </CocktailProvider>
);
앞서 봤던 createTheme api나 createThemeContract api는 제로 런타임을 표방하는 vanilla extract에 맞게 빌드 타임에 css를 생성했습니다. 하지만 위와 같이 런타임에 테마 주입이 필요할 경우에는 빌드 타임이 아닌 런타임에 스타일을 생성할 수 있어야 합니다.
동적으로 css variables를 생성하기 위해 @vanilla-extract/dynamic에서는 assignInlineVars api를 제공합니다. 런타임에 생성하지만 라이브러리 자체는 매우 가벼우며 성능 저하를 일으키지 않습니다.
먼저 앞서 봤던 createThemeContract를 이용해 theme contarct를 만들어줍니다.
// theme.css.ts
import {
  createThemeContract,
  style
} from '@vanilla-extract/css';

export const themeVars = createThemeContract({
  color: {
    brand: null
  },
  font: {
    body: null
  }
});

export const container = style({
  background: themeVars.color.brand,
  fontFamily: themeVars.font.body
});
위 코드는 아래와 같이 css로 변환됩니다.
.theme_container__z05zdf2 {
  background: var(--color-brand__z05zdf0);
  font-family: var(--font-body__z05zdf1);
}
이를 Container 컴포넌트에서 사용해보겠습니다.
import { assignInlineVars } from '@vanilla-extract/dynamic';
import { container, themeVars } from './theme.css.ts';

interface ContainerProps {
  brandColor: string;
  fontFamily: string;
}
const Container = ({
  brandColor,
  fontFamily
}: ContainerProps) => (
  <section
    className={container}
    style={assignInlineVars(themeVars, {
      color: { brand: brandColor },
      font: { body: fontFamily }
    })}
  >
    ...
  </section>
);
아직 Container 컴포넌트에 적용되는 color와 font는 정해지지 않았습니다.
ContainerProps에 전달되는 brandColor와 fontFamily에 따라 정해집니다.
const App = () => (
  <Container brandColor="pink" fontFamily="Arial">
    ...
  </Container>
);
글을 마무리 하며
오늘은 vanilla extract의 기본 api들과 theme 생성 시 필요한 api에 대해 살펴보았습니다. 특히 테마를 만드는 부분이 빌드타임/런타임을 유동적으로 선택할 수 있는 부분이 인상적이고 코드 스플리팅을 적용할 수 있는 방법도 제시한다는 점은 매력적인 것 같은데요,
다음 포스팅에서는 실제 vanilla extract에서 제공하는 유틸 함수를 이용해developer experience를 충족시켜 줄 수 있는 부분이 있는지 같이 살펴보겠습니다.
감사합니다 :)