1. JSON이란??
'객체를 표현하는 형식'으로 데이터를 표현한것
껍데기는 필요없고 데이터인 것이다.
변수를 사용하는 이유도 그러했듯이, 웹을 만들고 서비스 하는데에 있어서
정보(자료)를 다루어야 하는 것은 필수적이다.
다른 방식에 비해 가볍고 자바스크립트와 호환성이 높아서 많이 사용된다.
줄글로 표현된 정보의 덩어리다!!!
1.1 JSON 기본 형태
중괄호 안에 "key" & "value"의 형태로 들어가있다.
"value" 값으로 배열이 들어갈 수 있다.
그 배열안에는 객체들로 구성될 수 있다.
{
  "squadName": "슈퍼히어로",
  "members": [
    {
      "name": "아이언맨",
      "age": 29,
      "본명": "토니 스타크"
    },
    {
      "name": "헐크",
      "age": 39,
      "본명": "부르스 배너"
    }
  ]
}
1.2 임의의 JSON 뽑아오기
회원정보를 가져와보자!!
들어가서 '여기'의 숫자를 수정하면 원하는만큼의 데이터가 출력된다.
'{{repeat(10, 여기)}}'
[
  {
    "_id": "61aede73271f746185366b20",
    "index": 0,
    "picture": "http://placehold.it/32x32",
    "age": 35,
    "eyeColor": "brown",
    "name": "Cain Nicholson",
    "gender": "male",
    "company": "NIXELT",
    "email": "cainnicholson@nixelt.com",
    "phone": "+1 (923) 489-3725",
    "address": "207 Townsend Street, Garberville, Vermont, 2378"
  },
  {
    "_id": "61aede7375d228513960410a",
    "index": 1,
    "picture": "http://placehold.it/32x32",
    "age": 30,
    "eyeColor": "green",
    "name": "Ellen Henson",
    "gender": "female",
    "company": "ZILLATIDE",
    "email": "ellenhenson@zillatide.com",
    "phone": "+1 (886) 549-3129",
    "address": "129 Orange Street, Moscow, Louisiana, 7877"
  },
  ...
   ,
  {
    "_id": "61aede7390e141e3b5f809d6",
    "index": 9,
    "picture": "http://placehold.it/32x32",
    "age": 22,
    "eyeColor": "brown",
    "name": "Watkins Stuart",
    "gender": "male",
    "company": "ORBIN",
    "email": "watkinsstuart@orbin.com",
    "phone": "+1 (830) 435-3472",
    "address": "149 Monroe Street, Gilgo, Pennsylvania, 6618"
  }
]
나는 10명의 정보를 가져와봤다.
2. JSON => table로 렌더링
<!DOCTYPE html>
<html lang="ko">
<head>
    <meta charset="UTF-8">
    <meta http-equiv="X-UA-Compatible" content="IE=edge">
    <meta name="viewport" content="width=device-width, initial-scale=1.0">
    <title>renderTable</title>
</head>
<body>
    <table class="table">
        <thead>
            <tr>
                <th>index</th>
                <th>picture</th>
                <th>age</th>
                <th>eyeColor</th>
                <th>name</th>
                <th>gender</th>
                <th>company</th>
                <th>email</th>
                <th>phone</th>
                <th>address</th>
            </tr>
        </thead>
        <tbody></tbody>
    </table>
</body>
</html>
주의할점은, <th>부분은 전부 다 직접 작성해주어야 한다!!!
나는
<tbody></tbody>요 안에다가 정보를 넣어주고 싶다.
2.1 html로는 어떻게 되어있어야 하는가?
<!DOCTYPE html>
<html lang="ko">
<head>
    <meta charset="UTF-8">
    <meta http-equiv="X-UA-Compatible" content="IE=edge">
    <meta name="viewport" content="width=device-width, initial-scale=1.0">
    <title>renderTable</title>
    <link href="https://cdn.jsdelivr.net/npm/bootstrap@5.1.3/dist/css/bootstrap.min.css" rel="stylesheet">
</head>
<body>
    <table class="table table-striped table-hover">
        <thead>
            <tr>
                <th>index</th>
                <th>picture</th>
                <th>age</th>
                <th>eyeColor</th>
                <th>name</th>
                <th>gender</th>
                <th>company</th>
                <th>email</th>
                <th>phone</th>
                <th>address</th>
            </tr>
        </thead>
        <tbody>
      	    <tr>
              <td>o</td>
              <td>"http://placehold.it/32x32"</td>
              <td>35</td>
              <td>"brown"</td>
              <td>"Cain Nicholson"</td>
              <td>"male"</td>
              <td>"NIXELT"</td>
              <td>"cainnicholson@nixelt.com"</td>
              <td>"+1 (923) 489-3725"</td>
              <td>"207 Townsend Street, Garberville, Vermont, 2378"</td>
            </tr>
          <-- 위와같은게 9개 더 들어가야함 -->
      	</tbody>
    </table>
</body>
</html>
이제 js를 이용해서, JSON데이터를 불러와 테이블로 렌더링하기까지 과정을 알아보자.
2.2 JSON 데이터 불러오기
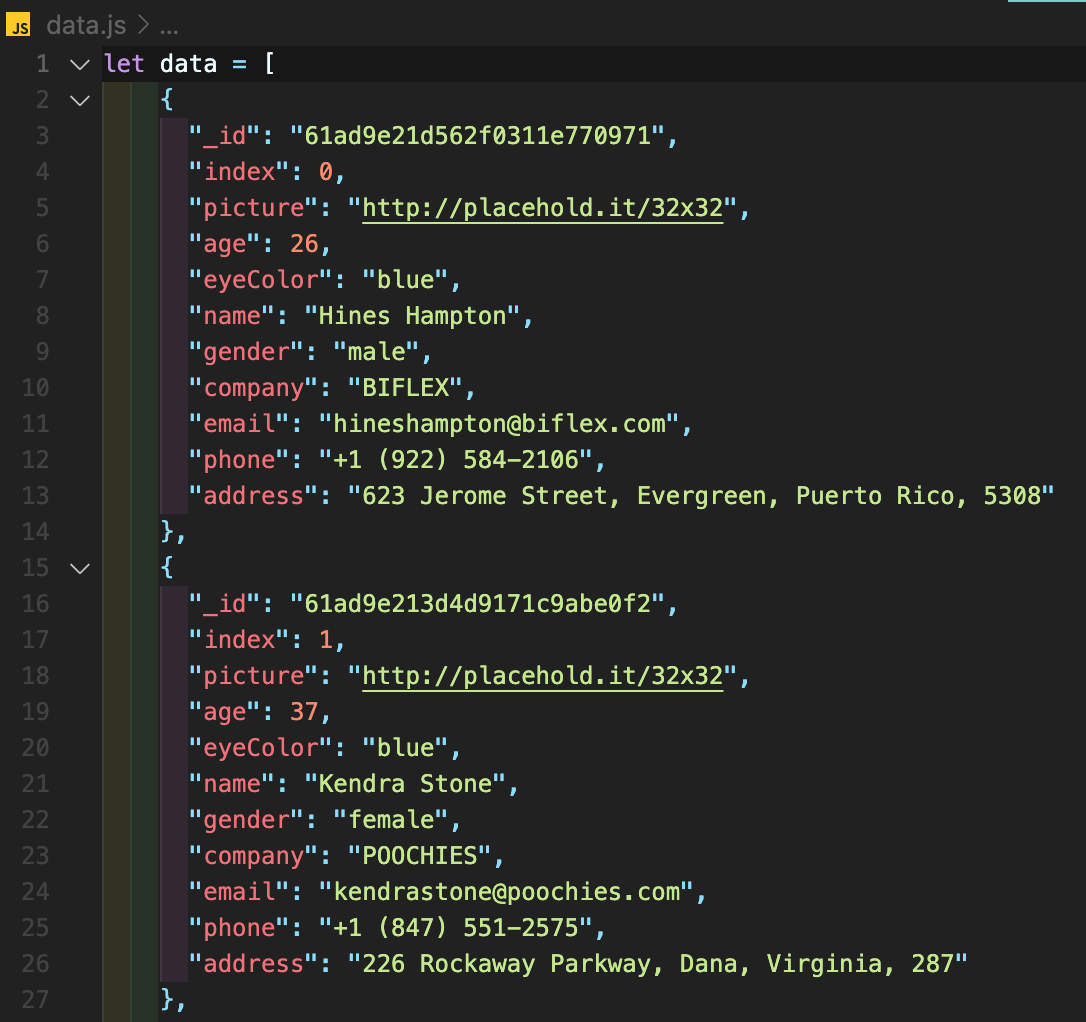
위에서 가져온 데이터를 data.js 파일로 저장한다.
JSON 데이터를 담은 변수의 이름은 data이다.
 (여러번 수정하느라 위와 완전히 같은 정보가 아님. 2번부터는 생략)
html파일에서 스크립트를 작성한다.
...
   <script src="data.js"></script>
</body>
이제 우리는 data라는 변수(JSON데이터)를 쓸 수 있게 된다.
2.3 테이블 렌더링(하는 함수)!!
위에서 작성한 스크립트 아래에서 다른 새로운 스크립트를 작성해준다.
<script src="data.js"></script>
<script>
  <-- JSON데이터를 받아서 정보를 넣어주는 함수 생성 -->
    function renderTable(data) {
      	<-- 빈배열에 문자열로 푸쉬해줄 예정 -->
        let tbodyData = [];
        <-- 이터레이터는 회원한명의 정보(객체로된) -->
        for (const iterator of data) {
            <-- ['...', '...', ... , '...'] -->
            <-- 위와 같이 배열안에 총 열개의 문자열이 생길것임 -->
            <-- 백틱을 써주는 것을 꼭 명심 -->
            tbodyData.push(`
                <tr>
                    <td>${iterator.index}</td>
                    <td>${iterator.picture}</td>
                    <td>${iterator.age}</td>
                    <td>${iterator.eyeColor}</td>
                    <td>${iterator.name}</td>
                    <td>${iterator.gender}</td>
                    <td>${iterator.company}</td>
                    <td>${iterator.email}</td>
                    <td>${iterator.phone}</td>
                    <td>${iterator.address}</td>
                </tr>
            `)
        }
        document.querySelector('.table > tbody').innerHTML = tbodyData.join('');
    }
</script>
2.4 버튼을 누르면 함수를 렌더링!!
아래와 같은 버튼을 생성해주면 끝!!!
(onclick은 사실 실무에선 많이 쓰지 않는다고 한다. 그러나 테이블 렌더링에 초점을 두었기 때문에, 여기에서 다루지 않는다)
<button onclick="renderTable(data)">데이터 호출!</button>
...
<table class="table">
...
쿼리셀렉터로 '.table > tbody'로 해주었기 때문에, 테이블에 클래스를 추가한다.

2.2 부터 조금 이해가 안됩니다.
스크립트 작성은 어떻게 하는건지 모르겠어요..
비개발자라...ㅠㅠ