🤍 Spring Security
지난번에 이어서 진행하겠다.
🩵 Spring Security 인증과정
💙 일반적인 프로세스
-
클라이언트가 로그인을 시도한다.
-
다음과 같은 과정으로 인증을 처리한다.
2-1.
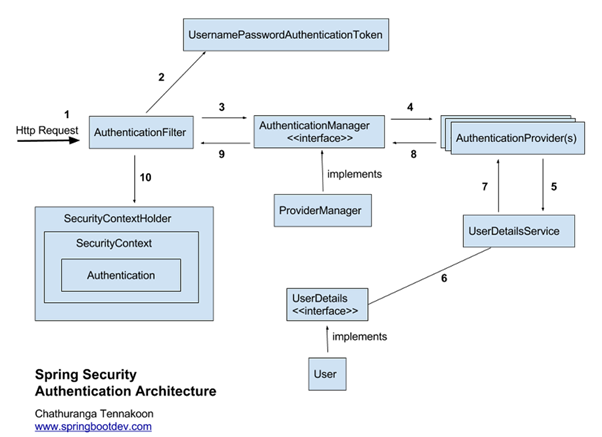
AuthenticationFilter에서 인증을 처리한다.Servlet Filter에 의해서Security Filter로 Security 작업이 위임된다.- 여러
Security Filter중UsernamePasswordAuthenticationFilter에서 인증을 처리한다. - 로그인 폼을 사용하지 않더라도 해당 필터를 통해 로그인 폼으로 보내진다.
2-2.
UsernameAuthenticationToken을 발급한다.AuthenticationFilter는HttpServletRequest에서 아이디와 비밀번호를 추출하여UsernameAuthenticationToken을 발급한다.
-
AuthenticationManager에게 인증 객체를 전달한다.AuthenticationFilter는AuthenticationManager에게 인증 객체를 전달한다.AuthenticationManager는 인증을 담당하는데, 2번에서 발급한 토큰이 올바른 유저인지 확인한다.
-
인증을 위해
AuthenticationProvider에게 인증 객체를 전달한다. -
전달받은 인증 객체의 정보를
UserDetailsService에 전달한다.AuthenticationProvider는 전달받은 인증 객체의 정보를UserDetailsService에 넘겨준다.
-
UserDetails구현 객체를 생성한다.-
UserDetailsService는 전달받은 사용자 정보를 통해 DB에서 알맞은 사용자를 찾고 이를 기반으로UserDetails를 구현한 객체를 반환한다. -
이때 메서드는 이 반환하는 것 하나뿐이다.
-
-
UserDetails객체를AuthenticationProvider에게 전달한다. -
ProviderManager에게 권한을 담은 검증된 인증 객체를 전달한다.AuthenticationProvider는 전달받은UserDetails를 인증해서 성공하면ProviderManager에게 권한을 담은 인증 객체를 전달한다.
-
검증된 인증 객체를
AuthenticationFilter에게 전달한다. -
검증된 인증 객체를
SecurityContextHolder의SercurityContext에 저장한다.
🩵 로그인한 사용자 정보 가져오기
위 과정은 인증 과정이다.
그렇다면 그 후에 다른 유저 서비스를 이용하면 Current User 정보가 필요하다.
💙 Bean에서 사용자 정보 가져오기
가장 간단한 전역에 선언된 SecurityContextHolder에서 가져오는 방법이다.
public static String getCurrentUserSocialId() {
	Object principal = SecurityContextHolder.getContext()
    	.getAuthentication()
    	.getPrincipal();
	User currentUser = (User) principal;
	Social social = currentUser.getSocial();
	return social.getId();
}
💙 Controller에서 사용자 정보 가져오기
principal 객체뿐만 아니라 Authentication Token 또한 가져올 수 있다.
@PostMapping("/{challengeRoomId}/create")
public Response<CreateRecordResponse> createRecord(
		// Principal 또는 Authentication
		Principal principal,
		Authentication authentication) {
	…
}
💙 @AuthenticationPrincipal
이건 Spring Security 3.2부터 지원하는 annotation을 이용하여 현재 로그인한 사용자 객체를 인자에 주입할 수 있다.
@PostMapping("/{challengeRoomId}/create")
public Response<CreateRecordResponse> createRecord(
		@AuthenticationPrincipal CustomUserDetails customUserDetails ) {
	…
}