JavaScript DOM & EVENT
노드에 접근하기
DOM(Document Object Model): HTML 문서의 각 요소들을 트리 형식으로 표현해 줌
const pList = document.getElementsByTagName('p');
for(p of pList) {
  p.style.fontSize = '20px'
}
// 이때 pList는 배열은 아니고 iterable
// 그래서 for ... of ... 사용
document.querySelectorAll('.link');
document.querySelector('#first');
document.querySelector('h3:nth-of-type(2)').style.color = 'red';
부모, 자식, 형제 노드
document.querySelectorAll('p');
// 반환값이 NodeList
document.getElementsByTagName('p');
// 반환값이 HTMLCollection
// NodeList, HTMLCollection 둘다 유사배열 객체 이면서 iterable 임
// for ... of 로 순회함
// 이때 실시간으로 p태그를 하나 추가 해보면
// NodeList에는 반영이 안되지만 HTMLCollection에는 반영이 됨
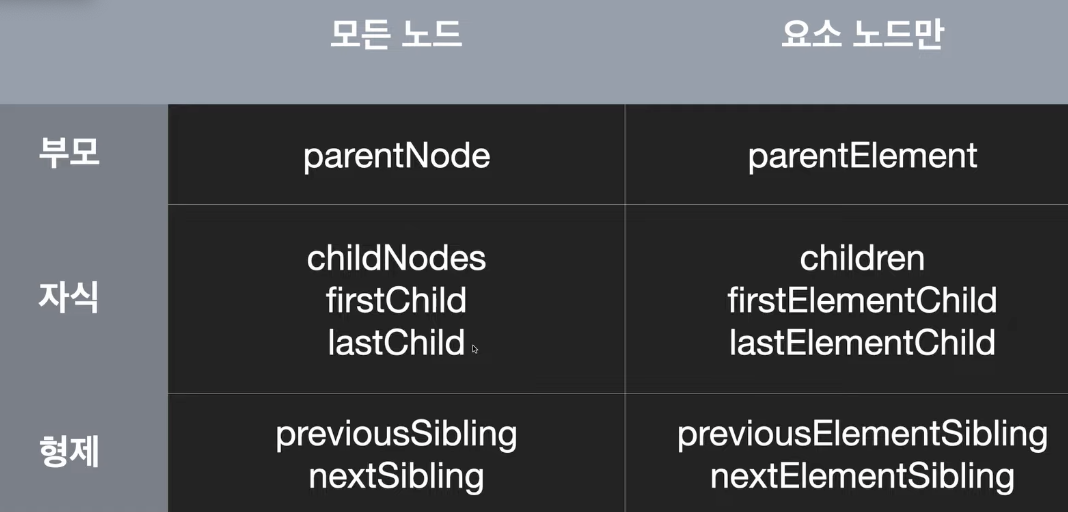
const red = document.getElementById('red');
red.parentNode;
// 부모 노드를 반환함
red.parentElement;
// 부모 노드 중 요소 노드만 반환
// 요소 노드는 html 태그로 이루어진 요소
const ul = document.getElementById('color');
ul.childNodes;
// NodeList - li 말고도 주석을 포함한 모든 텍스트(줄바꿈 포함)를 반환
ul.children;
// HTMLCollection - li만 반환
ul.firstChild;
ul.lastChild;
// 위에 두개 보다는 아래 두개를 더 많이 사용함
ul.firstElementChild;
ul.lastElementChild;
const blue = document.getElementById('blue');
blue.previousSibling;
blue.nextSibling;
// 위가 아니라 아래를 사용한다
blue.previousElementSibling;
blue.nextElementSibling;보통 요소 노드만 뽑아서 사용한다
노드 생성, 추가, 복제, 삭제
const blue = document.getElementById('blue');
const blueTextNoe = blue.firstChild;
blueTextNode.nodeName; // '#text'
blueTextNode.nodeType; // 3
blueTextNode.nodeValue; // 'Blue'
// 텍스트 밸류를 가지고 있을 때만 nodeValue를 이용하여 수정 가능
blueTextNode.nodeValue = '파랑';
// 또는 innerHTML로 수정

const newLi = document.createElement('li');
newLi.innerHTML = 'green';
const ul = document.getElementById('color');
ul.appendChild(newLi);

const newLi2 = document.createElement('li');
const newText = document.createTextNode('pink');
newLi2.appendChild(newText);
ul.appendChild(newLi2);

const newLi3 = document.createElement('li');
const newText3 = document.createTextNode('orange');
ul.inserBefore(newLi3, red);

// 기존 노드를 사용하면 노드가 이동함
ul.appendChild(red); // red가 맨 아래로 이동

// cloneNode
const newOrange = newLi3.cloneNode(); // li만 복사 됨
const newOrange2 = newLi2.cloneNode(true); // 안에 있는 요소(텍스트 등)까지 복사

// removeChild
ul.removeChild(red);
ul.removeChild(ul.firstElementChild);
CSS style, class 제어
const box = document.getElementById('box');
box.style.backgroundColor = 'red';

box.className = 'bg-red';
box.className = 'bg-red txt-pink';

box.classList.add = 'txt-white';
box.classList.remove = 'txt-white');
box.classList.replace('bg-red', 'bg-blue');
box.classList.toggle('bg-blue');
이벤트 핸들러(Event Handler)
// 1
<button onclick="alert('click')"> 클릭1 </button>

// 2
<button onclick='sayHello()'> 클릭2 </button>
<script>
  function sayHello() {
    alert('hello');
  }
</script>

// 3
<button id='btn'> 클릭3 </button>
<script>
  const btn = document.getElementById('btn');
  btn.onclick = sayHello;
</script>

// 4
<button id='btn2'> 클릭4 </button>
<script>
  const btn = document.getElementById('btn2');
  btn.addEventListener('click', sayHello);
</script>

// removeEventListener도 있음
event 종류
- dbclick(더블 클릭), keydown, keyup
- focus, focusin <-> blur
- mousemove -> clientX, clientY 이용가능
- resize -> window.innerHeight, innerWidth 이용가능
이벤트 버블링, 이벤트 위임
이벤트 버블링: 자식 요소에 발생한 이벤트는 부모 요소에 전파된다
// 대부분의 이벤트는 버블링이 일어나나,
// focus, blur, mouseenter, mouseleave는 그렇지 않음
// 인위적으로 막고 싶다면
event.stopPropagation();
이벤트 위임: 자신에게 발생한 이벤트를 다른 요소에서 처리하는 것
// li를 클릭할 때 효과를 주고싶으면 모든 li에게 addEventListener를 걸 것이 아니라
// li를 감싸고 있는 ol 또는 ul전체에 addEventListener를 걸어라
// 이벤트가 위임되기 때문에 똑같이 적용됨
event.target; // 이벤트를 발생시키는 요소
event.currentTarget; // 이벤트 헨들러가 등록된 요소