jQuery
css처럼 생각하면 된다
$('#topAd, #topBtn').click(function(){
    $(this).addClass('up');
})
#topAd와 #topBtn 모두 같이 click 이벤트 쓴다
$('#topAd', '#topBtn').click(function(){
    $(this).addClass('up');
})
#topBtn 안에 있는 #topAd에 click 이벤트
앞에 있는 것이 뒤에 있는 것의 자식
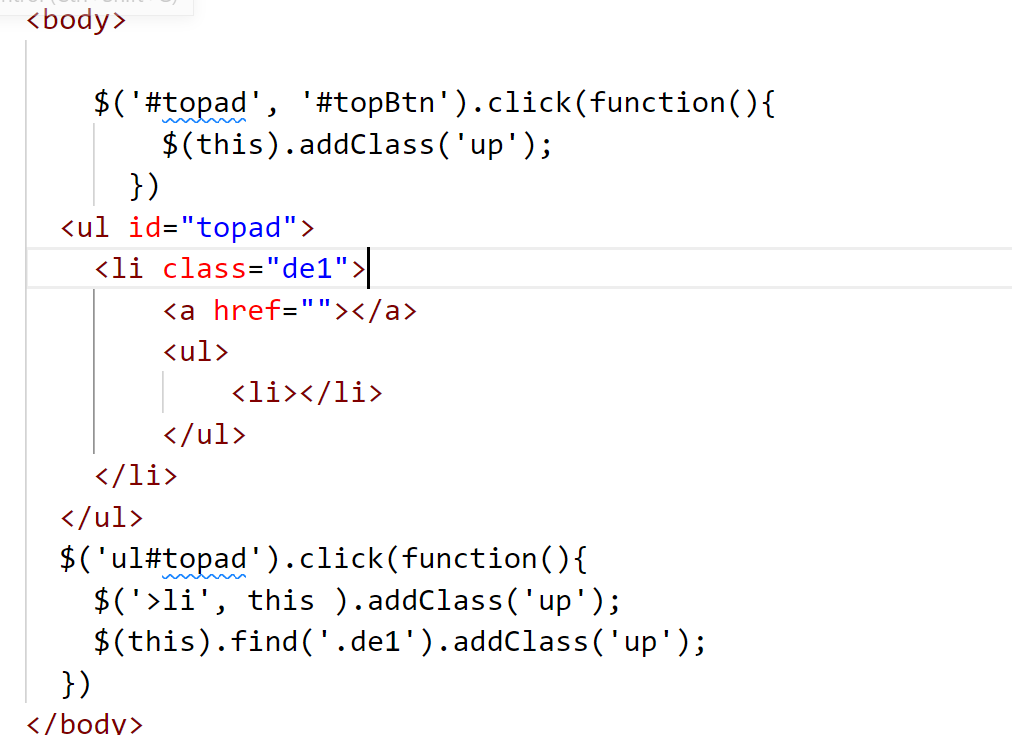
$('#topAd, #topBtn').click(function(){
    $('>li', this).addClass('up');
})
클릭된 this 안에 있는 다이렉트 자식태그인 li에 .up을 넣는다
$(this).find('li').addClass('up')로도 표현할 수 있지만 정확히 다이렉트로 고를 수 없기 때문에 불안,
구분 위해 class 넣어서.find()를 써도 비교적 시간이 더 걸려 효율적이지 못하다
js가 컨트롤러가 되는 keyframe
class와 css를 이용하여 js로 컨트롤한다
<body>
  <button class="btn">play</button>
  <div class="box"></div>
</body><style>
body {
display: flex;
justify-content: center;
align-items: center;
height: 100vh;
margin: 0;
}
.box {
width: 10rem;
height: 10rem;
border-radius: 50%;
background-color: black;
animation-duration: 1s;
animation-timing-function: cubic-bezier(0.075, 0.82, 0.165, 1);
animation-iteration-count: infinite;
position: relative;
display: flex;
justify-content: center;
align-items: center;
text-align: center;
}
.box.action {
animation-name: wing;
}
.box.action::after {
content: "두근두근";
color: white;
animation: doki 1s cubic-bezier(0.075, 0.82, 0.165, 1) infinite;
}
@keyframes doki {
0% {
color: transparent;
}
50% {
color: white;
}
100% {
color: transparent;
}
}
@keyframes wing {
0% {
transform: scale(1) translateY(0);
background-color: rgb(117, 25, 25);
}
50% {
transform: scale(1.5) translateY(-30%);
background-color: rgb(220, 83, 83);
}
100% {
transform: scale(1) translateY(0);
background-color: rgb(117, 25, 25);
}
}
</style>.action이 들어가야 animation-name이 들어가 keyframe wing이 실행되도록
javascript를 조정해준다
<script>

    const btn0 = document.querySelector('.btn');
    const box0 = document.querySelector('.box');

    const callfunc = (obj, trigger, cls)=>{
      obj.classList.toggle(cls);
      obj.classList.contains(cls) ? trigger.textContent = 'stop' : trigger.textContent = 'play';
    }

    btn0.addEventListener('click', ()=>{callfunc(box0, btn0, 'action')});

  </script>
삼항식을 이용하여 식을 간단하게 만들었으며
callback 함수와 매개인자로 스피드를 향상시키고 튜닝을 가능하게 만들었다