🔅개요🔅
딸깍으로 인스타 스크래핑하기
코딩하기 전 주의사항
JSONObject와 JSONArray를 사용하고 있습니다.
지원하는 라이브러리 다운받아서 사용하시면 됩니다
코드
//마지막 username= 뒤의 부분을 원하는 인스타그램 주소로 접속하신 뒤
    //https://www.instagram.com/이부분/ 의 이부분을 복사해서 붙여넣기 하시면 됩니다
    static String apiUrl = "https://www.instagram.com/api/v1/users/web_profile_info/?username=여기에복사";

    public static String getImageUrl(String apiUrl) throws Exception {

        //해당 주소의 첫번째 이미지 url을 불러온다(GET방식 - parameter:username)
        String urlPlain = "";

        try{
            URL url = new URL(apiUrl);
            HttpURLConnection con = (HttpURLConnection)url.openConnection();
            con.setRequestMethod("GET");
            con.setRequestProperty("Viewport-Width", "1020");

            //해당 부분 직접 채워주셔야합니다
            //하단에 이미지 넣어두었습니다
            con.setRequestProperty("X-Asbd-Id", "");
            con.setRequestProperty("X-Csrftoken", "");
            con.setRequestProperty("X-Ig-App-Id", "");
            con.setRequestProperty("X-Ig-Www-Claim", "");
            con.setRequestProperty("X-Requested-With", "");

            int responseCode = con.getResponseCode();
            BufferedReader br;
            if (responseCode == 200) {
                br = new BufferedReader(new InputStreamReader(con.getInputStream()));
            } else {
                br = new BufferedReader(new InputStreamReader(con.getErrorStream()));
            }
            String inputLine;
            StringBuffer response = new StringBuffer();
            while ((inputLine = br.readLine()) != null) {
                response.append(inputLine);
            }
            br.close();
            System.out.println(response.toString());
            JSONObject jsonob = new JSONObject(response.toString());

            jsonob = (JSONObject) jsonob.get("data");

            System.out.println(jsonob);

            jsonob = (JSONObject) jsonob.get("user");
            jsonob = (JSONObject) jsonob.get("edge_owner_to_timeline_media");
            JSONArray jsonarr = (JSONArray) jsonob.get("edges");
            jsonob = jsonarr.getJSONObject(0);
            jsonob = (JSONObject) jsonob.get("node");
            String a  = jsonob.get("thumbnail_src").toString();

            System.out.println(a);
            urlPlain = a;

        }catch(Exception e){
            e.printStackTrace();
        }

        return urlPlain;
    }

    public static void saveImage(String imageUrl) throws Exception {

        URL url = null;
        InputStream in = null;
        OutputStream out = null;

        try {
            url = new URL(imageUrl);
            in = url.openStream();

            // 컴퓨터 또는 서버의 저장할 경로(절대패스로 지정해 주세요.)
            //본인 새폴더 여시고 원하는 경로에 원하는 이미지 이름 붙여주시면 됩니다
            out = new FileOutputStream("C:\\Users\\Desktop\\새폴더\\예시용이미지이름.jpg");

            while (true) {
                // 루프를 돌면서 이미지데이터를 읽어들이게 됩니다.
                int data = in.read();

                // 데이터값이 -1이면 루프를 종료하고 나오게 됩니다.
                if (data == -1) {
                    break;
                }

                // 읽어들인 이미지 데이터값을 컴퓨터 또는 서버공간에 저장하게 됩니다.
                out.write(data);
            }

            // 저장이 끝난후 사용한 객체는 클로즈를 해줍니다.
            in.close();
            out.close();

        } catch (Exception e) {
            // 예외처리
            e.printStackTrace();
        } finally {
            // 만일 에러가 발생해서 클로즈가 안됐을 가능성이 있기에
            // NULL값을 체크후 클로즈 처리를 합니다.
            if (in != null) {
                in.close();
            }
            if (out != null) {
                out.close();
            }
        }


    }

    public static void main(String[] args) throws Exception {
        String imgUrl = getImageUrl(apiUrl);
        saveImage(imgUrl);
    }
이미지 경로 첨부할 때
원하는 경로를 탐색기로 들어가셔서 위의 경로를 복사한 뒤
\을 추가하시고 뒤에 파일 이름을 적으시면 됩니다
중간 리퀘스트 헤더 작성 부분 요령🔶
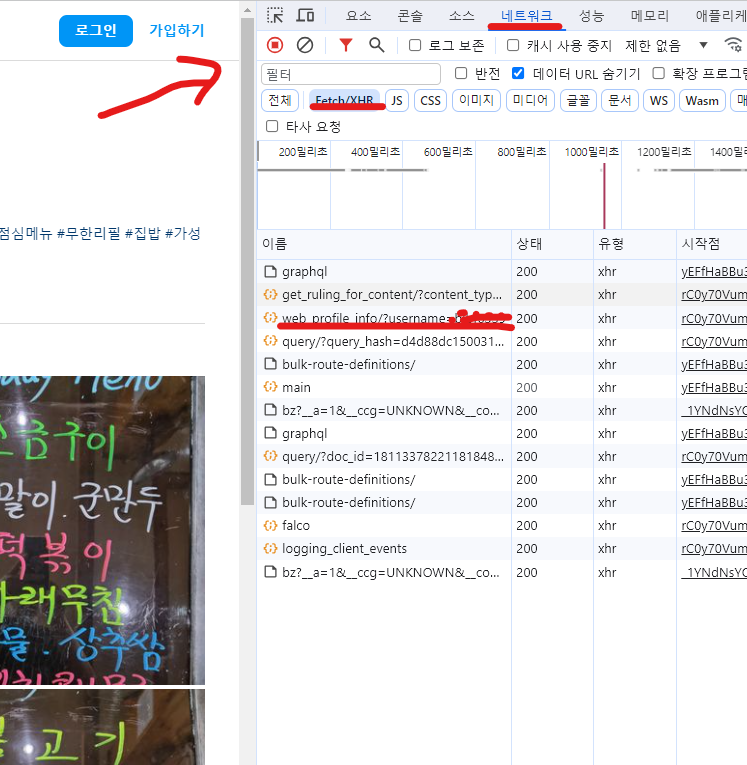
해당 주소 접속하셔서
개발자 도구를 여신 뒤(F12)
네트워크 클릭
밑의 Fetch/XHR 클릭하신 뒤
새로고침(Ctrl+R) 합니다
web_profile_info/?user~~~ 부분 클릭
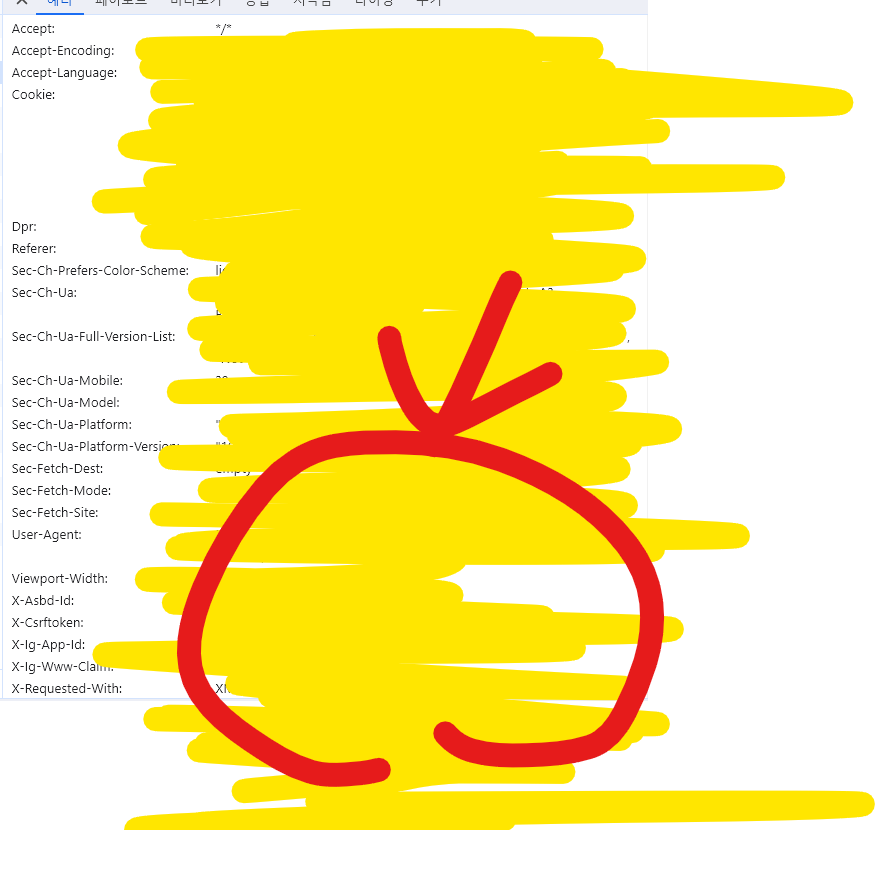
해당 빨간 부분에서 같은 글자 찾아서
값을 복사 붙여넣기 해주시면 됩니다
이후 메인메소드를 실행하면

원하는 폴더에 저장되고 종료합니다.

개발자호소인