개발환경 설정
- JDK 설치
- Apache Maven 설치
- IDE 설치
- netty dependency 추가
implementation 'io.netty:netty-all:4.1.68.Final'Discard 서버작성
- 클라이언트로부터 데이터를 8888번 포트로 수신
데이터만 받을 뿐 클라이언트에 데이터를 보내지 않는 Discard 서버를 만들어보자.
모든 netty 서버에는 다음이 필요하다.
- 클라이언트의 입력을 받아들일 포트를 지정하는 메인서버
- 클라이언트로부터 받아들인 입력 데이터를 처리하는 핸들러
- BootStrapping: 서버를 구성하는 시작코드로 최소한 연결 요청을 수신할 포트에 서버를 바인딩한다.
스프링 부트 시작시 로직수행
import org.springframework.boot.context.event.ApplicationReadyEvent;
import org.springframework.context.ApplicationListener;
import org.springframework.stereotype.Component;

import lombok.RequiredArgsConstructor;

@Component
@RequiredArgsConstructor
public class ApplicationStartupTask implements ApplicationListener<ApplicationReadyEvent> {

    @Override
    public void onApplicationEvent(ApplicationReadyEvent event) {
        try {
            new DiscardServer().start();
        } catch (InterruptedException e) {
            e.printStackTrace();
        }
    }

}
Discard Server
서버의 8888번 포트에 클라이언트 접속을 허용하고 클라이언트로부터 받은 데이터를 DiscardServerHandler 클래스가 처리하도록 지정한다.
import io.netty.bootstrap.ServerBootstrap;
import io.netty.channel.ChannelFuture;
import io.netty.channel.ChannelInitializer;
import io.netty.channel.ChannelPipeline;
import io.netty.channel.EventLoopGroup;
import io.netty.channel.nio.NioEventLoopGroup;
import io.netty.channel.socket.SocketChannel;
import io.netty.channel.socket.nio.NioServerSocketChannel;
import lombok.RequiredArgsConstructor;

@RequiredArgsConstructor
public class DiscardServer {

    public void start() throws InterruptedException {
        EventLoopGroup bossGroup = new NioEventLoopGroup(1);
        EventLoopGroup workerGroup = new NioEventLoopGroup();

        try {
            ServerBootstrap b = new ServerBootstrap(); // ServerBootstrap 생성
            b.group(bossGroup, workerGroup)
                .channel(NioServerSocketChannel.class) // // NIO 전송 채널을 이용하도록 지정
                // .localAddress(new InetSocketAddress(8888)) // 지정된 포트를 이용해 소켓 주소를 설정
                .childHandler(new ChannelInitializer<SocketChannel>() { // // EchoServerHandler 하나를 채널의 Channel Pipeline으로 추가

                    @Override
                    protected void initChannel(SocketChannel ch) throws Exception {
                        ChannelPipeline p = ch.pipeline();
                        // 접속된 클라이언트로부터 수신된 데이터를 처리할 핸들러를 지정
                        p.addLast(new DiscardServerHandler());
                    }

                });
            // bootstrap 클래스의 bind 메서드로 접속할 포트를 지정
            ChannelFuture f = b.bind(8888).sync(); // 서버를 비동기식으로 바인딩, sync()는 바인딩이 완료되기를 대기
            f.channel().closeFuture().sync(); // 채널의 CloseFuture를 얻고 완료될 때까지 현재 스레드를 블로킹

        } finally {
            // EventLoopGroup를 종료하고 모든 리소스를 해제
            workerGroup.shutdownGracefully();
            bossGroup.shutdownGracefully();
        }
    }
}- 채널 파이프라인은 네티의 채널과 이벤트 핸들러 사이의 연결 통로 역할
DiscardServerHandler
데이터가 수신되었을 때 자동으로 수행되는 Discard 서버의 데이터 처리 핸들러다. 이 핸들러는 네티가 제공하는 SimpleChannelInboundHandler 클래스를 상속받는다.
import io.netty.channel.ChannelHandlerContext;
import io.netty.channel.SimpleChannelInboundHandler;

public class DiscardServerHandler extends SimpleChannelInboundHandler<Object> {

    @Override
    protected void channelRead0(ChannelHandlerContext ctx, Object msg) throws Exception { // channelRead() 메서드가 자동으로 실행된다.
        // 데이터 입력 시 아무것도 하지않음
    }

    @Override
    public void exceptionCaught(ChannelHandlerContext ctx, Throwable cause) { // 지정한 포트로 접속한 클라이언트가 데이터를 전송하면
        cause.printStackTrace();
        ctx.close();
    }

}
Connection 확인
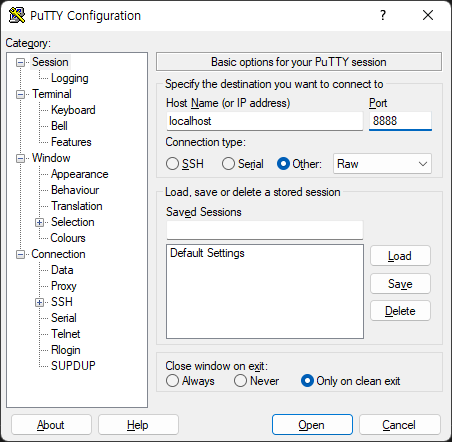
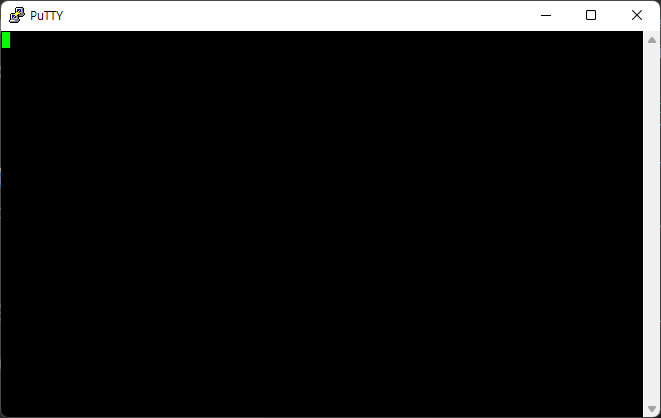
PuTTY에서 확인해볼 수 있지만 이 서버는 연결만 할 뿐 큰 의미가 없다. open했을 때 초록색 프롬프트만 있다면 정상 동작하여 접속한 것이다.
Echo 서버/클라이언트 작성
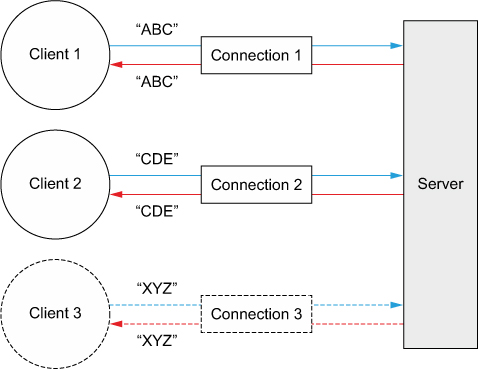
Echo 클라이언트와 서버간의 상호작용은 매우 간단하다.
- 클라이언트가 연결을 설정한 후 서버에 하나 이상의 메세지를 보낸다.
- 각 메세지를 클라이언트에 에코한다.
Echo Server
import io.netty.bootstrap.ServerBootstrap;
import io.netty.channel.ChannelFuture;
import io.netty.channel.ChannelInitializer;
import io.netty.channel.ChannelPipeline;
import io.netty.channel.EventLoopGroup;
import io.netty.channel.nio.NioEventLoopGroup;
import io.netty.channel.socket.SocketChannel;
import io.netty.channel.socket.nio.NioServerSocketChannel;
import lombok.RequiredArgsConstructor;

@RequiredArgsConstructor
public class EchoServer {

    public void start() throws InterruptedException {
        EventLoopGroup bossGroup = new NioEventLoopGroup(1);
        EventLoopGroup workerGroup = new NioEventLoopGroup();

        try {
            ServerBootstrap b = new ServerBootstrap();
            b.group(bossGroup, workerGroup)
                .channel(NioServerSocketChannel.class)
                .childHandler(new ChannelInitializer<SocketChannel>() {

                    @Override
                    protected void initChannel(SocketChannel ch) throws Exception {
                        ChannelPipeline p = ch.pipeline();
                        p.addLast(new EchoServerHandler());
                    }

                });
            ChannelFuture f = b.bind(8888).sync();
            f.channel().closeFuture().sync();

        } finally {
            workerGroup.shutdownGracefully();
            bossGroup.shutdownGracefully();
        }
    }
}
ChannelHandler
import io.netty.buffer.ByteBuf;
import io.netty.buffer.Unpooled;
import io.netty.channel.ChannelFutureListener;
import io.netty.channel.ChannelHandlerContext;
import io.netty.channel.ChannelInboundHandlerAdapter;
import io.netty.channel.ChannelHandler.Sharable;
import io.netty.util.CharsetUtil;
@Sharable // ChannelHandler를 여러 채널간에 안전하게 공유할 수 있도록 하는 것
public class EchoServerHandler extends ChannelInboundHandlerAdapter { // 입력된 데이터를 처리하는 이벤트 핸들러인 ChannelInboundHandlerAdapter를 상속
// 데이터 수신 이벤트처리
@Override
public void channelRead(ChannelHandlerContext ctx, Object msg) {
ByteBuf in = (ByteBuf) msg;
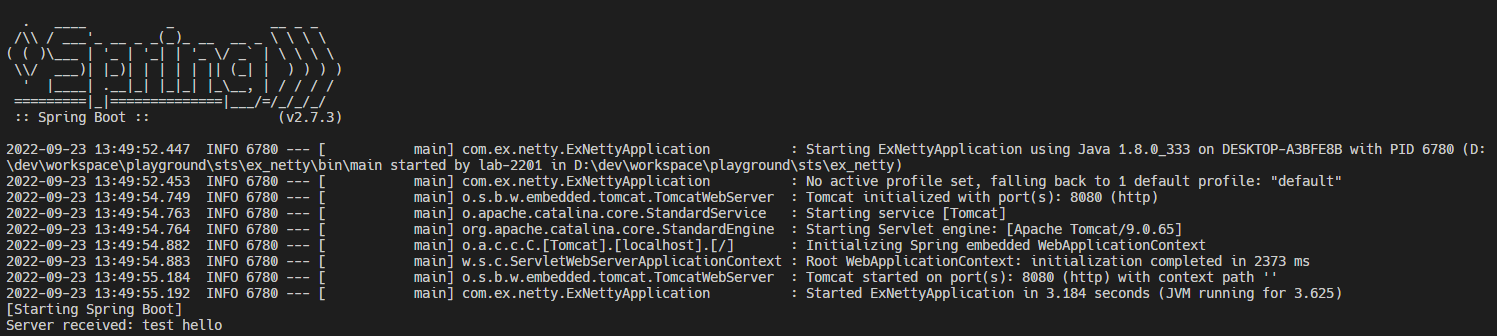
System.out.println("Server received: " + in.toString(CharsetUtil.UTF_8)); //
ctx.write(in); // 아웃바운드 메시지를 플러시할지 않은 채로 받은 메시지를 발신자로 출력함.
}
// 채널 파이프라인에 대한 이벤트를 처리
// channelRead의 이벤트 처리 완료 후 자동으로 수행됨
@Override
public void channelReadComplete(ChannelHandlerContext ctx) {
ctx.writeAndFlush(Unpooled.EMPTY_BUFFER).addListener(ChannelFutureListener.CLOSE); // 대기 중인 메시지를 원격 피어로 플러시하고 채널을 닫음
}
@Override
public void exceptionCaught(ChannelHandlerContext ctx, Throwable cause) {
cause.printStackTrace(); // 예외 stack trace를 출력
ctx.close(); // 채널을 닫음
}
}
EchoClient
클라이언트 프로그램은 에코 서버 8888번 포트로 접속하여 "Hello Netty!"라는 문자열을 전송하고 서버의 응답을 수신한다. 이어서 수신한 데이터를 화면에 출력하고 연결된 소켓을 종료한다.
package com.ex.netty.echo;

import io.netty.bootstrap.Bootstrap;
import io.netty.channel.ChannelFuture;
import io.netty.channel.ChannelInitializer;
import io.netty.channel.ChannelPipeline;
import io.netty.channel.EventLoopGroup;
import io.netty.channel.nio.NioEventLoopGroup;
import io.netty.channel.socket.SocketChannel;
import io.netty.channel.socket.nio.NioSocketChannel;

public class EchoClient {

    public static void main(String[] args) throws Exception {
        connect();
    }

    public static void connect() throws InterruptedException {
        EventLoopGroup group = new NioEventLoopGroup();

        try {
            Bootstrap b = new Bootstrap();
            b.group(group) // 클라이언트는 서버와 달리 서버에 연결된 채널 하나만 존재하기 때문에 이벤트 루프 그룹이 하나다.
                .channel(NioSocketChannel.class) // 클라이언트가 생성하는 채널의 종류를 설정. NIO 소켓 채널로 설정
                .handler(new ChannelInitializer<SocketChannel>() { // 클라이언트이므로 채널 파이프라인의 설정에 일반 소켓 채널 클래스인 SocketChannel을 설정

                    @Override
                    protected void initChannel(SocketChannel ch) throws Exception {
                        ChannelPipeline p = ch.pipeline();
                        p.addLast(new EchoClientHandler());
                    }

                });
            // 비동기 입출력 메서드인 connect 호출. ChannelFuture 객체를 리턴/ 이 객체를 통해 비동기 처리 결과를 확인
            // sync는 ChannelFuture 객체의 요청이 완료될 때까지 대기/ 실패하면 예외 던짐
            ChannelFuture f = b.connect("localhost", 8888).sync();

            f.channel().closeFuture().sync();
        } finally {
            group.shutdownGracefully();
        }
    }
}
EchoClientHandler
package com.ex.netty.echo;

import java.nio.charset.Charset;

import io.netty.buffer.ByteBuf;
import io.netty.buffer.Unpooled;
import io.netty.channel.ChannelHandlerContext;
import io.netty.channel.ChannelInboundHandlerAdapter;

public class EchoClientHandler extends ChannelInboundHandlerAdapter{

    @Override
    public void channelActive(ChannelHandlerContext ctx) { // 소켓 채널이 최초 활성화되었을 때 실행됨
        String sendMessage = "Hello, Netty";

        ByteBuf messageBuffer = Unpooled.buffer();
        messageBuffer.writeBytes(sendMessage.getBytes());

        StringBuilder builder = new StringBuilder();
        builder.append("전송한 문자열 [");
        builder.append(sendMessage);
        builder.append("]");

        System.out.println(builder.toString());

        ctx.writeAndFlush(messageBuffer); // 데이터 기록, 전송 두가지 메서드를 호출/ 첫번째는 채널에 데이터를 기록하는 write, 두번째는 채널에 기록된 데이터를 서버로 전송하는 flush
    }

    @Override
    public void channelRead(ChannelHandlerContext ctx, Object msg) { // 서버로 수신된 데이터가 있을 때 호출
        String readMessage = ((ByteBuf)msg).toString(Charset.defaultCharset()); // 서버로부터 수신된 데이터가 저장된 msg 객체에서 문자열 데이터를 추출

        StringBuilder builder = new StringBuilder();
        builder.append("수신한 문자열 [");
        builder.append(readMessage);
        builder.append("]");

        System.out.println(builder.toString());
    }

    @Override
    public void channelReadComplete(ChannelHandlerContext ctx) { // 수신된 데이터를 모두 읽었을 때 호출/ ChannelRead가 완료된 후 자동으로 호출
        ctx.close();
    }

    @Override
    public void exceptionCaught(ChannelHandlerContext ctx, Throwable cause) {
        cause.printStackTrace();
        ctx.close();
    }
}

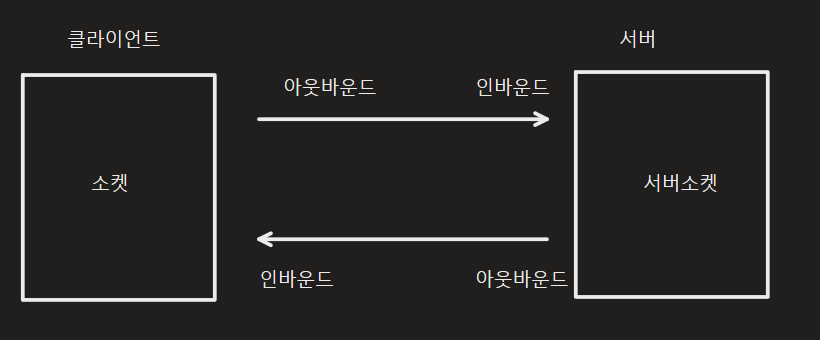
데이터 이동의 방향성
네티는 이벤트를 인바운드 이벤트와 아웃바운드 이벤트로 구분한 추상화 모델을 제공한다. 즉 네트워크 프로그램 개발자가 신경써야 하는 이벤트들을 논리적으로 구분하여 고수준의 추상화 모델을 제공한다. 예를 들어 서버 개발자는 클라이언트로부터 데이터가 수신될 때 발생하는 이벤트에 관심이 있다면 인바운드 이벤트 중 하나인 데이터 수신 이벤트 메서드에서 데이터를 가공하는 코드를 작성하면된다.