목표

스프링 이메일 설정
gradle 의존성 추가
implementation 'org.springframework.boot:spring-boot-starter-mail'JavaMailSender 설정
gmail 설정 방법 및 2차 비밀번호는 구글링하면 많이 나오므로 생략ㅎㅎ
계정에 관한 정보는 application.yml 파일에 저장했다. 또한 JavaMailSender 설정을 위해 따로 MailConfig 클래스를 만들도록 했다. 여기서 설정값들은 application.yml 파일에서 설정한 값들을 불러오는 방식을 사용했다. 이러한 방식을 통해 실제 메일을 전송하는 서비스 계층에서는 JavaMailSender의 설정값은 신경쓰지 않고 수신자와 메일 내용만 작성하면 된다.
spring:
	...(생략)...
    mail:
        host: smtp.gmail.com
        port: 587
        username: 아이디
        password: 비밀번호
package com.mysite.sbb.config;
import java.util.Properties;
import org.springframework.beans.factory.annotation.Value;
import org.springframework.context.annotation.Bean;
import org.springframework.context.annotation.Configuration;
import org.springframework.mail.javamail.JavaMailSender;
import org.springframework.mail.javamail.JavaMailSenderImpl;
@Configuration
public class MailConfig {
@Value("${spring.mail.host}")
private String host;
@Value("${spring.mail.port}")
private int port;
@Value("${spring.mail.username}")
private String id;
@Value("${spring.mail.password}")
private String password;
@Bean
public JavaMailSender javaMailService() {
JavaMailSenderImpl javaMailSender = new JavaMailSenderImpl();
javaMailSender.setHost(host);
javaMailSender.setUsername(id);
javaMailSender.setPassword(password);
javaMailSender.setPort(port);
javaMailSender.setJavaMailProperties(getMailProperties());
return javaMailSender;
}
private Properties getMailProperties() {
Properties properties = new Properties();
properties.setProperty("mail.transport.protocol", "smtp");
properties.setProperty("mail.smtp.auth", "true");
properties.setProperty("mail.smtp.starttls.enable", "true");
properties.setProperty("mail.smtp.starttls.required", "true");
properties.setProperty("mail.debug", "true");
return properties;
}
}gmail 서버의 ssl과 tls의 포트는 다르다. ssl: 465 / tls: 587
본인이 설정한 값에 맞게 포트를 설정 하자!
아래 코드를 위 코드와 같이 적어서 한참을 찾았다 허허properties.setProperty("mail.smtp.ssl.enable", "true");
이메일 전송 서비스 계층
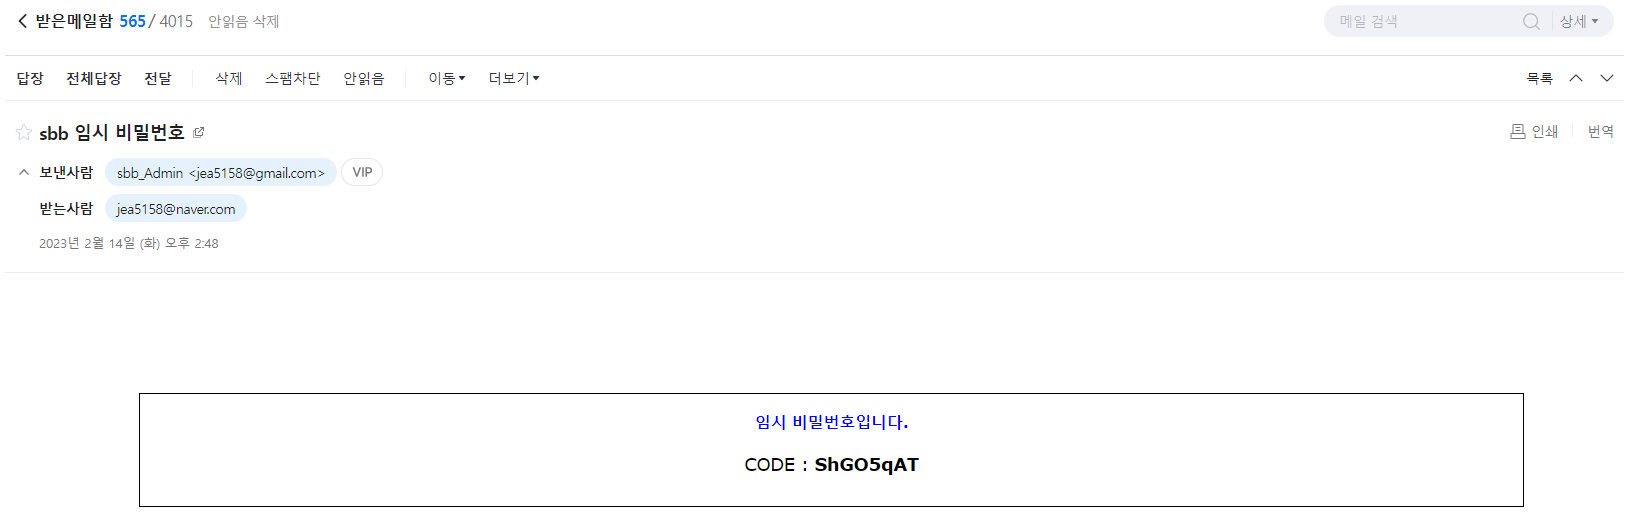
이메일 전송 과정을 2개의 메서드로 나눴다. 먼저 전송할 메시지를 만들고 만들어진 메시지를 JavaMailSender에게 넘겨주면 메일이 전송된다. 메시지를 만들면서 예외가 발생할 수 있고 메일을 보내면서도 예외가 발생할 수 있다. 따라서 2가지 경우를 나눠서 예외처리를 했다.
@Service
@RequiredArgsConstructor
public class TempPasswordMail {

    private final JavaMailSender javaMailSender;

    private String ePw;

    public MimeMessage createMessage(String to)
        throws UnsupportedEncodingException, MessagingException {
        MimeMessage message = javaMailSender.createMimeMessage();

        message.addRecipients(RecipientType.TO, to);
        message.setSubject("sbb 임시 비밀번호");

        String msgg = "";
        msgg += "<div style='margin:100px;'>";
        msgg +=
            "<div align='center' style='border:1px solid black; font-family:verdana';>";
        msgg += "<h3 style='color:blue;'>임시 비밀번호입니다.</h3>";
        msgg += "<div style='font-size:130%'>";
        msgg += "CODE : <strong>";
        msgg += ePw + "</strong><div><br/> ";
        msgg += "</div>";
        message.setText(msgg, "utf-8", "html");
        message.setFrom(new InternetAddress("jea5158@gmail.com", "sbb_Admin"));

        return message;
    }

    public void sendSimpleMessage(String to, String pw) {
        this.ePw = pw;
        MimeMessage message;
        try {
            message = createMessage(to);
        } catch (UnsupportedEncodingException | MessagingException e) {
            e.printStackTrace();
            throw new EmailException("이메일 생성 에러");
        }
        try {
            javaMailSender.send(message);
        } catch (MailException e) {
            e.printStackTrace();
            throw new EmailException("이메일 전송 에러");
        }
    }
}
public class EmailException extends RuntimeException {
private static final long serialVersionUID = 1L;
public EmailException(String message) {
super(message);
}
}이제 임시 비밀번호를 만들고 사용자에게 임시 비밀번호를 담아서 사용자에게 메일을 보내보자.
- 순서
- 임시 비밀번호 생성
- 회원 엔티티에 임시 비밀번호 저장
- 이메일 전송
@RequiredArgsConstructor
@Service
public class UserService {

    private final UserRepository userRepository;
    private final PasswordEncoder passwordEncoder;
    private final TempPasswordMail tempPasswordMail;
    private final CommonUtil commonUtil;

    ...(생략)...

    @Transactional
    public void modifyPassword(String email) throws EmailException {
        String tempPassword = commonUtil.createTempPassword();
        SiteUser user = userRepository.findByEmail(email)
            .orElseThrow(() -> new DataNotFoundException("해당 이메일의 유저가 없습니다."));
        user.setPassword(passwordEncoder.encode(tempPassword));
        userRepository.save(user);
        tempPasswordMail.sendSimpleMessage(email, tempPassword);
    }
}
UserController
로그인 페이지에서 임시 비밀번호 발급 버튼을 클릭하면 이메일을 입력하는 창이 나오게 하자. 이메일을 입력하는 페이지에서는 아래 사항들을 확인해 주자.
- 빈값인지
- 이메일 형식이 맞는지
- 입력한 이메일이 유저 DB에 있는지
- 이메일 전송이 실패했는지
이미 서비스 계층에서 이메일 전송 실패, 유저 찾기 실패 시 예외를 발생하기 때문에 로직상에서 추가할 부분은 없다.
@RequiredArgsConstructor
@Controller
@RequestMapping("/user")
public class UserController {

    private final UserService userService;

	private static final String TEMP_PASSWORD_FORM = "temp_password_form";


	...(생략)...

    @PostMapping("/tempPassword")
    public String sendTempPassword(@Valid TempPasswordForm tempPasswordForm,
        BindingResult bindingResult) {
        if (bindingResult.hasErrors()) {
            return TEMP_PASSWORD_FORM;
        }

        try {
            userService.modifyPassword(tempPasswordForm.getEmail());
        } catch (DataNotFoundException e) {
            e.printStackTrace();
            bindingResult.reject("emailNotFound", e.getMessage());
            return TEMP_PASSWORD_FORM;
        } catch (EmailException e) {
            e.printStackTrace();
            bindingResult.reject("sendEmailFail", e.getMessage());
            return TEMP_PASSWORD_FORM;
        }
        return "redirect:/";
    }
}
@Getter
@Setter
public class TempPasswordForm {
@NotEmpty(message = "이메일은 필수항목입니다.")
@Email
private String email;
}<html layout:decorate="~{layout}">
<div layout:fragment="content" class="container my-3">
<form th:action="@{/user/tempPassword}" th:object="${tempPasswordForm}" method="post">
<div th:replace="~{form_errors :: formErrorsFragment}"></div>
<div class="mb-3">
<label for="email" class="form-label">사용자 이메일</label>
<input type="text" name="email" id="email" class="form-control">
</div>
<button type="submit" class="btn btn-primary">임시 비밀번호 생성</button>
</form>
</div>
</html>