이번장 한줄 요약
Autoscaling을 이용해 Pod나 Node를 Metric을 기반으로 자동으로 Scale-out / in 하는 방법
목차는
1. Autoscaling은 누가 수행하고 일어나는 과정은 어떤가?
2. CPU 사용량을 기준으로 Autoscaling 하기
3. Custom metrics를 기준으로 Autoscaling 하기
4. Cluster nodes를 auto scaling하기
들어가기 전에 알아야 할 개념
- Horizontal auto scaling : 리소스 풀에 더 많은 시스템 을 추가하여 확장하는 방식
- Vertical auto scaling : 기존 시스템에 더 많은 전력 (CPU, RAM)을 추가하여 확장하는 방식
1. Autoscaling은 누가 수행하고 일어나는 과정은 어떤가?
1) 누가 Autoscaling을 하는가?
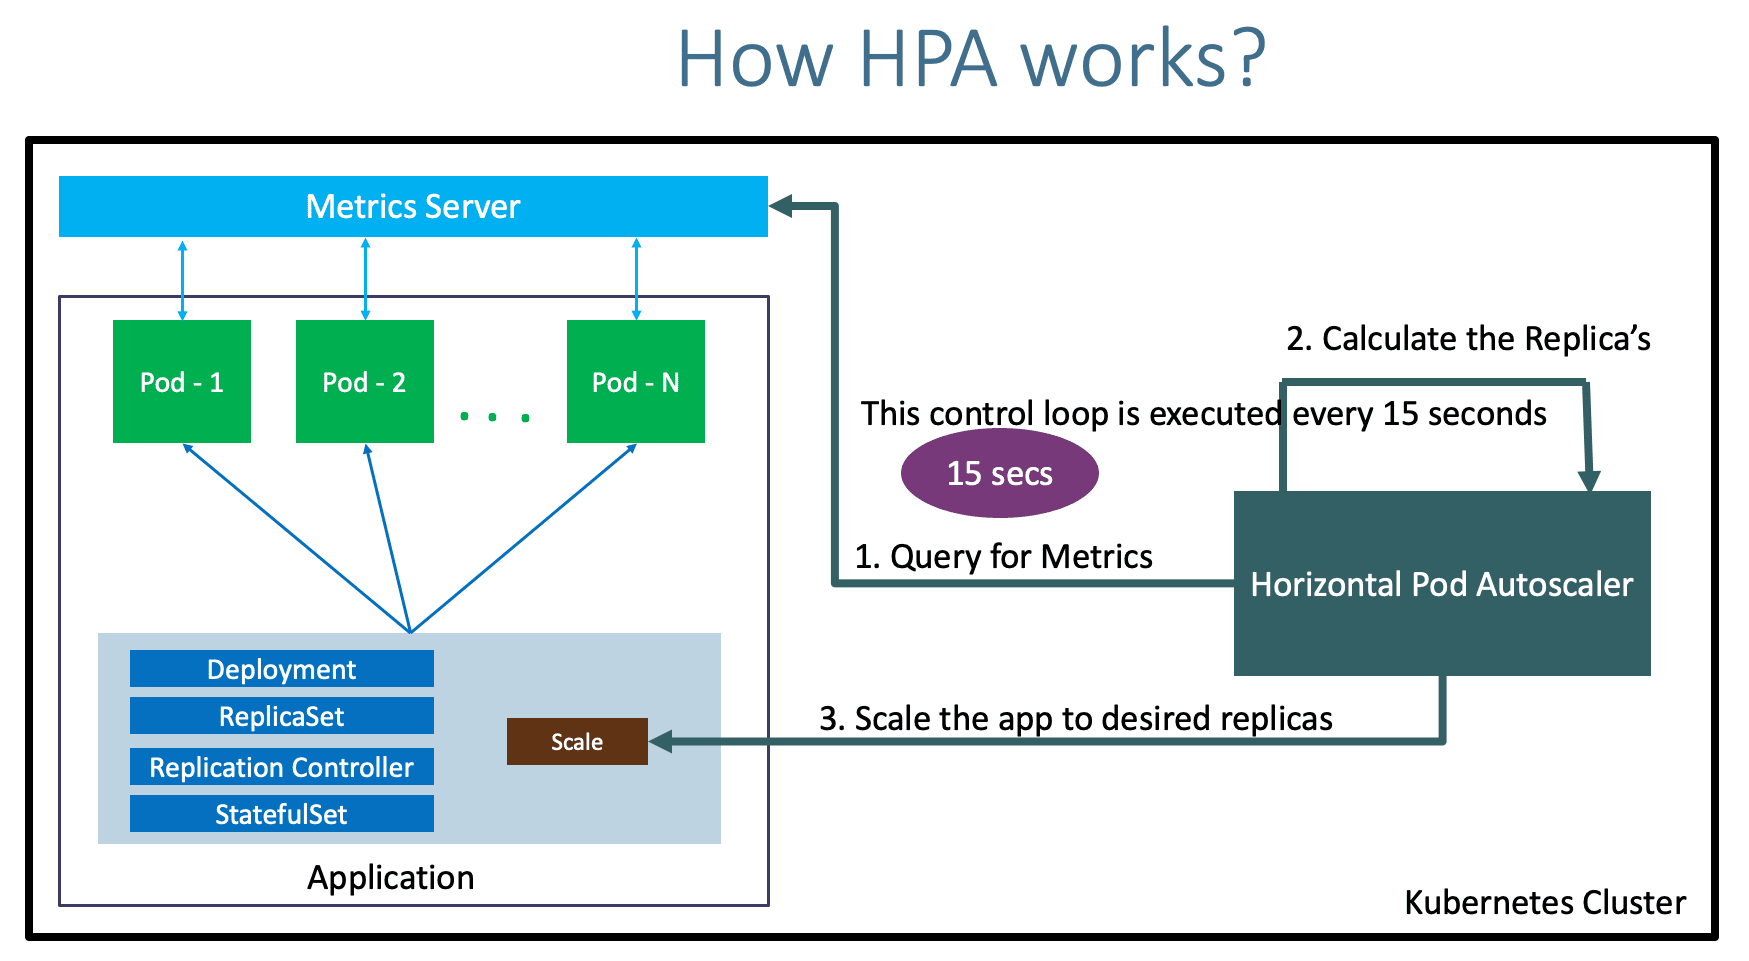
- Horizontal pod autoscaling이란 Controller에 의해 관리되는 Pod의 Replicas 수가 자동으로 스케일링 되는 것을 의미한다.
- HPA(Horizontal Pod Autoscaler)라는 Kubernetes의 리소스를 만들면 이 scaling의 동작을 결정한다.
2) Auto scaling은 어떻게 이뤄지는가?
1. Controller가 주기적으로 Metric을 확인한다.

2. HPA Resource에 설정된 Target Value 값을 만족하는 replica수를 계산한다.

- Kubelet에서 실행되는 cAdvisor에 의해 Metric이 수집된다
- 수집된 Metric들은 metrics-server의해 집계된다.
- Horizontal Controller는 REST를 통해 모든 Pod의 metric을 가져온다.
- Pod의 모든 Metric 값을 더한 뒤, HPA에 정의된 target value로 나누고, 큰 정수로 반올림한다.
- 만약에 여러개 Metric을 기준으로 한다면? 개별적으로 계산한 뒤, 높은 값을 취한다.
note) cAdvisor
cAdvisor (Container Advisor) provides container users an understanding of the resource usage and performance characteristics of their running containers. It is a running daemon that collects aggregates processes and exports information about running containers.
3. deployment, replicaset 등 replicas 필드 값을 갱신한다.
- 필요한 replica 수를 계산한 뒤, Replicaset 또는 Deployment등의 리소스 object의 replica를 조정한다.
- API server가 직접 replica field를 조정하는 것이 아니고,
Scale이라는 sub-resource를 통해 간접적으로 조정한다.
note) Scale 이라는 virtual resource의 정체
curl http://localhost:8080/apis/apps/v1/namespaces/default/deployments
/kubia/scale
{
  "kind": "Scale",
  "apiVersion": "autoscaling/v1",
  "metadata": {
  "name": "kubia",
  "namespace": "default",
  "uid": "4ac36acf-33c5-49d2-90fa-66c25eb6f44b",
  "resourceVersion": "34597",
  "creationTimestamp": "2021-07-27T12:59:19Z"
  },
  "spec": {
    "replicas": 3
  },
  "status": {
  "replicas": 3,
  "selector": "app=kubia"
  }
}%
deployement 리소스에 scale sub-resource를 패치하는 REST request
curl -X PATCH -H 'Content-Type: application/strategic-merge-patch+json'
--data '
{
"spec":
  {
  "replicas":1
  }
}' 'http://localhost:8080/apis/apps/v1/namespaces
/default/deployments/kubia/scale'
{
"kind": "Scale",
"apiVersion": "autoscaling/v1",
"metadata": {
"name": "kubia",
"namespace": "default",
"uid": "4ac36acf-33c5-49d2-90fa-66c25eb6f44b",
"resourceVersion": "35485",
"creationTimestamp": "2021-07-27T12:59:19Z"
},
"spec": {
"replicas": 1
},
"status": {
"replicas": 3,
"selector": "app=kubia"
}
}
deployment가 scale 됨
# kubectl get deployment kubia
NAME READY UP-TO-DATE AVAILABLE AGE
kubia 1/1      1        1       22m
전체 Scaling 과정 이해

CPU 사용량을 기준으로 Autoscaling 하기
- Autoscaler가 Pod의 CPU utilization을 결정할 때, 실제 사용량과 요청 (requests) 양을 비교한다.
- 즉, Autoscaling이 필요한 Pod는 request가 명시되어야 함. (밑의 예제 참고)
CPU utilization 기반의 HPA를 생성하는 과정
1. metrics-server를 설치한다.
https://github.com/kubernetes-sigs/metrics-server#installation
2. Deployment를 생성하거나, 타 리소스를 생성할 때 request를 적어준다.
apiVersion: apps/v1
kind: Deployment
metadata:
 name: kubia
spec:
 replicas: 3
 selector:
 	matchLabels:
 		app: kubia
 template:
 	metadata:
 		name: kubia
		labels:
 			app: kubia
 spec:
 	containers:
 	- image: luksa/kubia:v1
 	name: nodejs
 	resources:
 		requests: #### 여기처럼 requests를 입력해줘야함
 			cpu: 100m
3. HPA를 생성한다.
# kubectl autoscale deployment kubia --cpu-percent=30 --min=1 --max=5
** note) Memory consumption에 기반한 Scaling
- 메모리 소비 기반 auto scaling은 CPU utilization 기반에 비교해 문제가 많다.
- 이유는.. Scale up 한 후에 오래된 Pod는 memory를 해제하는 것이 필요하지만, memory 해제 작업은 Application 수준에서 해야하며 (ex. garbage collector..) 이건 K8S 시스템에서 할 수 있는 것이 안디ㅏ.
- 새로운 Pod가 동일하게 memory를 사용한다면 최대치까지 Scale up되는게 반복될 뿐이다.
기타 Custom metrics를 기준으로 Autoscaling 하기
HPA를 생성할 때
...
spec:
	scaleTargetRef:
		apiVersion: apps/v1
		kind: Deployment
		name: <deployment name>
	minReplicas: 1
	maxReplicas: 10
	metrics:
	- type: Resource # metric
		resource:
		name: cpu #
		target: #
		type: Utilization
		averageUtilization: 50
metrics 필드에다가 사용할 하나 이상의 metric type을 정의하면 된다.
사용할 수 있는 metric 유형은 다음과 같이 정해져 있다.
- resource
- Container의 리소스 requests 항목 등의 resource metric 기반 - pod
- QPS(Queries per Second), Message Broker의 Queue Message 수 등의 Pod metrics
	type: Pods
	pods:
		metric:
			name: packets-per-second
		target:
			type: AverageValue
averageValue: 1k- object
해당 pod와 관련이 없는 metric을 기반으로 만드는 경우 사용된다.
ex. ingress object 기준, cluster object의 어떤 metric 기준..
	type: Object
	object:
		metric:
			name: requests-per-second
		describedObject:
			apiVersion: networking.k8s.io/v1beta1
			kind: Ingress
			name: main-route
		target:
          type: Value
          value: 10k
note) Replica를 0으로 감소
HPA는 아무리 metric이 작은 숫자더라도 minReplicas(최소 replica) 를 0으로 조절하지는 않는다.
Cluster nodes를 auto scaling하기
Cluster Autoscaler는 node에 resource가 부족해서 scheduling 할 수 없는 pod를 발견하면, node를 추가공급한다.
1. Scale up
Node 의 Resource가 부족해 cluster auto scale이 시작되면
1. cluster autoscaler는 사용 가능한 Node group을 확인한다.
2. 최소한 하나의 node 유형이라도 pod를 수용할 수 있는지 확인한다.
3. Node를 추가한다.
- Node group이 하나인 경우: 해당 Node group에다가 node추가
- Node group이 여러개인 경우 :
- 어떤 Node유형이 pod에 맞을지 결정 후 node를 추가- 최적의 경우, 무작위로 하나를 선택해서 추가
2. Scale down
특정 node에서 실행 중인 모든 pod의 resource가 50% 미만이면 해당 노드를 불필요한 node라고 간주한다.
Node를 종료할 수 없는 경우는?
- system pod가 실행중이라면, node는 종료될 수 없다
- 관리되지 않는 pod나, local volume을 가진 pod가 실행되는 경우 종료될 수 없다
Node를 종료하는 경우는?
- 실행되는 pod가 다른 노드로 다시 스케줄링 될 수 있다는 걸 안다면 node 종료가 시작되는데..
- 제거 대상 node가 더 이상 pod를 scheduling 할 수 없는 상태로 전환되면
- node에 속한 모든 pod를 삭제한다 (pod들은 다른 node에 정상적으로 스케줄링 됨)
- Node 삭제 후, cloud provider에게 반환된다
다음과 같은 providers에서 cluster autoscaler를 활성화 할 수 있다
- GKE
- GCE
- AWS
- Azure
추가.. VPA (Vertical Pod Autoscaling)
처음 공부하던 때와 달리, VPA 가 개발되었다.
VPA 한줄 요약 : 사용자가 pod의 request를 수동으로 입력하지 않아도 사용량에 근거해서 적합한 auto scaling을 하도록 알아서 조정함 오오..
End of docs
