나만의 셀렉샵 설계하기
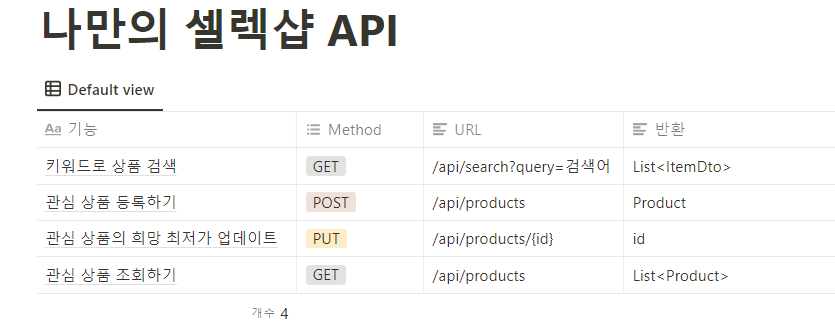
이렇게 api 설계를 하고 시작한다.
-
다음으로는 프로젝트를 준비했는데 하던대로 5개의 dependencies설치하고 시작했다.
-
다음으로는 db를 설정해줬는데 resources > application.properties에서
spring.h2.console.enabled=true
spring.datasource.url=jdbc:h2:mem:springcoredb
를 작성해주면서 h2 디비랑 연결하는 것이다.
그리고 웹페이지에 http://localhost:8080/h2-console 를 입력하면
내가 설정해놓은 h2 db에 접속할수있는데 이때 jdbc url을 jdbc:h2:mem:springcoredb 으로 넣어줘야한다. connect하면 잘 연결된다.
나만의 셀렉샵 API 구현하기
1) 네이버 상품 검색 API 구현하기
설계했던 부분을 확인하면 GET방식으로 API를 요청을 쿼리를 보내면서 검색어를 같이 전달해주고, 네이버 쇼핑 API에서 해당되는 상품들을 결과로 ItemDto로 반환해주는 api이다.
2) SearchRequestController 클래스 만들기
@RestController // JSON으로 응답함을 선언합니다.
public class SearchRequestController {

    private final NaverShopSearch naverShopSearch;

    @Autowired
    public SearchRequestController(NaverShopSearch naverShopSearch) {
        this.naverShopSearch = naverShopSearch;
    }

    @GetMapping("/api/search") //
    public List<ItemDto> getItems(@RequestParam String query) {
        String resultString = naverShopSearch.search(query); //쿼리로 들어오는 검색어를 요청한다.
        return naverShopSearch.fromJSONtoItems(resultString); // 이결과로 들어온 Json형태의 내용을 items로 바궈주는 것이다.
    }
}
3) NaverShopSearch 클래스 만들기
코드를 붙여 넣었당.
package com.sparta.springcore;

import org.json.JSONArray;
import org.json.JSONObject;
import org.springframework.http.*;
import org.springframework.stereotype.Component;
import org.springframework.web.client.RestTemplate;

import java.util.ArrayList;
import java.util.List;

@Component // 스프링 IoC 에 빈으로 등록
public class NaverShopSearch {
    public String search(String query) {
        RestTemplate rest = new RestTemplate();
        HttpHeaders headers = new HttpHeaders();
        headers.add("X-Naver-Client-Id", "zdqMoIkFaK8uKvC2oNY2");
        headers.add("X-Naver-Client-Secret", "LiZfsgtuD5");
        String body = "";

        HttpEntity<String> requestEntity = new HttpEntity<String>(body, headers);
        ResponseEntity<String> responseEntity = rest.exchange("https://openapi.naver.com/v1/search/shop.json?query=" + query, HttpMethod.GET, requestEntity, String.class);
        HttpStatus httpStatus = responseEntity.getStatusCode();
        int status = httpStatus.value();
        String response = responseEntity.getBody();
        System.out.println("Response status: " + status);
        System.out.println(response);

        return response;
    }

    public List<ItemDto> fromJSONtoItems(String result) {
        JSONObject rjson = new JSONObject(result);
        JSONArray items  = rjson.getJSONArray("items");
        List<ItemDto> ret = new ArrayList<>();
        for (int i=0; i<items.length(); i++) {
            JSONObject itemJson = (JSONObject) items.get(i);
            ItemDto itemDto = new ItemDto(itemJson);
            ret.add(itemDto);
        }
        return ret;
    }
        }
4) ItemDto 클래스 만들기
관심상품을 등록하기 위해 필요한 정보들을 담는 것이다.
package com.sparta.springcore;

import lombok.Getter;
import lombok.NoArgsConstructor;
import org.json.JSONObject;

@NoArgsConstructor // 기본 생성자를 자동으로 만듭니다.
@Getter
public class ItemDto {
    private String title;
    private String link;
    private String image;
    private int lprice;

    public ItemDto(JSONObject itemJson) {
        this.title = itemJson.getString("title");
        this.link = itemJson.getString("link");
        this.image = itemJson.getString("image");
        this.lprice = itemJson.getInt("lprice");
    }
}
- json처리 라이브러리 추가는 mvn사이트에서 가장 많이 사용하는 json 라이브러리를 검색해서 복사해오고 build.gradle에서 dependencies에 추가한다. 그리고 gradle을 눌러준다.
5) 관심상품 api 관련 클래스 구현하기
- 3계층 controller service repository를 제외한 모든 클래스를 구현해야한다.
관심상품 등록요청 dto: productrequestdto,
DB테이블에 대응되는 Entity: product,
DB테이블의 최초 등록시간, 마지막 업데이트시간: timestamped,
관심상품 최저가 업데이트 요청DTO: ProductMypricerequestDto
@Setter
@Getter // get 함수를 자동 생성합니다.
@MappedSuperclass // 멤버 변수가 컬럼이 되도록 합니다.
@EntityListeners(AuditingEntityListener.class) // 변경되었을 때 자동으로 기록합니다.
public abstract class Timestamped {

    @CreatedDate // 최초 생성 시점
    private LocalDateTime createdAt;

    @LastModifiedDate // 마지막 변경 시점
    private LocalDateTime modifiedAt;
}
꼭 3계층을 사용해야하는가? 한번해보자
@SpringBootApplication
@EnableJpaAuditing // 시간 자동 변경이 가능하도록 합니다.
@ServletComponentScan
public class SpringcoreApplication {
    public static void main(String[] args) {
        SpringApplication.run(SpringcoreApplication.class, args);
    }
}
spring말고 servlet를 사용하기위해서 main문에 넣어보았다.
servlet에 다 넣어서 상품을 조회하고, 최저가격을 수정하는 것 까지 다해봤는데
중간에 에러가 났다.
매핑을 잘 못해서 일단은 오브젝트 매퍼에 JavaTimeModule 모듈을 추가해줘서 해결하긴했다.
AllInOneServelt을 살펴보자
servlet은 자바를 사용해서 웹페이즈를 동적으로 생성하는 서버 측 프로그램을 얘기한다.
스프링없이 자바를 통한 서버구현이 이미 가능하고, 현재도 그렇게 구현된 서버들이 많이 있다.
그럼 왜 굳이 스프링의 3계층을 사용하는지 학습해보자
- api부분을 먼저 보자
이해해야할 부분이 클라이언트와 서버를 다른 언어를 사용중이다.
클라이언트는 JS 서버는 JAVA를 사용하기때문에 응답과 요청을 주고받을때의 데이터는 JSON형태를 사용한다.
신규 상품을 등록하는 부분인데
@WebServlet(urlPatterns = "/api/products/*", loadOnStartup = 1)
public class AllInOneServlet extends HttpServlet {
    // 신규 상품 등록
    @Override
    protected void doPost(HttpServletRequest request, HttpServletResponse response) throws IOException {

        // 요청 Body 의 JSON -> 자바 객체
        ProductRequestDto requestDto = null;
        StringBuffer jb = new StringBuffer();
        String line = null;
        try {
            BufferedReader reader = request.getReader();
            while ((line = reader.readLine()) != null)
                jb.append(line);

            ObjectMapper objectMapper = new ObjectMapper();
            requestDto = objectMapper.readValue(jb.toString(), ProductRequestDto.class);
        } catch (Exception e) { /*report an error*/ }


        // 관심 상품 DB 에 저장
		// ...

        // 다시 클라이언트로 돌려주기위해서 자바 객체 -> JSON 으로 변환
        ObjectMapper objectMapper = new ObjectMapper();
        String productJson = objectMapper.writeValueAsString(product);

        // 응답 보내기
        response.setContentType("application/json");
        response.setCharacterEncoding("UTF-8");
        PrintWriter out = response.getWriter();
        out.print(productJson);
        out.flush();
    }
}
한줄한줄 이해하기보다는 이렇구나로 넘어가자! 이제 spring의 controller을 알아보자
@RestController // JSON으로 데이터를 주고받음을 선언합니다.
public class AllInOneController {
    // 신규 상품 등록
    @PostMapping("/api/products")
    public Product createProduct(@RequestBody ProductRequestDto requestDto) throws SQLException {

        // 관심 상품 DB 에 저장
				// ...

        // 응답 보내기
        return product;
    }
}
이렇게 간단해진다.. 스프링이 알아서 json으로 바꿔준다.
관심상품 희망 최저가를 업데이트하는 부분을 비교해보자.
@WebServlet(urlPatterns = "/api/products/*", loadOnStartup = 1)
public class AllInOneServlet extends HttpServlet {
    // 설정 가격 변경
    @Override
    protected void doPut(HttpServletRequest request, HttpServletResponse response) throws IOException {
        // 요청 URL 에 입력되어 있는 'id' 파라미터 조회
        String uri = request.getRequestURI();
        String idStr = uri.substring(uri.lastIndexOf("/") + 1);

        Long id = Long.parseLong(idStr);

        // 요청 BODY 의 JSON -> 자바 객체
        ProductMypriceRequestDto requestDto = null;
				StringBuffer jb = new StringBuffer();
        String line = null;
        try {
            BufferedReader reader = request.getReader();
            while ((line = reader.readLine()) != null)
                jb.append(line);

            ObjectMapper objectMapper = new ObjectMapper();
            requestDto = objectMapper.readValue(jb.toString(), ProductMypriceRequestDto.class);
        } catch (Exception e) { /*report an error*/ }

				// DB 에 최저 희망가 (myprice) 업데이트
        // ..

        // 자바 객체 -> JSON 으로 변환
        ObjectMapper objectMapper = new ObjectMapper();
        String productIdJson = objectMapper.writeValueAsString(product.getId());

        // 응답 보내기 (업데이트된 상품 id)
        response.setContentType("application/json");
        response.setCharacterEncoding("UTF-8");
        PrintWriter out = response.getWriter();
        out.print(productIdJson);
        out.flush();
    }
}
@RestController // JSON으로 데이터를 주고받음을 선언합니다.
public class AllInOneController {
// 설정 가격 변경
@PutMapping("/api/products/{id}")
public Long updateProduct(@PathVariable Long id, @RequestBody ProductMypriceRequestDto requestDto) throws SQLException {
// DB 에 최저 희망가 (myprice) 업데이트
// ...
// 응답 보내기 (업데이트된 상품 id)
return product.getId();
}
}