DOM(Document Object Model)
document ?
브라우저에 이미 존재하는 object이다. 우리들이 접근할 수 있는 html 을 가리키는 object이다 javascript는 html에 이미 연결 되어 있다
document가 html이 해당 js파일을 load 하기 때문에 document가 존재하는 것 → 그 후 브라우저가 html 정보가 있는 document 라는 object를 전달해줌으로써 접근 할 수 있게 해줌
document가 모든 것들의 시작점이다 (document = 우리들의 web site)
DOM이란 웹페이지의 html 을 계층화 시켜 트리구조로 만든 객체 모델이다 자바스크립트는 이 model 로 웹페이지에 접근하고 페이지를 수정할 수 있다 DOM은 html 인 웹페이지와 스크립팅 언어(javascript)를 서로 잇는 역할이다
DOM은 html문서의 계층적 구조와 정보를 표현하며 제어할수 있는 API , 즉 프로퍼티와 메서드를 제공하는 트리 자료구조 이다 이때 각각의 요소와 속성, 콘텐츠를 표현하는 단위를 '노드(node)'라고 한다

HTMLCollection과 NodeList 차이
    <article id="colorContainer">
      <ul>
        <li>빨강</li>
        <li class="yellow">노랑</li>
        <li>파랑</li>
      </ul>
    </article>


	<script>
      const container = document.getElementById('colorContainer');
      const color1 = document.getElementsByTagName('li');
      const color2 = document.querySelectorAll('li');

      console.log(container); // <article id="colorContainer">...</article>
      console.log(color1); // HTMLCollection(3) [li, li.yellow, li]
      console.log(color2); // NodeList(3) [li, li.yellow, li]
    </script>
color1, color2 를 비교해보면 HTMLCollection와 NodeList로 출력되는데
첫번째 차이점은
HTMLCollection는 HTML만 포함하지만
NodeList는 뫃든 DOM 요소 인 텍스트, 주석 등 모든 것을 포함 한 것이다
두번째 차이점은 객체를 구성하는 값이 변경 가능 여부 이다
HTMLCollection는 변경이 즉시 반영 되지만
NodeList는 정적이므로 즉시 반영 되지 않는다
세번째 차이점은 메소드가 다르다
NodeList는 배열 메소드 사용 가능하지만
HTMLCollection는 또 다른 기능을 지원한다
요소 제어
ul 태그 안에 DOM 제어 명령어로 li 태그를 생성해보자
    <ul></ul>
    <button>Make me MORE!</button>

    <script>
      const myBtn = document.querySelector('button');
      const myUl = document.querySelector('ul');

      myBtn.addEventListener('click', function () {
        for (let i = 0; i < 5; i++) {
          const myLi = document.createElement('li');
          const btnDel = document.createElement('button');
          const btnTxt = (document.createTextNode = '버튼');

          btnDel.append(btnTxt);
          btnDel.addEventListener('click', () => {
            myLi.remove();
          });
          myLi.append('삭제하기 - ', btnDel);
          myUl.appendChild(myLi);
        }
      });
</script>- document.createElement() : 요소 생성
- document.createTextNode() : 텍스트 생성
- element.appendChild() : 요소를 element 자식에 위치
- element.removeChild() : element 자식 요소 제거
- element.append() : 요소를 element 자식에 위치
- target.remove() : target 요소 제거
button 클릭 했을 때 color 바꾸기 🌈
🦁✍️ 참고 코드
속성 제어하기
style의 프로퍼티와 메서드를 가지고 있는 style 객체로 특정 요소의 style 속성 을 바꿀수 있다. 속성에 Attribute 메서드로 접근 , 수정 가능하다
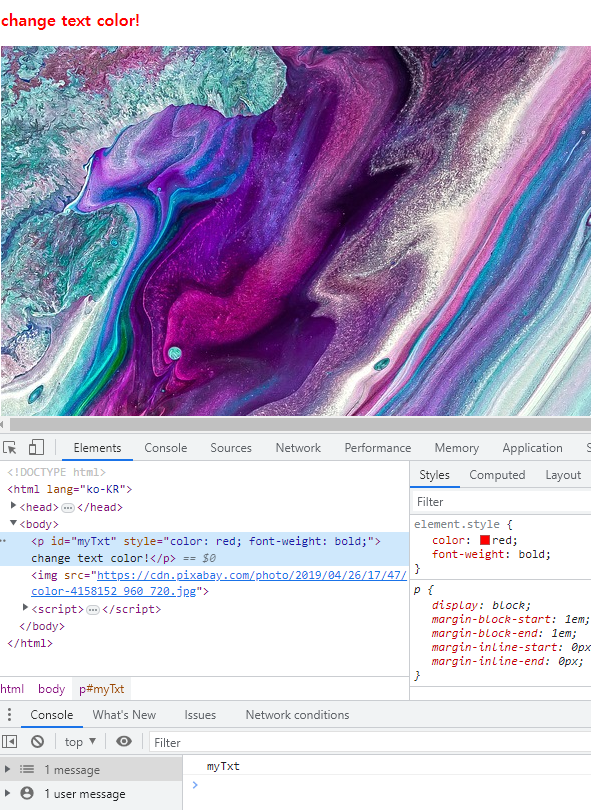
 <p id="myTxt">change text color!</p>
    <img
      src="https://cdn.pixabay.com/photo/2018/06/29/23/51/fabric-3506846_960_720.jpg"
    />
    <script>
      const target = document.querySelector('p');
      const myImg = document.querySelector('img');
      const targetAtt = target.getAttribute('id');
      const textCol = target.style.color;

      console.log(targetAtt);
      target.style.color = 'red';
      target.style.fontWeight = 'bold';
      myImg.setAttribute(
        'src',
        'https://cdn.pixabay.com/photo/2019/04/26/17/47/color-4158152_960_720.jpg'
      );
    </script>
👉 결과 화면
myTxt font-color 와 font-weight, img src, 그리고 getAttribute 로 가져온 id 값이 콘솔에 출력되었다
이벤트 흐름
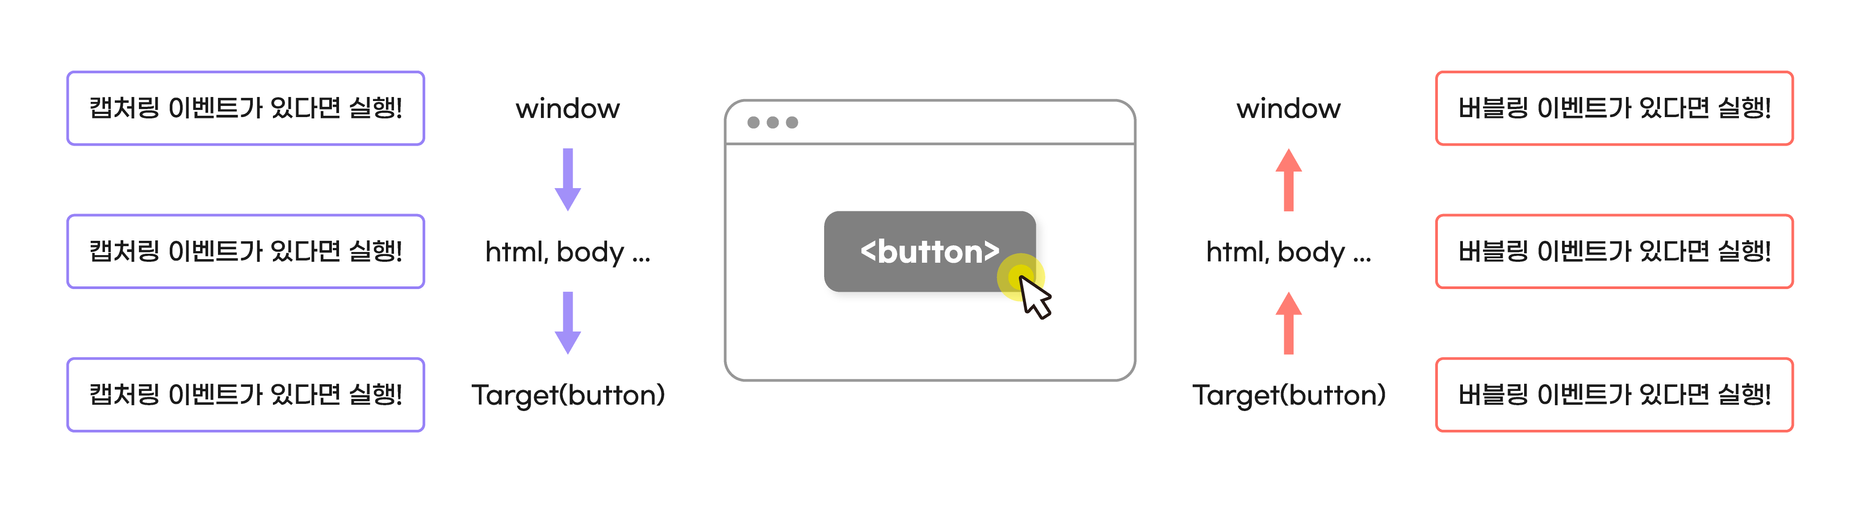
브라우저가 이벤트 대상을 찾아 갈때 가장 상위부터 내려 간다
window -> document -> body 순으로 DOM트리를 따라 내려간다
-> 캡처링 단계
이벤트 대상을 찾고 캡처링 단계를 끝내면 다시 DOM 트리를 따라 올라간다
올라가며 만나는 모든 버블링 이벤트 리스너를 실행
-> 버블링 단계
이러한 과정에서 이벤트 리스너가 차례대로 실행 되는 것
-> 이벤트 전파