
“Android 로봇은 Google에서 제작하여 공유한 저작물을 복제하거나 수정한 것으로 Creative Commons 3.0 저작자 표시 라이선스의 약관에 따라 사용되었습니다.”
개요
우리가 스마트폰을 쓰면서 가장 많이 쓰이는 기능 중 하나는
바로 알림이다.
알림이 없다면 누가 나에게 카톡을 보냈는지
누가 나한테 전화를 했었는지 알 수가 없다.
오늘은 이 알림 (Notification)을 띄우는 간단한 예제를 다뤄보려고 한다.
Notification
알림을 띄우기 위해서는 사전 준비가 필요하다.
- 알림을 구성하는 NotificationBuilder
- 알림의 컨텐츠를 담당하는 PendingIntent
- 알림을 그룹핑하는 Channel (API Level 29 (Android Oreo) 이상)
PendingIntent
    private fun getPendingIntent() : PendingIntent {
        return PendingIntent.getActivity(
            this,	// context
            NOTIFICATION_ID,	// 각 알림을 구분하기 위한 ID
            Intent(this, MainActivity::class.java), // 알림을 클릭했을 때 실행할 Activity
            PendingIntent.FLAG_UPDATE_CURRENT or PendingIntent.FLAG_IMMUTABLE // 알림을 제어하기 위한 flag
        )
}- Android 12 (API Level 31) 이상부터는
FLAG_IMMUABLEFLAG_MUTABLE둘 중 하나를 flag에 추가해야한다.
Builder
    private fun getNotificationBuilder(title: String, text: String) : NotificationCompat.Builder {
        return NotificationCompat.Builder(this, PRIMARY_CHANNEL_ID).apply {
            setContentTitle(title)	// 제목
            setContentText(text)	// 내용
            setSmallIcon(R.drawable.ic_launcher_foreground)	// 아이콘
            setContentIntent(getPendingIntent())	// PendingIntent
            setAutoCancel(true)	// 알림을 클릭했을 때 자동삭제 여부
        }
    }
Channel
    private fun createNotificationChannel(notificationManager: NotificationManager) {
        val notificationChannel = NotificationChannel(
            PRIMARY_CHANNEL_ID,	// 채널을 구분할 ID
            "Test",	// 채널 이름
            NotificationManager.IMPORTANCE_HIGH	// 채널의 중요도, 일반적으로 IMPORTANE_HIGH를 사용한다.
        ).apply {
        	// 채널에 적용할 설정
            enableLights(true)
            lightColor = Color.GRAY
            enableVibration(true)
            description = "Notification Sample"
        }
       // 채널 등록
       notificationManager.createNotificationChannel(notificationChannel)
    }
실행해보자
    override fun onCreate(savedInstanceState: Bundle?) {
        super.onCreate(savedInstanceState)
        val binding = ActivityMainBinding.inflate(layoutInflater)
        setContentView(binding.root)

        notificationManager = getSystemService(NotificationManager::class.java)

        createNotificationChannel()
        binding.notyButton.run {
            setOnClickListener {
                notificationManager.notify(NOTIFICATION_ID, getNotificationBuilder("Title", "Message").build())
            }
        }
}notificationManager.notify()를 호출하여 알림을 띄울 수 있다.
주의할 점은 NOTIFICATION_ID와 CHANNEL_ID를 반드시 잘 맞춰야한다.
하나라도 맞지 않으면 알림이 나타나지 않는다.
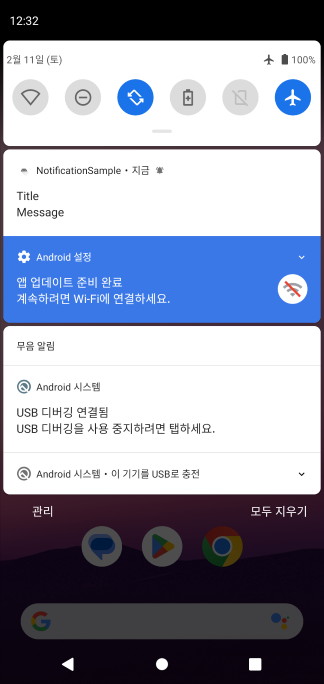 | 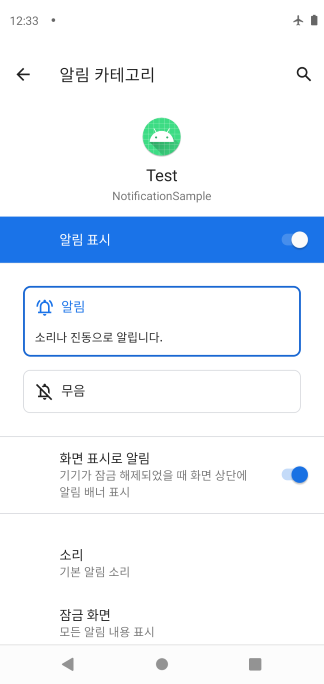 |
|---|
캡처를 보면 알림이 정상적으로 보여지고
채널(카테고리) 또한 생성이 된 것을 확인할 수 있다.
개인적으로 공부했던 것을 바탕으로 작성하다보니
잘못된 정보가 있을수도 있습니다.
인지하게 되면 추후 수정하겠습니다.
피드백은 언제나 환영합니다.
읽어주셔서 감사합니다.

지프처럼 거침없는 개발을 하고싶은 개발자