
서론
안녕하세요, 영훈입니다. 오랜만에 글을 쓰네요!
이번 글은 웹팩으로 직접 React 개발 환경을 구축해보면서 웹팩에 대한 기본 개념과 감을 잡을 수 있도록 목표로 작성한 글입니다.
웹팩을 사용하고 있지만 정확히 웹팩이 어떻게 돌아가는지 감이 잘 안오시는 분들께 도움이 되길 바라면서 시작하겠습니다.
완성된 소스코드는 아래 URL에서 볼 수 있습니다.
https://github.com/jeffchoi72/webpack4-react
웹팩 개념 잡고 가기
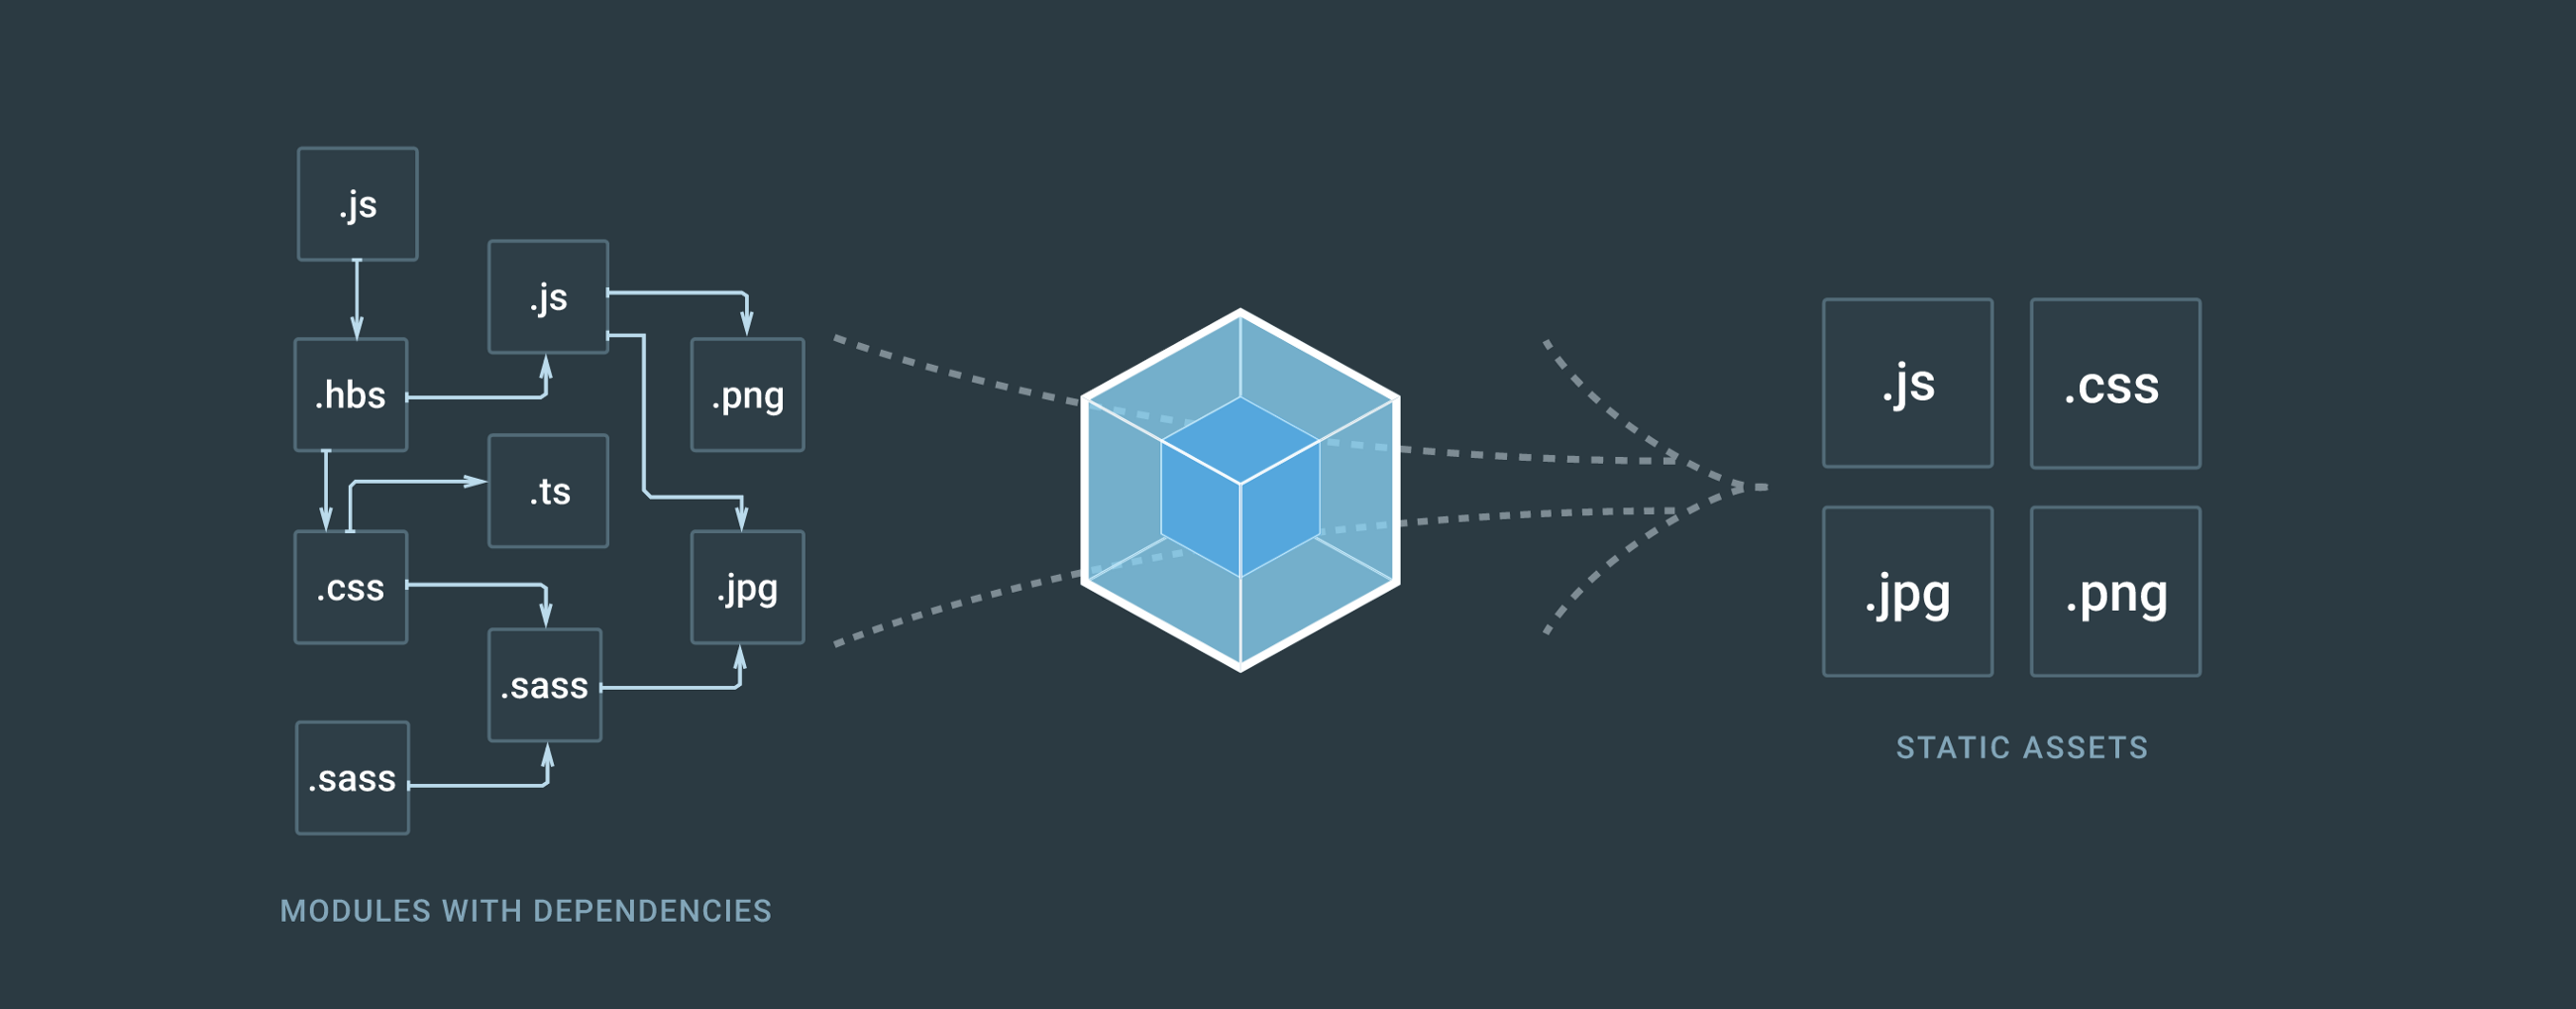
일단, 웹팩에 대한 개념을 잡을려면 모듈 번들러에 대한 개념이 있어야 합니다.
모듈 번들러란 여러개의 나누어져 있는 파일들을 하나의 파일로 만들어주는 라이브러리를 말합니다.
모듈 번들러 라이브러리는 웹팩(wepback), Parcel 등 있습니다.
그렇다면 왜 여러개의 나누어져 있는 파일들을 하나의 파일로 만들어주는 모듈 번들러가 나왔을까요?
옛날 모듈 번들러 개념이 없었다고 가정하고 웹페이지에 접속했다고 가정해봅시다.
이때 웹페이지에서는 페이지를 보여주기 위한 수 많은 자바스크립트 파일을 서버에 요청합니다.
이를 통해 웹페이지를 보여주기 위해 서버와 여러번 통신하게 되는게 비효율적이다 라고 볼 수 있습니다.
또한 옛날 자바스크립트는 모듈 개념이 없었기 때문에 파일이 나누어져 있어도 변수 스코프를 생각하면서 개발을 해야했습니다.
이런 문제를 해결하기위해 최신 자바스크립트부터는 모듈 개념이 생겼습니다. 하지만 지원을 안해주는 브라우저들도 있기 때문에 무언가 브라우저들이 지원할 수 있는 코드로 변환해 줘야합니다.
그 무언가가 웹팩과 같은 모듈 번들러 라이브러리 입니다.
모듈 번들러는 여러개의 자바스크립트 파일을 하나의 파일로 묶어서 한 번에 요청을 통해 가지고 올 수 있게 하고 최신 자바스크립트 문법을 브라우저에서 사용할 수 있게 해줍니다.
또한 모듈 번들러들은 자바스크립트 코드들을 압축하고 최적화 할 수 있기 때문에 로딩 속도를 높일 수 있습니다.
물론, 수 많은 자바스크립트 파일이 하나의 파일로 묶인다면 초기 로딩 속도가 어마어마해 질 수 있습니다.
모듈 번들러들은 이런 문제를 해결하기 위해 청크, 캐시, 코드 스플릿 개념들을 도입하면서 문제들을 해결하고 있습니다.
이제 실습을 해보면서 개념들을 익혀보겠습니다.
실습
프로젝트 설정하기
우선 웹팩과 리액트를 사용하기 위해 필요 라이브러리 설치를 진행하겠습니다.
우선 webpack-react 라는 디렉터리를 만드신 후 아래와 같은 명령어를 통해 초기화를 해주세요
yarn init -y그 후 해당 실습에서 사용할 라이브러리들을 모두 설치하겠습니다.
진행하면서 해당 라이브러리를 왜 설치를 했는지 자연스럽게 이해할 수 있습니다.
yarn add -D @babel/core @babel/preset-env @babel/preset-react babel-loader clean-webpack-plugin css-loader html-loader html-webpack-plugin mini-css-extract-plugin node-sass react react-dom sass-loader style-loader webpack webpack-cli webpack-dev-server웹팩으로 자바스크립트 파일 빌드하기
먼저, 웹팩으로 자바스크립트 파일을 빌드 해보도록 하겠습니다.
src 디렉터리를 만드신 후 아래와 같이 test.js 파일을 작성해 주세요
console.log("webpack test");그 후 최상위 디렉터리로 이동한 후 아래와 같이 webpack.config.js 파일을 작성해 주세요
const path = require("path");

module.exports = {
  entry: "./src/test.js",
  output: {
    filename: "bundle.js",
    path: path.resolve(__dirname + "/build")
  },
  mode: "none"
};
여기서 entry는 웹팩이 빌드할 파일을 알려주는 역할을 합니다.
이렇게 한다면 src/test.js 파일 기준으로 import 되어 있는 모든 파일들을 찾아 하나의 파일로 합치게 됩니다.
output은 웹팩에서 빌드를 완료하면 output에 명시되어 있는 정보를 통해 빌드 파일을 생성합니다.
mode는 웹팩 빌드 옵션 입니다. production은 최적화되어 빌드되어지는 특징을 가지고 있고 development는 빠르게 빌드하는 특징, none 같은 경우는 아무 기능 없이 웹팩으로 빌드합니다.
이제 package.json 파일로 이동하신 후 다음과 같이 build: webpack 스크립트를 추가해 주세요
{
  "name": "webpack-react",
  "version": "1.0.0",
  "main": "index.js",
  "license": "MIT",
  "scripts": {
    "build": "webpack"
  },
  "devDependencies": {
    "@babel/core": "^7.4.3",
    "@babel/preset-env": "^7.4.3",
    "@babel/preset-react": "^7.0.0",
    "babel-loader": "^8.0.5",
    "clean-webpack-plugin": "^2.0.1",
    "css-loader": "^2.1.1",
    "html-loader": "^0.5.5",
    "html-webpack-plugin": "^3.2.0",
    "mini-css-extract-plugin": "^0.6.0",
    "node-sass": "^4.11.0",
    "react": "^16.8.6",
    "react-dom": "^16.8.6",
    "sass-loader": "^7.1.0",
    "style-loader": "^0.23.1",
    "webpack": "^4.30.0",
    "webpack-cli": "^3.3.1",
    "webpack-dev-server": "^3.3.1"
  }
}
webpack 명령어가 실행되면 디폴트로 실행할 파일은 같은 경로에 있는 webpack.config.js에 내용을 가지고 빌드 됩니다.
이제 터미널에서 yarn build 를 해주세요

그 후 빌드 디렉터리로 이동하면 bundle.js 파일을 볼 수 있습니다.

웹팩으로 HTML 파일 빌드하기
이번에는 html 파일들을 웹팩으로 빌드해 보도록 하겠습니다.
웹팩은 자바스크립트 파일뿐만 아니라 자바스크립트가 아닌 파일들도 모듈로 관리 할 수 있습니다.
어떻게 자바스크립트가 아닌 파일들도 관리할 수 있을까요?
바로 웹팩에서는 로더(loader) 라는 기능이 있습니다. 로더는 자바스크립트 파일이 아닌 파일을 웹팩이 이해할 수 있게 해줍니다.
로더를 사용하는 방법은 아래와 같습니다.
module : {
	rules: {
		test: '가지고올 파일 정규식',
		use: [
			{
				loader: '사용할 로더 이름',
				options: { 사용할 로더 옵션 }
			}
		]
	}
}
직접 html 파일을 웹팩으로 빌드해 봄으로써 로더에 개념을 이해해 보도록 하겠습니다.
public 디렉터리를 만들어 주신 후 public 디렉터리에 다음과 같이 index.html 파일을 만들어 주세요
<!DOCTYPE html>
<html lang="kr">
  <head>
    <meta charset="utf-8" />
    <title>WEBPACK4-REACT</title>
  </head>
  <body>
    <noscript>스크립트가 작동되지 않습니다!</noscript>
    <div id="root"></div>
  </body>
</html>
그 후 webpack.config.js 파일에 아래와 같이 html 관련 코드를 추가해 주세요
const path = require("path");
const HtmlWebPackPlugin = require("html-webpack-plugin");

module.exports = {
  entry: "./src/test.js",
  output: {
    filename: "bundle.js",
    path: path.resolve(__dirname + "/build")
  },
  mode: "none",
  module: {
    rules: [
      {
        test: /\.html$/,
        use: [
          {
            loader: "html-loader",
            options: { minimize: true }
          }
        ]
      }
    ]
  },
  plugins: [
    new HtmlWebPackPlugin({
			template: './public/index.html', // public/index.html 파일을 읽는다.
      filename: 'index.html' // output으로 출력할 파일은 index.html 이다.
    })
  ]
};
html-webpack-plugin은 웹팩이 html 파일을 읽어서 html 파일을 빌드할 수 있게 해줍니다.
위에 있는 로더는 html 파일을 읽었을 때 html-loader를 실행하여 웹팩이 이해할 수 있게 하고 options 으로는 minimize 라는 코드 최적화 옵션을 사용하고 있습니다.
그 후 yarn build 명령어를 실행해 주시면 다음과 같이 build/index.html 파일이 생성되어 있는 모습을 볼 수 있습니다.

minimize 옵션이 켜져 있어서 파일 내용이 한줄로 되어 있습니다. minimize 옵션을 꺼주시면 줄바꿈된 형태로 보여집니다. 또한 HtmlWebpackPlugin은 웹팩 빌드시 output에 있는 bundole.js를 자동으로 import 합니다.
index.html 을 웹브라우저에서 보시면 콘솔창에 webpack test 가 찍히는 것을 볼 수 있습니다.

웹팩으로 리액트 빌드하기
이제 웹팩으로 리액트를 빌드해보도록 하겠습니다.
src/index.js를 만들고 아래와 같은 내용을 입력해 주세요
import React from "react";
import ReactDOM from "react-dom";
import Root from "./Root";

ReactDOM.render(<Root />, document.getElementById("root"));
그 후 src/Root.js를 만들고 아래와 같은 내용을 입력해 주세요
import React from 'react';

const Root = () => {
  return (
    <h3>Hello, React</h3>
  );
};

export default Root;
최상위 디렉터리에서 .babelrc 파일을 만든 후 아래와 같은 내용을 입력해 주세요
바벨 (babel)은 ES6에서 ES5로 자바스크립트를 변환해주는 역할을 합니다.
아래 내용은 바벨이 ES6와 리액트를 ES5로 변환할 수 있게 해준다는 내용입니다.
{
  "presets": ["@babel/preset-env", "@babel/preset-react"]
}
이제 webpack.config.js 파일에 entry와 rules에 babel-loader를 추가해 줍니다.
이를 통해 babel-loader는 우리가 사전에 작업한 .babelrc를 참고하여 리액트와 ES6를 ES5로 반환해 줍니다.
const path = require("path");
const HtmlWebPackPlugin = require("html-webpack-plugin");

module.exports = {
  entry: "./src/index.js",
  output: {
    filename: "bundle.js",
    path: path.resolve(__dirname + "/build")
  },
  mode: "none",
  module: {
    rules: [
      {
        test: /\.(js|jsx)$/,
        exclude: "/node_modules",
        use: ['babel-loader'],
      },
      {
        test: /\.html$/,
        use: [
          {
            loader: "html-loader",
            options: { minimize: true }
          }
        ]
      }
    ]
  },
  plugins: [
    new HtmlWebPackPlugin({
      template: './public/index.html', // public/index.html 파일을 읽는다.
      filename: 'index.html' // output으로 출력할 파일은 index.html 이다.
    })
  ]
};
그 후 yarn build 명령어를 실행해 웹팩으로 빌드한 후 index.html 파일을 열어보면 Hello, React가 보이는 모습을 확인할 수 있습니다.

웹팩에서 CSS 사용하기
이제 CSS를 적용하겠습니다.
먼저 src/style.css를 만들어 아래와 같은 내용을 입력해 주세요
.title {
	color: #2196f3;
    font-size: 52px;
    text-align: center;
}
그 후 src/root.js에서 style.css를 가지고 올 수 있도록 해주세요
import React from 'react';
import './style.css';

const Root = () => {
  return (
    <h3 className="title">Hello, React</h3>
  );
};

export default Root;
yarn build를 하면 아래와 같이 file을 읽을 수 없다고 나옵니다.

그렇다면, css-loader를 적용해 CSS를 읽을 수 있게 합시다!
아래와 같이 webpack.config.js에 css-loader를 추가해 주세요
const path = require("path");
const HtmlWebPackPlugin = require("html-webpack-plugin");

module.exports = {
  entry: "./src/index.js",
  output: {
    filename: "bundle.js",
    path: path.resolve(__dirname + "/build")
  },
  mode: "none",
  module: {
    rules: [
      {
        test: /\.(js|jsx)$/,
        exclude: "/node_modules",
        use: ['babel-loader'],
      },
      {
        test: /\.html$/,
        use: [
          {
            loader: "html-loader",
            options: { minimize: true }
          }
        ]
      },
      {
        test: /\.css$/,
        use: ['css-loader']
      }
    ]
  },
  plugins: [
    new HtmlWebPackPlugin({
      template: './public/index.html', // public/index.html 파일을 읽는다.
      filename: 'index.html' // output으로 출력할 파일은 index.html 이다.
    })
  ]
};
그 후 yarn build를 하시면 성공적으로 빌드가 된 것을 볼 수 있습니다.

하지만 build가 완료된 index.html 파일을 웹브라우저에서 열어보면 css가 적용이 안되어 있습니다.
왜냐하면, 웹팩에서 css 파일을 읽은 후 어딘가에 저장을 해야하기 때문입니다.
이럴때, css를 index.html에 합치는 방법도 있지만 파일을 추출해 보도록 하겠습니다!
webpack.config.js에 CSS를 추출해서 파일로 저장하는 플러그인을 적용하겠습니다.
아래와 같이 추가해 주세요
const path = require("path");
const HtmlWebPackPlugin = require("html-webpack-plugin");
const MiniCssExtractPlugin = require("mini-css-extract-plugin");

module.exports = {
  entry: "./src/index.js",
  output: {
    filename: "bundle.js",
    path: path.resolve(__dirname + "/build")
  },
  mode: "none",
  module: {
    rules: [
      {
        test: /\.(js|jsx)$/,
        exclude: "/node_modules",
        use: ['babel-loader'],
      },
      {
        test: /\.html$/,
        use: [
          {
            loader: "html-loader",
            options: { minimize: true }
          }
        ]
      },
      {
        test: /\.css$/,
        use: [MiniCssExtractPlugin.loader, 'css-loader']
      }
    ]
  },
  plugins: [
    new HtmlWebPackPlugin({
      template: './public/index.html', // public/index.html 파일을 읽는다.
      filename: 'index.html' // output으로 출력할 파일은 index.html 이다.
    }),
    new MiniCssExtractPlugin({
      filename: 'style.css'
    })
  ]
};
이제 yarn build를 한 후 index.html을 확인하면 아래와 같은 모습을 확인할 수 있습니다!
잠깐!
{
test: /\.css$/,
use: [MiniCssExtractPlugin.loader, 'css-loader']
}
use에 있는 loader 순서는 오른쪽에서 왼쪽 순서로 실행이 됩니다.
위에 있는 코드에 의미는 css-loader로 css 파일을 읽고 MniCssExtractPlugin.loader로 읽은 CSS를 파일로 추출해 냅니다.
웹팩에서 SCSS 사용하기
이제 SCSS를 적용해 보도록 하겠습니다.
src/style.scss 파일을 만들어 아래와 같이 만들어 주세요
$fontColor: #2196f3;
$fontSize: 52px;


.title {
  color: $fontColor;
  font-size: $fontSize;
  text-align: center;
}
그 후 src/Root.js를 아래와 같이 scss를 import하게 수정해 주세요
import React from 'react';
import './style.scss';

const Root = () => {
  return (
    <h3 className="title">Hello, React</h3>
  );
};

export default Root;
그 후 yarn build 명령어를 통해 빌드를 하면 에러가 나는 모습을 확인하실 수 있습니다.

이는 웹팩이 scss 파일을 읽을 수 없어서 나오는 에러이며, 웹팩이 scss 파일을 읽을 수 있게 해줘야 합니다.
webpack.config.js를 열어 아래와 같이 sass-loader를 적용해 줍시다!
const path = require("path");
const HtmlWebPackPlugin = require("html-webpack-plugin");
const MiniCssExtractPlugin = require("mini-css-extract-plugin");

module.exports = {
  entry: "./src/index.js",
  output: {
    filename: "bundle.js",
    path: path.resolve(__dirname + "/build")
  },
  mode: "none",
  module: {
    rules: [
      {
        test: /\.(js|jsx)$/,
        exclude: "/node_modules",
        use: ['babel-loader'],
      },
      {
        test: /\.html$/,
        use: [
          {
            loader: "html-loader",
            options: { minimize: true }
          }
        ]
      },
      {
        test: /\.css$/,
        use: [MiniCssExtractPlugin.loader, 'css-loader']
      },
      {
        test: /\.scss$/,
        use: [MiniCssExtractPlugin.loader, "css-loader", "sass-loader"]
      }
    ]
  },
  plugins: [
    new HtmlWebPackPlugin({
      template: './public/index.html', // public/index.html 파일을 읽는다.
      filename: 'index.html' // output으로 출력할 파일은 index.html 이다.
    }),
    new MiniCssExtractPlugin({
      filename: 'style.css'
    })
  ]
};
use: [MiniCssExtractPlugin.loader, "css-loader", "sass-loader"]
위에 부분을 해석하면 먼저 sass-loader로 scss 파일을 읽고 css로 변환한 후 css-loader로 css 읽습니다. 그 후 MiniCssExtractPlugin으로 읽은 CSS를 파일로 추출합니다.
이제 yarn build를 하면 성공적으로 빌드된것을 볼 수 있습니다.

index.html을 보면 scss가 적용된 모습을 볼 수 있습니다.

웹팩 개발 서버 적용하기
지금까지 소스코드를 수정할 때마다 웹팩으로 직접 빌드를 했습니다.
수정할때 마다 직접 빌드하면 많이 불편할 것 같습니다.
이런 불편한 점때문에 소스코드를 수정할때마다 알아서 웹팩이 빌드해주는 webpack-dev-server가 있습니다.
바로 webpack-dev-server를 적용해보도록 하겠습니다.
먼저, webpack.config.js 파일에 들어가 devServer를 추가해 줍시다.
const path = require("path");
const HtmlWebPackPlugin = require("html-webpack-plugin");
const MiniCssExtractPlugin = require("mini-css-extract-plugin");

module.exports = {
  entry: "./src/index.js",
  output: {
    filename: "bundle.js",
    path: path.resolve(__dirname + "/build")
  },
  devServer: {
    contentBase: path.resolve("./build"),
    index: "index.html",
    port: 9000
  },
  mode: "none",
  module: {
    rules: [
      {
        test: /\.(js|jsx)$/,
        exclude: "/node_modules",
        use: ['babel-loader'],
      },
      {
        test: /\.html$/,
        use: [
          {
            loader: "html-loader",
            options: { minimize: true }
          }
        ]
      },
      {
        test: /\.css$/,
        use: [MiniCssExtractPlugin.loader, 'css-loader']
      },
      {
        test: /\.scss$/,
        use: [MiniCssExtractPlugin.loader, "css-loader", "sass-loader"]
      }
    ]
  },
  plugins: [
    new HtmlWebPackPlugin({
      template: './public/index.html', // public/index.html 파일을 읽는다.
      filename: 'index.html' // output으로 출력할 파일은 index.html 이다.
    }),
    new MiniCssExtractPlugin({
      filename: 'style.css'
    })
  ]
};
그 후 package.json 파일에 들어가 scripts에 다음과 같이 yarn start를 추가해 줍니다.
"scripts": {
	"build": "webpack",
	"start": "webpack-dev-server --hot"
}
그런다음 터미널에서 yarn start를 실행해주세요

그 후 브라우저로 http://localhost:9000 에 접속하시면 빌드된 모습을 확인할 수 있습니다.
src/Root.js에 출력될 문자를 아무거나 바꾸시고 저장하시면 자동으로 빌드 됩니다!
빌드 디렉터리 깨끗하게 하기
이번에는 build 디렉터리를 clean-webpack-plugin 을 통해서 빌드될때마다 안쓰는 파일들을 삭제할 수 있게 하겠습니다.
먼저, webpack.config.js에서 아래와 같이 plugins에 MiniCssExtractPlugin에 filename을 style-test.css로 변경해 주세요
plugins: [
	new HtmlWebPackPlugin({
		template: './public/index.html', // public/index.html 파일을 읽는다.
		filename: 'index.html' // output으로 출력할 파일은 index.html 이다.
	}),
	new MiniCssExtractPlugin({
		filename: 'style-test.css'
	})
]
그런 다음 yarn build를 해주신 후 build 디렉터리를 보면 다음과 같이 안쓰는 style.css가 여전히 존재하는 모습을 볼 수 있습니다.

clean-webpack-plugin을 사용해서 사용안하는 파일을 자동으로 삭제할 수 있게 해봅시다!
webpack.config.js를 clean-webpack-plguin을 추가하고 plugins에 적용해 주세요
const CleanWebpackPlugin = require("clean-webpack-plugin");

module.exports = {
 	...,
  plugins: [
    new HtmlWebPackPlugin({
      template: './public/index.html', // public/index.html 파일을 읽는다.
      filename: 'index.html' // output으로 출력할 파일은 index.html 이다.
    }),
    new MiniCssExtractPlugin({
      filename: 'style-test.css'
    }),
    new CleanWebpackPlugin()
  ]
};
그 후 yarn build를 하면 사용 안하는 파일이 삭제된 것을 볼 수 있습니다.

웹팩 빌드 모드 나누기
웹팩은 빌드 모드가 Development와 Production에 따라서 차이가 있습니다.
간단하게 설명하면, Development는 빠르게 빌드하기 위해서 빌드할때 최적화를 안하는 특징을 가지고 있고 Production은 빌드할때 최적화 작업을 하고 있습니다.
파일을 confing/webpack.config.dev.js와 config/webpack.config.prod.js로 나누어 적용해 보도록 하겠습니다.
먼저 config 디렉터리를 만드신 후 webpack.config.dev.js와 webpack.config.prod.js를 만들어 주세요
그리고 각 파일들을 아래와 같이 적용해 주세요
config/webpack.config.dev.js
const path = require("path");
const HtmlWebPackPlugin = require("html-webpack-plugin");
const MiniCssExtractPlugin = require("mini-css-extract-plugin");
const CleanWebpackPlugin = require("clean-webpack-plugin");

module.exports = {
  entry: "./src/index.js",
  output: {
    filename: "bundle.js",
    path: path.resolve(__dirname, "../build")
  },
  mode: "development",
  devServer: {
    contentBase: path.resolve(__dirname, "../build"),
    index: "index.html",
    port: 9000
  },
  module: {
    rules: [
      {
        test: /\.(js|jsx)$/,
        exclude: "/node_modules",
        use: ["babel-loader"]
      },
      {
        test: /\.html$/,
        use: [
          {
            loader: "html-loader",
            options: { minimize: true }
          }
        ]
      },
      {
        test: /\.css$/,
        use: [MiniCssExtractPlugin.loader, "css-loader"]
      },
      {
        test: /\.scss$/,
        use: [MiniCssExtractPlugin.loader, "css-loader", "sass-loader"]
      }
    ]
  },
  plugins: [
    new HtmlWebPackPlugin({
      template: "./public/index.html",
      filename: "index.html"
    }),
    new MiniCssExtractPlugin({
      filename: "style.css"
    }),
    new CleanWebpackPlugin()
  ]
};
config/webpack.config.prod.js
const path = require("path");
const HtmlWebPackPlugin = require("html-webpack-plugin");
const MiniCssExtractPlugin = require("mini-css-extract-plugin");
const CleanWebpackPlugin = require("clean-webpack-plugin");

module.exports = {
  entry: "./src/index.js",
  output: {
    filename: "bundle.[contenthash].js",
    path: path.resolve(__dirname, "../build")
  },
  mode: "production",
  module: {
    rules: [
      {
        test: /\.(js|jsx)$/,
        exclude: "/node_modules",
        use: ["babel-loader"]
      },
      {
        test: /\.html$/,
        use: [
          {
            loader: "html-loader",
            options: { minimize: true }
          }
        ]
      },
      {
        test: /\.css$/,
        use: [MiniCssExtractPlugin.loader, "css-loader"]
      },
      {
        test: /\.scss$/,
        use: [MiniCssExtractPlugin.loader, "css-loader", "sass-loader"]
      }
    ]
  },
  plugins: [
    new HtmlWebPackPlugin({
      template: "./public/index.html",
      filename: "index.html"
    }),
    new MiniCssExtractPlugin({
      filename: "style.css"
    }),
    new CleanWebpackPlugin()
  ]
};
기존 webpack.config.js와 다른점은 mode를 development로 했냐 production으로 했냐에 차이점 입니다.
지금은 별로 차이는 없지만 development와 production에 맞는 플러그인들을 적용하면서 붙여나가기 시작하면 mode에 따라 강점들이 생길 것 입니다!
그 후 package.json에서 스크립트를 다음과 같이 추가해 주세요
"scripts": {
  "start": "webpack-dev-server --config ./config/webpack.config.dev --hot",
  "build": "webpack --config ./config/webpack.config.prod"
 },
이제 yarn start와 yarn build 명령어를 통해서 잘되는지 확인해 보세요!
마무리
직접 실습을 하면서 웹팩에 대해서 알아봤습니다.
저도 항상 CRA 만 사용해서 웹팩이 어떤 원리로 돌아가는지 감이 안왔습니다.
그래서 직접 웹팩을 사용해 리액트 개발 환경을 구축해보니 도움이 많이 된 것 같습니다.
이 글을 읽고 웹팩이 어떤건지 이해하신다면 정말 뿌듯할거 같습니다.
시간 내주셔서 긴 글 읽어주셔서 감사합니다!
모두 해피 코딩하세요~{^-^}
오타 및 틀린 사항은 알려주시면 바로 수정하도록 하겠습니다.
참고글
http://jeonghwan-kim.github.io/js/2017/05/15/webpack.html
https://medium.com/@ljs0705/spa-single-page-app-%EC%97%90%EC%84%9C-webpack%EC%9D%84-%EC%82%AC%EC%9A%A9%ED%95%98%EB%8A%94-%EC%9D%B4%EC%9C%A0-ce7d3f82fe9

29개의 댓글

궁금한게 하나 있는데요. yarn으로 패키지 설치하실 때 devDependency로 잡고 설치하시던데 react나 react-dom은 그쪽에 추가해도 production으로 빌드할 때 아무런 이상이 없는건가요?

잘 배우고갑니다 :) 글에서 하나 수정해주셨으면 하는 것은 '웹팩 개발 서버 적용하기' 부분에서 config 디렉토리를 만들지 않은 상태인데 config를 불러오는 script를 써주셔서 잠깐 혼란이 왔습니다. "start: webpack-dev-server" 로 수정해주니 잘 됩니다. 아니면 글의 순서를 바꾸는 것도 좋을 것 같습니다.


웹팩 설정에 대해 너무 무지하고 어려웠는데 매우 쉽게 차근 차근 잘 설명해주셔서 감사합니다 ^^
참고로, 제 PC 는 노드 10점대 인데, const CleanWebpackPlugin 이 부분이 그냥 선언하면 빌드되지 않고,
const { CleanWebpackPlugin } <= 이런식으로 구조화 할당을 해줘야 빌드 성공 되네요.
그리고, CleanWebpackPlugin 은 빌드시에 불필요한 파일을 제거해주는 용도로 알고 있는데,
webpack.config.dev.js 에 들어가 있을 필요가 있을지 궁금합니다 :)
확장자가 jsx 일때는 import 할때 jsx 까지 붙여줘야만 컴파일 에러가 나지 않고, 모듈을 찾을수 있네요 ㅜㅜ
이 부분 해결하려면 웹팩에서 어떻게 설정 해줘야 할까요??
react-router-dom 을 적용하는 순간부터, npm-run-build 후 build 폴더에서 index.html 실행시 라우터가 정상 작동하지 않네요 ㅜㅜ
다만 build 폴더에서 live-server 로 실행시에는 정상 작동합니다.
서버로 실행하지 않고도 정상 작동하게 하려면 어떻게 해야 할까요?
간단히 확인하실수 있게 https://github.com/bohaesoju/Webpack-Router-Build 링크 첨부합니다.

너무 잘봤습니다.
토이로 부트+리엑트 프로젝트를 해보려 하는데 리엑트에 대한 지식이 전혀 없어 찾던 도중에 간단한 예제와 상세한 설명으로 많은 도움을 받았습니다.
webpack.config.js 내용 중 CleanWebpackPlugin 를 const로 선언해주는 부분에서
TypeError: CleanWebpackPlugin is not a constructor 에러가 발생하네요.
구글링 하니 스오플에서
const { CleanWebpackPlugin } = require('clean-webpack-plugin'); 이런 해답을 주는군여
ES6 문법이 익숙치 않아 차이점은 잘 모르겠습니다만..
같은 문제에 직면하시는 분들 계실것 같아서 남깁니다/


config/webpack.config.dev.js
config/webpack.config.prod.js
이전 , cofig 폴더는 /src 폴더 하위 or root 경로 인가요?
그럼 기존에 만들었던 webpack.config.js 도 같으 config 폴더에 넣는가요 ?

웹팩 설정 파일을 dev, prod 2개로 나누는게
mode를 development / production 으로 각각 적용하여
개발환경에서는 일단 빠르게 사용하기 위해 development 를 사용하고
운영환경으로 배포할때는 속도보단 최적화를 중요하게 생각하여 사용한다고 이해를 하겠는데요,
만약에 개발을 하면서 webpack을 수정할일이 생긴다면 그럴때마다 2군데를 수정해줘야하는건가요?
두 파일의 다른점은 mode 일뿐일것같은데, 매번 같은 작업을 2번씩 한다는게 좀 번거롭지 않나 라는생각이 드네요. 혹시 설정 파일을 하나만 사용하고 상황에따라 mode만 변경하는 방법은 없을까요?
I found this post while searching for information about places to visit around Suwon. It’s not always easy to find detailed explanations about the 분위기 or what to expect, especially for first-time visitors.
While looking through different resources, I also came across 수원가라오케 which provides a helpful overview of nightlife spots and general information about the area. Sharing this in case others are also looking for similar information.
덕분에 그동안 궁금한게 해소가 되네요. 감사합니다.