OAuth
카카오 소셜 로그인 서비스를 가져와서 내가 만든 프로젝트에 카카오 로그인 기능을 적용시켰다.
평소에 접하던 카카오, 네이버 같은 로그인 기능이 이렇게 구현되는 것이란걸 알 수 있었다.
그리고 가끔 소셜 로그인을 했는데도 또 사이트의 로그인이나 회원가입이 나오는 이유가 궁금했었는데, 오늘 직접 구현해보면서 왜 그렇게 되었는지 이해는 해줄 수 있었다! (근데 굳이 그렇게 했어야했니...)
카카오 사용자 정보 가져오기
kakao developers > 로그인 REST API
카카오는 친절하게 그림까지 보여주며 이해하기 쉽게 로그인 과정을 설명해주지만, 더 간단히 나타낸 그림은 다음과 같다.
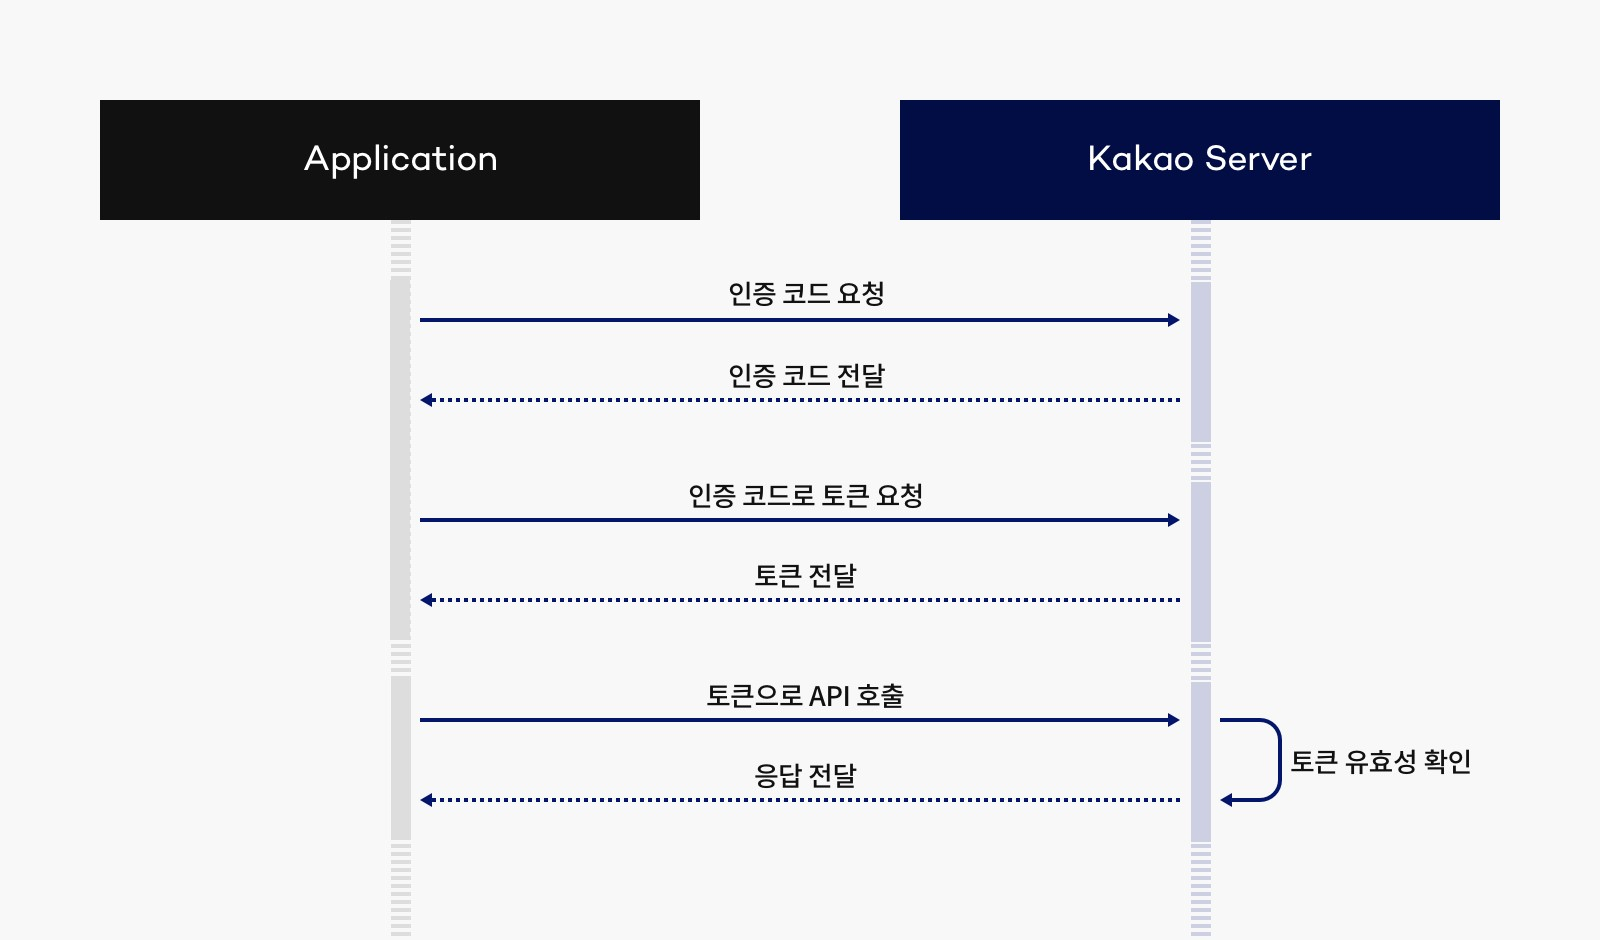
1. 인증 코드를 받아오기
(프론트)앱에서 사용자가 카카오 로그인 ID, PW를 입력하면 인증 코드 요청이 된다.
그러면 카카오 서버는 인증 코드 전달을 주며, 이것을 Controller로 받아오면 된다.
Controller
    @GetMapping("/user/kakao/callback")   // kakao developers의 어플리케이션 등록 할 때 넣어줬던 path
    public String kakaoLogin(@RequestParam String code, HttpServletResponse response) throws JsonProcessingException {
        String token = kakaoService.kakaoLogin(code);

        Cookie cookie = new Cookie(JwtUtil.AUTHORIZATION_HEADER, token.substring(7));  // Cookie에는 띄어쓰기 못넣는다. -> "Bearer "로 시작하기 때문에 오류 -> substring해줬음
        cookie.setPath("/");
        response.addCookie(cookie); //successfulAuthentication과 같은 역할

        return "redirect:/";
}- 카카오에서 쿼리스트링방식으로 인가코드를 전해주기 때문에 requestParam으로 받는다.
- JWT를 생성해서 쿠키를 직접 만들고, 그 쿠키에 JWT를 넣어서 전달 -> 브라우저에 자동으로 set 될 수 있도록 만들 예정이라 이렇게 만들어줬다.
- 주의사항: Cookie 에는 " "인 빈칸을 못넣는다. 꼭 substring으로 "Bearer "제거해서 사용 할 것.
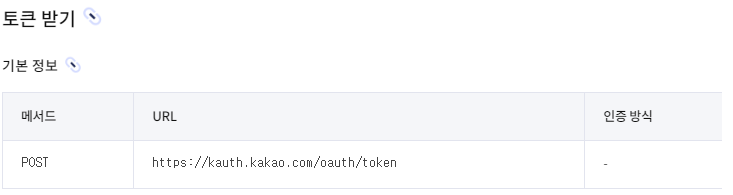
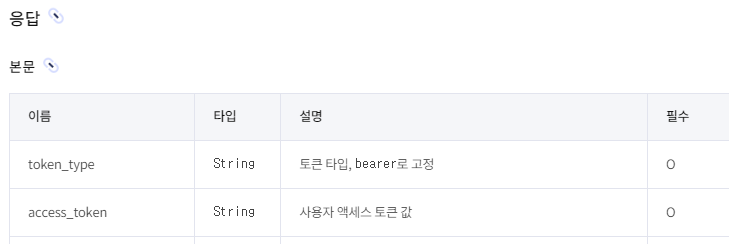
2. 인증 코드로 토큰 요청
REST API 문서
Service
public String kakaoLogin(String code) throws JsonProcessingException {
// 1. "인가 코드"로 "액세스 토큰" 요청
String accessToken = getToken(code);
// 2. 토큰으로 카카오 API 호출 : "액세스 토큰"으로 "카카오 사용자 정보" 가져오기
KakaoUserInfoDto kakaoUserInfo = getKakaoUserInfo(accessToken);
... // 회원가입, JWT 토큰 반환 등 -> 필요한 로직으로 변경
return createToken;
}
private String getToken(String code) throws JsonProcessingException {
// 요청 URL 만들기
URI uri = UriComponentsBuilder
.fromUriString("https://kauth.kakao.com")
.path("/oauth/token") // REST API 문서에 따라 작성
.encode()
.build()
.toUri();
// HTTP Header 생성
HttpHeaders headers = new HttpHeaders();
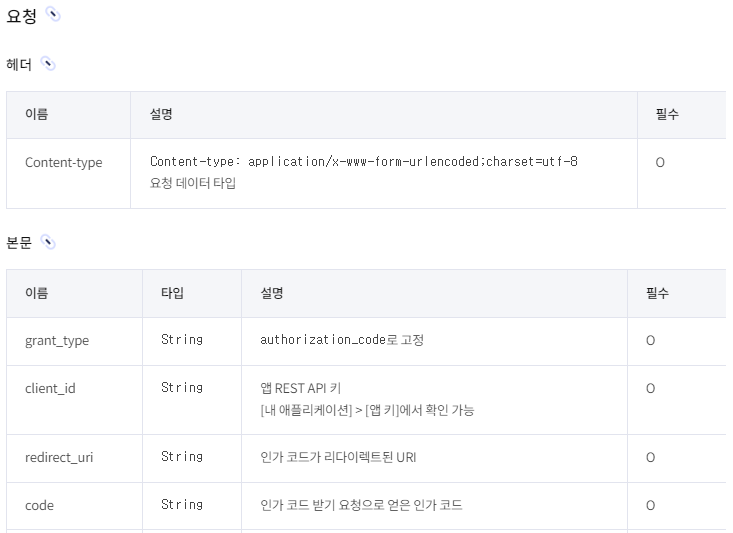
headers.add("Content-type", "application/x-www-form-urlencoded;charset=utf-8");
// HTTP Body 생성
MultiValueMap<String, String> body = new LinkedMultiValueMap<>();
body.add("grant_type", "authorization_code");
body.add("client_id", "**rest API key 복붙**");
body.add("redirect_uri", "http://localhost:8080/api/user/kakao/callback");
body.add("code", code);
RequestEntity<MultiValueMap<String, String>> requestEntity = RequestEntity // '이런 형태로 request'라고 고정됨.
.post(uri) //post로 고정되어있다.
.headers(headers)
.body(body);
// HTTP 요청 보내기
ResponseEntity<String> response = restTemplate.exchange(
requestEntity,
String.class
...
);
}
private KakaoUserInfoDto getKakaoUserInfo(String accessToken) throws JsonProcessingException {
...
}- 카카오서버가 준 인증코드는 String 형태이다. 이것으로 토큰을 요청.
- MultiValueMap을 사용하여 application/x-www-form-urlencoded 형식의 데이터를 생성했다. String 으로 보내달라니까 MultiValueMap<String, String>로 보내주면 된다.
- Json 형태로 통신한다고 나와있다. -> RequestEntity 사용
RequestEntity는 Spring의 클래스로서, HTTP 요청의 엔터티(본문)를 나타낸다.
HTTP 메서드, 헤더, 본문 등을 포함하는 HTTP 요청을 캡슐화하는 역할이 있기 때문에, 카카오가 원하는데로RequestEntity<MultiValueMap<String, String>>라고 request를 보낸 것. restTemplate.exchange: restTemplate를 호출하여 카카오 서버를 호출하는 것이다! -> 이게 실행되면 인증코드로 토큰 요청을 하는 것.
exchange 메서드로 requestEntity를 넣어주면 Json형태의 토큰이 반환되기에, ResponseEntity로 받아왔다. (타입은 String으로 나와있다.)
3. 받아온 토큰 처리
Service
private String getToken(String code) throws JsonProcessingException {

     ...

     // HTTP 응답 (JSON) -> 액세스 토큰 파싱
     JsonNode jsonNode = new ObjectMapper().readTree(response.getBody());
     return jsonNode.get("access_token").asText();
}- Json 형태로 응답을 받았기 때문에, ObjectMapper를 사용해서 body의 값을 읽어온다음 JsonNode에 담아준다.
- ObjectMapper는 Jackson 라이브러리에서 제공하는 클래스로서, Java 객체와 JSON 데이터 간의 변환을 담당.
- readTree 메서드는 JSON 문자열을 JsonNode로 변환하는 역할 - JsonNode는 Jackson 라이브러리에서 제공하는 클래스로, JSON 문서의 노드를 나타낸다. 한마디로 JSON문서를 쉽게 조작 할 수 있게 만들어준다.
(JSON 파싱, 생성, 탐색 - 여기선 파싱)
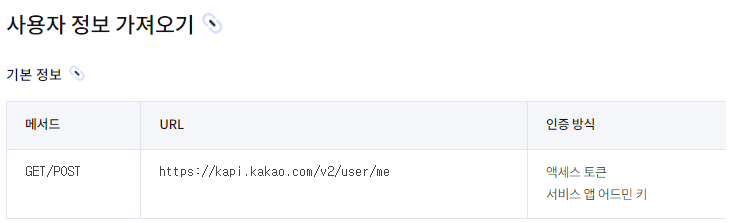
4. 토큰으로 API 호출
REST API 문서
Service
private KakaoUserInfoDto getKakaoUserInfo(String accessToken) throws JsonProcessingException {
// 요청 URL 만들기
URI uri = UriComponentsBuilder
.fromUriString("https://kapi.kakao.com")
.path("/v2/user/me")
.encode()
.build()
.toUri();
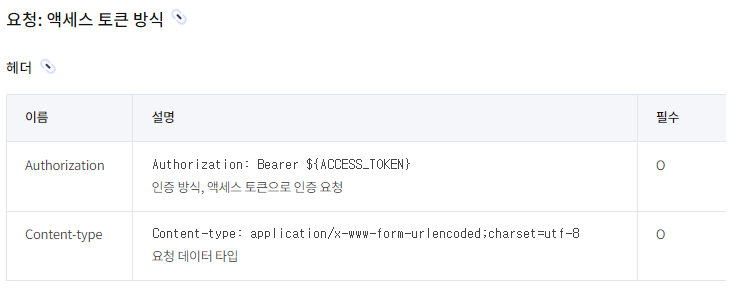
// HTTP Header 생성
HttpHeaders headers = new HttpHeaders();
headers.add("Authorization", "Bearer " + accessToken);
headers.add("Content-type", "application/x-www-form-urlencoded;charset=utf-8");
RequestEntity<MultiValueMap<String, String>> requestEntity = RequestEntity
.post(uri)
.headers(headers)
.body(new LinkedMultiValueMap<>()); //body는 보낼 필요가 없어서 그냥 생성만 해서 보냄
// HTTP 요청 보내기
ResponseEntity<String> response = restTemplate.exchange(
requestEntity,
String.class
);
...
}- 앞 부분에서 이해한 내용이라 쭉 보면 읽힌다.
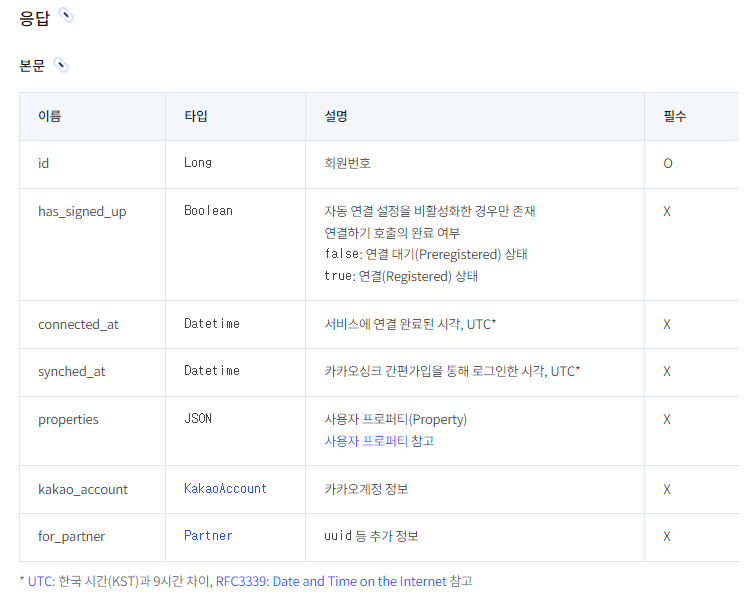
5. 응답 받은 토큰 활용
REST API 문서
Service
    private KakaoUserInfoDto getKakaoUserInfo(String accessToken) throws JsonProcessingException {

        JsonNode jsonNode = new ObjectMapper().readTree(response.getBody());
        Long id = jsonNode.get("id").asLong();
        String nickname = jsonNode.get("properties")
                .get("nickname").asText();
        String email = jsonNode.get("kakao_account")
                .get("email").asText();

        return new KakaoUserInfoDto(id, nickname, email);
}- 토큰 중 필요한 정보만 가져와서 User 객체로 사용한다.
properties에 담겨 있는 nickname 과, kakao_account에 담겨있는 email을 가져와서 id와 함께 활용.
6. 이후 필요한 로직에 따라 코딩
필요시에 회원가입 로직
        // DB 에 중복된 Kakao Id 가 있는지 확인
        Long kakaoId = kakaoUserInfo.getId();
        User kakaoUser = userRepository.findByKakaoId(kakaoId).orElse(null);

        if (kakaoUser == null) {
            // 카카오 사용자 email 동일한 email 가진 회원이 있는지 확인
            String kakaoEmail = kakaoUserInfo.getEmail();
            User sameEmailUser = userRepository.findByEmail(kakaoEmail).orElse(null);
            if (sameEmailUser != null) {
                kakaoUser = sameEmailUser;
                // 기존 회원정보에 카카오 Id 추가
                kakaoUser = kakaoUser.kakaoIdUpdate(kakaoId);
            } else {
                // 신규 회원가입
                // password: random UUID
                String password = UUID.randomUUID().toString();
                String encodedPassword = passwordEncoder.encode(password);

                // email: kakao email
                String email = kakaoUserInfo.getEmail();

                kakaoUser = new User(kakaoUserInfo.getNickname(), encodedPassword, email, UserRoleEnum.USER, kakaoId);
            }

            userRepository.save(kakaoUser);  // 영속성
        }
return kakaoUser;kakaoUser.kakaoIdUpdate(kakaoId);: Transactional이 필요 없게 하려고 return을 kakaoUser라는 객체를 반환했다.
@Transactional 걸어버리면 하나의 오류라도 있으면 다시 롤백되므로, 오류 난건 그대로 놓고 나머지 잘 수행된건 그대로 DB에 영향을 주게 하고 싶기 때문.
이후, Jwt 생성하여 클라이언트에게 반환하면 끝!
외부 API 받아오는 것도 처음엔 뭐가뭔지 도통 몰랐는데, 이렇게 하나씩 뜯어가며 공부해보니 받아와서 사용만 하면 되겠구나 싶다. 물론 막상 스스로 해보면 잘 될지는 모르겠지만... 아무튼 이번 기회에 그 구조에 대해 이해 할 수 있었다.
다른 API들도 받아와서 활용해보고싶다!!!

I live in Seoul, Korea, Handsome