요청 매핑 - API 예시
요청 매핑 - API 예시
MappingController
package hello.springmvc.basic.requestmapping;

import org.slf4j.Logger;
import org.slf4j.LoggerFactory;
import org.springframework.web.bind.annotation.*;

@RestController
public class MappingController {

  private Logger log = LoggerFactory.getLogger(this.getClass());

  @RequestMapping("/hello-basic")
  public String helloBasic() {
    log.info("helloBasic");
    return "ok";
  }
}
매핑 정보
@RestController
@Controller는 반환 값이String이면 뷰 이름으로 인식된다. 그래서 뷰를 찾고 뷰가 랜더링 된다.@RestController는 반환 값으로 뷰를 찾는 것이 아니라, HTTP 메시지 바디에 바로 입력한다. 따라서 실행 결과로 ok 메세지를 받을 수 있다.@ResponseBody와 관련이 있는데, 뒤에서 더 자세히 설명한다.
@RequestMapping("/hello-basic")
/hello-basicURL 호출이 오면 이 메서드가 실행되도록 매핑한다.- 대부분의 속성을
배열[]로 제공하므로 다중 설정이 가능하다. {"/hello-basic", "/hello-go"}
HTTP 메서드
@RequestMapping 에 method 속성으로 HTTP 메서드를 지정하지 않으면 HTTP 메서드와 무관하게 호출된다.
모두 허용 GET, HEAD, POST, PUT, PATCH, DELETE
HTTP 메서드 매핑
  @RequestMapping(value = "/mapping-get-v1", method = RequestMethod.GET)
  public String mappingGetV1() {
    log.info("mappingGetV1");
    return "ok";
  }
만약 여기에 POST 요청을 하면 스프링 MVC는 HTTP 405 상태코드(Method Not Allowed)를 반환한다.
HTTP 메서드 매핑 축약
  /**
   * 편리한 축약 애노테이션 (코드보기)
   * @GetMapping
   * @PostMapping
   * @PutMapping
   * @DeleteMapping
   * @PatchMapping
   */
  @GetMapping(value = "/mapping-get-v2")
  public String mappingGetV2() {
    log.info("mapping-get-v2");
    return "ok";
  }
PathVariable(경로 변수) 사용
  /**
   * PathVariable 사용
   * 변수명이 같으면 생략 가능
   * @PathVariable("userId") String userId -> @PathVariable String userId
   */
  @GetMapping("/mapping/{userId}")
  public String mappingPath(@PathVariable("userId") String data) {
    log.info("mappingPath userId={}", data);
    return "ok";
  }
@PathVariable 의 이름과 파라미터 이름이 같으면 생략할 수 있다.
PathVariable 사용 - 다중
  /**
   * PathVariable 사용 다중
   */
  @GetMapping("/mapping/users/{userId}/orders/{orderId}")
  public String mappingPath(@PathVariable String userId, @PathVariable Long
      orderId) {
    log.info("mappingPath userId={}, orderId={}", userId, orderId);
    return "ok";
  }
특정 파라미터 조건 매핑
  /**
   * 파라미터로 추가 매핑
   * params="mode",
   * params="!mode"
   * params="mode=debug"
   * params="mode!=debug" (! = )
   * params = {"mode=debug","data=good"}
   */
  @GetMapping(value = "/mapping-param", params = "mode=debug")
  public String mappingParam() {
    log.info("mappingParam");
    return "ok";
  }
특정 헤더 조건 매핑
  /**
   * 특정 헤더로 추가 매핑
   * headers="mode",
   * headers="!mode"
   * headers="mode=debug"
   * headers="mode!=debug" (! = )
   */
  @GetMapping(value = "/mapping-header", headers = "mode=debug")
  public String mappingHeader() {
    log.info("mappingHeader");
    return "ok";
  }
미디어 타입 조건 매핑 - HTTP 요청 Content-Type, consume
  /**
   * Content-Type 헤더 기반 추가 매핑 Media Type
   * consumes="application/json"
   * consumes="!application/json"
   * consumes="application/*"
   * consumes="*\/*"
   * MediaType.APPLICATION_JSON_VALUE
   */
  @PostMapping(value = "/mapping-consume", consumes = "application/json")
  public String mappingConsumes() {
    log.info("mappingConsumes");
    return "ok";
  }
미디어 타입 조건 매핑 - HTTP 요청 Accept, produce
  /**
   * Accept 헤더 기반 Media Type
   * produces = "text/html"
   * produces = "!text/html"
   * produces = "text/*"
   * produces = "*\/*"
   */
  @PostMapping(value = "/mapping-produce", produces = "text/html")
  public String mappingProduces() {
    log.info("mappingProduces");
    return "ok";
  }
요청 매핑 - API 예시
요청 매핑 - API 예시
회원 관리 API
- 회원 목록 조회: GET
/users - 회원 등록: POST
/users - 회원 조회: GET
/users/{userId} - 회원 수정: PATCH
/users/{userId} - 회원 삭제: DELETE
/users/{userId}
package hello.springmvc.basic.requestmapping;

import org.springframework.web.bind.annotation.*;

@RestController
@RequestMapping("/mapping/users")
public class MappingClassController {

  @GetMapping
  public String user() {
    return "get user";
  }

  @PostMapping
  public String addUser() {
    return "post user";
  }

  @GetMapping("/{userId}")
  public String findUser(@PathVariable String userId) {
    return "get userId="  + userId;
  }

  @PatchMapping("/{userId}")
  public String updateUser(@PathVariable String userId) {
    return "update userId="  + userId;
  }

  @DeleteMapping("/{userId}")
  public String deleteUser(@PathVariable String userId) {
    return "delete userId="  + userId;
  }
}
HTTP 요청 - 기본, 헤더 조회
HTTP 요청 - 기본, 헤더 조회
RequestHeaderController
package hello.springmvc.basic.request;

import jakarta.servlet.http.HttpServletRequest;
import jakarta.servlet.http.HttpServletResponse;
import lombok.extern.slf4j.Slf4j;
import org.springframework.http.HttpMethod;
import org.springframework.util.MultiValueMap;
import org.springframework.web.bind.annotation.CookieValue;
import org.springframework.web.bind.annotation.RequestHeader;
import org.springframework.web.bind.annotation.RequestMapping;
import org.springframework.web.bind.annotation.RestController;

import java.util.Locale;

@Slf4j
@RestController
public class RequestHeaderController {

  @RequestMapping("/headers")
  public String headers(HttpServletRequest request,
                        HttpServletResponse response,
                        HttpMethod httpMethod,
                        Locale locale,
                        @RequestHeader MultiValueMap<String, String> headerMap,
                        @RequestHeader("host") String host,
                        @CookieValue(value = "myCookie", required = false) String cookie
                        ) {

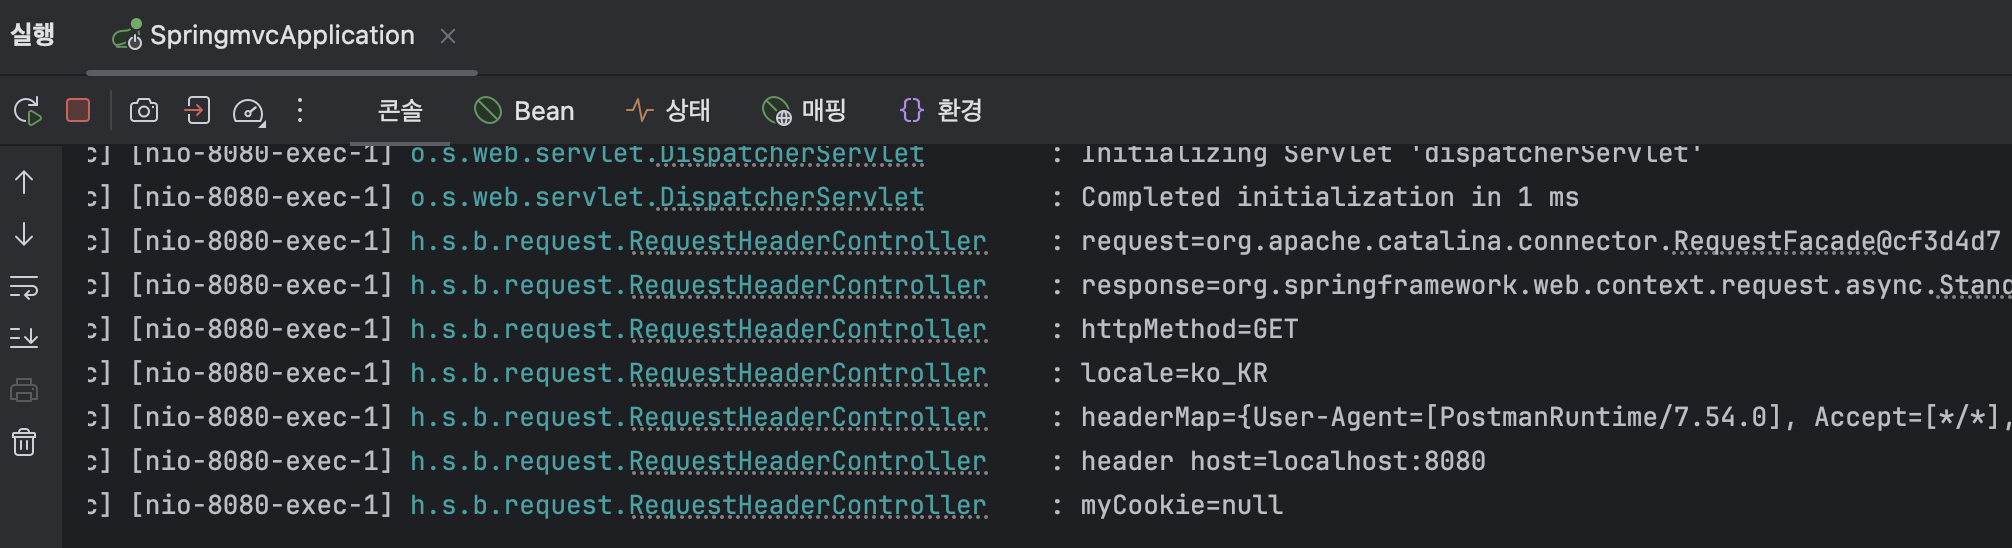
    log.info("request={}", request);
    log.info("response={}", response);
    log.info("httpMethod={}", httpMethod);
    log.info("locale={}", locale);
    log.info("headerMap={}", headerMap);
    log.info("header host={}", host);
    log.info("myCookie={}", cookie);

    return "ok";
  }
}
요청 파라미터 - 쿼리 파라미터, HTML Form
요청 파라미터 - 쿼리 파라미터, HTML Form
HttpServletRequest 의 request.getParameter() 를 사용하면 두가지 요청 파라미터를 조회할 수 있다.
- GET, 쿼리 파라미터 전송
http://localhost:8080/request-param?username=hello&age=20 - POST, HTML Form 전송
POST /request-param ...
content-type: application/x-www-form-urlencoded
username=hello&age=20
GET 쿼리 파리미터 전송 방식이든, POST HTML Form 전송 방식이든 둘다 형식이 같으므로 구분없이 조회할 수 있다.
RequestParamController
package hello.springmvc.basic.request;

import jakarta.servlet.http.HttpServletRequest;
import jakarta.servlet.http.HttpServletResponse;
import lombok.extern.slf4j.Slf4j;
import org.springframework.stereotype.Controller;
import org.springframework.web.bind.annotation.RequestMapping;

import java.io.IOException;

@Slf4j
@Controller
public class RequestParamController {

  @RequestMapping("/request-param-v1")
  public void requestParamV1(HttpServletRequest request, HttpServletResponse response) throws IOException {
    String username = request.getParameter("username");
    int age = Integer.parseInt(request.getParameter("age"));
    log.info("username = {}, age = {}", username, age);

    response.getWriter().write("ok");
  }


}
request.getParameter()
여기서는 단순히 HttpServletRequest가 제공하는 방식으로 요청 파라미터를 조회했다.
Post Form 페이지 생성
<!DOCTYPE html>
<html>
<head>
    <meta charset="UTF-8">
    <title>Title</title>
</head>
<body>
<form action="/request-param-v1" method="post">
    username: <input type="text" name="username" />
    age: <input type="text" name="age" />
    <button type="submit">전송</button>
</form>
</body>
</html>
HTTP 요청 파라미터 - @RequestParam
requestParamV2
  @ResponseBody
  @RequestMapping("/request-param-v2")
  public String requestParamV2(@RequestParam("username") String memberName,
                               @RequestParam("age") int memberAge) {

    log.info("username = {}, age = {}", memberName, memberAge);
    return "ok";
}@RequestParam: 파라미터 이름으로 바인딩@ResponseBody: View 조회를 무시하고, HTTP message body에 직접 해당 내용 입력
@RequestParam의 name(value) 속성이 파라미터 이름으로 사용
- @RequestParam("username") String memberName
- request.getParameter("username")
requestParamV3
  @ResponseBody
  @RequestMapping("/request-param-v3")
  public String requestParamV3(@RequestParam String username,
                               @RequestParam int age) {

    log.info("username = {}, age = {}", username, age);
    return "ok";
  }
HTTP 파라미터 이름이 변수 이름과 같으면 @RequestParam(name="xx") 생략 가능
requestParamV4
  @ResponseBody
  @RequestMapping("/request-param-v4")
  public String requestParamV4(String username, int age) {

    log.info("username = {}, age = {}", username, age);
    return "ok";
  }
String , int , Integer 등의 단순 타입이면 @RequestParam 도 생략 가능
파라미터 필수 여부 - requestParamRequired
  @ResponseBody
  @RequestMapping("/request-param-required")
  public String requestParamRequired(
      @RequestParam(required = true) String username,
      @RequestParam(required = false) Integer age) {

    log.info("username = {}, age = {}", username, age);
    return "ok";
}-
@RequestParam.required파라미터 필수 여부
기본값이 파라미터 필수(true)이다. -
/request-param-required요청
username이 없으므로 400 예외가 발생한다.
/request-param-required?username=
파라미터 이름만 있고 값이 없는 경우 빈문자로 통과
/request-param 요청
@RequestParam(required = false) int age
null 을 int 에 입력하는 것은 불가능(500 예외 발생)
따라서 null 을 받을 수 있는 Integer 로 변경하거나 다음에 나오는 defaultValue 사용
기본 값 적용 - requestParamDefault
  @ResponseBody
  @RequestMapping("/request-param-default")
  public String requestParamDefault(
      @RequestParam(required = true, defaultValue = "guest") String username,
      @RequestParam(required = false, defaultValue = "-1") int age) {

    log.info("username = {}, age = {}", username, age);
    return "ok";
  }
파라미터에 값이 없는 경우 defaultValue 를 사용하면 기본 값을 적용할 수 있다.
이미 기본 값이 있기 때문에 required 는 의미가 없다.
defaultValue 는 빈 문자의 경우에도 설정한 기본 값이 적용된다.
/request-param-default?username=
파라미터를 Map으로 조회하기 - requestParamMap
  @ResponseBody
  @RequestMapping("/request-param-map")
  public String requestParamMap(@RequestParam Map<String, Object> paramMap) {

    log.info("username = {}, age = {}", paramMap.get("username"), paramMap.get("age"));
    return "ok";
  }
파라미터를 Map, MultiValueMap으로 조회할 수 있다.
@RequestParam Map
Map(key=value)
@RequestParam MultiValueMap
MultiValueMap(key=[value1, value2, ...] ex) (key=userIds, value=[id1, id2])
파라미터의 값이 1개가 확실하다면 Map 을 사용해도 되지만 그렇지 않다면 MultiValueMap 을 사용하자.
HTTP 요청 파라미터 - @ModelAttribute
HTTP 요청 파라미터 - @ModelAttribute
@RequestParam String username;
@RequestParam int age;

HelloData data = new HelloData();
data.setUsername(username);
data.setAge(age);
스프링은 이 과정을 완전히 자동화해주는 @ModelAttribute 기능을 제공한다.
HelloData
package hello.springmvc.basic;

import lombok.Data;

@Data
public class HelloData {
  private String username;
  private int age;

}
롬복 @Data
@Getter,@Setter,@ToString,@EqualsAndHashCode,@RequiredArgsConstructor를 자동으로 적용해준다
@ModelAttribute 적용 - modelAttributeV1
  @ResponseBody
  @RequestMapping("/request-attribute-v1")
  public String modelAttributeV1(@ModelAttribute HelloData helloData) {
    log.info("username = {}, age = {}", helloData.getUsername(), helloData.getAge());

    return "ok";
  }
스프링MVC는 @ModelAttribute 가 있으면 다음을 실행한다.
HelloData객체를 생성한다.- 요청 파라미터의 이름으로
HelloData객체의 프로퍼티를 찾는다. 그리고 해당 프로퍼티의 setter를 호출해서 파라미터의 값을 입력(바인딩) 한다. - 예) 파라미터 이름이
username이면setUsername()메서드를 찾아서 호출하면서 값을 입력한다.
@ModelAttribute 생략 - modelAttributeV2
  @ResponseBody
  @RequestMapping("/request-attribute-v2")
  public String modelAttributeV2(HelloData helloData) {
    log.info("username = {}, age = {}", helloData.getUsername(), helloData.getAge());

    return "ok";
  }
@ModelAttribute 는 생략할 수 있다.
그런데 @RequestParam 도 생략할 수 있으니 혼란이 발생할 수 있다.
String,int,Integer같은 단순 타입 =@RequestParam- 나머지 =
@ModelAttribute(argument resolver 로 지정해둔 타입 외)
HTTP 요청 메시지 - 단순 텍스트
HTTP 요청 메시지 - 단순 텍스트
요청 파라미터와 다르게 HTTP 메시지 바디를 통해 데이터가 직접 넘어오는 경우는 @RequestParam ,@ModelAttribute 를 사용할 수 없다.
RequestBodyStringController
  @PostMapping("/request-body-string-v1")
  public void requestBodyString(HttpServletRequest request, HttpServletResponse response) throws IOException {
    ServletInputStream inputStream = request.getInputStream();
    String messageBody = StreamUtils.copyToString(inputStream, StandardCharsets.UTF_8);

    log.info("messageBody = {}", messageBody);

    response.getWriter().write("ok");
  }
Input, Output 스트림, Reader - requestBodyStringV2
  @PostMapping("/request-body-string-v2")
  public void requestBodyStringV2(InputStream inputStream, Writer responseWriter) throws IOException {
    String messageBody = StreamUtils.copyToString(inputStream, StandardCharsets.UTF_8);
    log.info("messageBody = {}", messageBody);
    responseWriter.write("ok");
  }
InputStream(Reader): HTTP 요청 메시지 바디의 내용을 직접 조회
OutputStream(Writer): HTTP 응답 메시지의 바디에 직접 결과 출력
HttpEntity - requestBodyStringV3
  @PostMapping("/request-body-string-v3")
  public HttpEntity<String> requestBodyStringV3(HttpEntity<String> httpEntity) throws IOException {

    String messageBody = httpEntity.getBody();
    log.info("messageBody = {}", messageBody);

    return new HttpEntity<>("ok");
}HttpEntity: HTTP header, body 정보를 편리하게 조회
- 메시지 바디 정보를 직접 조회
- 요청 파라미터를 조회하는 기능과 관계 없음
@RequestParamX,@ModelAttributeX
HttpEntity는 응답에도 사용 가능
- 메시지 바디 정보 직접 반환
- 헤더 정보 포함 기능
- view 조회 x
@RequestBody - requestBodyStringV4
  @ResponseBody
  @PostMapping("/request-body-string-v4")
  public String requestBodyStringV4(@RequestBody String messageBody) throws IOException {
    log.info("messageBody = {}", messageBody);
    return "ok";
  }
@RequestBody
@RequestBody 를 사용하면 HTTP 메시지 바디 정보를 편리하게 조회할 수 있다. 참고로 헤더 정보가 필요하다면 HttpEntity 를 사용하거나 @RequestHeader 를 사용하면 된다.
이렇게 메시지 바디를 직접 조회하는 기능은 요청 파라미터를 조회하는 @RequestParam , @ModelAttribute 와는 전혀 관계가 없다.
HTTP 요청 메시지 - JSON
HTTP 요청 메시지 - JSON
RequestBodyJsonController
  @PostMapping("/request-body-json-v1")
  public void requestBodyJsonV1(HttpServletRequest request, HttpServletResponse response) throws IOException {
    ServletInputStream inputStream = request.getInputStream();
    String messageBody = StreamUtils.copyToString(inputStream, StandardCharsets.UTF_8);

    log.info("messageBody = {}", messageBody);
    HelloData helloData = objectMapper.readValue(messageBody, HelloData.class);
    log.info("username = {}, age = {}", helloData.getUsername(), helloData.getAge());

    response.getWriter().write("ok");
  }
HttpServletRequest를 사용해서 직접 HTTP 메시지 바디에서 데이터를 읽어와서, 문자로 변환한다.
문자로 된 JSON 데이터를 Jackson 라이브러리인 objectMapper 를 사용해서 자바 객체로 변환한다.
requestBodyJsonV2 - @RequestBody 문자 변환
  @ResponseBody
  @PostMapping("/request-body-json-v2")
  public String requestBodyJsonV2(@RequestBody String messageBody) throws IOException {

    log.info("messageBody = {}", messageBody);
    HelloData helloData = objectMapper.readValue(messageBody, HelloData.class);
    log.info("username = {}, age = {}", helloData.getUsername(), helloData.getAge());

    return "ok";
  }
requestBodyJsonV3 - @RequestBody 객체 변환
  @ResponseBody
  @PostMapping("/request-body-json-v3")
  public String requestBodyJsonV3(@RequestBody HelloData helloData) {
    log.info("username = {}, age = {}", helloData.getUsername(), helloData.getAge());
    return "ok";
  }
@RequestBody는 생략 불가능
스프링은 @ModelAttribute , @RequestParam 과 같은 해당 애노테이션을 생략시 다음과 같은 규칙을 적용한다.
String,int,Integer같은 단순 타입 =@RequestParam- 나머지 =
@ModelAttribute(argument resolver 로 지정해둔 타입 외)
requestBodyJsonV4 - HttpEntity
  @ResponseBody
  @PostMapping("/request-body-json-v4")
  public String requestBodyJsonV4(HttpEntity<HelloData> helloEntity) {
    HelloData data = helloEntity.getBody();
    log.info("username = {}, age = {}", data.getUsername(), data.getAge());
    return "ok";
  }
requestBodyJsonV5
  @ResponseBody
  @PostMapping("/request-body-json-v5")
  public HelloData requestBodyJsonV5(@RequestBody HelloData data) {
    log.info("username = {}, age = {}", data.getUsername(), data.getAge());
    return data;
  }
@ResponseBody
응답의 경우에도 @ResponseBody 를 사용하면 해당 객체를 HTTP 메시지 바디에 직접 넣어줄 수 있다.
HTTP 응답 - HTTP API, 메시지 바디에 직접 입력
HTTP 응답 - HTTP API, 메시지 바디에 직접 입력
HTTP API를 제공하는 경우에는 HTML이 아니라 데이터를 전달해야 하므로, HTTP 메시지 바디에 JSON 같은 형식으로 데이터를 실어 보낸다.
ResponseBodyController
package hello.springmvc.basic.response;

import hello.springmvc.basic.HelloData;
import jakarta.servlet.http.HttpServletResponse;
import lombok.extern.slf4j.Slf4j;
import org.springframework.http.HttpStatus;
import org.springframework.http.ResponseEntity;
import org.springframework.stereotype.Controller;
import org.springframework.web.bind.annotation.GetMapping;
import org.springframework.web.bind.annotation.ResponseBody;
import org.springframework.web.bind.annotation.ResponseStatus;

import java.io.IOException;

@Slf4j
@Controller
//@RestController
public class ResponseBodyController {

  @GetMapping("/response-body-string-v1")
  public void responseBodyV1(HttpServletResponse response) throws IOException {
    response.getWriter().write("ok");
  }

  @GetMapping("/response-body-string-v2")
  public ResponseEntity<String> responseBodyV2() throws IOException {
    return new ResponseEntity<>("ok", HttpStatus.OK);
  }

  @ResponseBody
  @GetMapping("/response-body-string-v3")
  public String responseBodyV3() {
    return "ok";
  }

  @GetMapping("/response-body-json-v1")
  public ResponseEntity<HelloData> responseBodyJsonV1() throws IOException {
    HelloData helloData = new HelloData();
    helloData.setUsername("hello");
    helloData.setAge(20);

    return new ResponseEntity<>(helloData, HttpStatus.OK);

  }

  @ResponseStatus(HttpStatus.OK)
  @ResponseBody
  @GetMapping("/response-body-json-v2")
  public HelloData responseBodyJsonV2() throws IOException {
    HelloData helloData = new HelloData();
    helloData.setUsername("hello");
    helloData.setAge(20);

    return helloData;
  }

}
responseBodyV1
서블릿을 직접 다룰 때 처럼
HttpServletResponse 객체를 통해서 HTTP 메시지 바디에 직접 ok 응답 메시지를 전달한다.
response.getWriter().write("ok")
responseBodyV2
ResponseEntity 엔티티는 HttpEntity 를 상속 받았는데, HttpEntity는 HTTP 메시지의 헤더, 바디 정보를 가
지고 있다. ResponseEntity 는 여기에 더해서 HTTP 응답 코드를 설정할 수 있다.
HttpStatus.CREATED 로 변경하면 201 응답이 나가는 것을 확인할 수 있다.
responseBodyV3
@ResponseBody 를 사용하면 view를 사용하지 않고, HTTP 메시지 컨버터를 통해서 HTTP 메시지를 직접 입력할 수 있다. ResponseEntity 도 동일한 방식으로 동작한다.
responseBodyJsonV1
ResponseEntity 를 반환한다. HTTP 메시지 컨버터를 통해서 JSON 형식으로 변환되어서 반환된다.
responseBodyJsonV2
ResponseEntity 는 HTTP 응답 코드를 설정할 수 있는데, @ResponseBody 를 사용하면 이런 것을 설정하기 까다롭다.
@ResponseStatus(HttpStatus.OK) 애노테이션을 사용하면 응답 코드도 설정할 수 있다.
@RestController
@Controller 대신에 @RestController 애노테이션을 사용하면, 해당 컨트롤러에 모두 @ResponseBody 가 적용되는 효과가 있다. 따라서 뷰 템플릿을 사용하는 것이 아니라, HTTP 메시지 바디에 직접 데이터를 입력한다. 이름그대로 Rest API(HTTP API)를 만들 때 사용하는 컨트롤러이다.