Visual Studio CODE 사용
section 1)_vue.js 시작하기
section 2) 인스턴스 - 210820
section 3) 컴포넌트 - 210823
section 4) 컴포넌트 통신 방식 - 210824
1.vue.js 소개
reactivity(반응성) => 뷰의 핵심
데이터의 변화를 라이브러리에서 감지해 바로 화면을 바꿔준다
단축키
VSCODE에서 오른쪽 버튼 누르고 'Open with Live Server' 실행
개발자 도구 단축키
- 윈도우 : ctrl + shift + i / F12
- 맥 : cmd + option + i
패널 토글 단축키
- 윈도우: Ctrl+\
- 맥: Cmd+\
example
ex1-1
<!--210819 -->
<!DOCTYPE html>
<html>
  <head>
    <meta charset="utf-8">
    <meta name="viewport" content="width=device-width, initial-scale=1.0">
    <title>Getting Started</title>
  </head>
  <body>
    <div id="app">
      {{ message }}
    </div>

    <script src="https://cdn.jsdelivr.net/npm/vue/dist/vue.js"></script>
    <script>
      new Vue({
        el: '#app',
        data: {
          message: 'Hello Vue.js'
        }
      })
    </script>
  </body>
</html>
+ TIP!!!
- html 파일 구성 자동완성 : ! 쓰고 Tab키 => html 기본 코드구조 완성
- div#app 작성 후 Tab/Enter키 누르면 에밋 작동 => <div id="app"></div> 완성
- console 창에서 직접 쓸때 줄 바꿈 단축키 : shift+enterex1-2
<!--210819 -->
<!DOCTYPE html>
<html lang="en">
<head>
    <meta charset="UTF-8">
    <meta http-equiv="X-UA-Compatible" content="IE=edge">
    <meta name="viewport" content="width=device-width, initial-scale=1.0">
    <title>Document</title>
</head>
<body>
    <div id="app"></div>

    <script>
      var div = document.querySelector('#app');
      var viewModel = {};

      //객체의 동작을 재정의하는 API - 기본 문법
      // Object.defineProperty(대상 객체, 객체의 속성, {
      //   // 정의할 내용
      // })

      //자바스크립트 - 즉시 실행함수
      (function() {
        function init() {
          Object.defineProperty(viewModel, 'str', {
            // 속성에 접근했을 때의 동작을 정의
            get: function() {
              console.log('접근');
            },
            // 속성에 값을 할당했을 때의 동작을 정의
            set: function(newValue) {
              console.log('할당', newValue);
              render(newValue);
            }
          });
        }

        function render(value) {
          div.innerHTML = value;
        }
        //호출
        init();
      })();
    </script>
  </body>
  </html>
Object.defineProperty() : 객체의 동작을 재정의하는 API - 기본 문법
Object.defineProperty(대상 객체, 객체의 속성, {
      // 정의할 내용
})
Object.defineProperty 더 공부하기 >>
https://developer.mozilla.org/en-US/docs/Web/JavaScript/Reference/Global_Objects/Object/defineProperty
자바스크립트 즉시 실행함수(IIFE) :
(function() {
	//내용
})();
즉시 실행 함수 표현(IIFE, Immediately Invoked Function Expression) >>
https://developer.mozilla.org/ko/docs/Glossary/IIFE
2. 인스턴스
인스턴스 생성자, 프로토타입
인스턴스를 생성하면 개발자 도구: Vue에서 Root 컴포넌트로 인식한다.
함수 이름이 대문자라면 생성자 함수를 의미한다

Console :
function Person(name, job) {
    this.name = name;
    this.job = job;
}

// p객체에 new Person 값을 넣어주고 console에 값을 찍어보면
var p = new Person('josh', 'developer');
p

>> Person {name: "josh", job: "developer"}
job: "developer"
name: "josh"
=> 기본적인 생성자 함수의 정의
생성자 함수 : 객체를 생성할 때 사용하는 함수
-> 여러개의 동일한 프로퍼티를 가지는 객체를 생성하기 위해서 필요하다.
자바스크립트 생성자(constructor) 함수
https://www.zerocho.com/category/JavaScript/post/573c2acf91575c17008ad2fc
prototype 설명문서
https://developer.mozilla.org/ko/docs/Web/JavaScript/Reference/Global_Objects/Object/constructor
example
<!-- 210820 -->
<!DOCTYPE html>
<html lang="en">
<head>
    <meta charset="UTF-8">
    <meta http-equiv="X-UA-Compatible" content="IE=edge">
    <meta name="viewport" content="width=device-width, initial-scale=1.0">
    <title>Document</title>
</head>
<body>
    <div id="app">
        <!-- ... -->
    </div>

    <script src="https://cdn.jsdelivr.net/npm/vue/dist/vue.js"></script>
    <script>
        //var options =
        var vm = new Vue({
            el: '#app',
            data: { //개발자도구에서 Vue <Root> 가면 message 확인가능
                message: 'hi'
            },
            methods: {

            },
            created: function() {

            }
        });
    </script>
</body>
</html>
=> 정리
function Vue() {
    this.logText = function() {
   	  console.log('hello');
    }
}
-> Vue라는 생성자 함수를 이용, logText라는 함수를 미리 정의해놓는다.  'hello'

var vm = new Vue();
-> vm으로 new Vue를 생성할때마다

vm.logText();
>>hello //hello값 나옴
-> 객체 안에는 미리 정의한 logText라는 함수가 들어가있음, 매번 함수를 정의하는 것이 아니라 미리 정의된 함수를 가져다 사용할 수 있음3. 컴포넌트
컴포넌트
화면의 영역을 구분하여 개발할 수 있는 뷰의 기능
사용했을 때 장점 : 코드의 재사용성*이 올라가고 빠르게 화면을 제작할 수 있음
전역 컴포넌트, 지역 컴포넌트
전역 컴포넌트 : 컴포넌트를 등록하는 가장 간단한 방법
지역 컴포넌트 : 서비스를 만들때 가장 많이 쓰는 컴포넌트 등록 방법
전역 컴포넌트와 지역 컴포넌트의 차이점 : 지역 컴포넌트는 전역 컴포넌트와 하단에 어떤 것이 등록되어있는지 알 수 있다. 서비스 구현할 때는 components에 추가로 계속 등록하여 사용하고 확인해볼 수 있다.
example
전역 컴포넌트 ex
<!-- 210823 -->
<!DOCTYPE html>
<html lang="en">
<head>
    <meta charset="UTF-8">
    <meta http-equiv="X-UA-Compatible" content="IE=edge">
    <meta name="viewport" content="width=device-width, initial-scale=1.0">
    <title>Document</title>
</head>
<body>
    <div id="app">
        <app-header></app-header>
        <app-content></app-content>
    </div>

    <script src="https://cdn.jsdelivr.net/npm/vue/dist/vue.js"></script>
    <script>
        // 컴포넌트를 등록하는 가장 간단한 방법 -> Vue.component(전역 컴포넌트)로 등록
        //Vue.component('컴포넌트 이름', 컴포넌트 내용);
        Vue.component('app-header', {//객체를 열어서 작성
            template: '<h1>Header</h1>' //컴포넌트가 표현되는 마크업, 코드
        });
        Vue.component('app-content', {
            template: '<div>content</div>'
        });

        new Vue({
            el: '#app'
        });
    </script>
</body>
</html>
지역 컴포넌트 ex
<!-- 210823 -->
<!DOCTYPE html>
<html lang="en">
<head>
    <meta charset="UTF-8">
    <meta http-equiv="X-UA-Compatible" content="IE=edge">
    <meta name="viewport" content="width=device-width, initial-scale=1.0">
    <title>Document</title>
</head>
<body>
    <div id="app">
        <app-header></app-header>
        <app-content></app-content>
        <app-footer></app-footer>
    </div>

    <script src="https://cdn.jsdelivr.net/npm/vue/dist/vue.js"></script>
    <script>
        // 컴포넌트를 등록하는 가장 간단한 방법 -> Vue.component(전역 컴포넌트)로 등록
        //Vue.component('컴포넌트 이름', 컴포넌트 내용);
        Vue.component('app-header', {//객체를 열어서 작성
            template: '<h1>Header</h1>' //컴포넌트가 표현되는 마크업, 코드
        });
        Vue.component('app-content', {
            template: '<div>content</div>'
        });

        //전역 컴포넌트 등록
        //new Vue({
        //    el: '#app'
        //});

        new Vue({
            el: '#app',
            //지역 컴포넌트 등록 방식
            components: {
               // '키' : '값'
               //=> '컴포넌트 이름' : '컴포넌트 내용',
                'app-footer' : {
                    template: '<footer>footer</footer>'
                }
            }
        });
    </script>
</body>
</html>
컴포넌트와 인스턴스의 관계 :
전역 컴포넌트는 인스턴스를 생성할 때마다 따로 등록할 필요없이 기본적으로 모든 인스턴스에 등록이 되어있다
지역 컴포넌트는 인스턴스를 등록할 때마다 컴포넌트를 새로 등록해주어야 함
4. 컴포넌트 통신 방식
 출처 ㅣ Cracking Vue.js
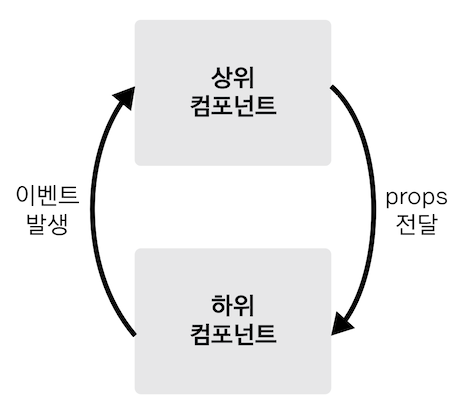
컴포넌트는 각각 고유한 데이터 유효범위를 갖는다
상위 -> 하위 컴포넌트 : 데이터를 내려줌 props 속성,
하위 -> 상위 컴포넌트 : 이벤트를 올려줌, 이벤트 발생 전달
컴포넌트 통신규칙이 필요한 이유 : 데이터의 흐름을 추적할 수 있다.
props
props 속성 ->
<app-header v-bind:프롭스 속성 이름="상위 컴포넌트의 데이터 이름">
<!-- 210824 -->
<!DOCTYPE html>
<html lang="en">
<head>
    <meta charset="UTF-8">
    <meta http-equiv="X-UA-Compatible" content="IE=edge">
    <meta name="viewport" content="width=device-width, initial-scale=1.0">
    <title>Document</title>
</head>
<body>
    <div id="app">
        <!-- <app-header v-bind:프롭스 속성 이름="상위 컴포넌트의 데이터 이름"></app-header> -->
        <app-header v-bind:propsdata="message"></app-header>
    </div>

    <script src="https://cdn.jsdelivr.net/npm/vue/dist/vue.js"></script>
    <script>
        var appHeader = {
            template: '<h1>header</h1>',
            props: ['propsdata']
        }

        new Vue({
            el: '#app',
            components: {
                'app-header' : appHeader
            },
            data: {
                message: 'hi'
            }
        });
    </script>
</body>
</html>
props 속성의 특징
<!-- 210824 -->
<!DOCTYPE html>
<html lang="en">
<head>
    <meta charset="UTF-8">
    <meta http-equiv="X-UA-Compatible" content="IE=edge">
    <meta name="viewport" content="width=device-width, initial-scale=1.0">
    <title>Document</title>
</head>
<body>
    <div id="app">
        <!-- <app-header v-bind:프롭스 속성 이름="상위 컴포넌트의 데이터 이름"></app-header> -->
        <app-header v-bind:propsdata="message"></app-header>
    </div>

    <script src="https://cdn.jsdelivr.net/npm/vue/dist/vue.js"></script>
    <script>
        var appHeader = {
            template: '<h1>{{ propsdata }}</h1>',
            props: ['propsdata']
        }

        new Vue({
            el: '#app',
            components: {
                'app-header' : appHeader
            },
            data: {
                message: 'hi'
            }
        });
    </script>
</body>
</html>
props 속성 실습

<!-- 210824 -->
<!DOCTYPE html>
<html lang="en">
<head>
    <meta charset="UTF-8">
    <meta http-equiv="X-UA-Compatible" content="IE=edge">
    <meta name="viewport" content="width=device-width, initial-scale=1.0">
    <title>Document</title>
</head>
<body>
    <div id="app">
        <!-- <app-header v-bind:프롭스 속성 이름="상위 컴포넌트의 데이터 이름"></app-header> -->
        <app-header v-bind:propsdata="message"></app-header>
        <app-content v-bind:propsdata="num"></app-content>
    </div>

    <script src="https://cdn.jsdelivr.net/npm/vue/dist/vue.js"></script>
    <script>
        var appHeader = {
            template: '<h1>{{ propsdata }}</h1>',
            props: ['propsdata']
        }
        var appContent = {
            template: '<div>{{ propsdata }}</div>',
            props: ['propsdata']
        }

        new Vue({
            el: '#app',
            components: {
                'app-header' : appHeader,
                'app-content' : appContent
            },
            data: {
                message: 'hi',
                num: 10
            }
        });
    </script>
</body>
</html>
event
event emit
<!-- 210824 -->
<!DOCTYPE html>
<html lang="en">
<head>
    <meta charset="UTF-8">
    <meta http-equiv="X-UA-Compatible" content="IE=edge">
    <meta name="viewport" content="width=device-width, initial-scale=1.0">
    <title>Document</title>
</head>
<body>
    <div id="app">
        <app-header></app-header>
    </div>

    <script src="https://cdn.jsdelivr.net/npm/vue/dist/vue.js"></script>
    <script>
        var appHeader = {
            template: '<button v-on:click="passEvent">click me</button>',
            methods: {
                passEvent: function() {
                    this.$emit('pass');
                }
            }
        }

        new Vue({
            el: '#app',
            components: {
                'app-header' : appHeader
            }
        });
    </script>
</body>
</html>
=> clickme 버튼을 누를때마다 이벤트 탭에 pass $emit by 계속 늘어난다
event emit으로 콘솔 출력하기
<app-header v-on:하위 컴포넌트에서 발생한 이벤트 이름="상위 컴포넌트의 메소드 이름">
<!-- 210824 -->
<!DOCTYPE html>
<html lang="en">
<head>
    <meta charset="UTF-8">
    <meta http-equiv="X-UA-Compatible" content="IE=edge">
    <meta name="viewport" content="width=device-width, initial-scale=1.0">
    <title>Document</title>
</head>
<body>
    <div id="app">
        <!-- <app-header v-on:하위 컴포넌트에서 발생한 이벤트 이름="상위 컴포넌트의 메소드 이름"></app-header> -->
        <app-header v-on:pass="logText"></app-header>
    </div>

    <script src="https://cdn.jsdelivr.net/npm/vue/dist/vue.js"></script>
    <script>
        var appHeader = {
            template: '<button v-on:click="passEvent">click me</button>',
            methods: {
                passEvent: function() {
                    this.$emit('pass');
                }
            }
        }

        new Vue({
            el: '#app',
            components: {
                'app-header' : appHeader
            },
            methods: {
                logText: function() {
                    console.log('hi');
                }
            }
        });
    </script>
</body>
</html>
=> clickme 버튼을 누를때마다 이벤트 탭에 pass $emit by 계속 늘어난다 + console에 찍은 hi도 똑같이 갯수 늘어남
event emit 실습
<!-- 210824 -->
<!DOCTYPE html>
<html lang="en">
<head>
    <meta charset="UTF-8">
    <meta http-equiv="X-UA-Compatible" content="IE=edge">
    <meta name="viewport" content="width=device-width, initial-scale=1.0">
    <title>Document</title>
</head>
<body>
    <div id="app">
        <p>{{ num }}</p>
        <!-- <app-header v-on:하위 컴포넌트에서 발생한 이벤트 이름="상위 컴포넌트의 메소드 이름"></app-header> -->
        <app-header v-on:pass="logText"></app-header>
        <app-content v-on:increase="increaseNumber"></app-content>
    </div>

    <script src="https://cdn.jsdelivr.net/npm/vue/dist/vue.js"></script>
    <script>
        var appHeader = {
            template: '<button v-on:click="passEvent">click me</button>',
            methods: {
                passEvent: function() {
                    this.$emit('pass');
                }
            }
        }
        var appContent = {
            template: '<button v-on:click="addNumber">add</button>',
            methods: {
                addNumber: function() {
                    this.$emit('increase');
                }
            }
        }

        new Vue({
            el: '#app',
            components: {
                'app-header' : appHeader,
                'app-content' : appContent
            },
            methods: {
                logText: function() {
                    console.log('hi');
                },
                //정의하기, 버튼을 누를때마다 1씩 증가하도록
                increaseNumber: function() {
                    this.num = this.num + 1;
                }
            },
            data: {
                num: 10
            }
        });
    </script>
</body>
</html>
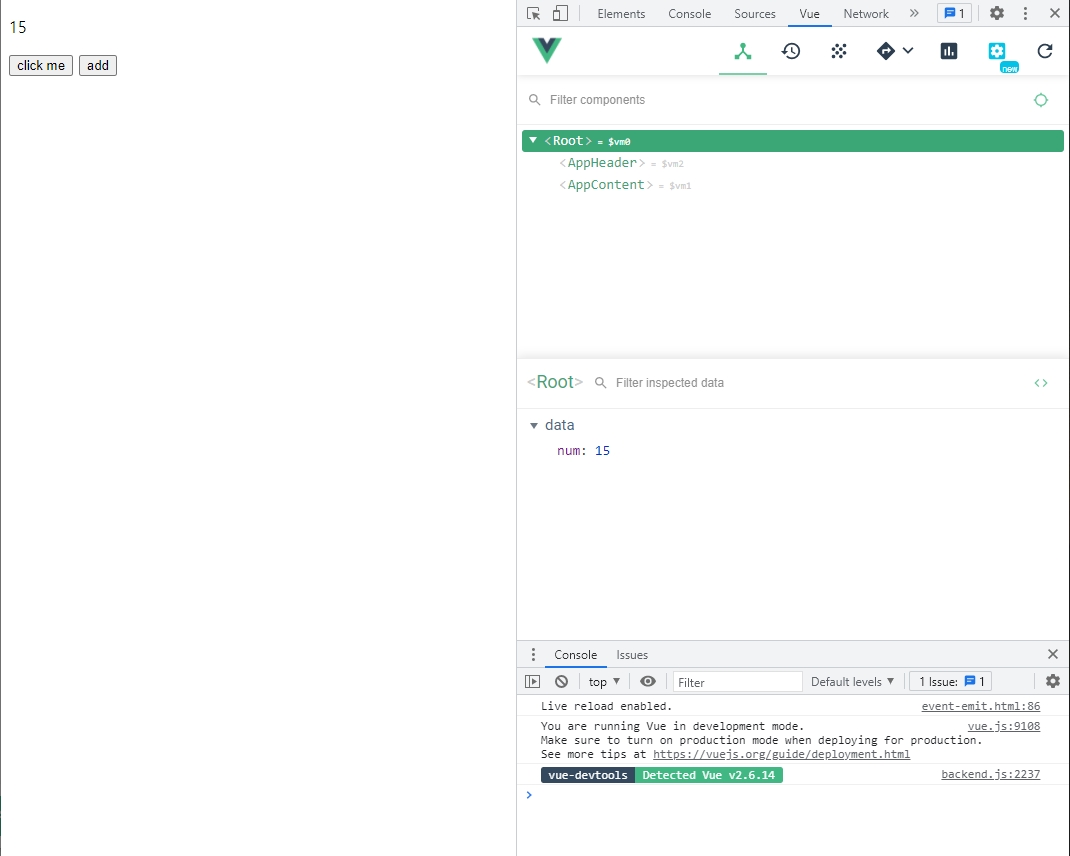
=> add 버튼을 누르면 event 탭에서 increase 발생하고,
component 탭에 - data num: 버튼 누른 수만큼 증가
바로바로 확인하기 위해 p태그를 추가해 화면에 표시
뷰 인스턴스에서의 this
onsole에
>> var obj = {
    num:10,
    getNumber: function() {
        console.log(this.num);
    }
}

찍고

>> obj.getNumber();
=> this.num 은 data의 num 속성을 가르킨다.
**this에 대해 참고 (this 4가지) ** https://www.w3schools.com/js/js_this.asp https://betterprogramming.pub/understanding-the-this-keyword-in-javascript-cb76d4c7c5e8