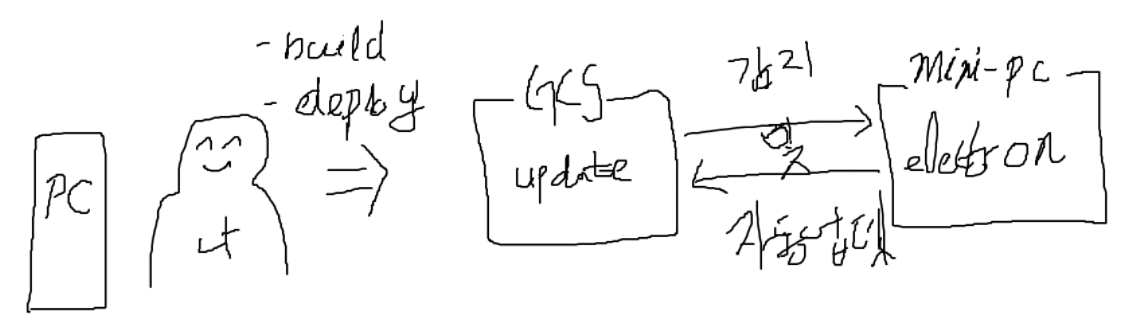
1. GCS(google cloud storage) 서비스
GCS 는 AWS 의 S3 포지션으로 static 파일을 서빙하는 역할을 한다.
그래서 나는 다음과 같이 pipe-line 을 구상해봤다.
자, 그럼 우선 코드부터 작성해보자.
0. package.json 수정
publish 설정은 빌드 시 업데이트 메타데이터 파일을 생성함.
latest.yml (Windows)
latest-mac.yml (macOS)
latest-linux.yml (Linux)
이 파일들에는 최신 버전 정보, 다운로드 URL, 파일 해시값 등이 포함됨.
{
  "name": "프로젝트 이름",
  "version": "프로젝트 버전",
  "description": "프로젝트 설명"
  "main": "main.js",
  "scripts": {
    "start": "electron .",
    "dev": "electron . --enable-logging",
    "build": "electron-builder",
    "dist": "electron-builder --publish=never",
    "build:linux64": "electron-builder --linux --x64",
    "postinstall": "electron-builder install-app-deps",
    "build-publish": "electron-builder --publish=always",
    "deploy": "node deploy-to-gcs.js"
  },
  "author": "kjw",
  "license": "ISC",
  "devDependencies": {
    "electron": "^37.2.5",
    "electron-builder": "^26.0.12",
    "electron-updater": "^6.6.2",
    "electron-log": "5.4.3"
  },
  "build": {
    "appId": "앱 id",
    "productName": "SmartSilverClient",
    "directories": {
      "output": "dist"
    },
    "files": [
      "**/*"
    ],
    "publish": {
      "provider": "generic",
      "url": "https://storage.cloud.google.com/tv-client-releases/"
    },
    "linux": {
      "target": [
        "AppImage"
      ],
      "category": "Utility"
    }
  },
  "type": "commonjs",
  "packageManager": "npm",
  "dependencies": {
    "@google-cloud/storage": "^7.17.0"
  }
}
provider와 url 옵션의 역할
provider: "generic": 커스텀 서버를 사용한다는 의미 (GitHub, S3 등이 아닌)
url: 업데이트 파일들이 위치한 베이스 URL
electron-updater는 이 URL에 /latest.yml을 붙여서 메타데이터를 가져옴.
참고로 파일 url 은 AppImage 가 들어있는 폴더까지 작성해주면 된다.
1. @google-cloud/storage 를 사용한 자동 deploy 로직 작성
@google-cloud/storage 에서 다운 받으면 되고 공식문서에서 upload 부분을 보면 된다.
const {Storage} = require("@google-cloud/storage");
const fs = require('fs');
const path = require('path');
const {log} = require("electron-log");

const storage = new Storage({
    keyFilename: '<본인 서비스 계정 .json>',
    projectId: '<본인 project id>'
});

const bucketName = '<본인 버킷 이름>';
const bucket = storage.bucket(bucketName);

async function uploadFiles() {
    const distPath = './dist'; // 본인 build 결과물 통상 ./dist
    const files = fs.readdirSync(distPath);

    // 본인은 linux 만 사용하여 AppImage 와 -linux.yml 만 등록
    const targetFiles = files.filter(file =>
        file.endsWith('.AppImage') || file.endsWith('-linux.yml')
    );

    for (const file of targetFiles) {
        const filePath = path.join(distPath, file);
        const destination = file;

        try {
            await bucket.upload(filePath, {
                destination: destination,
                metadata: {
                    cacheControl: 'no-cache',
                },
            });
            log(`✅ ${file} uploaded to ${bucketName}/${destination}`);
        } catch (error) {
            error(`❌ Failed to upload ${file}:`, error);
        }
    }
}

uploadFiles().catch(console.error);
참고로 electron 은 빌드하면 본인이 package.json 을 어떻게 꾸렸냐에 따라 빌드 결과물이 바뀐다.
만약 크로스 빌딩 등을 위해 모든 OS 에 대한 정보를 작성했다면 아래와 같은 결과물이 나온다.
버킷이름/
├── 폴더이름/
│   ├── latest.yml (Windows)
│   ├── latest-mac.yml (macOS)
│   ├── latest-linux.yml (Linux)
│   ├── your-app-1.0.0.exe
│   ├── your-app-1.0.0.dmg
│   └── your-app-1.0.0.AppImage
그리고 작성한 파일을 명령어로써 등록해주면 된다.
  // 윗줄 생략

  "main": "main.js",
  "scripts": {
    "start": "electron .",
    "dev": "electron . --enable-logging",
    "build": "electron-builder",
    "dist": "electron-builder --publish=never",
    "build:linux64": "electron-builder --linux --x64",
    "postinstall": "electron-builder install-app-deps",
    "build-publish": "electron-builder --publish=always",
    "deploy": "node deploy-to-gcs.js"
  },
  "author": "kjw",
  "license": "ISC",

  // 아랫줄 생략
2. main.js 에 자동 update 기능 넣어주기
보통은 이제 해당 electron App 이 뜰 때, update 여부를 yml 로 검사하여 다르다면 이벤트에 따라 분기처리해주면 된다.
app.whenReady().then(() => {
    createWindow();

    // macOS에서 독 아이콘 클릭 시 윈도우 재생성
    app.on('activate', () => {
        if (BrowserWindow.getAllWindows().length === 0) {
            createWindow();
        }
    });

    // 디버깅 메뉴 생성
    createMenu();

    // 앱 실행 후 업데이트 확인
    if (!isDev) {
        setTimeout(() => {
            log.info('업데이트 확인을 시작합니다...');
            autoUpdater.checkForUpdatesAndNotify();
        }, 5000);
    }
});
업데이터 설정
autoUpdater.on('checking-for-update', () => {
    log.info('업데이트 확인 중...');
});

autoUpdater.on('update-available', (info) => {
    log.info(`새 업데이트가 있습니다: v${info.version}`);
    if (mainWindow) {
        mainWindow.webContents.send('update-available', info.version);
    }
});

autoUpdater.on('update-not-available', (info) => {
    log.info(`현재 최신 버전입니다: v${info.version}`);
});

autoUpdater.on('error', (err) => {
    log.error('업데이트 에러:', err);
});

autoUpdater.on('download-progress', (progressObj) => {
    const percent = Math.round(progressObj.percent);
    log.info(`업데이트 다운로드 중: ${percent}% (${progressObj.transferred}/${progressObj.total} bytes)`);

    if (mainWindow) {
        mainWindow.webContents.send('download-progress', percent);
    }
});

autoUpdater.on('update-downloaded', (info) => {
    log.info('업데이트 다운로드 완료. 5초 후 재시작합니다.');

    if (mainWindow) {
        mainWindow.webContents.send('update-ready');
    }

    setTimeout(() => {
        autoUpdater.quitAndInstall();
    }, 5000);
});
setFeedURL()로 동적 설정 (런타임에 설정)
package.json의 publish 설정 (빌드타임에 설정)
main.js에서 setFeedURL 제거하고, package.json만 사용
단, 동적으로 URL을 변경해야 하는 경우에만 setFeedURL 사용
(옵션.renderer.js 를 운용한다면) ㄱ. UI 업뎃
// renderer.js
const { ipcRenderer } = require('electron');

// 수동 업데이트 체크 버튼
document.getElementById('check-update').addEventListener('click', () => {
  ipcRenderer.send('check-for-updates');
});

// 업데이트 상태 수신
ipcRenderer.on('update-available', () => {
  document.getElementById('update-status').textContent = '새 업데이트가 있습니다. 다운로드 중...';
});

ipcRenderer.on('update-downloaded', () => {
  document.getElementById('update-status').textContent = '업데이트가 준비되었습니다. 재시작합니다.';
});
(옵션.renderer.js 를 운용한다면) ㄴ. Main 에서 핸들링
ipcMain.handle("check-for-updates", async () => {
    if (!isDev) {
        try {
            return await autoUpdater.checkForUpdatesAndNotify();
        } catch (error) {
            log('업데이트 체크 실패:', error);
            throw error;
        }
    }
    return null;
});

ipcMain.handle("quit-and-install", () => {
    if (!isDev) {
        autoUpdater.quitAndInstall();
    }
});
3. GCS 설정하기
여기서는 서비스 계정을 생성해줘야한다.
서비스 계정이란?
사람이 아닌 워크로드(앱, 배치, 컨테이너, VM)가 GCP 리소스에 안전하게 접근하기 위한 전용 신원이다.
개발자 개인 계정 대신, 애플리케이션 자체가 인증·권한 부여를 받을 수 있게 해주는 bot 이라고 생각하면 된다.
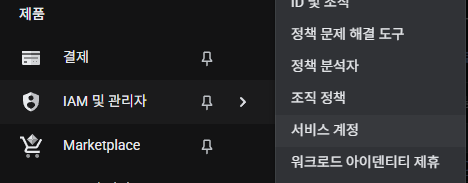
계정을 생성 후 json 을 다운 받으면 된다.
다음 원하는 버킷으로 가서 엑세스 권한 부여 를 누른 다음, 생성한 서비그 계정의 e-mail 입력해주면 된다.
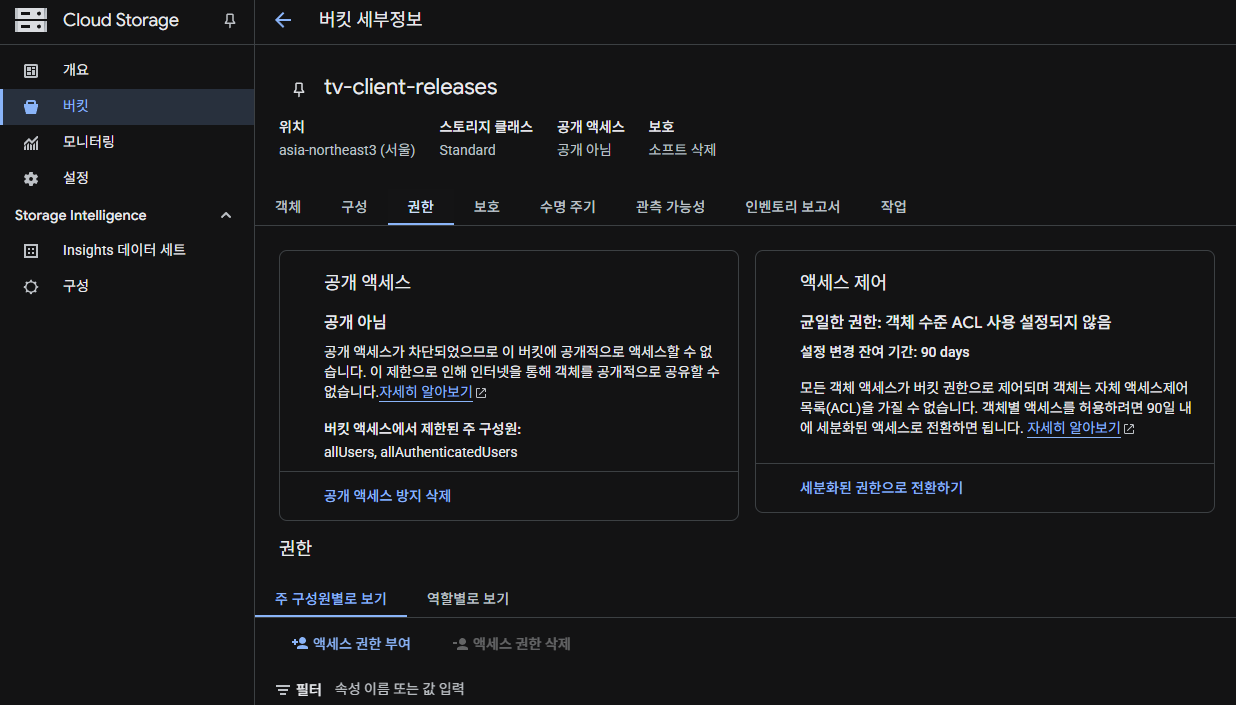
그 후 오른쪽 상속 편집을 눌러 권한을 다음과 같이 지정해주면 된다.

4. build 및 deploy
그리고 다시 deploy 로직에서 본인의 프로젝트 id, 본인 서비스 계정의 .json 을 등록해준 후 build, deploy 를 해주면 성공적으로 static 파일이 올라간 것을 확인할 수 있다.