Excel 다운로드를 구현해보자.
우선 서버단 못지 않게 client 단도 신경써야할 부분이 존재한다.
대충 개념은
클라이언트에서 사용자가 보고있는 내역을 엑셀 파일 다운로드 요청 => 해당 내역을 서버에 보냄 =>
서버에서는 해당 데이터들을 받아다가 POI-OOXML 라이브러리를 사용하여 편하게 excel 파일 작성 =>
완성된 WorkBook 객체를 ByteArrayOutputStream 를 사용하여 ByteArray 로 작성될 수 있도록 하고 =>
해당 값을 HTTP message 를 구성하여 보냄 =>
클라이언트는 응답 받은 메시지를 Blob 객체로 구성하여 url 을 생성 후 사용자가 url 을 클릭하는 것을 JS 로 구현하여 파일 다운로드를 구현한다.
client => server
대충 강우 현황을 표출해주는 화면이 있다고 가정하자.

이 화면을 누군가에게 보고용으로 Excel 파일로 다운로드 받고 싶을 때를 구현하자.
우선 서버에 요청을 보낼 API 를 작성해준다.
여기서 responseType 을 반드시 적어줘야한다.
export const getCurrentRainExcelFile = async(payload: Array<페이로드>) => {
    const tokenCookie = getCookie('token')
    return await instance_Api_A.post(`${대충 URL 부분}`, payload, {
        headers: {
            Authorization: `Barrer ${tokenCookie}`,
            'Content-Type': 'application/json'
        },
        responseType: 'blob'
    })
}
controller => service
    @Override
    @PostMapping("/대충 URL 부분")
    public ResponseEntity<byte[]> currentDataRainExcel(@RequestBody @Validated List<대충 Request Payload VO> requestPayload, BindingResult error) throws TestCustomException, IOException {
        if (error.hasErrors()) {
            throw new InvalidParameterException(Maker.inValidMessage(error.getAllErrors()));
        }

        Workbook workbook = historyService.mkCurrentDataRainExcel(requestPayload);

        ByteArrayOutputStream baos = new ByteArrayOutputStream();
        workbook.write(baos);
        workbook.close();

        byte[] excelBytes = baos.toByteArray();
        baos.close();

        return ResponseEntity.ok()
                .contentType(MediaType.parseMediaType("application/vnd.openxmlformats-officedocument.spreadsheetml.sheet"))
                .header(HttpHeaders.CONTENT_DISPOSITION, "attachment; filename=\"current-data-rain.xlsx\"")
                .body(excelBytes);
    }
service => ExcelHandler
    @Override
    public Workbook mkCurrentDataRainExcel(List<CurrentDataRainExcelRequestPayload> requestPayload) {
        return ExcelHandler.createCurrentDataRainExcelReport(requestPayload);
    }
Excel 생성
이 부분은 정말 순수 노가다 이다. 사용자가 원하는 보고서 양식을 코드로 일일이 구현해야하기 때문이다.
나중에 뭐 시트 너비 설정, Font 설정 등 기타 설정 부분은 메소드로 빼면 되겠다.
참고로 여기서 HSSFWorkbook vs XSSFWorkbook 2가지 객체를 볼 수 있는데
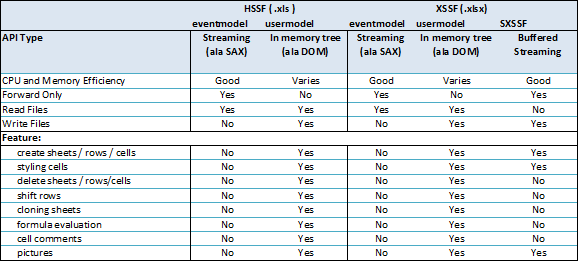
- HSSF
excel 97 ~ 2003 버전 - XSSF
excel 2007 이상의 버전 - SXSSF
POI 3.8 beta3 버전부터 지원하는 성능개선 버전
이기 때문에 우리는 XSSF 를 사용할 것이다.
물론 속도는 HSSF 가 압도적으로 빠르나 2024 년에 2003 년 이전 버전의 xls 파일을 만들면 읽히지도 안더라..
public class ExcelHandler {
public static Workbook createCurrentDataRainExcelReport(List<CurrentDataRainExcelRequestPayload> currentDataRainData) {
// 엑셀 파일 생성
XSSFWorkbook workbook = new XSSFWorkbook();
// 시트생성
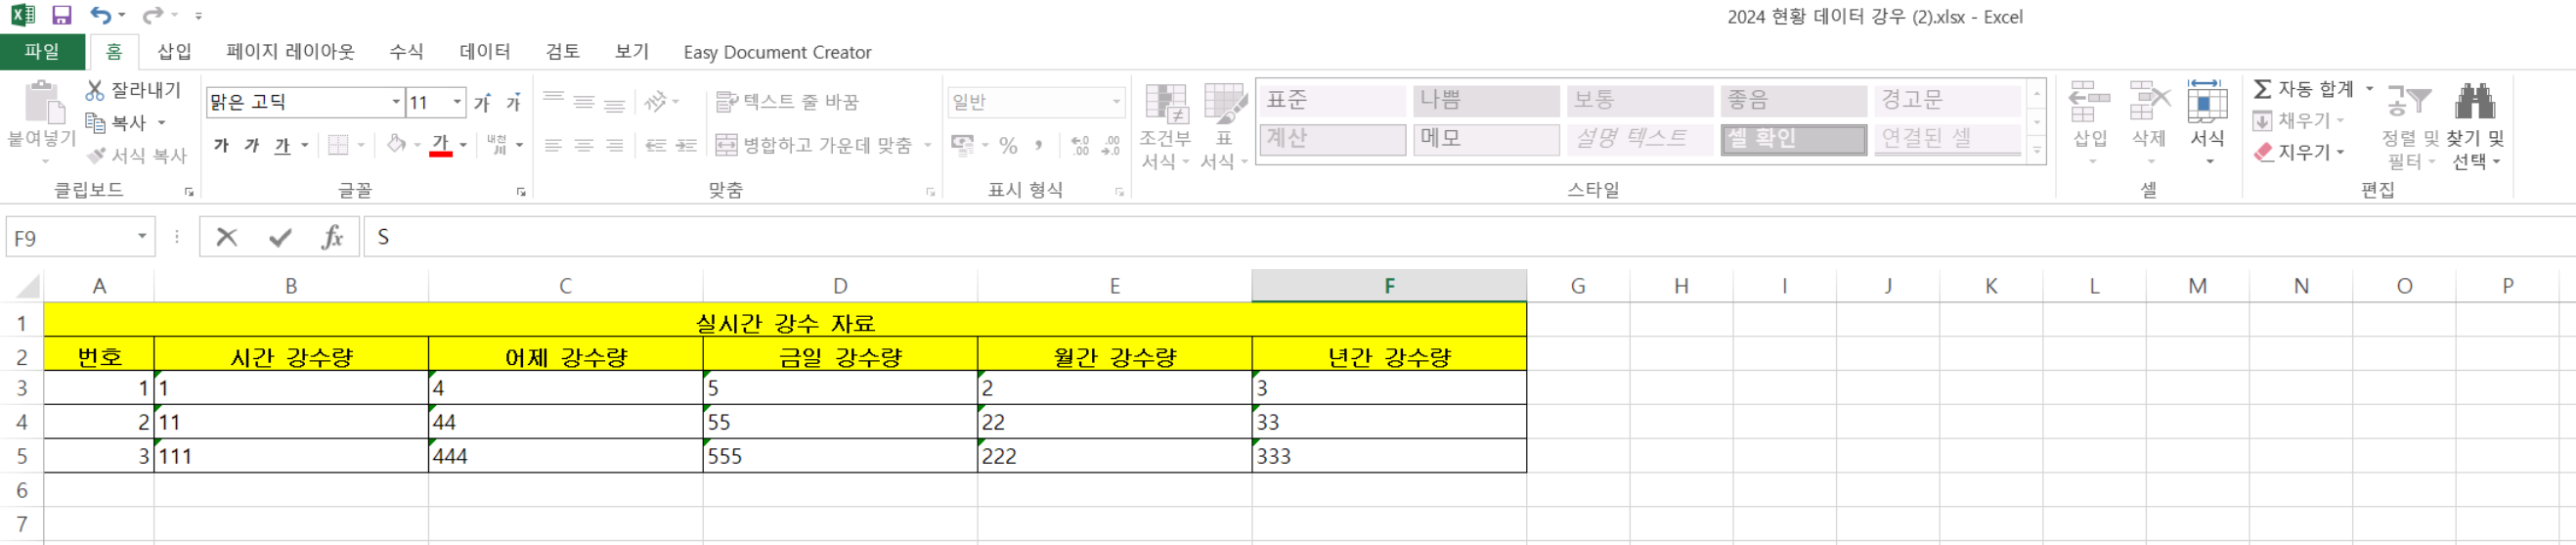
XSSFSheet sheet = workbook.createSheet("실시간 강우 데이터");
// 시트 너비 설정
sheet.setColumnWidth(0, 2400);
sheet.setColumnWidth(1, 6000);
sheet.setColumnWidth(2, 6000);
sheet.setColumnWidth(3, 6000);
sheet.setColumnWidth(4, 6000);
sheet.setColumnWidth(5, 6000);
// Font 설정
XSSFFont headerFont = workbook.createFont();
headerFont.setFontName("나눔고딕");
headerFont.setFontHeight(11);
headerFont.setColor(IndexedColors.BLACK.getIndex());
headerFont.setBold(true);
// 행, 열, 열번호
Row row;
Cell cell;
int rowNo = 0;
// 테이블 헤더용 스타일
XSSFCellStyle headStyle = workbook.createCellStyle();
headStyle.setFont(headerFont);
// 가는 경계선을 가집니다.
headStyle.setBorderTop(BorderStyle.THIN);
headStyle.setBorderBottom(BorderStyle.THIN);
headStyle.setBorderLeft(BorderStyle.THIN);
headStyle.setBorderRight(BorderStyle.THIN);
// 배경색은 노란색입니다.
headStyle.setFillForegroundColor(IndexedColors.YELLOW.getIndex());
headStyle.setFillPattern(FillPatternType.SOLID_FOREGROUND);
// 데이터는 가운데 정렬합니다.
headStyle.setAlignment(HorizontalAlignment.CENTER);
// 데이터용 경계 스타일 테두리만 지정
XSSFCellStyle bodyStyle = workbook.createCellStyle();
bodyStyle.setBorderTop(BorderStyle.THIN);
bodyStyle.setBorderBottom(BorderStyle.THIN);
bodyStyle.setBorderLeft(BorderStyle.THIN);
bodyStyle.setBorderRight(BorderStyle.THIN);
sheet.addMergedRegion(new CellRangeAddress(rowNo, rowNo, 0, 5));
// 헤더 생성
row = sheet.createRow(rowNo++);
for (int i = 0; i <= 5; i++) {
cell = row.createCell(i);
cell.setCellStyle(headStyle);
cell.setCellValue("실시간 강수 자료");
}
// 헤더 생성
row = sheet.createRow(rowNo++);
cell = row.createCell(0);
cell.setCellStyle(headStyle);
cell.setCellValue("번호");
cell = row.createCell(1);
cell.setCellStyle(headStyle);
cell.setCellValue("시간 강수량");
cell = row.createCell(2);
cell.setCellStyle(headStyle);
cell.setCellValue("어제 강수량");
cell = row.createCell(3);
cell.setCellStyle(headStyle);
cell.setCellValue("금일 강수량");
cell = row.createCell(4);
cell.setCellStyle(headStyle);
cell.setCellValue("월간 강수량");
cell = row.createCell(5);
cell.setCellStyle(headStyle);
cell.setCellValue("년간 강수량");
int index = 1;
for (CurrentDataRainExcelRequestPayload item : currentDataRainData) {
row = sheet.createRow(rowNo++);
cell = row.createCell(0);
cell.setCellStyle(bodyStyle);
cell.setCellValue(index++);
cell = row.createCell(1);
cell.setCellStyle(bodyStyle);
cell.setCellValue(item.getHourRain());
cell = row.createCell(2);
cell.setCellStyle(bodyStyle);
cell.setCellValue(item.getYesterdayRain());
cell = row.createCell(3);
cell.setCellStyle(bodyStyle);
cell.setCellValue(item.getTodayRain());
cell = row.createCell(4);
cell.setCellStyle(bodyStyle);
cell.setCellValue(item.getMonthlyRain());
cell = row.createCell(5);
cell.setCellStyle(bodyStyle);
cell.setCellValue(item.getYearlyRain());
}
return workbook;
}
}다시 Controller 로
    @Override
    @PostMapping("/대충 URL 부분")
    public ResponseEntity<byte[]> currentDataRainExcel(@RequestBody @Validated List<대충 Request Payload VO> requestPayload, BindingResult error) throws TestCustomException, IOException {
        if (error.hasErrors()) {
            throw new InvalidParameterException(Maker.inValidMessage(error.getAllErrors()));
        }

        Workbook workbook = historyService.mkCurrentDataRainExcel(requestPayload);

        // 이 부분임.
        ByteArrayOutputStream baos = new ByteArrayOutputStream();
        workbook.write(baos);
        workbook.close();

        byte[] excelBytes = baos.toByteArray();
        baos.close();

        return ResponseEntity.ok()
                .contentType(MediaType.parseMediaType("application/vnd.openxmlformats-officedocument.spreadsheetml.sheet"))
                .header(HttpHeaders.CONTENT_DISPOSITION, "attachment; filename=\"current-data-rain.xlsx\"")
                .body(excelBytes);
    }
response 한 workbook 을 OutputStream 편리하게 사용할 수 있는 ByteArrayOutputStream 을 사용하여 ByteArray 로 변환해주고 이 값을 HTTP message body 에 실어준다.
다음 contentType 과 header 를 작성하면 된다.
application/json 이 아니고 우리는 sheet 니까 응답의 Content-Type 헤더를 설정한다. 이때 우리는 이 MIME(미디어) 타입을 Excel 2007 이상에서 사용하는 .xlsx 파일 형식으로 설정해줄 것이다. 그렇기 때문에 poi-ooxml 을 받아준 것.
그리고 header 부분은 Content-Disposition 헤더를 설정하고 브라우저에게 이 응답이 파일 다운로드임을 알려준다.
그리고 뭐 대충 다운로드 파일의 이름을 current-data-rain.xlsx로 지정한다.
다시 client 단으로
const {data} = await getCurrentRainExcelFile(대충화면에 나온 값들을 json 화 해서 전송.);
const fileURL = window.URL.createObjectURL(new Blob([data], {type: "application/vnd.openxmlformats-officedocument.spreadsheetml.sheet"}));
const fileLink = document.createElement("a");

fileLink.href = fileURL;
fileLink.setAttribute("download",  "2024 "+ "현황 데이터 강우" + ".xlsx");
document.body.appendChild(fileLink);
fileLink.click();
document.body.removeChild(fileLink);
하면 axios 로 날릴 경우 구조분해로 data 만 뽑아내서 다운로드 url 을 생성해준 후 사용자가 해당 url 을 클릭하는 로직을 JS 로 구현하면 끝난다.