검증
- 가장 기초적인 검증방법을 만들어보자.
work-flow에 따르면 사용자가 추가페이지(add.html)에서 확인을 눌렀을 때 넘어오는 값을 가지고 유효성 검사 코드를 작성하면 된다.
@PostMapping("/add")
public String addItem(@ModelAttribute Item item, RedirectAttributes redirectAttributes, Model model) {
// 에러를 담을 hashMap 객체 선언
Map<String, String> errors = new HashMap<>();
// 각각의 항목에 대하여 유효성 검사 후 실패하면 errors 객체에 담기
if (!StringUtils.hasText(item.getItemName())) {
errors.put("itemName", "required item name");
}
if (item.getPrice() == null || item.getPrice() < 1000 || item.getPrice() > 1_000_000) {
errors.put("price", "u need valid price");
}
if (item.getQuantity() == null || item.getQuantity() >= 999) {
errors.put("quantity", "u need valid quantity");
}
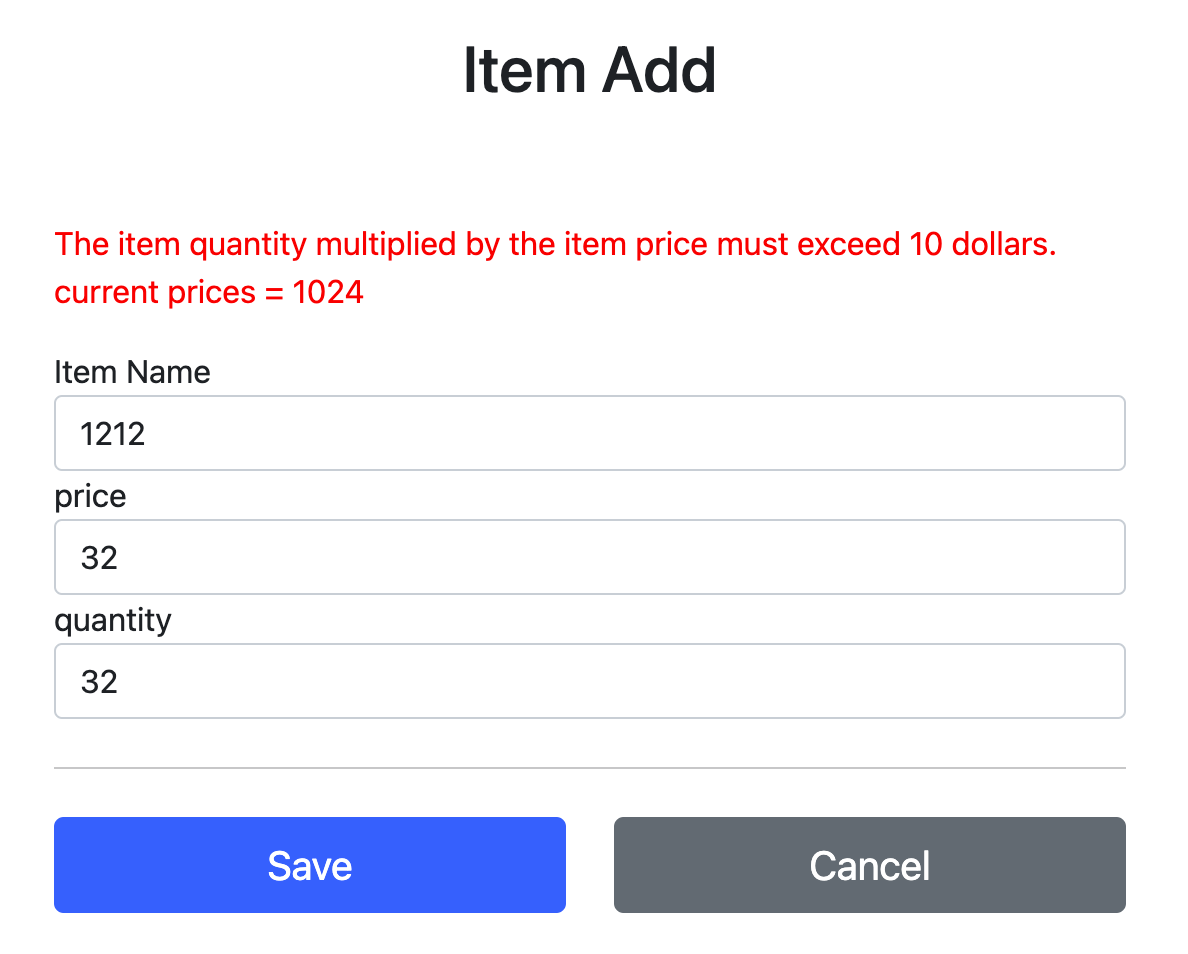
if (item.getPrice() != null && item.getQuantity() != null) {
int resultPrice = item.getPrice() * item.getQuantity();
if (resultPrice < 10_000) {
errors.put("globalError", "The item quantity multiplied by the item price must exceed 10 dollars. current prices = " + resultPrice);
}
}
// 만약 errors 객체에 담긴게 없지 않다면 즉, 에러가 있다면 다시 form으로 보내주기
if (!errors.isEmpty()) {
model.addAttribute("erros", errors);
return "validation/v1/addForm";
}
// error 객체가 비었다면 즉, form 입력 값에 이상이 없다면 정상적인 페이지 보여주기
Item savedItem = itemRepository.save(item);
redirectAttributes.addAttribute("itemId", savedItem.getId());
redirectAttributes.addAttribute("status", true);
return "redirect:/validation/v1/items/{itemId}";
}- 그런데 html을 수정하기 전에 보면 에러가 나서 controller를 다시 갔다 왔는데도 내가 입력한 값이 유지되어 있는데 이는 최초에
@GetMapping("/add")의 컨트롤러에서 Item의 빈 객체를 생성하여 보냈고
@PostMapping("/add")컨트롤러에서는 값을 받아와서@ModelAttribute로 생략된
Item item = new Item();
model.addAttribute("price",item.price)
...
의 코드를 사실상 다 실행하기 때문에 해당 item 객체가 넘어가서 다시 html파일로 가도 기존에 입력값이 남아있는 것이다.
- 그럼 이제 이 errors 객체를 담은 모델을 가지고 html을 다시 보여주자.
<div th:if="${errors?.containsKey('globalError')}">
    <p class="field-error" th:text="${errors['globalError']}">전체 오류 메시지</p>
</div>- 사용법은 역시 model과 마찬가지로
th:if="${}"표현식을 사용하면 된다.
errors객체는 optional로 처리해주고 접근하는 것도 Map 객체이기에errors['globalError']이런식으로 접근하여 값을 뽑아주면 된다.
- 또한 th:classappend 코드로 동적으로 class를 추가할 수도 있다.
<div>
    <label for="price" th:text="#{label.item.price}">가격</label>
    <input type="text" id="price" th:field="*{price}"
           th:classappend="${errors.containsKey('price')} ? 'field-error' : '_'"
           class="form-control" placeholder="가격을 입력하세요">
    <div class="field-error" th:if="${errors.containsKey('price')}" th:text="${errors['price']}">
        가격 오류
    </div>
</div>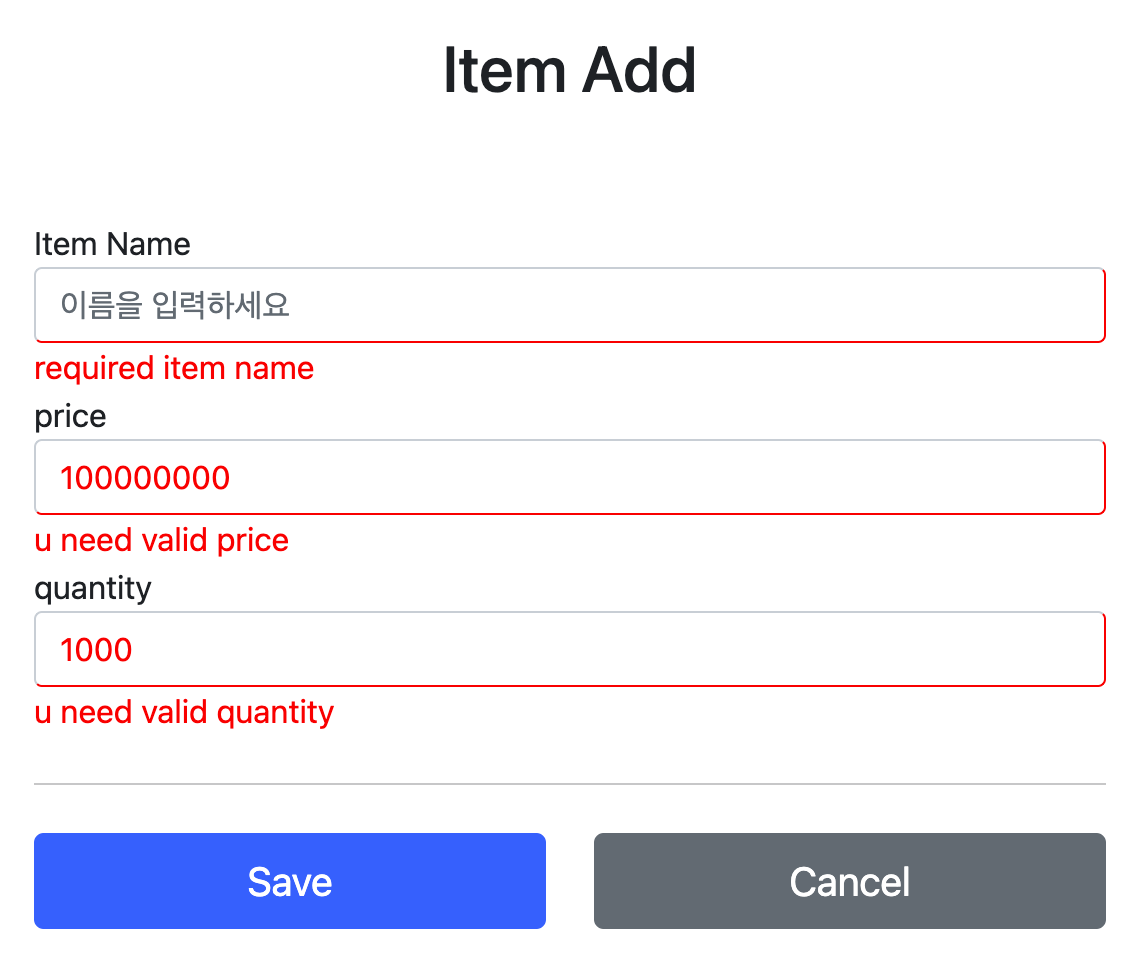
? (Safe Navigation Operator)
- 더 정확한 표현으로 safe-navigation-operator라고 만약 null인 객체에 그냥 접근하려하면 errors.containsKey() 를 호출하는 순간 NullPointerException 이 발생한다.
errors?.은 errors 가 null 일때 NullPointerException 이 발생하는 대신, null 을 반환하는 문법이다.
th:if 에서 null 은 실패로 처리되므로 오류 메시지가 출력되지 않는다.
이것은 스프링의 SpringEL이 제공하는 문법이다. 자세한 내용은 공식문서를 참고하자
문제점
- 여기까지 했다면 0가지 문제점이 발생한다.
-
중복이 많다. 위 코드는 예시로 "가격 오류"에 대해서만 작성해 두었는데 사실 이름, 가격, 수량 모두 아주 조금씩만 바뀌도 모두 같은 코드이다.
-
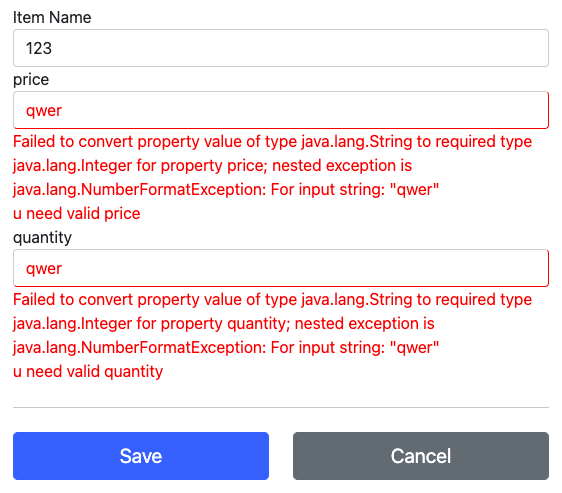
타입 처리가 안 된다. 우선 Item 객체를 보면 price와 quantity는 Inteager 타입인데 이는 유효성 검사를 위해 컨트롤러로 들어가기도 전에 HTTP message에서 에러(400 bad request)를 내기 때문에 유효성 검사가 안 된다.
-
그리고 bad request white label 페이지로 이동하기 때문에 사용자가 입력해 두었던 값이 모두 날아가버린다.
- 이제 이 문제점들을 하나하나 고쳐보자.
BindingResult
@PostMapping("/add")
public String addItem(@ModelAttribute Item item, BindingResult bindingResult, RedirectAttributes redirectAttributes, Model model) {

    if (!StringUtils.hasText(item.getItemName())) {
    	// addError()의 인자로 FeildError 객체를 생성해서 넣어주면 되는데 이때
        // 첫번째 인자는 @ModelAttribute의 모델이 되고 두번째 인자는 해당 ModelAttribute의 속성값
        // 마지막으로 세번째 인자는 메시지를 넘겨주면 된다.
        bindingResult.addError(new FieldError("item", "itemName", "required item name"));
    }
    if (item.getPrice() == null || item.getPrice() < 1000 || item.getPrice() > 1_000_000) {
        bindingResult.addError(new FieldError("item", "price", "u need valid price"));
    }
    if (item.getQuantity() == null || item.getQuantity() >= 999) {
        bindingResult.addError(new FieldError("item", "quantity", "u need valid quantity"));
    }
    if (item.getPrice() != null && item.getQuantity() != null) {
        int resultPrice = item.getPrice() * item.getQuantity();
        if (resultPrice < 10_000) {
        	// 그런데 이렇게 @ModelAttribute에 없는 필드의 값을 추가로 넘겨주고 싶을 때가 있는데
            // 이때는 그냥 FieldError가 아니라 그냥 ObjectError 구현체를 넣어주면 된다.
            bindingResult.addError(new ObjectError("item", "The item quantity multiplied by the item price must exceed 10 dollars. current prices = " + resultPrice));
        }
    }

    if (bindingResult.hasErrors()) {
    	// 기존처럼 model.addAttribute("erros", error);를 하지 않아도 된다. BindingResult는 자동으로 담김
        return "validation/v2/addForm";
    }

    Item savedItem = itemRepository.save(item);
    redirectAttributes.addAttribute("itemId", savedItem.getId());
    redirectAttributes.addAttribute("status", true);
    return "redirect:/validation/v2/items/{itemId}";
}-
model attribute에 따로 안 담아도 된다.
-
addError 메서드에서 FieldError를 통상 넣어주면 되는데 이때 파라미터 3개중 첫번째에 model로서 담기는 값에 field가 없는 정보를 넘기고 싶다면 objectError를 넘겨주면 된다.
-
반드시 @ModelAttribute 다음에 BindingResult를 넣어줘야한다.

- 참고로 위 사진 처럼 특정 메서드에 필요한 파라미터들을 보고 싶다면
cmd + p를 누르면 알 수 있다.
BindingResult값 html파일에 적용하기
기존 v1
<div>
    <label for="price" th:text="#{label.item.price}">가격</label>
    <input type="text" id="price" th:field="*{price}"
           th:classappend="${errors.containsKey('price')} ? 'field-error' : '_'"
           class="form-control" placeholder="가격을 입력하세요">
    <div class="field-error" th:if="${errors.containsKey('price')}" th:text="${errors['price']}">
        가격 오류
    </div>
</div>
BindingResult로 작성한 v2
<div th:if="${#fields.hasGlobalErrors()}">
    <p class="field-error" th:each="err:${#fields.globalErrors()}" th:text="${err}">글로벌 오류 메시지</p>
</div>

<div>
    <label for="price" th:text="#{label.item.price}">가격</label>
    <input type="text" id="price" th:field="*{price}"
           th:errorclass="field-error"
           class="form-control" placeholder="가격을 입력하세요">
    <div class="field-error" th:errors="*{price}">
        가격 오류
    </div>
</div>-
동적으로 부여하던 error class css는 이제는 th:errorclass로 편하게 부여할 수 있다.
-
참고로 th:object와 똑같이 꺼낼 수 있는 이유는 errors 값역시 BindingResult에 똑같이 @ModelAttribute를 등록을 해두었기 때문에
*{...}로 필드값을 바로 꺼낼 수 있다.
이게 BindingResult 는 Model에 자동으로 포함되기 때문이다. -
와 그럼 어떻게 input 태그 내부에서 자동으로 알아서 errorclass를 잡아내지? 할 수 있는데 사실 input 태그에 같이 붙어있는 th:field 의 값 이름을 보고 BindingResult에 값이 있는지 없는지를 판단한다.
-
타임리프 스프링 검증 오류 통합 기능
- 타임리프는 스프링의 BindingResult 를 활용해서 편리하게 검증 오류를 표현하는 기능을 제공한다.
- #fields : #fields 로 BindingResult 가 제공하는 검증 오류에 접근할 수 있다.
- th:errors : 해당 필드에 오류가 있는 경우에 태그를 출력한다. th:if 의 편의 버전이다.
- th:errorclass : th:field 에서 지정한 필드에 오류가 있으면 class 정보를 추가한다.
- hasGlobalErrors, globalErrors : 따로 field에 지정하지 않은 에러들을 볼 수 있다.
-
@ModelAttribute에 바인딩 시 타입 오류가 발생하면?
BindingResult 가 없을 때: 400 오류가 발생하면서 컨트롤러가 호출되지 않고, 오류 페이지로 이동한다.
BindingResult 가 있을 때: 오류 정보( FieldError )를 BindingResult 에 담아서 컨트롤러를 정상 호출한다. -
BindingResult에 검증 오류를 적용하는 3가지 방법
@ModelAttribute의 객체에 타입 오류 등으로 바인딩이 실패하는 경우 스프링이 FieldError 생성해서BindingResult에 넣어준다.- 개발자가 직접 넣어준다.
Validator사용
BindingResult와 Errors
org.springframework.validation.Errors
org.springframework.validation.BindingResult
BindingResult는 인터페이스이고,Errors인터페이스를 상속받고 있다.
실제 넘어오는 구현체는BeanPropertyBindingResult라는 것인데, 둘다 구현하고 있으므로BindingResult대신에Errors를 사용해도 된다.Errors인터페이스는 단순한 오류 저장과 조회 기능을 제공한다.
BindingResult는 여기에 더해서 추가적인 기능들을 제공한다.
addError()도BindingResult가 제공하기 때문에 주로 관례상 BindingResult 를 많이 사용한다.
FieldError, ObjectError
if (!StringUtils.hasText(item.getItemName())) {
    bindingResult.addError(new FieldError("item", "itemName", item.getItemName(), false, null, null, "required item name"));
}
if (item.getPrice() == null || item.getPrice() < 1000 || item.getPrice() > 1_000_000) {
    bindingResult.addError(new FieldError("item", "price", item.getPrice(), false, null, null, "u need valid price"));
}
if (item.getQuantity() == null || item.getQuantity() >= 999) {
    bindingResult.addError(new FieldError("item", "quantity", item.getQuantity(), false, null, null, "u need valid quantity"));
}
if (item.getPrice() != null && item.getQuantity() != null) {
    int resultPrice = item.getPrice() * item.getQuantity();
    if (resultPrice < 10_000) {
        bindingResult.addError(new ObjectError("item", null, null, "The item quantity multiplied by the item price must exceed 10 dollars. current prices = " + resultPrice));
    }
}- 사실 앞서 작성한 FieldError는 2가지 생성자를 갖고있는데

-
첫번째는 우리가 앞서 생성한 생성자이고 두번째로
rejectedValue값을 넣어야하는 것을 볼 수 있는데 얘를 넣으면 바로 반환되는 값이 넘어와서 자동으로 html에 다시 들어가 사용자가 기존에 입력한 값을 유지시켜주는 것이다. -
그럼 곰곰이 생각해보면 @ModelAttribute에 넣을 수도 없는데 (왜냐하면 item객체의 필드값이 Inteager와 String으로 아예 다르기 때문에) 어떻게 바로 다시 html으로다시 들어감? -> 바로
FieldError객체가 그 기능을 대신한다. 자세히 보면rejectedValue를 받는 곧이Object타입이기 때문에 어떤 데이터라도 일단 다 받을 수 있는 것이다. -
그래서 순서상 badreqeust가 뜨면 오류 정보( FieldError )를 BindingResult 에 담아서
bindingResult.addError(new FieldError("item", "itemName",
"원래 Inteager여야하는데 String으로 입력함", true, null, null, "required item name"));- 이런식으로 위 에러객체가 만들어진 후 해당 오류를
BindingResult에 담아서 컨트롤러를 호출한다. 따라서 타입 오류 같은 바인딩 실패시에도 사용자의 오류 메시지를 정상 출력할 수 있다.
이게 완료된 후 컨트롤러를 정상 호출한다.
-
그리고 대충 파라미터 목록을 살펴보면
field : 오류 필드
rejectedValue : 사용자가 입력한 값(거절된 값)
bindingFailure : 타입 오류 같은 바인딩 실패인지, 검증 실패인지 구분 값
codes : 메시지 코드
arguments : 메시지에서 사용하는 인자
defaultMessage : 기본 오류 메시지 -
타임리프의 사용자 입력 값 유지
th:field="*{price}"타임리프의 th:field 는 매우 똑똑하게 동작하는데,
정상 상황에는 모델 객체의 값을 사용하지만,
오류가 발생하면 FieldError 에서 보관한 값을 사용해서 값을 출력한다.
- 그런데 위 사진을 보면 오류 코드가 굉장히 무섭게 생겼다. 사실 읽어보면 그냥 field값이 안 맞아서 오류난건데 말이다. 그래서 다음에 오류코드와 메시지 처리에 대해 포스팅하겠다.