1. 소개
Boiler plate
→ 로그인 / 사인업 같은 자주 쓰는 기능을 재사용 할 수 있게 만들어 놓은 것
2. Node JS, Express JS 다운로드 하기
-
Node.js is an open-source, cross-platform, JavaScript runtime environment that executes JavaScript code outside of a browser
node js가 나와 javascript를 브라우저가 아닌 서버사이드에서도 사용가능.
-
Express.js or simply Express is a web application framework for Node.js
Node.js 엔진 이용해서 자동차(웹, 앱)을 만들게 도와주는 Express.js (프레임워크)
-
Node.js download
-
cmd
node -v → 버전 확인
mkdir boiler-plate
npm init
author : username -
visual studio code terminal
npm install express --save (package.json에서 확인 가능)
-
index.js → 백엔드 시작점
const express = require('express') const app = express() const port = 3000 app.get('/', (req, res) => { res.send('Hello World!') }) app.listen(port, () => { console.log(`Example app listening on port ${port}`) }) -
package.json : start 추가
"scripts": { "start": "node index.js", "test": "echo \"Error: no test specified\" && exit 1" }, -
visual studio code terminal
npm run start
3. 몽고 DB 연결
-
mongodb.com
- login → create new cluster
- Create a MongoDB User / database → Connect → Choose a connection method → connect your application
-
mongoose
간단하게, 몽고DB를 편하게 쓸 수 있는 object modeling tool이다.
- visual studio code terminal
npm install mongoose --save (package.json에서 확인 가능)
- visual studio code terminal
-
index.js
const mongoose = require('mongoose')
mongoose.connect('mongodb+srv://username:password@boilerplate.ruemuzi.mongodb.net/?retryWrites=true&w=majority', {
}).then(() => console.log('MongoDB Connected...'))
  .catch(err => console.log(err))
warning 1. npm WARN config global --global, --local are deprecated. Use --location=global instead
powershell 관리자 권한으로 실행
Set-ExecutionPolicy Unrestricted -Scope CurrentUser -Force
npm install --global --production npm-windows-upgrade
npm-windows-upgrade --npm-version latest
warning 2. mongoose 버전 6.0 이상부터는 아래의 내용 입력 x
useNewUrlParser: true, useUnifiedTopology: true, useCreateIndex: true, useFindAndModify: false → 모두 주석처리
4. 몽고 DB 연결
- user DB → 보관하기 위해 user schema 만들기
- model은 schema를 감싸주는 역할
- 상품의 작성자 , 타이틀과 설명 등 타입 설정→ shema를 통해 할 수 있다
const mongoose = require('mongoose')

const userSchema = mongoose.Schema({
    name : {
        type : String,
        maxlength : 50
    },
    email : {
        type : String,
        unique : 1,
        trime : true //공백 삭제
    },
    password : {
        type : String,
        minlength : 5
    },
    lastname : {
        type : String,
        maxlength : 50
    },
    role : {
        type : Number,
        default : 0
    },
    image : String,
    token : {
        type : String
    },
    tokenExp : {
        type : Number
    }
})

const User = mongoose.model('User', userSchema)

module.exports = {User}
5. GIT 설치
-
cmd
git --version
-
visual studio code terminal (C:\Users\UserName\Documents\boiler-plate)
git init (git 저장소를 만들어주는 역할)
git status
- wording Directory → git add → Staging Area (git에 올리기 전 대기)
파일 만들기 : .gitignore / 파일 내용 : node_modules
- 만약 위의 파일을 만들지 않고 add를 먼저 했을 때 : git rm —cached node_modules -r (node_modules 정보 지우기)
git add .
git commit -m “ 처음 저장소에 올림 “- 해당 파일은 git repository (LOCAL) 에 올라감
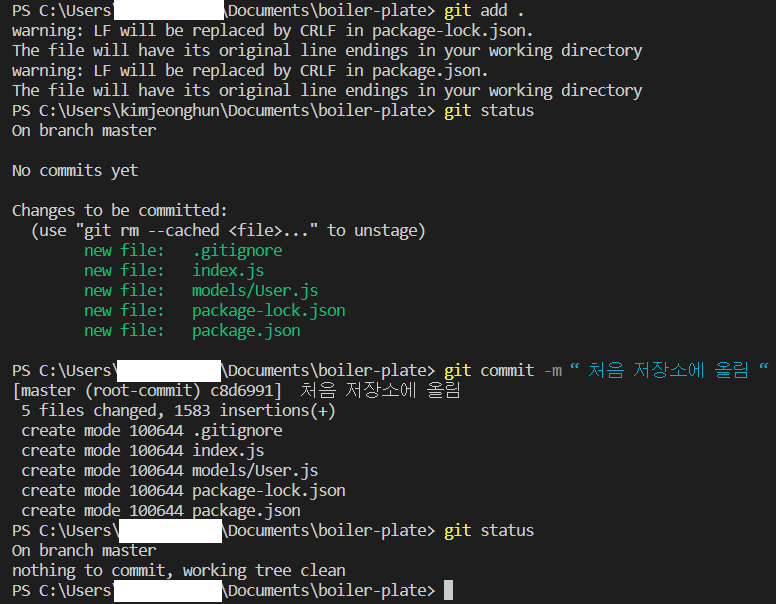
warning 1 : LF will be replaced by CRLF in package-lock.json. The file will have its original line endings in your working directory
LF는 줄바꿈 문자열이 \n, CRLF는 \r\n 이기 때문에 git이 바라볼 땐 어느 쪽을 선택할지 몰라 경고 메세지 띄움 (해당 프로젝트만 적용은 --global 옵션 제거)
해결 방법 1. windows : git config --global core.autocrlf true
(windows는 CRLF를 사용하기 때문에 CRLF -> LF로 변경)해결 방법 2 . Linux, MAC : git config --global core.autocrlf input
(Linux, MAC은 LF를 사용하기 때문에 LF -> line ending으로 사용)
6. SSH를 이용해 GITHUB 연결

-
git - tool
-
github - 깃을 사용하는 클라우드 서비스
-
SSH(secure shell)를 이용해 git을 github에 연결하기
- cmd
ls -a ~/.ssh (ssh 존재하는지 확인하기)
-
ssh 없다면
Generating a new SSH key and adding it to the ssh-agent
Adding a new SSH key to your GitHub account
상위 링크 2개 모두 그대로 따라하고echo "# boiler-plate-ko" >> README.md git remote add origin https://github.com/githubsite/boiler-plate-ko.git git branch -M main git push -u origin main해당 내용과 같이 4줄을 visual studio code terminal 에 입력하면 push 된다.
만들었던 repositories의 code로 가면 위의 내용과 같이 보이는데 5강에서 commit 했기 때문에 바로 push로 넘어갔다. 또한, README.md 파일도 선택이다.