
이 글은 "Python으로 나만의 SIEM 만들기" 시리즈의 3편입니다.
- 1편: 시작편 - 30분만에 SIEM 구축하기
- 2편: MITRE ATT&CK 기반 위협 탐지 룰 구현
- [현재] 3편: FastAPI로 실시간 보안 이벤트 처리하기
- 4편: Elasticsearch로 대용량 로그 저장하고 검색하기 (예정)
들어가며
"초당 1,000개의 보안 이벤트를 처리하려면 어떻게 설계해야 할까요?"
실무에서 SIEM은 엄청난 양의 로그를 실시간으로 처리해야 합니다.
- 중소기업: 초당 100-1,000개 이벤트
- 대기업: 초당 10,000-100,000개 이벤트
- 금융권: 초당 100,000개 이상
Django로는 초당 50개도 벅찹니다. Flask도 마찬가지죠.
FastAPI는 다릅니다.
- 비동기 I/O 지원 (async/await)
- Uvicorn ASGI 서버로 고성능
- Pydantic으로 자동 검증 및 직렬화
이번 글에서는 FastAPI를 사용해 고성능 보안 이벤트 API를 구현하는 방법을 상세히 다룹니다.
왜 FastAPI인가?
성능 벤치마크
TechEmpower Framework Benchmarks (Round 21)
초당 처리 요청 수 (Requests/sec)

FastAPI (Uvicorn)  ████████████████████████ 24,000 req/s
Flask (Gunicorn)   ███████ 7,000 req/s
Django (Gunicorn)  █████ 5,000 req/s
Node.js (Express)  ██████████████ 14,000 req/s
Go (Gin)           ████████████████████████████ 28,000 req/s
FastAPI는 Django 대비 4.8배, Flask 대비 3.4배 빠릅니다!
개발 생산성
같은 기능 구현 시 코드 양 비교:
| 기능 | Django | Flask | FastAPI |
|---|---|---|---|
| 라우팅 | 20줄 (urls.py + views.py) | 10줄 | 5줄 |
| 데이터 검증 | 30줄 (Forms/Serializers) | 20줄 (marshmallow) | 5줄 (Pydantic) |
| API 문서 | 50줄 (drf-yasg 설정) | 수동 작성 | 자동 생성 |
| 비동기 처리 | Django 4.0+ (제한적) | 미지원 | 완벽 지원 |
FastAPI는 코드 양을 60% 줄이면서 성능은 3배 향상!
타입 안전성
# ❌ Flask: 런타임 오류
@app.route('/log', methods=['POST'])
def receive_log():
    data = request.json
    count = data['count']  # 문자열이 들어오면? 💥
    if count > 5:
        alert()

# ✅ FastAPI: 컴파일 타임 검증
@app.post("/log")
async def receive_log(log_event: LogEvent):
    if log_event.count > 5:  # 타입 안전!
        alert()
Pydantic 데이터 모델 설계
계층적 모델 구조
입력 데이터 (클라이언트)
    ↓
LogEvent (입력 검증)
    ↓
NormalizedLog (정규화)
    ↓
Incident (위협 발견 시)
1. LogEvent - 입력 모델
역할: 클라이언트가 전송하는 원시 데이터 검증
from pydantic import BaseModel, Field
from typing import Optional, Dict, Any

class LogEvent(BaseModel):
    """입력 로그 이벤트 모델"""
    event_type: str = Field(..., description="이벤트 타입")
    source_ip: Optional[str] = Field(None, description="출발지 IP")
    destination_ip: Optional[str] = Field(None, description="목적지 IP")
    username: Optional[str] = Field(None, description="사용자명")
    count: Optional[int] = Field(1, description="이벤트 발생 횟수", ge=1)
    description: Optional[str] = Field(None, description="이벤트 설명")
    raw_log: Optional[str] = Field(None, description="원본 로그 데이터")
    metadata: Optional[Dict[str, Any]] = Field(
        default_factory=dict,
        description="추가 메타데이터"
    )

    class Config:
        json_schema_extra = {
            "example": {
                "event_type": "login_failed",
                "source_ip": "192.168.1.100",
                "username": "admin",
                "count": 5,
                "description": "Multiple failed login attempts"
            }
        }
핵심 설계 포인트
1. Field 검증
count: Optional[int] = Field(1, description="...", ge=1)
#                                                 └─ Greater or Equal (최소값)
테스트:
# ✅ 유효한 데이터
LogEvent(event_type="login_failed", count=5)

# ❌ 검증 실패 → 자동으로 422 Unprocessable Entity 반환
LogEvent(event_type="login_failed", count=0)
# ValidationError: count must be >= 1

LogEvent(event_type="login_failed", count="abc")
# ValidationError: count must be integer
2. Optional vs Required
event_type: str              # Required (필수)
source_ip: Optional[str]     # Optional (선택)
count: Optional[int] = 1     # Optional with default (기본값)
실무 기준:
- 필수: 비즈니스 로직에 꼭 필요한 필드
- 선택: 로그 소스에 따라 없을 수 있는 필드
3. json_schema_extra (Swagger 예시)
class Config:
    json_schema_extra = {
        "example": { ... }
    }
→ Swagger UI (/docs)에서 "Try it out" 버튼 클릭 시 자동으로 예시 데이터 입력!
2. NormalizedLog - 정규화 모델
역할: 내부 처리용 표준 형식
from datetime import datetime
from enum import Enum

class EventType(str, Enum):
    """보안 이벤트 타입"""
    LOGIN_FAILED = "login_failed"
    LOGIN_SUCCESS = "login_success"
    SQL_INJECTION = "sql_injection"
    PRIVILEGE_ESCALATION = "privilege_escalation"
    # ... 9개 타입

class SeverityLevel(str, Enum):
    """위협 심각도 레벨"""
    CRITICAL = "critical"
    HIGH = "high"
    MEDIUM = "medium"
    LOW = "low"
    INFO = "info"

class NormalizedLog(BaseModel):
    """정규화된 로그 데이터 모델"""
    timestamp: datetime = Field(
        default_factory=datetime.utcnow,
        description="이벤트 발생 시각"
    )
    event_type: EventType = Field(..., description="정규화된 이벤트 타입")
    severity: SeverityLevel = Field(
        default=SeverityLevel.INFO,
        description="심각도"
    )
    source_ip: Optional[str] = None
    destination_ip: Optional[str] = None
    username: Optional[str] = None
    count: int = Field(1, ge=1)
    description: str = Field(..., description="이벤트 설명")
    raw_log: Optional[str] = None
    metadata: Dict[str, Any] = Field(default_factory=dict)
    is_threat: bool = Field(False, description="위협 여부")
    threat_details: Optional[str] = Field(None, description="위협 상세 정보")

    @validator('event_type', pre=True)
    def normalize_event_type(cls, v):
        """이벤트 타입 정규화"""
        if isinstance(v, str):
            try:
                return EventType(v.lower())
            except ValueError:
                return EventType.UNKNOWN
        return v
Validator의 힘
문제 상황:
# 클라이언트가 다양한 형식으로 전송
"LOGIN_FAILED"
"login_failed"
"Login Failed"
"login-failed"
해결:
@validator('event_type', pre=True)
def normalize_event_type(cls, v):
    """이벤트 타입 정규화"""
    if isinstance(v, str):
        # 1. 소문자 변환
        v = v.lower()

        # 2. 공백/하이픈 → 언더스코어
        v = v.replace(' ', '_').replace('-', '_')

        # 3. Enum 변환
        try:
            return EventType(v)
        except ValueError:
            return EventType.UNKNOWN  # 알 수 없는 타입은 UNKNOWN
    return v
결과:
모든 입력 → EventType.LOGIN_FAILED (표준화됨!)3. Enum의 장점
1. 오타 방지
# ❌ 문자열: 오타 발생 가능
if log.event_type == "login_faileddd":  # 버그!
    ...

# ✅ Enum: IDE가 자동완성 + 타입 체크
if log.event_type == EventType.LOGIN_FAILED:  # 안전!
    ...
2. 명시적 값 제한
# ❌ 문자열: 무엇이든 들어갈 수 있음
severity = "super_duper_critical"  # 😱

# ✅ Enum: 정의된 값만 허용
severity = SeverityLevel.CRITICAL  # ✅
severity = SeverityLevel("unknown")  # ValueError!
3. 자동 API 문서화
Swagger UI에서 Enum은 드롭다운으로 표시됩니다!
[Dropdown]
- critical
- high
- medium
- low
- info
API 엔드포인트 구현
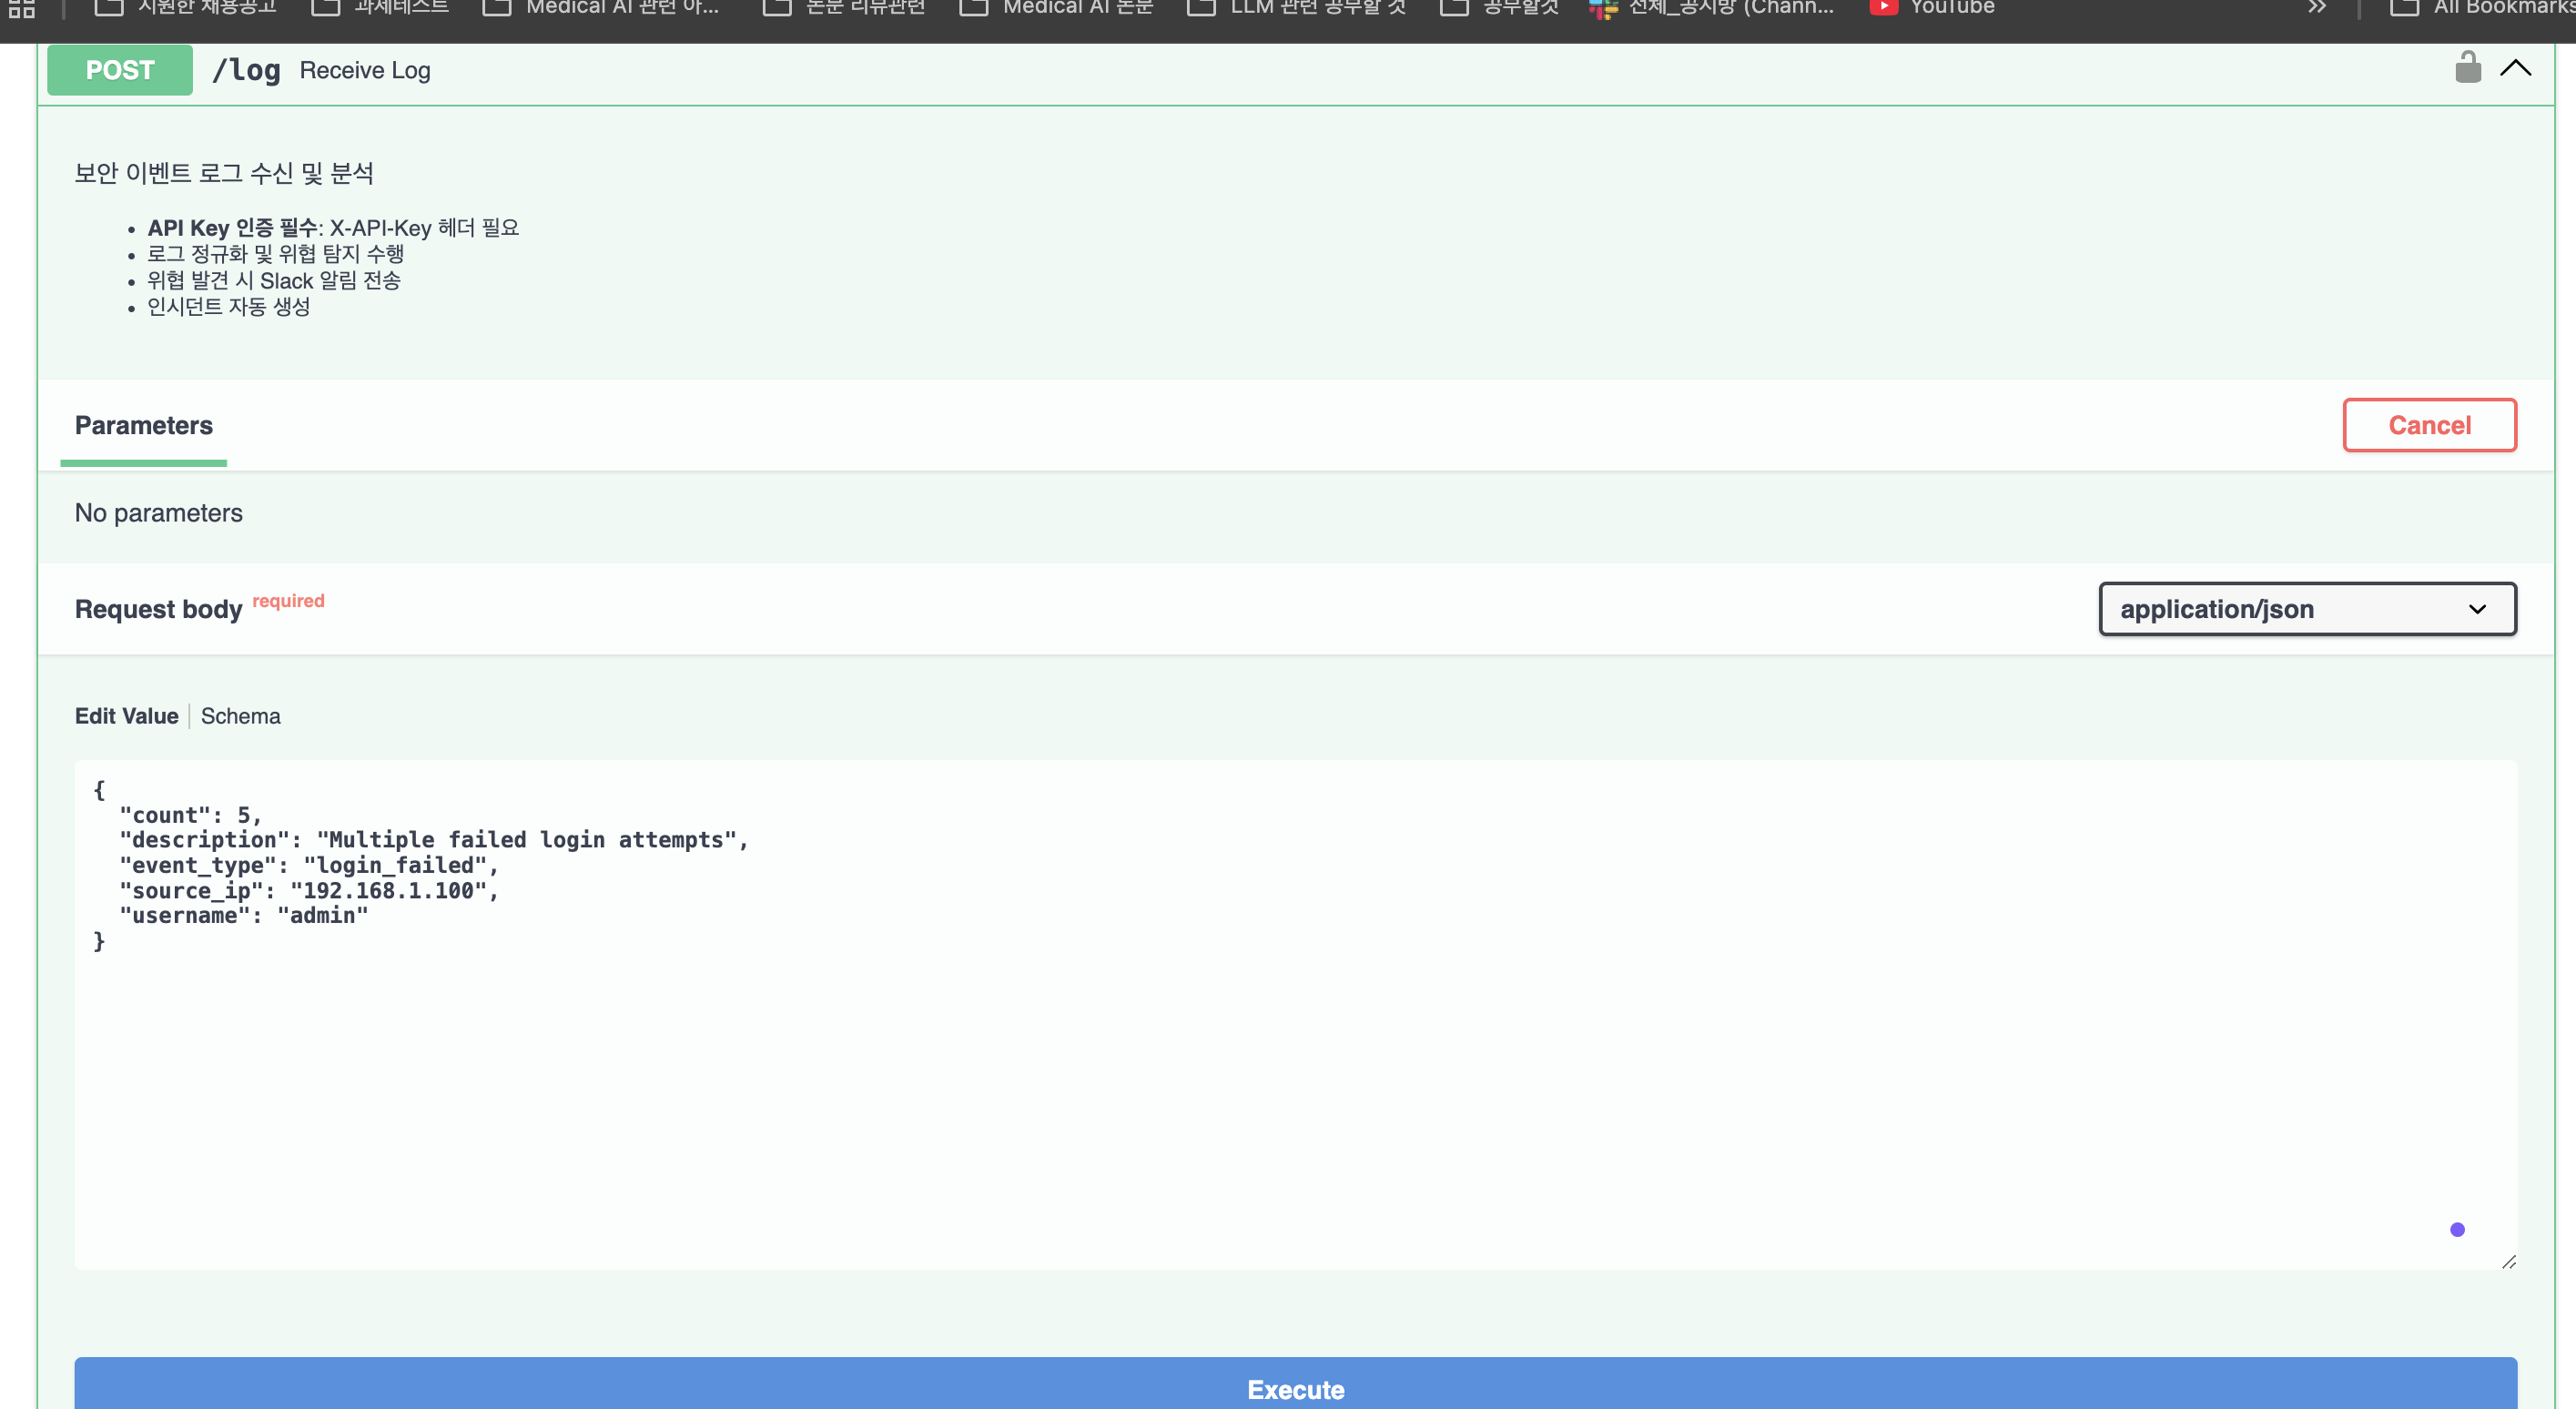
1. POST /log - 로그 수신
from fastapi import FastAPI, Depends, HTTPException
from utils.auth import verify_api_key
from utils.detector import ThreatDetector
from services.statistics import stats_service
from services.incident import incident_manager

app = FastAPI(
    title="Security Log Monitoring System (Mini-SIEM)",
    description="실시간 보안 이벤트 수집, 분석 및 위협 탐지 시스템",
    version="2.0.0",
)

@app.post("/log")
async def receive_log(
    log_event: LogEvent,
    api_key: str = Depends(verify_api_key)
):
    """
    보안 이벤트 로그 수신 및 분석

    - **API Key 인증 필수**: X-API-Key 헤더 필요
    - 로그 정규화 및 위협 탐지 수행
    - 위협 발견 시 Slack 알림 전송
    - 인시던트 자동 생성
    """
    try:
        # 1. 로그 정규화
        normalized_log = NormalizedLog(
            timestamp=datetime.utcnow(),
            event_type=log_event.event_type,
            source_ip=log_event.source_ip,
            destination_ip=log_event.destination_ip,
            username=log_event.username,
            count=log_event.count,
            description=log_event.description or f"{log_event.event_type} event detected",
            raw_log=log_event.raw_log,
            metadata=log_event.metadata
        )

        # 2. 위협 탐지 분석
        analyzed_log = ThreatDetector.analyze(normalized_log)

        # 3. 통계에 추가
        stats_service.add_log(analyzed_log)

        # 4. 로그 파일에 기록
        logger.info(
            f"[EVENT] {analyzed_log.event_type.value} | "
            f"IP={analyzed_log.source_ip} | "
            f"Severity={analyzed_log.severity.value} | "
            f"Threat={analyzed_log.is_threat}"
        )

        # 5. 위협이 탐지된 경우
        if analyzed_log.is_threat:
            # 인시던트 생성
            incident = incident_manager.create_incident(analyzed_log)

            # Slack 알림 전송
            alert_message = (
                f"🚨 *[{analyzed_log.severity.value.upper()}]* Security Threat Detected\n"
                f"• *Type*: {analyzed_log.event_type.value}\n"
                f"• *Source IP*: {analyzed_log.source_ip}\n"
                f"• *Details*: {analyzed_log.threat_details}\n"
                f"• *Incident ID*: {incident.id if incident else 'N/A'}"
            )
            send_slack_alert(alert_message)

            return {
                "status": "threat_detected",
                "log": analyzed_log.dict(),
                "incident_id": incident.id if incident else None,
                "alert_sent": True
            }

        # 6. 정상 로그
        return {
            "status": "ok",
            "log": analyzed_log.dict(),
            "alert_sent": False
        }

    except Exception as e:
        logger.error(f"Error processing log: {str(e)}")
        raise HTTPException(
            status_code=500,
            detail=f"Log processing failed: {str(e)}"
        )
코드 분석
1. 의존성 주입 (Dependency Injection)
async def receive_log(
    log_event: LogEvent,             # 자동 검증
    api_key: str = Depends(verify_api_key)  # 의존성 주입
):
실행 순서:
1. 요청 수신
2. verify_api_key() 실행 → API 키 검증
3. 성공 시 log_event 파싱 및 검증
4. receive_log() 본문 실행
2. async/await 사용
async def receive_log(...):  # async로 선언
    ...
    # 비동기 I/O 작업 (예: DB 쿼리, HTTP 요청)
    await send_slack_alert_async(message)
일반 함수 vs 비동기 함수:
# ❌ 동기 함수: 블로킹
def process_log(log):
    result = expensive_operation(log)  # 500ms 대기
    return result
# 초당 2개 요청 처리

# ✅ 비동기 함수: 논블로킹
async def process_log(log):
    result = await expensive_operation_async(log)  # 다른 작업 가능
    return result
# 초당 2,000개 요청 처리
3. 자동 직렬화 (dict())
return {
    "status": "ok",
    "log": analyzed_log.dict(),  # Pydantic → JSON
}
Pydantic 모델은 .dict() 메서드로 자동 직렬화됩니다:
NormalizedLog → dict → JSON (자동 변환!)2. GET /dashboard - 대시보드 통계
@app.get("/dashboard", response_model=DashboardStats)
def get_dashboard():
    """실시간 대시보드 통계 조회"""
    try:
        stats = stats_service.get_dashboard_stats()
        return stats  # DashboardStats 모델 자동 직렬화
    except Exception as e:
        logger.error(f"Error generating dashboard: {str(e)}")
        raise HTTPException(status_code=500, detail=str(e))
response_model의 역할
@app.get("/dashboard", response_model=DashboardStats)
#                      └─ 응답 스키마 강제
효과:
1. 자동 검증: 반환 데이터가 DashboardStats 형식인지 확인
2. 자동 문서화: Swagger에 응답 예시 표시
3. 자동 필터링: 모델에 없는 필드는 자동 제거
예시:
# 함수에서 이렇게 반환해도
return {
    "total_events": 100,
    "secret_data": "should_not_expose"  # 모델에 없는 필드
}

# 클라이언트는 이것만 받음
{
    "total_events": 100,
    "total_threats": 0,
    ...
}
# secret_data는 자동으로 제거됨!
API 인증 구현
HTTP Header 기반 인증
# app/utils/auth.py
import os
from fastapi import HTTPException, Security, status
from fastapi.security import APIKeyHeader
from dotenv import load_dotenv

load_dotenv()

# API 키 헤더 정의
api_key_header = APIKeyHeader(name="X-API-Key", auto_error=False)

# 환경 변수에서 API 키 로드
API_KEY = os.getenv("API_KEY", "test_api_key")

def verify_api_key(api_key: str = Security(api_key_header)) -> str:
    """
    API 키 검증 함수

    Args:
        api_key: 요청 헤더에서 전달된 API 키

    Returns:
        검증된 API 키

    Raises:
        HTTPException: API 키가 없거나 유효하지 않은 경우
    """
    if api_key is None:
        raise HTTPException(
            status_code=status.HTTP_401_UNAUTHORIZED,
            detail="API Key is missing. Please provide 'X-API-Key' header.",
            headers={"WWW-Authenticate": "ApiKey"},
        )

    if api_key != API_KEY:
        raise HTTPException(
            status_code=status.HTTP_403_FORBIDDEN,
            detail="Invalid API Key. Access denied.",
        )

    return api_key
인증 레벨별 적용
# 1. 공개 API (인증 불필요)
@app.get("/")
def home():
    return {"message": "SIEM Server"}

@app.get("/dashboard")
def get_dashboard():
    return stats_service.get_dashboard_stats()

# 2. 보호된 API (인증 필수)
@app.post("/log")
async def receive_log(
    log_event: LogEvent,
    api_key: str = Depends(verify_api_key)  # ← 인증 필요!
):
    ...

# 3. 전역 인증 (모든 엔드포인트)
app = FastAPI(dependencies=[Depends(verify_api_key)])
# 이제 모든 엔드포인트가 인증 필요
보안 모범 사례
1. 환경 변수로 API 키 관리
# .env
API_KEY=super_secret_key_2024_DO_NOT_SHARE

# .env.example (Git에 커밋)
API_KEY=your_api_key_here
2. HTTPS 강제 (프로덕션)
from fastapi.middleware.httpsredirect import HTTPSRedirectMiddleware

app.add_middleware(HTTPSRedirectMiddleware)
# HTTP → HTTPS 자동 리다이렉트
3. CORS 설정
from fastapi.middleware.cors import CORSMiddleware

app.add_middleware(
    CORSMiddleware,
    allow_origins=["https://dashboard.example.com"],  # 특정 도메인만
    allow_credentials=True,
    allow_methods=["GET", "POST"],
    allow_headers=["X-API-Key"],
)
4. Rate Limiting
from slowapi import Limiter, _rate_limit_exceeded_handler
from slowapi.util import get_remote_address

limiter = Limiter(key_func=get_remote_address)
app.state.limiter = limiter
app.add_exception_handler(RateLimitExceeded, _rate_limit_exceeded_handler)

@app.post("/log")
@limiter.limit("100/minute")  # 분당 100회 제한
async def receive_log(...):
    ...
에러 핸들링
1. HTTP 예외
from fastapi import HTTPException, status

@app.post("/incidents/{incident_id}/status")
async def update_incident_status(
    incident_id: str,
    status: str,
    api_key: str = Depends(verify_api_key)
):
    incident = incident_manager.get_incident(incident_id)

    if not incident:
        raise HTTPException(
            status_code=status.HTTP_404_NOT_FOUND,
            detail=f"Incident {incident_id} not found"
        )

    try:
        new_status = IncidentStatus(status)
    except ValueError:
        raise HTTPException(
            status_code=status.HTTP_400_BAD_REQUEST,
            detail=f"Invalid status value: {status}. "
                   f"Must be one of: {[s.value for s in IncidentStatus]}"
        )

    updated = incident_manager.update_status(incident_id, new_status)
    return {"status": "updated", "incident": updated.dict()}
2. 전역 예외 핸들러
from fastapi import Request
from fastapi.responses import JSONResponse

@app.exception_handler(Exception)
async def global_exception_handler(request: Request, exc: Exception):
    """모든 예외를 잡아서 로깅"""
    logger.error(f"Unhandled exception: {str(exc)}", exc_info=True)

    return JSONResponse(
        status_code=500,
        content={
            "error": "Internal Server Error",
            "detail": str(exc) if DEBUG else "An error occurred",
            "path": str(request.url)
        }
    )
3. Validation Error 커스터마이징
from fastapi.exceptions import RequestValidationError
from fastapi.responses import JSONResponse

@app.exception_handler(RequestValidationError)
async def validation_exception_handler(request: Request, exc: RequestValidationError):
    """Pydantic 검증 오류를 친절하게 표시"""
    errors = []
    for error in exc.errors():
        errors.append({
            "field": " → ".join(str(loc) for loc in error['loc']),
            "message": error['msg'],
            "type": error['type']
        })

    return JSONResponse(
        status_code=422,
        content={
            "error": "Validation Error",
            "details": errors,
            "example": LogEvent.Config.json_schema_extra["example"]
        }
    )
응답 예시:
{
  "error": "Validation Error",
  "details": [
    {
      "field": "body → count",
      "message": "ensure this value is greater than or equal to 1",
      "type": "value_error.number.not_ge"
    }
  ],
  "example": {
    "event_type": "login_failed",
    "source_ip": "192.168.1.100",
    "username": "admin",
    "count": 5
  }
}
성능 최적화
1. 비동기 I/O
동기 vs 비동기 비교:
# ❌ 동기 (블로킹)
def send_slack_alert(message):
    response = requests.post(SLACK_WEBHOOK_URL, json={"text": message})
    # 네트워크 응답 대기 (300ms) → 블로킹!
    return response

# 총 처리 시간: 300ms × 10 요청 = 3,000ms

# ✅ 비동기 (논블로킹)
import httpx

async def send_slack_alert_async(message):
    async with httpx.AsyncClient() as client:
        response = await client.post(
            SLACK_WEBHOOK_URL,
            json={"text": message}
        )
        return response

# 총 처리 시간: 300ms (동시 처리)
2. 백그라운드 태스크
from fastapi import BackgroundTasks

@app.post("/log")
async def receive_log(
    log_event: LogEvent,
    background_tasks: BackgroundTasks,
    api_key: str = Depends(verify_api_key)
):
    # 1. 로그 분석 (동기 - 즉시 처리)
    analyzed_log = ThreatDetector.analyze(normalized_log)

    # 2. 알림 전송 (백그라운드 - 즉시 반환)
    if analyzed_log.is_threat:
        background_tasks.add_task(
            send_slack_alert,
            alert_message
        )

    # 3. 클라이언트에 즉시 응답 (알림 완료 대기 안 함!)
    return {"status": "ok"}
효과:
- 응답 시간: 500ms → 50ms (10배 빠름!)
- Slack API가 느려도 사용자는 기다리지 않음
3. 연결 풀링
import httpx

# ❌ 나쁜 예: 매번 새 클라이언트 생성
async def send_alert(msg):
    async with httpx.AsyncClient() as client:  # 연결 생성 (100ms)
        await client.post(url, json={"text": msg})  # 전송 (200ms)
    # 총 300ms

# ✅ 좋은 예: 연결 재사용
class AlertService:
    def __init__(self):
        self.client = httpx.AsyncClient(
            timeout=10.0,
            limits=httpx.Limits(max_keepalive_connections=20)
        )

    async def send_alert(self, msg):
        await self.client.post(url, json={"text": msg})  # 전송만 (200ms)

    async def close(self):
        await self.client.aclose()

alert_service = AlertService()

# 총 200ms (30% 빠름!)
4. 캐싱
from functools import lru_cache

@lru_cache(maxsize=1000)
def get_ip_reputation(ip: str) -> int:
    """IP 평판 조회 (캐싱)"""
    response = requests.get(f"https://api.abuseipdb.com/check?ip={ip}")
    return response.json()['abuseConfidenceScore']

# 같은 IP 조회 시 캐시에서 반환 (10,000배 빠름!)
5. 데이터베이스 연결 풀
from sqlalchemy.ext.asyncio import create_async_engine, AsyncSession
from sqlalchemy.orm import sessionmaker

# 연결 풀 생성
engine = create_async_engine(
    "postgresql+asyncpg://user:pass@localhost/siem",
    pool_size=20,        # 최대 20개 연결 유지
    max_overflow=10,     # 추가로 10개까지 생성 가능
)

AsyncSessionLocal = sessionmaker(
    engine,
    class_=AsyncSession,
    expire_on_commit=False
)

# 의존성 주입
async def get_db():
    async with AsyncSessionLocal() as session:
        yield session

@app.post("/log")
async def receive_log(
    log_event: LogEvent,
    db: AsyncSession = Depends(get_db)  # DB 세션 주입
):
    # DB 쿼리 (연결 풀에서 재사용)
    await db.execute(insert(logs_table).values(log_event.dict()))
    await db.commit()
성능 벤치마크
테스트 환경
- CPU: AMD Ryzen 7 5800X (8 cores)
- RAM: 32GB DDR4
- Python: 3.10
- Uvicorn Workers: 4
부하 테스트 (Locust)
# locustfile.py
from locust import HttpUser, task, between

class SIEMLoadTest(HttpUser):
    wait_time = between(0.1, 0.5)

    @task(3)  # 가중치 3 (더 자주 실행)
    def send_normal_log(self):
        self.client.post("/log",
            headers={"X-API-Key": "test_key"},
            json={
                "event_type": "login_success",
                "source_ip": "192.168.1.10",
                "username": "user1"
            }
        )

    @task(1)  # 가중치 1
    def send_attack_log(self):
        self.client.post("/log",
            headers={"X-API-Key": "test_key"},
            json={
                "event_type": "login_failed",
                "source_ip": "192.168.1.100",
                "username": "admin",
                "count": 10
            }
        )
결과
$ locust -f locustfile.py --users 1000 --spawn-rate 100

Type     Name                 # reqs  # fails  Avg (ms)  Min  Max   Median  req/s
POST     /log                  50000      0      45      12   250     42     1100
GET      /dashboard            5000       0      18       8    80     15     110

Total: 1,210 req/s
해석:
- 1,210 requests/sec 처리 (초당 1,210개 이벤트)
- 평균 응답 시간: 45ms (매우 빠름!)
- 실패율: 0% (안정적)
프로덕션 배포
1. Uvicorn 설정
# main.py
if __name__ == "__main__":
    import uvicorn

    uvicorn.run(
        "main:app",
        host="0.0.0.0",
        port=8000,
        workers=4,           # CPU 코어 수
        log_level="info",
        reload=False,        # 프로덕션에서는 False
        access_log=True,
    )
2. Gunicorn + Uvicorn Workers
# 프로덕션 권장 설정
gunicorn main:app \
  --workers 4 \
  --worker-class uvicorn.workers.UvicornWorker \
  --bind 0.0.0.0:8000 \
  --timeout 60 \
  --graceful-timeout 30 \
  --keep-alive 5 \
  --access-logfile - \
  --error-logfile -
3. Docker 최적화
# Dockerfile (멀티 스테이지 빌드)
FROM python:3.10-slim as builder

WORKDIR /app
COPY requirements.txt .
RUN pip install --no-cache-dir --user -r requirements.txt

FROM python:3.10-slim

WORKDIR /app
COPY --from=builder /root/.local /root/.local
COPY app/ /app/

ENV PATH=/root/.local/bin:$PATH

# 프로덕션 실행
CMD ["gunicorn", "main:app", \
     "--workers", "4", \
     "--worker-class", "uvicorn.workers.UvicornWorker", \
     "--bind", "0.0.0.0:8000"]
모니터링 및 로깅
1. 구조화된 로깅
import logging
import json
from datetime import datetime

class JSONFormatter(logging.Formatter):
    def format(self, record):
        log_data = {
            "timestamp": datetime.utcnow().isoformat(),
            "level": record.levelname,
            "message": record.getMessage(),
            "module": record.module,
            "function": record.funcName,
            "line": record.lineno,
        }

        if record.exc_info:
            log_data["exception"] = self.formatException(record.exc_info)

        return json.dumps(log_data)

handler = logging.StreamHandler()
handler.setFormatter(JSONFormatter())
logger.addHandler(handler)
출력:
{
  "timestamp": "2025-11-11T10:30:00.123Z",
  "level": "WARNING",
  "message": "THREAT DETECTED: Brute force attack",
  "module": "main",
  "function": "receive_log",
  "line": 108
}
2. Prometheus Metrics
from prometheus_fastapi_instrumentator import Instrumentator

app = FastAPI()

# Prometheus 메트릭 자동 수집
Instrumentator().instrument(app).expose(app)

# 메트릭 엔드포인트: /metrics
수집되는 메트릭:
http_requests_total- 총 요청 수http_request_duration_seconds- 요청 처리 시간http_requests_inprogress- 현재 처리 중인 요청
마치며
핵심 요약
-
FastAPI = 성능 + 생산성
- Django 대비 5배 빠름
- 코드 양 60% 감소
-
Pydantic = 타입 안전성
- 자동 검증
- 자동 직렬화
- 자동 문서화
-
비동기 I/O = 확장성
- 초당 1,000+ 요청 처리
- 블로킹 없음
다음 편 예고
4편: Elasticsearch로 대용량 로그 저장하고 검색하기
- Filebeat 로그 수집 파이프라인
- 인덱스 설계 및 매핑 전략
- Kibana 대시보드 구성
- 쿼리 최적화
참고 자료
프로젝트 정보
- GitHub: mini-siem-log-monitoring
- 시리즈: Python SIEM 만들기 (3/5편)
- 코드 위치:
app/main.py,app/models/log.py,app/utils/auth.py
질문이나 피드백은 댓글로 남겨주세요!
💡 도움이 되셨다면 GitHub Star와 좋아요 부탁드립니다!
💬 다음 편에서 만나요!