⭐ Java 강의
Java 입문 과정에서 강의 들으며 빠른 학습 진도를 위해 추후에 집중해서 복습할 부분 ➡️메모하기
⭐ 클래스와 객체
-
클래스(class)란? 객체를 만들 때 필요한 청사진
- 클래스의 첫 글자는 대문자
-
객체(object)란? 실제로 존재하는 것 ( 볼 수 있는 사물, 개념/논리 등 또한 무형의 객체)
-
객체를 만들 때는
new라는 키워드를 사용 -
객체를 만드는 과정을 인스턴스화 라고 한다
// 객체 생성(인스턴스화) /// --- personA ----; /// - name = 20; /// - age = 20; /// - address = xxxx Person personA = new Person("gygim", 20); Person personB = new Person("Steve", 15); -
⭐ 클래스의 구조
- 클래스의 구조는 속성 / 생성자 / 기능 부분으로 나누어진다.
⭐ 속성(property 또는 field)
-
객체를 생성해야 속성에 접근할 수 있다
-
이 속성들은 변수로 표현한다
-
사람의 속성을 예로 들면 나이, 이름, 주소 등이 해당된다
⭐ 셍성자(constructor) - 조립설명서
-
객체를 어떻게 만들지 정의해 놓는 것
-
생성자가 없으면 클래스를 객체화 시킬 수 없다
-
클래스를 생성하면 기본 생성자는 자동으로 추가가 된다 (-> 그래서 클래스를 객체화 시킬 수 있었다)
-
생성자 특징
-
1) 반환 자료형이 없다
-
2) 클래스명과 이름이 똑같다
-
3) 여러 개가 존재할 수 있다
-
-
생성자를 만들면 기본 생성자는 제거된다
public class Person {
   // 1. 속성 - 변수 선언으로 표현할 수 있다.
   String name;
   int age;
   String address;

   // 2. 생성자
   // 기본생성자: Person() {}
   // 생성자의 특징:
   // 1) 클래스와 이름이 같다.
   // 2) 반환 타입이 존재하지 않다.
   // 3) 여러개가 존재할 수 있다.
   Person(String name, int age) {
       this.name = name;
       this.age = age;
   }
this 는 객체 자신을 가리키는 키워드. 현재 실행 중인 객체를 의미
⭐ 기능 (메서드)
-
객체의 기능을 나열하는 곳
-
기능은 메서드로 표현
// 3. 기능(메서드 부분) int sum(int value1, int value2) { int result = value1 + value2; return result; } // 게터 - 속성을 가져오는 기능 String getName() { return this.name; } // 세터 - 속성을 설정해주는 기능 void setAddress(String address) { this.address = address; }-
게터(getter)는 클래스의 속성을 가져올 때 사용되는 기능
-
세터(Settter)는 객체의 속성을 외부에서 설정할 수 있게 해주는 기능
-
⭐ 실습 과제
package chapter2.clazz.assignment;
public class Car {
// 1. 속성
String name;
String type;
// 2. 생성자
Car(String name, String type) {
this.name = name;
this.type = type;
}
// 3. 기능
void drive() {
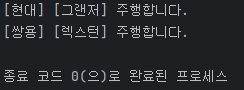
System.out.println("[" + this.type + "] [" + name + "]" + " 주행합니다.");
}
}
package chapter2.clazz.assignment;

public class Main {
    public static void main(String[] args) {

        Car car1 = new Car("그랜저", "현대");
        Car car2 = new Car("렉스턴", "쌍용");
        car1.drive();
        car2.drive();

    }
}
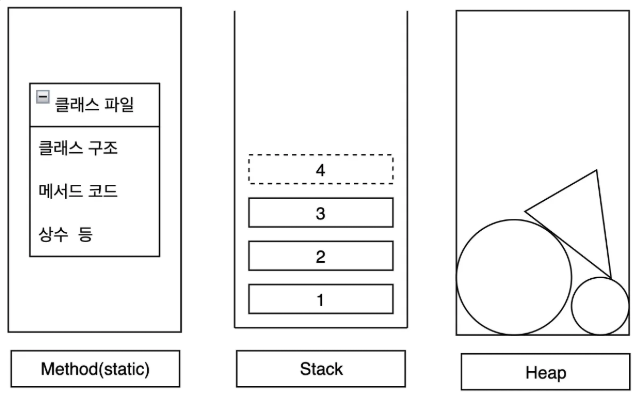
⭐ JVM 메모리 구조
Java 메모리 구조는 크게 3가지로 나뉜다
-
Method Area
-
프로그램 시작 시 정보가 저장된다
-
클래스 정보(.class 파일) 가 올라가는 곳
-
클래스의 메서드 정보, static 변수 등이 저장된다
-
모든 객체가 공유하는 공용 공간
-
-
Stack Area
-
선입후출(LIFO) 구조
-
메서드가 호출될 때마다 새로운 접시한장(스택프레임)이 쌓인다
-
가장 위의 접시(최근 호출된 메서드)가 먼저 실행된다
-
메서드 실행이 끝나면 스택에서 제거된다
-
-
Heap Area
-
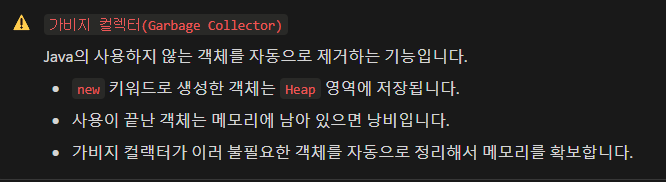
new키워드로 생성된 객체가 저장되는 곳 -
객체의 실제 데이터가 저장되고 데이터의 주소는 stack 영역에 저장된다
-
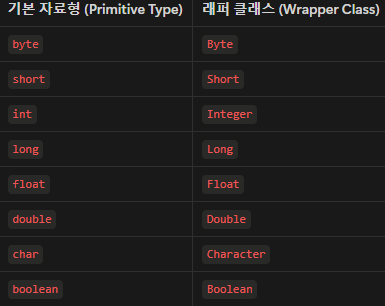
⭐ 래퍼클래스(Wrapper Class)
⭐ 래퍼클래스란? 기본자료형을 객체로 감싸는 클래스
-
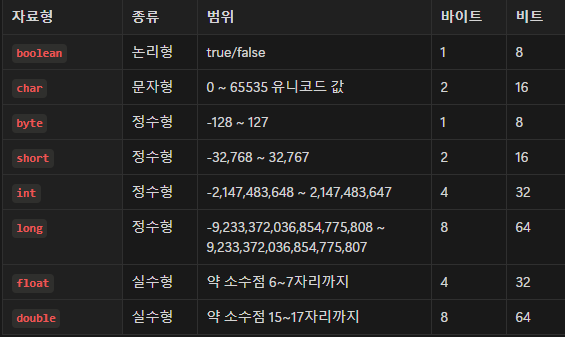
기본형(Primitive Type)의 종류
-
참조형(Reference Type)
-
변수에 객체가 담기면 해당 변수를 참조형변수라고 말한다
-
참조형 변수는 데이터가 저장된 메모리 주소를 가리킨다
→ Heap 메모리 주소 (객체 데이터는 Heap 영역에 저장되어 있기 때문) -
객체, 배열 등이 참조형에 속한다
-
-
오토박싱(Auto-boxing)
Integer는 참조형(객체)이지만 기본형int값을 직접 대입할 수 있다. 내부적으로 컴파일러가 자동으로Integer.valueOf(10)을 호출하여 객체를 생성하기 때문 -
오토 언박싱
래퍼형 → 기본형으로 변환하는 과정
num은Integer객체(참조형변수)지만 기본형int변수에 대입할 수 있다. 내부적으로 컴파일러가 자동으로num.intValue()를 호출하여 기본형으로 변환하기 때문
package chapter2.wrapper;

public class CustomInteger {
    // 1. 속성
    int value;

    // 2. 생성자
    CustomInteger(int value) {
        this.value = value;
    }

    // 3. 기능 - 자동으로 문자열로 변환해주는 기능
    // toString() 오버라이딩 (값을 출력할 수 있도록)
    @Override
    public String toString() {
        return String.valueOf(value);
    }

}
package chapter2.wrapper;

public class Main {
    public static void main(String[] args) {

        // 기본형 변수
        int a = 1;
        System.out.println("a = " + a);

        // 참조형 변수
        Person personA = new Person();
        System.out.println("personA = " + personA);
        int[] arr = {1, 2, 3, 4, 5};
        System.out.println("arr = " + arr);

        // 래퍼클래스 (기본형 변수를 감싸고 있는 클래스)
        // 참조형 변수이다.
        Integer num = 100;
        System.out.println("num = " + num);
        String numStr = num.toString();

        // 직접 만든 래퍼클래스
        CustomInteger myInteger = new CustomInteger(10);
        String myStringInteger = myInteger.toString();

        // 오토박싱 (기본형 -> 래퍼)
        Integer num3 = 10;
        // Integer num3 = Integer.valueOf(10);

        // 오토 언박싱
        int num4 = num3;
        // int num4 = num.intValue();

    }
}
⭐ 기본형과 래퍼형 성능 비교
-
래퍼형은 내부적으로 데이터를 감싸고 있기때문에 연산시 불리하다
-> 객체에서 기본형 값을 꺼내서 연산하는 추가작업이 발생하기 때문 -
이런 추가 작업때문에 기본형보다 래퍼클래스는 연산 속도가 느리다
-> 빠른 작업이 필요한 경우 기본형을 직접 활용하는 것이 좋은 선택
package chapter2.wrapper;

public class PrimitiveVSWrapper {

    public static void main(String[] args) {
        int iteration = 10_000_000; // 1000만 번 반복

        // 기본형 int 연산 성능 테스트
        long startTime1 = System.nanoTime();
        int sum1 = 0;
        for (int i = 0; i < iteration; i++) {
            sum1 += i;  // 기본형 연산
        }
        long endTime1 = System.nanoTime();
        long primitiveTime = endTime1 - startTime1;

        // 래퍼 클래스 Integer 연산 성능 테스트
        long startTime2 = System.nanoTime();
        Integer sum2 = 0;
        for (int i = 0; i < iteration; i++) {
            sum2 += i;  // 오토박싱 & 언박싱 발생
        }
        long endTime2 = System.nanoTime();
        long wrapperTime = endTime2 - startTime2;

        // 결과 출력
        System.out.println("기본형(int) 연산 시간: " + primitiveTime + " ns");
        System.out.println("래퍼 클래스(Integer) 연산 시간: " + wrapperTime + " ns");
        System.out.println("성능 차이 (배수): " + (double) wrapperTime / primitiveTime);
    }
}
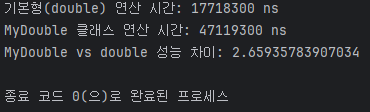
⭐ 실습 과제
double 기본형과 직접만든 DoubleWrapper 래퍼형의 연산 성능차이 확인하기
package chapter2.wrapper.assignment;

// 직접 만든 Double 래퍼 클래스
class Double {
    private final double value;

    public Double(double value) {
        this.value = value;
    }

    public double getValue() {
        return value;
    }

    // 덧셈
    public Double add(Double other) {
        return new Double(this.value + other.value);
    }

    @Override
    public String toString() {
        return String.valueOf(value);
    }
}
package chapter2.wrapper.assignment;

public class DoubleVSDoubleWrapper {
    public static void main(String[] args) {
        int iteration = 10_000_000; // 1000만 번 반복

        // 1. 기본형 double 연산
        long startTime1 = System.nanoTime();
        double sum1 = 0.0;
        for (int i = 0; i < iteration; i++) {
            sum1 += i * 1.1;
        }
        long endTime1 = System.nanoTime();
        long primitiveTime = endTime1 - startTime1;

        // 2. MyDouble 연산
        long startTime3 = System.nanoTime();
        Double sum3 = new Double(0.0);
        for (int i = 0; i < iteration; i++) {
            sum3 = sum3.add(new Double(i * 1.1));
        }
        long endTime3 = System.nanoTime();
        long myDoubleTime = endTime3 - startTime3;

        // 결과 출력
        System.out.println("기본형(double) 연산 시간: " + primitiveTime + " ns");
        System.out.println("MyDouble 클래스 연산 시간: " + myDoubleTime + " ns");
        System.out.println("MyDouble vs double 성능 차이: " + (double) myDoubleTime / primitiveTime);
    }
}
⭐ static - 클래스가 공유하는 공간 ➡️ 복습하기
⭐static 이란?
-
static키워드는 모든 객체가 함께 사용하는 변수나 메서드를 만들때 사용된다 -
객체(인스턴스)를 만들지 않아도 클래스 이름만으로 바로 사용할 수 있다
-
모든 객체가 같은 값을 공유한다 -> 공용 게시판이라고 생각하기
-
static변수와 메서드는 한 번만 생성되고 Method Area(메서드영역)에 저장된다
⭐ 인스턴스 멤버(인스턴스 변수 + 인스턴스 메서드)
-
객체를 만들때 마다 생성되는 변수와 메서드
-
객체(인스턴스)를 생성한 후에만 사용할 수 있다
-
각 객체가 개별적으로 값을 가진다 (공유되지 않음)
-
인스턴스는 Heap 영역에 위치한다
⭐ 인스턴스 변수란?
-
객체가 생성될 때마다 따로 만들어지는 변수
-
객체를 생성한 후 접근할 수 있다
-
name변수는 각 객체마다 별도로 저장된다
⭐ 인스턴스 메서드란?
- 객체의 속성을 활용하는 메서드
- 객체가 생성된 후에만 사용할 수 있다
⭐ 클래스 멤버(클래스 변수 + 클래스 메서드)
-
클래스 자체에 속하는 변수와 메서드를 의미
-
static키워드를 사용해서 선언 -
해당 클래스로 만들어진 객체가 공유해서 사용할 수 있다
-
클래스가 로드될때 Method Area 에 적재된다
-
객체 생성 없이 사용 가능
⭐ 클래스 변수란?
-
클래스가 로드될 때 한 번만 생성된다
-
모든 객체가 공유하는 변수
-
Heap 이 아니라 Method Area 에 저장된다
-
객체를 만들지 않아도
클래스명.변수명으로 접근가능
⭐ 클래스 메서드란?
-
클래스에 속하는 메서드
-
객체 없이 사용할 수 있다
-
클래스 변수만 사용할 수 있고 인스턴스 변수는 사용할 수 없다
package chapter2.staticexample;

public class Person {

    // 인스턴스 변수
    String name;

    // static 변수
    static int population = 0;

    Person() {
        population++;
    }

    // 인스턴스 메서드
    void printName() {
        System.out.println("나의 이름은 " + this.name + "입니다.");
    }

    // static 메서드
    static void printPopulation() {
        System.out.println("현재 인구 수: " + population);
    }

}
package chapter2.staticexample;
public class Main {
public static void main(String[] args) {
System.out.println("static 변수 활용: " + Person.population);
Person.printPopulation();
// 클래스 멤버
// static 변수, 메서드 활용
System.out.println("static 변수 활용: " + Person.population);
Person.printPopulation();
// 인스턴스 멤버 활용
Person p1 = new Person();
Person p2 = new Person();
// 인스턴스 변수 활용
p1.name = "gygim";
p2.name = "Steve";
// 인스턴스 메서드 활용
p1.printName();
p2.printName();
Person.printPopulation();
}
}
static은 꼭 필요할 때만 사용해야 한다

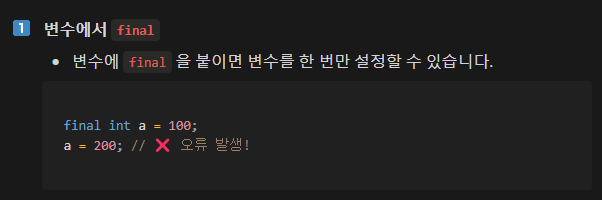
⭐ final - 변하지 않는 값
⭐final
1. 변수에 사용되면 변경이 불가능하게 만든다.
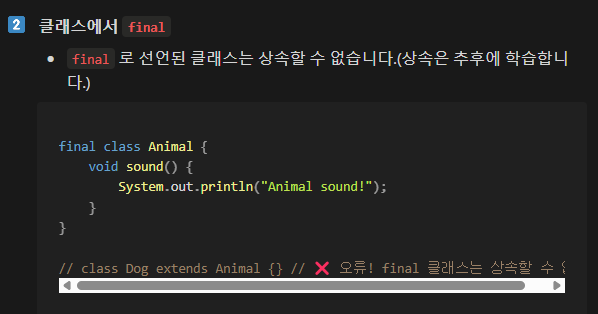
2. 클래스에 사용되면 상속할 수 없게 만든다.
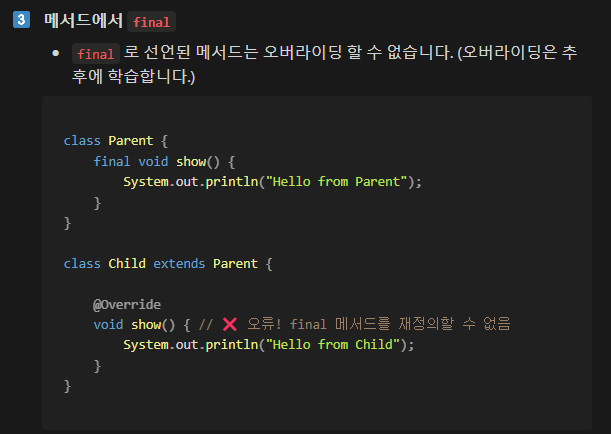
3. 메서드에 사용되면 수정할 수 없게 만든다.(오버라이딩 불가)
⭐상수 (Constant)
-
변하지 않고 항상 일정한 값을 갖는 수
-
Java에서 상수는 대문자로 표현하는 것이 관례
-
프로그램 실행중에 절대 변경되서는 안되기 때문에
static final키워드를 사용해 선언한다 -
static으로 선언된 변수는 프로그램 시작시 한 번만 초기화되고 모든 인스턴스에서 같은 값을 공유한다
⭐불변객체(Immutable Object)
-
내부 상태를 변경할 수 없는 객체
-
final을 속성(property, field) 에 활용한다 -
세터(setter) 없이 설계한다
-
변경이 필요할 경우 새로운 객체를 만들어야 한다
package chapter2.finalexample;

public class Circle {

    // 속성
    final static double PI = 3.14159;
    double radius;
   // 생성자
    Circle(double radius) {
        this.radius = radius;
    }

   // 기능
    Circle changeRadius(double newRadius) {
        return new Circle(newRadius);
    }

}
package chapter2.finalexample;

public class Main {

    public static void main(String[] args) {

        // final 활용 방법
        final int a = 1;
        // a = 2;
        System.out.println("a = " + a);

        // 상수 활용 방법
        System.out.println("상수 활용: " + Circle.PI);

        // 불변 객체 활용
        final Circle c1 = new Circle(2);
        // 참조 변경을 막지만 내부 상태 변경은 막지 않는다.
        // c1 = new Circle(5);
        // c1.radius = 5;
        System.out.println("c1 = " + c1);

        // 불변 객체의 내부 샅애가 변경이 필요한 경우
        Circle c2 = new Circle(10); // 생성자
        Circle c3 = c2.changeRadius(20); // 기능을 활용

    }
}
⭐ 인터페이스 - 표준화의 시작
-
인터페이스는 설계 표준이다
-
클래스가 따라야할 최소한의 규칙을 정의한다
-
클래스에서
implements키워드로 인터페이스를 활용할 수 있다 -
인터페이스를 구현한 클래스를 구현체 라고 한다
package chapter2.interfaceexample;

public interface Car {

    void drive();

    void stop();
}
package chapter2.interfaceexample;

public class LuxuryCar implements Car {

    @Override
    public void drive() {
        System.out.println("멋지게 이동합니다.");

    }

    @Override
    public void stop() {
        System.out.println("멋지게 정지합니다.");

    }

    void charge() {
        System.out.println("차량을 충전합니다.");
    }

//     void move() {
//        System.out.println("멋지게 이동합니다.");
//     }
//
//     void stop() {
//        System.out.println("멋지게 정지합니다.");
//
//     }
}
package chapter2.interfaceexample;

public class SpeedCar implements Car {

    @Override
    public void drive() {
        System.out.println("빠르게 이동합니다.");

    }

    @Override
    public void stop() {
        System.out.println("빠르게 정지합니다.");

    }

    void autoParking() {
        System.out.println("자동주차 기능을 실행합니다.");
    }

//    void drive() {
//        System.out.println("빠르게 주행합니다.");
//    }
}
package chapter2.interfaceexample;
public class Main {
public static void main(String[] args) {
// 인스턴스화
LuxuryCar luxuryCar = new LuxuryCar();
SpeedCar speedCar = new SpeedCar();
// 활용
// luxuryCar.move();
// luxuryCar.stop();
// speedCar.move();
// speedCar.stop();
// speedCar.drive();
// 인터페이스 활용
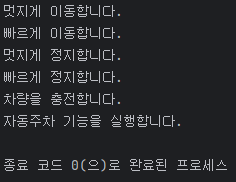
luxuryCar.drive();
speedCar.drive();
luxuryCar.stop();
speedCar.stop();
luxuryCar.charge();
speedCar.autoParking();
}
}
⭐ 인터페이스 다중구현 (multi-implementation)
implements키워드로 다수의 인터페이스를 구현할수 있다- 한 개의 클래스가 여러 인터페이스(
Animal,Flyable)를 구현한 경우 다중구현 이라고 한다
package chapter2.interfaceexample.v1;

public interface Flyable {
    void fly();
}
package chapter2.interfaceexample.v1;
public interface Animal {
void eat();
}package chapter2.interfaceexample.v1;
public class Bird implements Animal, Flyable {
@Override
public void eat() {
System.out.println("새가 먹습니다.");
}
@Override
public void fly() {
System.out.println("새가 날아갑니다.");
}
}
package chapter2.interfaceexample.v1;

import chapter2.interfaceexample.v1.Bird;

// 실행 코드
public class Main {
    public static void main(String[] args) {
        Bird bird = new Bird();
        bird.eat();
        bird.fly();
    }
}
⭐ 인터페이스에 변수를 선언하는 경우
public static final로 선언된다static으로 선언되기 때문에 구현체 없이도 활용 가능- 인터페이스는 표준의 역할이므로 변수선언은 최소화하는 것이 좋다
package chapter2.interfaceexample.v2;

public interface Config {
    // public static final 로 선언이 된다.
    int POPULATION = 100;
}
package chapter2.interfaceexample.v2;

public class Main {
    public static void main(String[] args) {

        System.out.println(Config.POPULATION);

    }
}
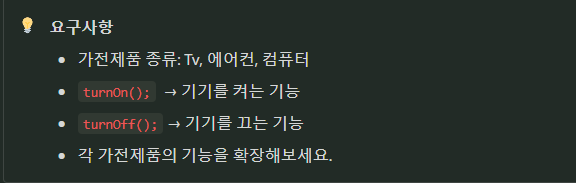
⭐ 실습 과제
package chapter2.interfaceexample.assignment;

// 가전제품의 기본 기능을 정의한 인터페이스
interface ElectronicDevice {
    void turnOn();  // 전원 켜기 기능
    void turnOff(); // 전원 끄기 기능
}
package chapter2.interfaceexample.assignment;

// TV 클래스 (ElectronicDevice 구현)
class TV implements ElectronicDevice {

    @Override
    public void turnOn() {
        System.out.println("TV 전원이 켜졌습니다.");
    }

    @Override
    public void turnOff() {
        System.out.println("TV 전원이 꺼졌습니다.");
    }

    // 추가 기능 (인터페이스에는 없는 기능)
    void changeChannel() {
        System.out.println("채널을 변경합니다.");
    }
}
package chapter2.interfaceexample.assignment;
// 에어컨 클래스 (ElectronicDevice 구현)
class AirConditioner implements ElectronicDevice {
@Override
public void turnOn() {
System.out.println("에어컨이 가동됩니다.");
}
@Override
public void turnOff() {
System.out.println("에어컨이 꺼졌습니다.");
}
// 추가 기능 (인터페이스에는 없는 기능)
void setTemperature() {
System.out.println("온도를 설정합니다.");
}
}
package chapter2.interfaceexample.assignment;

// 세탁기 클래스 (ElectronicDevice 구현)
class WashingMachine implements ElectronicDevice {

    @Override
    public void turnOn() {
        System.out.println("세탁기가 작동을 시작합니다.");
    }

    @Override
    public void turnOff() {
        System.out.println("세탁기가 작동을 멈춥니다.");
    }

    // 추가 기능 (인터페이스에는 없는 기능)
    void setTime() {
        System.out.println("세탁 시간을 설정합니다.");
    }
}
package chapter2.interfaceexample.assignment;
public class Main {
public static void main(String[] args) {
// 가전제품 객체 생성
TV tv = new TV();
AirConditioner airConditioner = new AirConditioner();
WashingMachine washingMachine = new WashingMachine();
// 개별적으로 전원 켜기
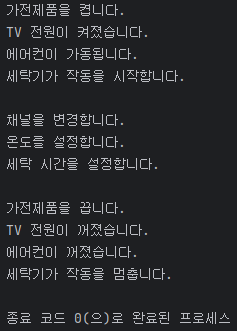
System.out.println("가전제품을 켭니다.");
tv.turnOn();
airConditioner.turnOn();
washingMachine.turnOn();
System.out.println(); // 줄바꿈
// 추가 기능 사용
tv.changeChannel();
airConditioner.setTemperature();
washingMachine.setTime();
System.out.println(); // 줄바꿈
// 개별적으로 전원 끄기
System.out.println("가전제품을 끕니다.");
tv.turnOff();
airConditioner.turnOff();
washingMachine.turnOff();
}
}