🌈 CSS Selector
🔥 CSS Selector 란?
🔥 기본 Selector
🔥 CSS Selector 조합
🔥 복합 Selector(Combinator)
🔥 가상 클래스(Pseudo-Class Selector)
🔥 UI 요소 상태 셀렉터(UI Element States Pseudo-Class)
🔥 구조화된 가상 클래스 셀렉터(Structured Pseudo-Class)
🔥 부정 셀렉터(Negation Pseudo-Class)
🔥 유효성 체크 셀렉터(Validity Pseudo-Class)
🔥 가상 요소 셀렉터(Preudo-Element Selector)
1. CSS Selector 란?
- HTML 문서의 특정 부분에 대해 렌더닝 방법을 정의하기 위해서는 특정 부분을 선택할 수 있어야함
- CSS Selector는 이런 특정 부분을 선택하기 위한 문법임

- CSS Selector 게임 : https://flukeout.github.io/
2. 기본 Selector
- 전체 Selector : html 전체를 선택함 👉🏻
*{ 속성:값; 속성:값; 속성:값; }
✍🏻 css
*{
    margin : 0;
    padding : 0;
    border : none;
    box-sizing: border-box;
}
- 태그 Selector : 태그명으로 선택 👉🏻
태그명{ 속성:값; 속성:값; 속성:값; } - ID Selector : id명으로 선택 👉🏻
#id명{ 속성:값; 속성:값; 속성:값; } - Class Selector : class명으로 선택 👉🏻
.class명{ 속성:값; 속성:값; 속성:값;} - Attribute Selector : 속성을 지정하여 css 효과 적용
- attr 속성을 가지는 모든 태그(요소) 👉🏻
[attr]{} - 특정한 value명과 일치하는 속성값을 가진 태그(요소) 👉🏻
[attr="value"]{} - 특정한 value명으로 속성값이 시작하는 태그(요소) 👉🏻
a[attr^="value"]{} - 특정한 value명으로 속성값이 끝나는 모든 태그(요소) 👉🏻
a[attr$="value"]{} - 특정한 value명을 속성값으로 포함하는 태그(요소) 👉🏻
a[attr*="value"]{}
- attr 속성을 가지는 모든 태그(요소) 👉🏻
3. CSS Selector 조합
- 여러 class명을 갖는 태그(요소)를 Selector로 지정하고 싶을 땐,
.클래스명.클래스명으로 나열함 - 즉 .으로 계속 이어서 선택해주면 되고, id가 필요할 때는
#id명으로 연이어 작성
✍🏻 html
<!DOCTYPE html>
<html lang="en">
  <head>
    <meta charset="UTF-8" />
    <meta http-equiv="X-UA-Compatible" content="IE=edge" />
    <meta name="viewport" content="width=device-width, initial-scale=1.0" />
    <title>Document</title>
    <style>
      h1.bkg-blue.color-red#basic-bd {
        background-color: blue;
        color: red;
        border: 10px;
      }
    </style>
  </head>
  <body>
    <h1 class="bkg-blue color-red" id="basic-bd">Hello CSS</h1>
  </body>
</html>
4. 복합 Selector(Combinator)
- 태그 안에, 또 다른 태그를 넣을 수 있으므로, 각 태그는 요소 간 부모/자식 관계가 존재
- 관계를 기반으로 HTML 문서 특정 부분을 선택하는 기법
- 후손 셀렉터(Descendant Selector) : 스페이스로 표시
- 후손 셀렉터는 바로 자식이던 자식의 자식이던 상관없이 일치하는 것이 있에 적용시킴
✍🏻 html
<!DOCTYPE html>
<html lang="en">
  <head>
    <meta charset="UTF-8" />
    <style>
      h1 {
        color: black;
      }
      div span {
        color: royalblue;
        background-color: mediumaquamarine;
        border: 15px;
      }
    </style>
  </head>
  <body>
    <div>
      <h1>Hi CSS</h1>
      <p>
        <span>Lorem ipsum dolor sit,</span> amet consectetur adipisicing elit.
        <span>Ad quod maiores rerum officia libero rem modi fuga molestiae consectetur sunt facere nisi,</span> suscipit
        ratione et distinctio autem molestias vitae deleniti?
      </p>
    </div>
  </body>
</html>

- 자식 셀렉터(child Selector) :
>로 표시 - 바로 다음 레벨(자식)인 태그만 선택할 때 사용
✍🏻 html
<!DOCTYPE html>
<html lang="ko">
  <head>
    <meta charset="UTF-8" />
    <style>
      h1 {
        color: black;
      }
      h1 > span {
        color: royalblue;
        background-color: mediumaquamarine;
        border: 15px;
      }
    </style>
  </head>
  <body>
    <div>
        <h1>Hi CSS</h1>
      <p>
        <h1><span>I'm not child</span></h1>
        <span>Lorem ipsum dolor sit,</span> amet consectetur adipisicing elit.
        <span>Ad quod maiores rerum officia libero rem modi fuga molestiae consectetur sunt facere nisi,</span> suscipit
        ratione et distinctio autem molestias vitae deleniti?
      </p>
    </div>
  </body>
</html>

- 인접 형제 셀렉터(Adjacent sibling Selector) :
+로 표시 - 태그와 동일 레벨(형제)에 위치하고, 바로 뒤에 위치하는 태그(요소) 선택
- 일반 형제 셀렉터(General sibling Selector) :
~로 표시 - 태그와 동일 레벨(형제)에 위치하고, 뒤쪽 어딘가에 위치하는 태그(요소) 선택
✍🏻 html
<!DOCTYPE html>
<html lang="ko">
  <head>
    <meta charset="UTF-8" />
    <style>
      h1 {
        color: black;
      }
      h1 + h2 {
        color: royalblue;
        background-color: mediumaquamarine;
        border: 15px;
      }
      p ~ span {
        color: yellow;
        background-color: gray;
        border: 15px;
      }
    </style>
  </head>
  <body>
    <div>
      <h1>I'm h1</h1>
      <h2>I'm direct brothers of h1</h2>
      <h2>I'm not direct brothers of h1</h2>
      <p>I'm P</p>
      <span>I'm brothers of p</span>
      <div>
        Accusamus recusandae error, tempora nihil quo facere temporibus quos consequuntur optio pariatur ad modi, odio,
        officiis eius voluptatibus praesentium voluptate harum? <span>Doloribus!</span>
      </div>
      <span>I'm brothers of p</span>
      <h2>I'm not direct brothers of h1</h2>
    </div>
  </body>
</html>

5. 가상 클래스(Pseudo-Class Selector)
- 가상 클래스는 요소에 특정 이벤트 발생했을 경우에만 선택을 적용하는 기법
- 예를 들어, h1태그에 마우스 커서가 올라갔을 때 CSS효과를 적용할 수 있음
- 가상 클래스 종류
- :link : 방문하지 않은 링크에 CSS 적용
- :visited : 방문한 링크에 CSS 적용
- :hover : 특정 요소에 마우스가 올라간 상태일 때 CSS 적용
- :active : 특정 요소를 누르고(클릭) 있는 상태에 CSS 적용
- :focus : 특정 요소에 포커스가 유지되는 상태에 CSS 적용
- :focus-within : 자식이 focus되면 부모에게 효과를 적용
- 가상 셀렉터는 가상 요소 셀럭터 이외에는 한 개의 콜론(:)을 사용함
✍🏻 html
<!DOCTYPE html>
<html lang="ko">
  <head>
    <meta charset="UTF-8" />
    <style>
      a:link {
        color: red;
      }
      a:visited {
        color: blue;
      }
      a:hover {
        color: green;
      }
      a:active {
        color: white;
        background-color: tomato;
      }
      input:focus {
        background-color: tomato;
      }
    </style>
  </head>
  <body>
    <div>
      <h1>Hi Presudo-Class Selector</h1>
      <a href="https://www.google.com/">Google</a>
      <form action="ab.html" method="get">
        <input type="text" id="id" name="id" /><br />
        <input type="submit" value="Submit" />
      </form>
    </div>
  </body>
</html>
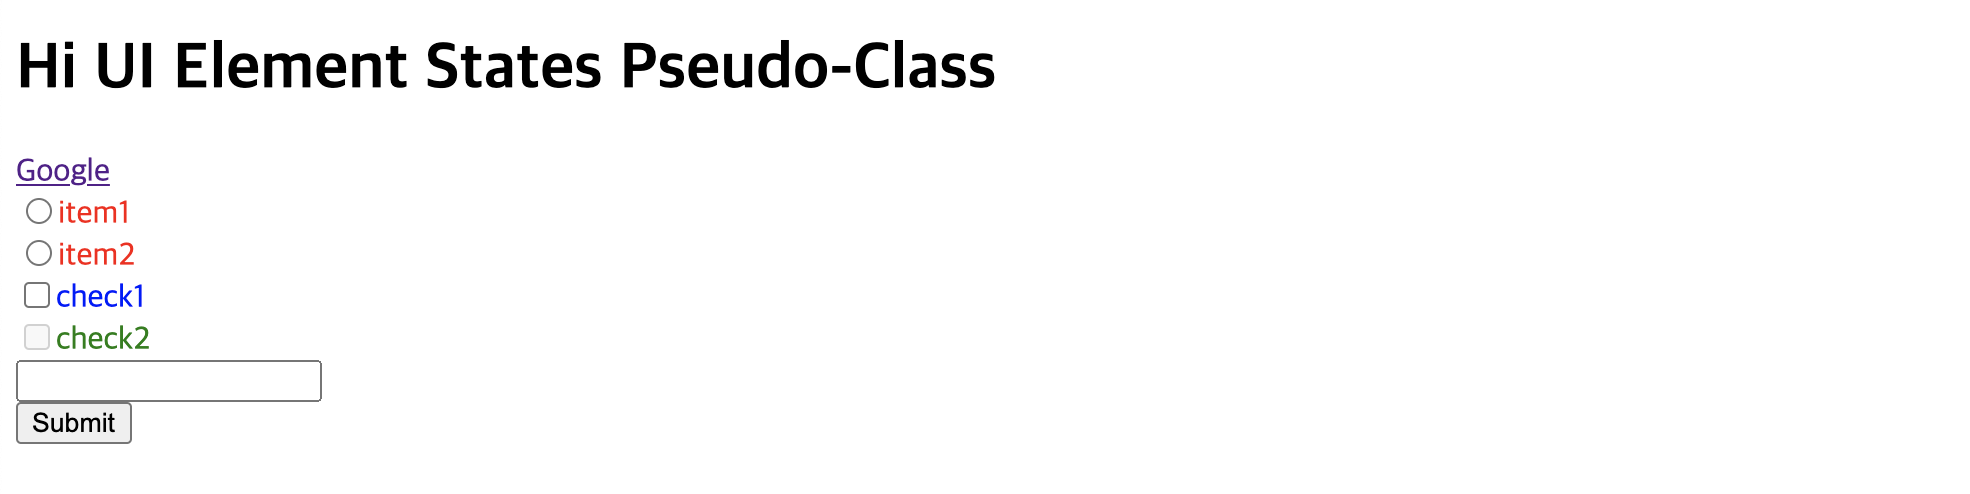
6. UI 요소 상태 셀렉터(UI Element States Pseudo-Class)
- 특정 UI 요소 상태에 따른 셀렉터
- enabled : UI 셀렉터가 사용 가능한 상태
- disable : UI 셀렉터가 사용 불가능한 상태
- checked : UI 셀렉터가 체크된 상태
- indeterminate : UI 셀렉터 상태가 결정되지 않은 상태(체크박스에 체크가 안되었거나, 라디오 버튼들이 하나도 체크되지 않은 상태)
✍🏻 html
<!DOCTYPE html>
<html lang="en">
  <head>
    <meta charset="UTF-8" />
    <style>
      input[type="radio"]:indeterminate + span {
        color: red;
      }
      input[type="radio"]:checked + span {
        color: orange;
      }
      input[type="checkbox"]:enabled + span {
        color: blue;
      }
      input[type="checkbox"]:disabled + span {
        color: green;
      }
    </style>
  </head>
  <body>
    <div>
      <h1>Hi UI Element States Pseudo-Class</h1>
      <a href="https://www.google.com/">Google</a>
      <form action="ab.html/" method="get">
        <input type="radio" value="item1" name="item" /><span>item1</span><br />
        <input type="radio" value="item2" name="item" /><span>item2</span><br />
        <input type="checkbox" value="check1" name="check" /><span>check1</span><br />
        <input type="checkbox" value="check2" name="check" disabled /><span>check2</span><br />
        <input type="text" id="data" name="data" /><br />
        <input type="submit" value="Submit" />
      </form>
    </div>
  </body>
</html>
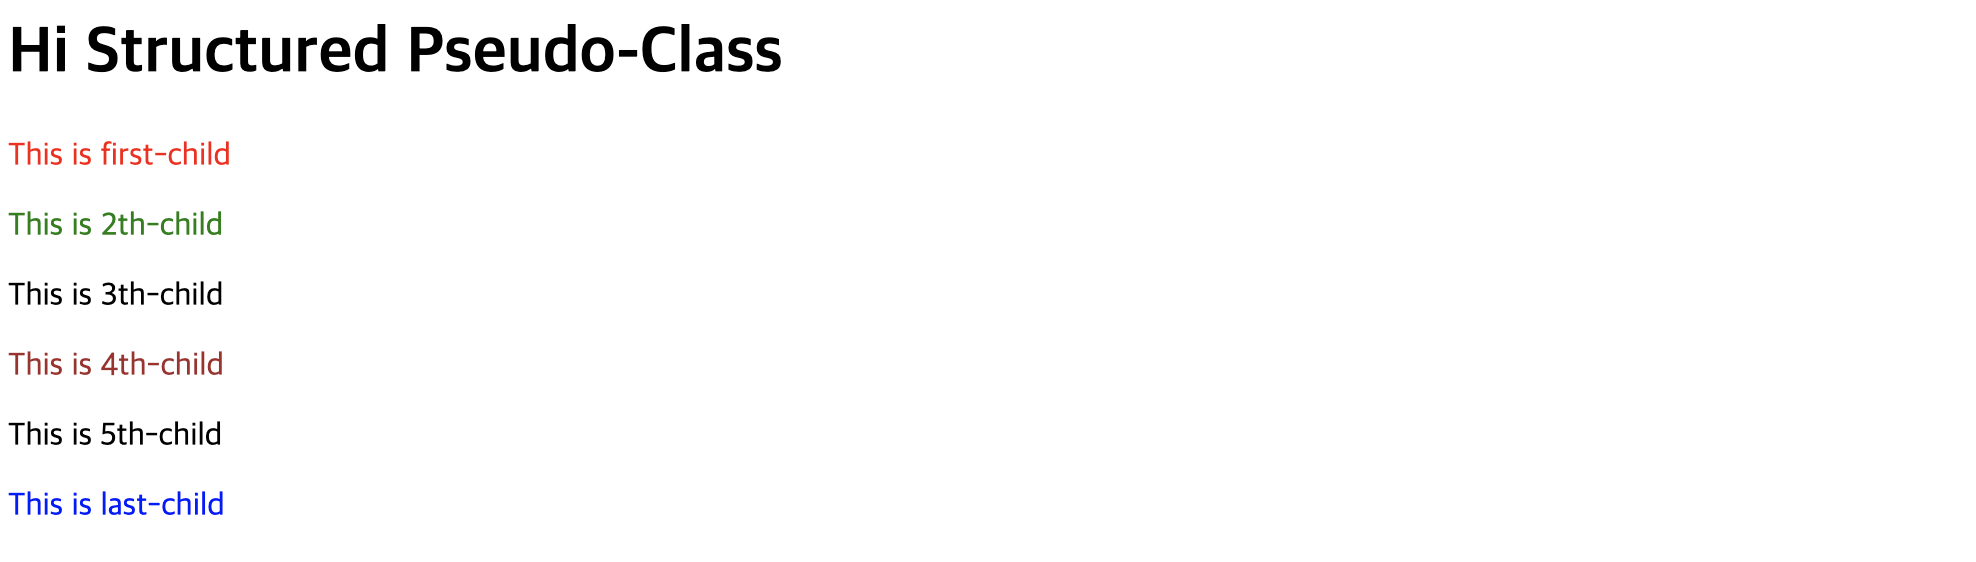
7. 구조화된 가상 클래스 셀렉터(Structured Pseudo-Class)
- first-child : 부모의 첫 번째 자식인 요소 선택
- last-child : 부모의 마지막 자식인 요소 선택
- nth-child(n) : 부모의 첫번째 자식 요소를 기준으로 n번째 자식 요소 선택(1부터 시작)
- nth-last-child(n) : 부모의 마지막 자식 요소를 기준으로 n번째 자식 요소 선택
- n자리에 2n(짝수), 2n-1(홀수) 등 수식을 적용시킬 수 있음
✍🏻 html
<!DOCTYPE html>
<html lang="en">
  <head>
    <meta charset="UTF-8" />
    <style>
      p:first-child {
        color: red;
      }
      p:last-child {
        color: blue;
      }
      p:nth-child(2) {
        color: green;
      }
      p:nth-last-child(3) {
        color: brown;
      }
    </style>
  </head>
  <body>
    <div>
      <h1>Hi Structured Pseudo-Class</h1>
      <div>
        <p>This is first-child</p>
        <p>This is <span>2th-child</span></p>
        <p>This is 3th-child</p>
        <p>This is 4th-child</p>
        <p>This is 5th-child</p>
        <p>This is last-child</p>
      </div>
    </div>
  </body>
</html>
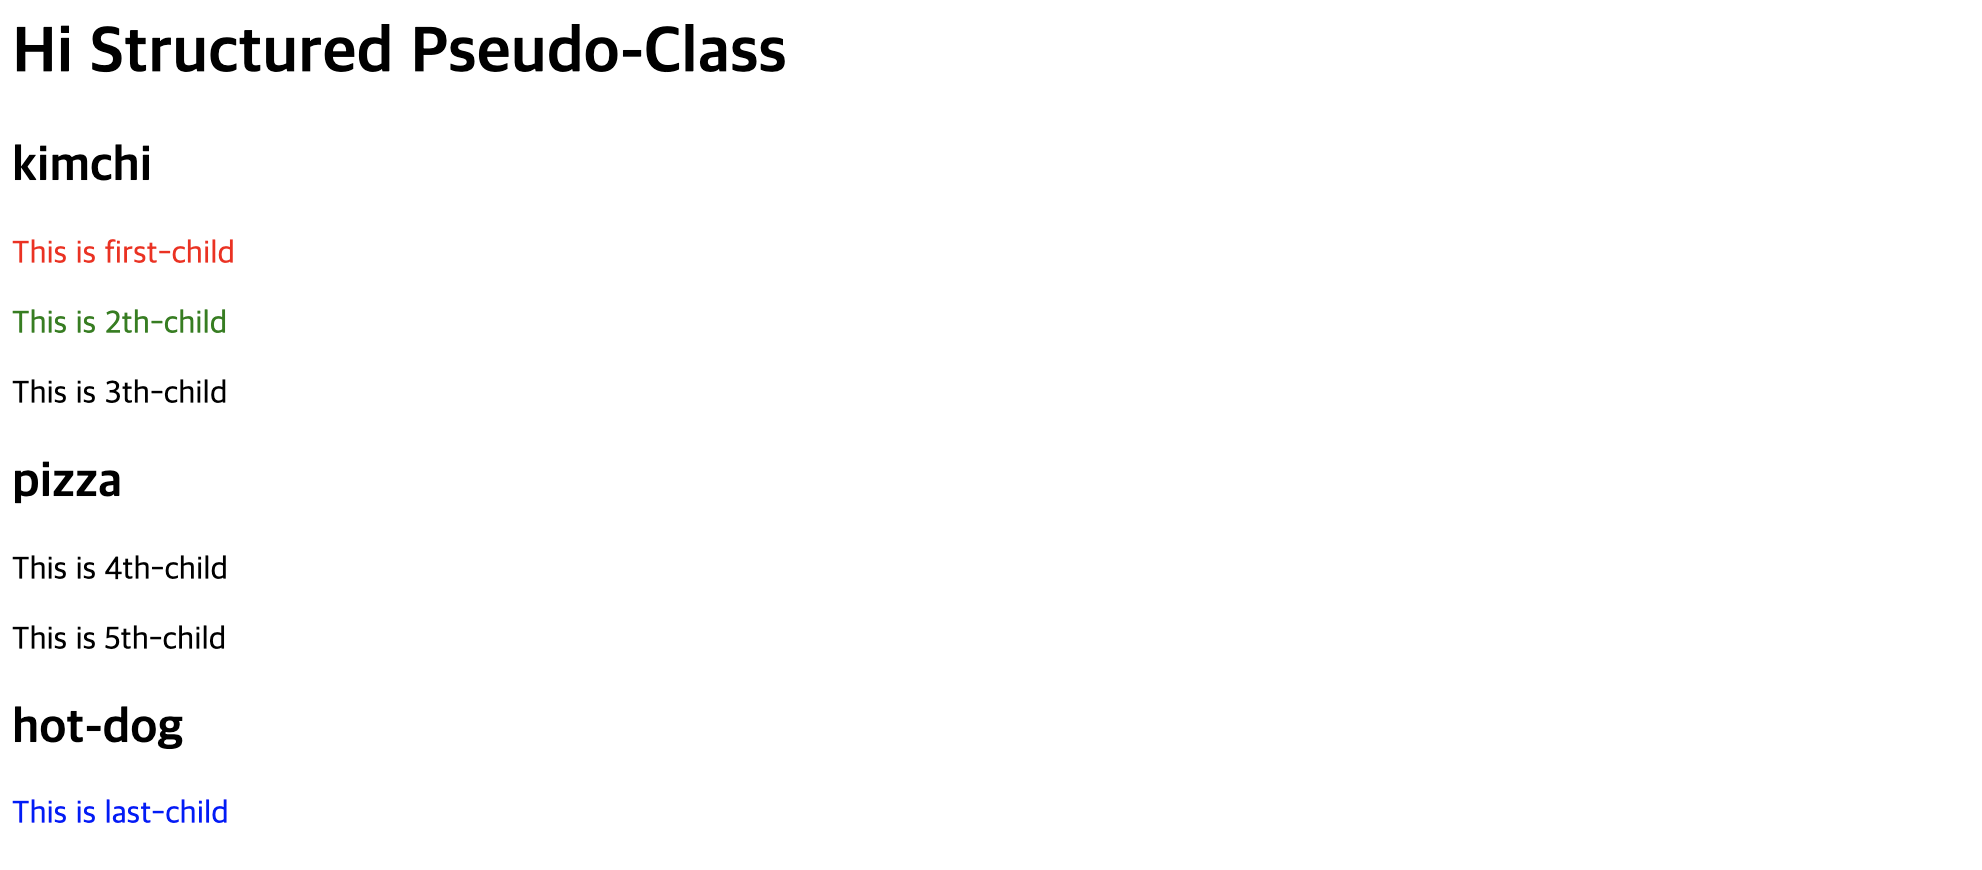
- 위 Structured Pseudo-Class는 앞뒤나 중간에 다른 태그가 섞여 있으면 적용되지 않음. 해당되는 태그들 중에서 순서에 따라 적용하고 싶을 때는 아래와 같이 사용
- first-of-type : 부모의 첫 번째 자식인 요소 선택
- last-of-type : 부모의 마지막 자식인 요소 선택
- nth-of-type(n) : 부모의 첫번째 자식 요소를 기준으로 n번째 자식 요소 선택(1부터 시작)
- nth-of-last-type(n) : 부모의 마지막 자식 요소를 기준으로 n번째 자식 요소 선택
✍🏻 html
<!DOCTYPE html>
<html lang="en">
  <head>
    <meta charset="UTF-8" />
    <style>
      p:first-of-type {
        color: red;
      }
      p:last-of-type {
        color: blue;
      }
      p:nth-of-type(2) {
        color: green;
      }
      p:nth-of-last-type(3) {
        color: brown;
      }
    </style>
  </head>
  <body>
    <div>
      <h1>Hi Structured Pseudo-Class</h1>
      <div>
        <h2>kimchi</h2>
        <p>This is first-child</p>
        <p>This is <span>2th-child</span></p>
        <p>This is 3th-child</p>
        <h2>pizza</h2>
        <p>This is 4th-child</p>
        <p>This is 5th-child</p>
        <h2>hot-dog</h2>
        <p>This is last-child</p>
      </div>
    </div>
  </body>
</html>
8. 부정 셀렉터(Negation Pseudo-Class)
- not(셀렉터) : 셀렉터에 해당하지 않은 모든 요소 선택
- 어떠한 특정 셀렉터를 제외하고 모두 적용시킬 때
✍🏻 html
<!DOCTYPE html>
<html lang="en">
  <head>
    <meta charset="UTF-8" />
    <style>
      h2:not(.without-h2) {
        color: tomato;
        background-color: bisque;
        padding: 10px;
      }
    </style>
  </head>
  <body>
    <h2>Hi Negation Pseudo-Class!</h2>
    <h2 class="without-h2">It is h2 without applied.</h2>
    <p>Lorem ipsum dolor sit amet consectetur adipisicing elit.</p>
    <p>
      Reiciendis eligendi, repudiandae dicta iste aspernatur commodi? Pariatur officiis debitis obcaecati quo sed quae
      voluptate quaerat. Obcaecati unde voluptatum quae. Quis, voluptatibus?
    </p>
  </body>
</html>

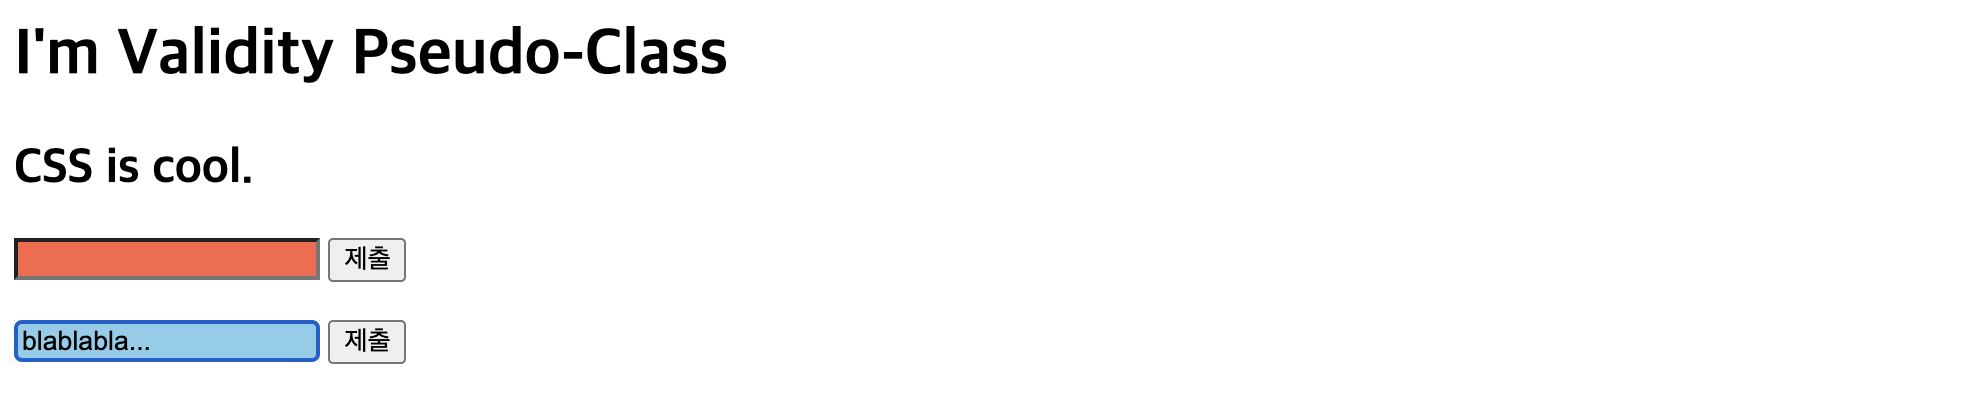
9. 유효성 체크 셀렉터(Validity Pseudo-Class)
- valid : 유효성이 검증된 input 또는 form 요소 태그
- invalid : 유효성이 검증도지 않은 input 또는 form 요소 태그
- required 경우, 반드시 입력해야한다는 속성임으로 입력 내용이 있을 경우는 valid에 따른 CSS가 적용되고, 입력하지 않았거나 그 이전에는 invalid의 CSS가 적용됨
- 브라우저별 호환성 문제로 인하여 required 정도만 사용하는 것을 권장
✍🏻 html
<!DOCTYPE html>
<html lang="en">
  <head>
    <meta charset="UTF-8" />
    <style>
      input[type="text"]:invalid {
        background-color: tomato;
      }
      input[type="text"]:valid {
        background-color: skyblue;
      }
    </style>
  </head>
  <body>
    <h1>I'm Validity Pseudo-Class</h1>
    <h2>CSS is cool.</h2>
    <form action="ab.html">
      <input type="text" id="id" name="id" required />
      <input type="submit" />
    </form>
    <br />
    <form action="cd.html">
      <input type="text" id="id" name="id" required />
      <input type="submit" />
    </form>
  </body>
</html>
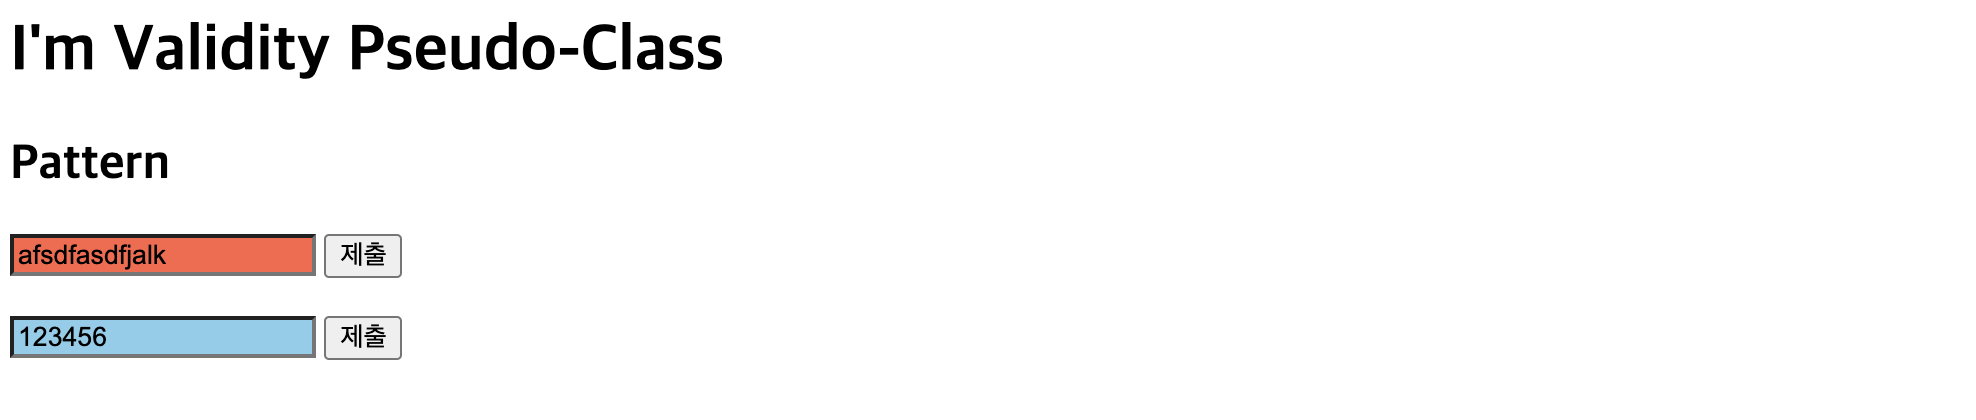
- 정규표현식과 같이 특정 pattern만 입력할 수 있게 해둔 경우에도 Validity Pseudo-Class 사용 가능
pattern="[0-9]{6}👈 숫자 6자리를 입력해야 유효함
✍🏻 html
<!DOCTYPE html>
<html lang="en">
  <head>
    <meta charset="UTF-8" />
    <style>
      input[type="text"]:invalid {
        background-color: tomato;
      }
      input[type="text"]:valid {
        background-color: skyblue;
      }
    </style>
  </head>
  <body>
    <h1>I'm Validity Pseudo-Class</h1>
    <h2>Pattern</h2>
    <form action="ab.html">
      <input type="text" id="number" name="number" pattern="[0-9]{6}" required />
      <input type="submit" />
    </form>
    <br />
    <form action="cd.html">
      <input type="text" id="number" name="number" pattern="[0-9]{6}" required />
      <input type="submit" />
    </form>
  </body>
</html>
10. 가상 요소 셀렉터(Preudo-Element Selector)
::first-letter: 요소의 첫글자 선택::first-line: 요소의 첫 라인(줄) 선택(block 요소에만 적용 가능)::after: 요소 뒤에 위치하는 공간 선택, content 속성과 함께 사용::before: 요소 앞에 위치하는 공간 선택, content 속성과 함께 사용::selection: 요소에서 드래그한 부분 선택
✍🏻 html
<!DOCTYPE html>
<html lang="en">
  <head>
    <meta charset="UTF-8" />
    <style>
      h3::before {
        content: "🍎 ";
        color: whitesmoke;
      }
      h3::after {
        content: " 🍌";
        color: whitesmoke;
      }
      p::first-letter {
        font-size: 2em;
        font-weight: 500;
      }
      p::first-line {
        color: darkorange;
        font-size: 1.2em;
      }
      p::selection {
        background-color: mediumpurple;
      }
    </style>
  </head>
  <body>
    <h3>Apple on the left, Banana on the right</h3>
    <p>
      Lorem, ipsum dolor sit amet consectetur adipisicing elit. Cupiditate rerum eum modi. Consequuntur quam eos impedit
      aspernatur voluptates nesciunt quod est magni debitis et? Sequi deserunt consequuntur doloremque velit adipisci.
      Lorem ipsum dolor, sit amet consectetur adipisicing elit. Ab suscipit quidem reiciendis, optio voluptate illo
      maxime asperiores rem eum fugit voluptatum eos, repudiandae ipsa at debitis impedit harum error quod! Lorem, ipsum
      dolor sit amet consectetur adipisicing elit. Cupiditate rerum eum modi. Consequuntur quam eos impedit aspernatur
      voluptates nesciunt quod est magni debitis et? Sequi deserunt consequuntur doloremque velit adipisci. Lorem ipsum
      dolor, sit amet consectetur adipisicing elit. Ab suscipit quidem reiciendis, optio voluptate illo maxime
      asperiores rem eum fugit voluptatum eos, repudiandae ipsa at debitis impedit harum error quod! Lorem, ipsum dolor
      sit amet consectetur adipisicing elit. Cupiditate rerum eum modi. Consequuntur quam eos impedit aspernatur
      voluptates nesciunt quod est magni debitis et? Sequi deserunt consequuntur doloremque velit adipisci. Lorem ipsum
      dolor, sit amet consectetur adipisicing elit. Ab suscipit quidem reiciendis, optio voluptate illo maxime
      asperiores rem eum fugit voluptatum eos, repudiandae ipsa at debitis impedit harum error quod!
    </p>
  </body>
</html>


Keep Going, Keep Coding!