AWS IoT Greengrass (Publish/subscribe AWS IoT Core MQTT messages)
1. 목적
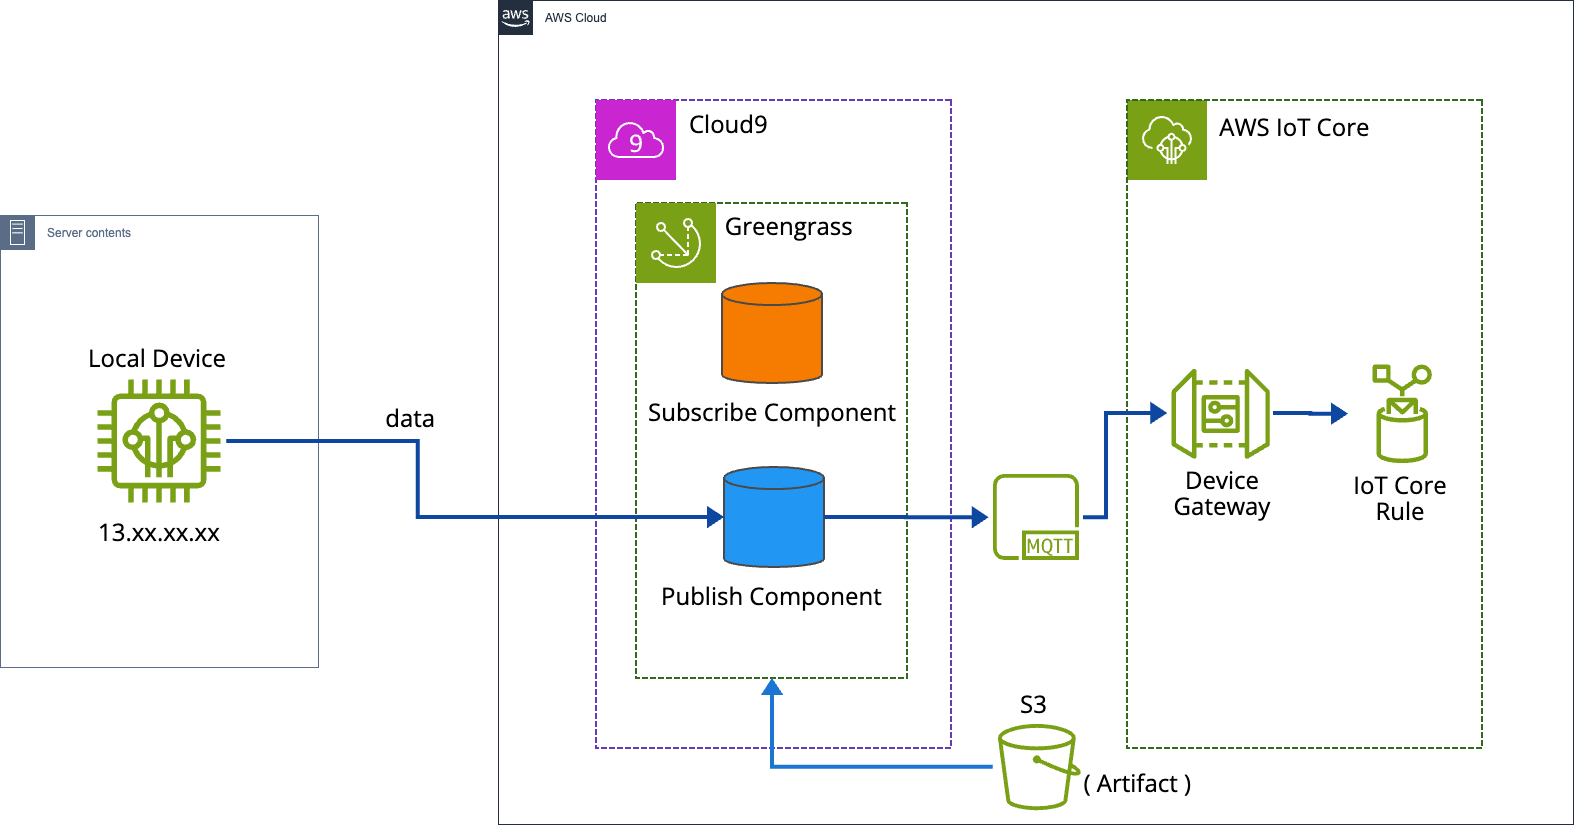
- local에서 쏘고있는 modbus 데이터를 greengrass에서 받아와서 iot core로 전송하는 것 입니다.
2. 동작
-
그렇다. cloud9에 iot 인증서 하나 받아서 코드에 엔드포인트 주소랑 pirvate key, certi key, rootCA 넣고 iot core에 쏴주면 된다.
-
그러나 다른점이 있다면 greengrass를 사용함으로써, greengrass에 포함된 사물에 배포할 수 있다는 장점이 있다.
-
뭔말인가 하면, 지금은 하나의 cloud9에 greengrass를 올려두었지만, 다른 cloud9에 greengrass core을 설치하고 같은 그룹에 묶어 놓으면 하나의 Greengrass 코어 디바이스에 배포하거나 여러 대의 코어 디바이스에 배포할 수 있다.
-
코드를 잘보면 엔드포인트도 없고, key도 없고 오직 topic만 존재한다. 우리는 greengrass의 IPC라는 것을 이용해서 iot core로 local device에 전송할 것 이다.
3. 용어정리
AWS IoT Greengrass의 맥락에서 IPC는 프로세스 간 통신을 의미합니다. 이는 서로 다른 프로세스(이 경우 서로 다른 Greengrass 구성 요소 또는 Lambda 함수)가 서로 통신할 수 있도록 하는 메커니즘을 나타냅니다.
AWS IoT Greengrass V2(Greengrass의 두 번째 주요 버전)의 경우 구성 요소는 IPC를 사용하여 AWS 클라우드와 서로 통신할 수 있습니다. 예를 들어 구성 요소는 AWS IoT Core의 MQTT 주제에 메시지를 게시해야 할 수 있습니다. 구성 요소는 AWS IoT SDK와 직접 상호 작용하는 대신 Greengrass IPC를 사용하여 Greengrass Core에 내장된 MQTT 프록시 서비스에 요청을 보냅니다. 그런 다음 이 서비스는 AWS IoT Core와의 실제 통신을 처리합니다.
AWS IoT Core: 연결된 장치가 클라우드 애플리케이션 및 기타 장치와 쉽고 안전하게 상호 작용할 수 있게 해주는 Amazon의 관리형 서비스입니다. 디바이스-클라우드 및 디바이스-디바이스 통신을 위한 프로토콜로 MQTT를 지원합니다.
MQTT: 대기 시간이 길거나 신뢰할 수 없는 네트워크에 최적화된 소형 센서 및 모바일 장치를 위한 경량 메시징 프로토콜입니다.
메시징: MQTT를 사용하여 디바이스와 클라우드 간(또는 디바이스 간)에 메시지를 보내는 동작을 의미합니다.
IPC(프로세스 간 통신): 이는 Greengrass 디바이스의 다양한 구성 요소 또는 프로세스가 서로 통신하는 메커니즘입니다.
따라서 "AWS IoT Core MQTT 메시징 IPC"는 구성 요소가 메시징 목적으로 MQTT를 사용하여 AWS IoT Core와 통신할 수 있도록 하는 Greengrass 내의 IPC 메커니즘을 나타냅니다.
4. 설치
- 가이드대로 설치하면 된다.
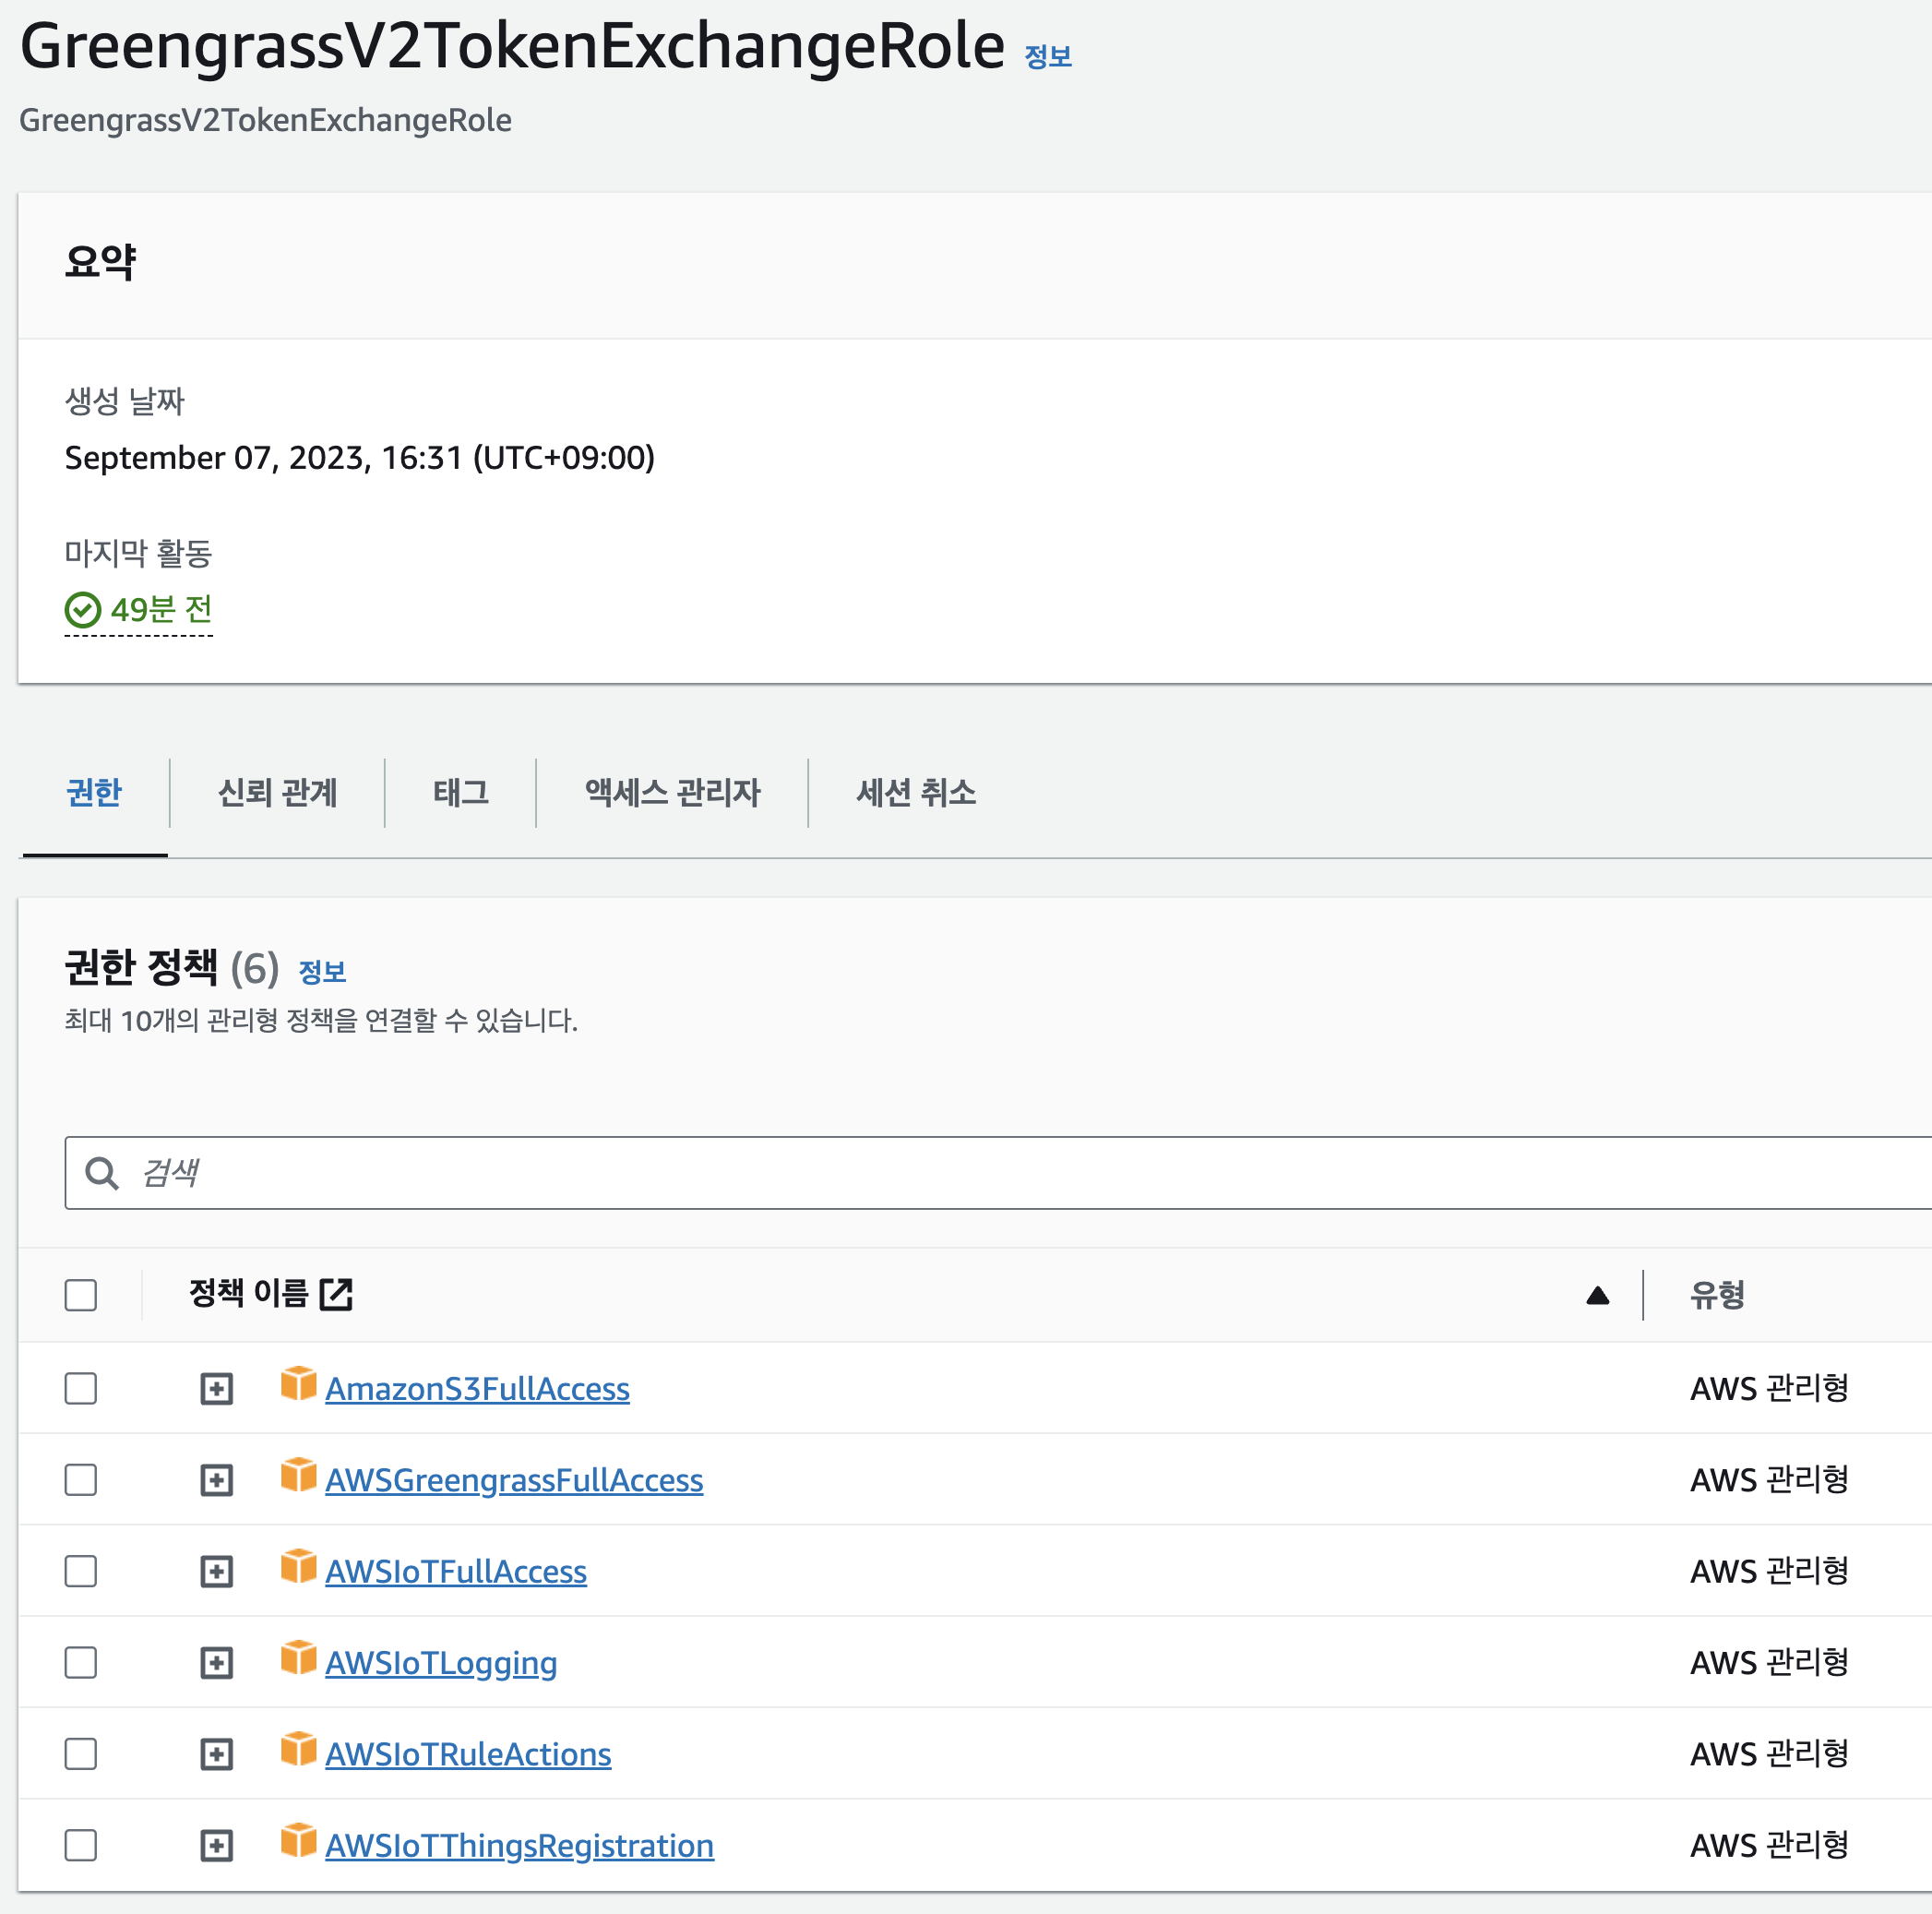
5. 정책
보안 > 정책 탭에 들어가면 2가지의 정책이 있다.

//GreengrassV2IoTThingPolicy

{
  "Version": "2012-10-17",
  "Statement": [
    {
      "Effect": "Allow",
      "Action": [
        "iot:Connect",
        "iot:Publish",
        "iot:Subscribe",
        "iot:Receive",
        "greengrass:*"
      ],
      "Resource": "*"
    },
    {
      "Effect": "Allow",
      "Action": "*",
      "Resource": "*"
    }
  ]
}
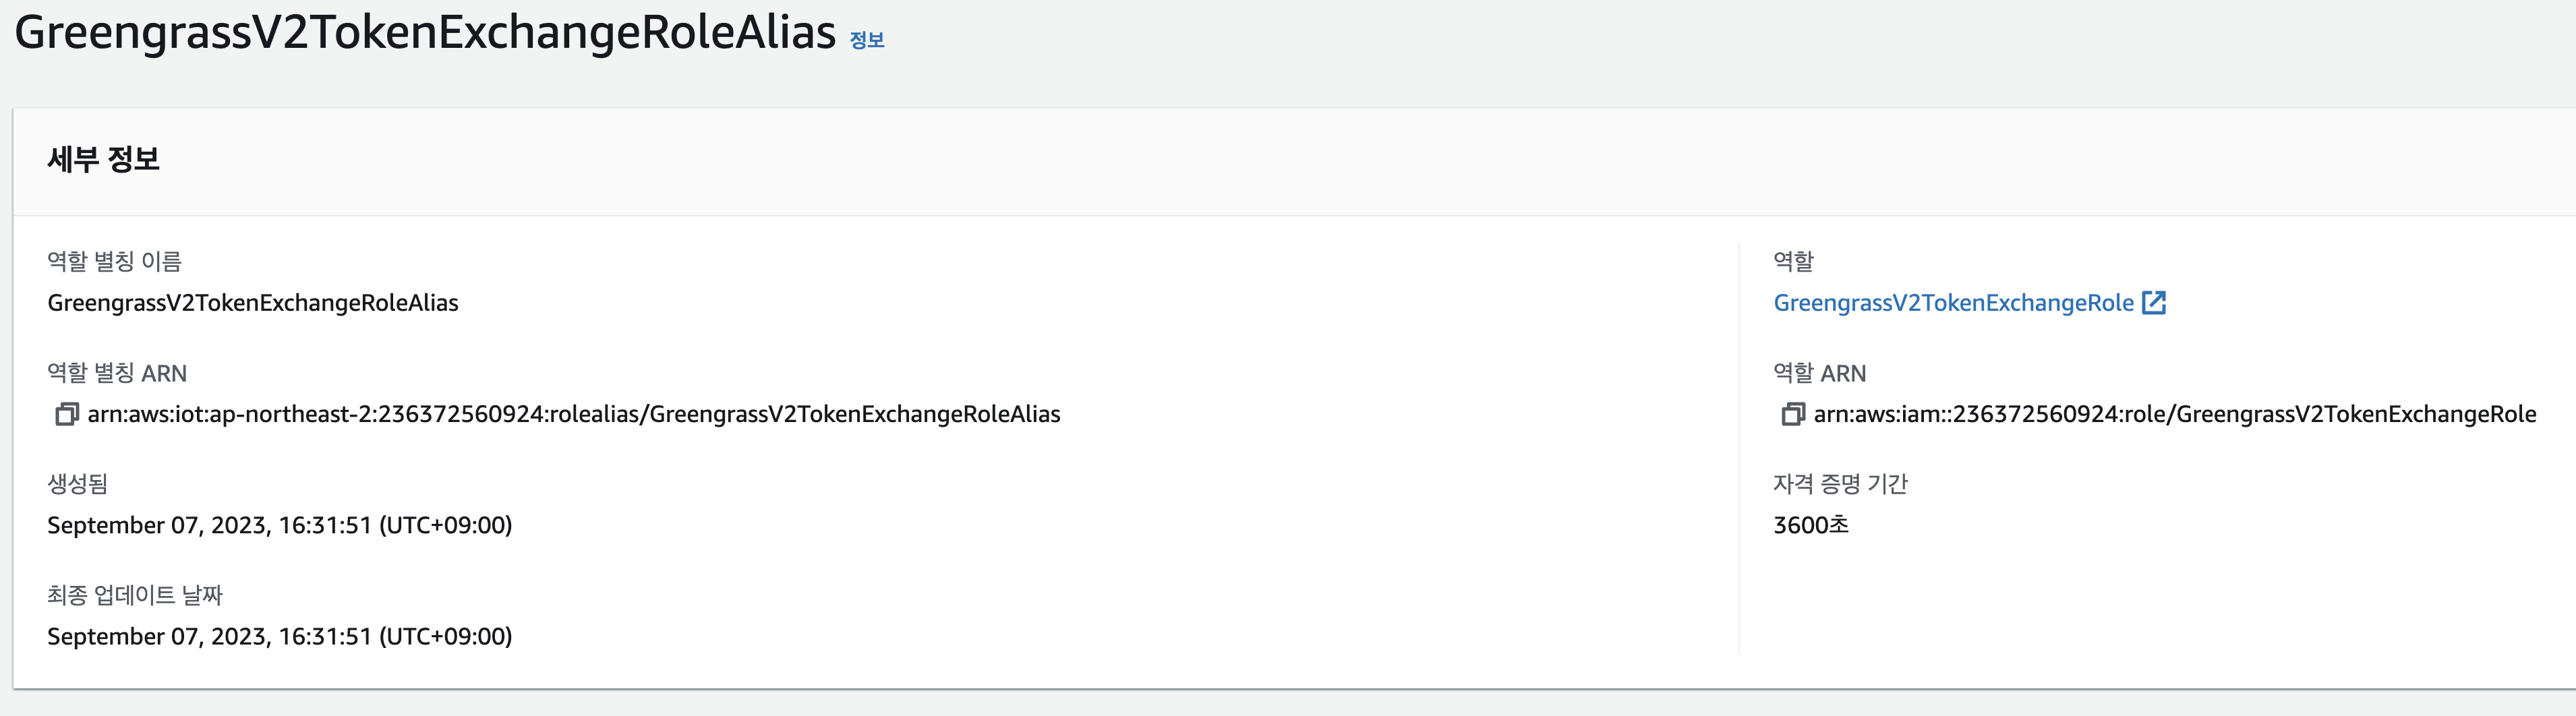
- GreengrassTESCertificatePolicyGreengrassV2TokenExchangeRoleAlias
보안 > 역할 별칭
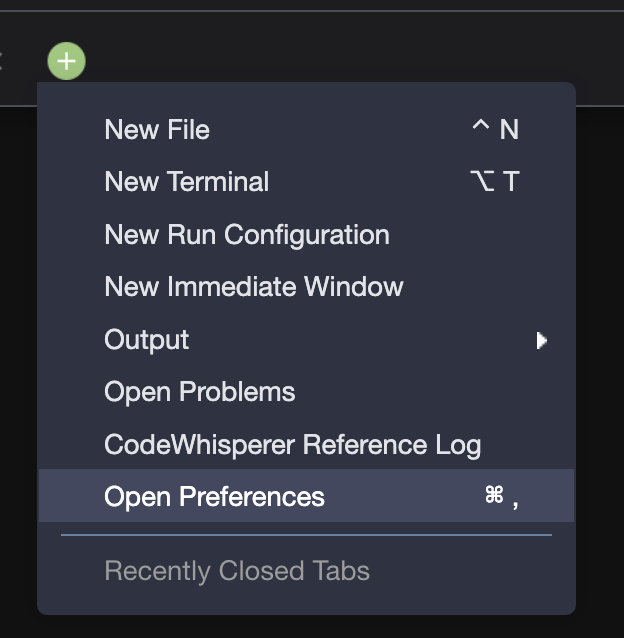
6. IAM & cloud9 setting

cloud9용 iam user를 만들고 access key와 secrte key를 cloud9에 적용한다.
그리고 아래 처럼 비활성화를 해준다.
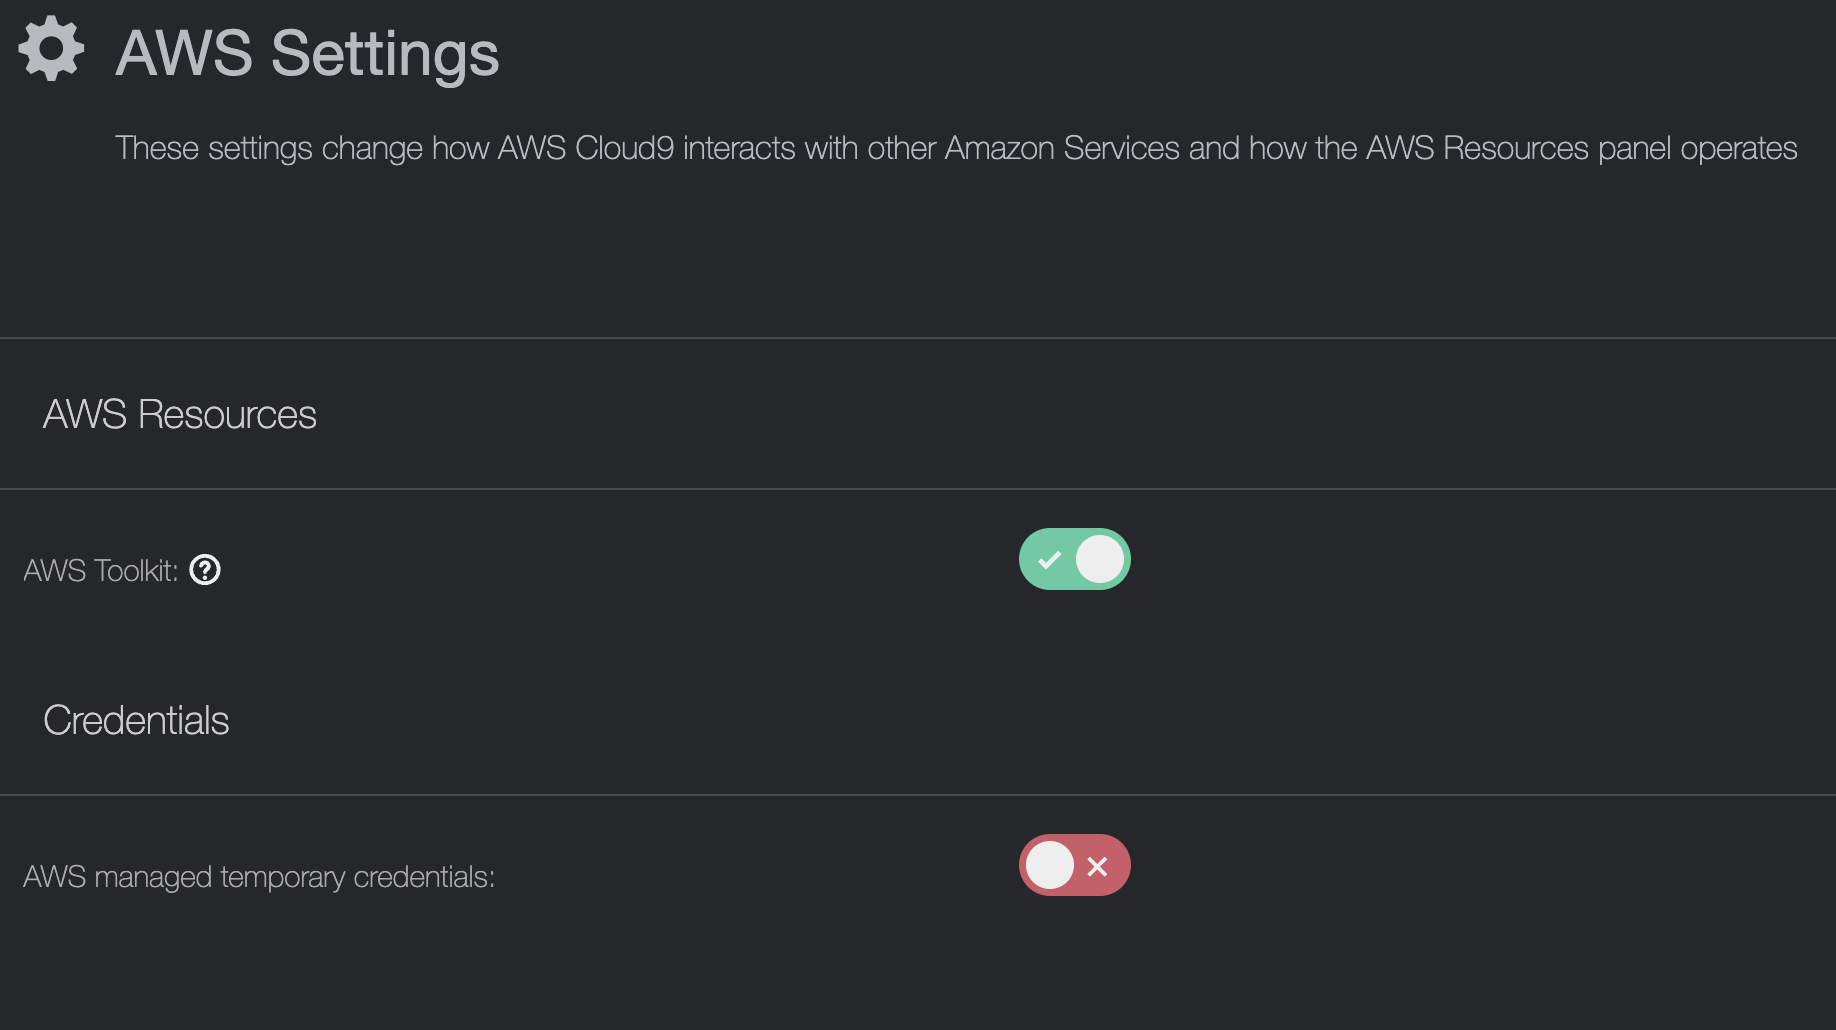
그다음에 cloud9의 role을 바꿔줄 차례이다.
EC2 > 작업 > 보안 > IAM 역할 수정 탭을 들어가준다.
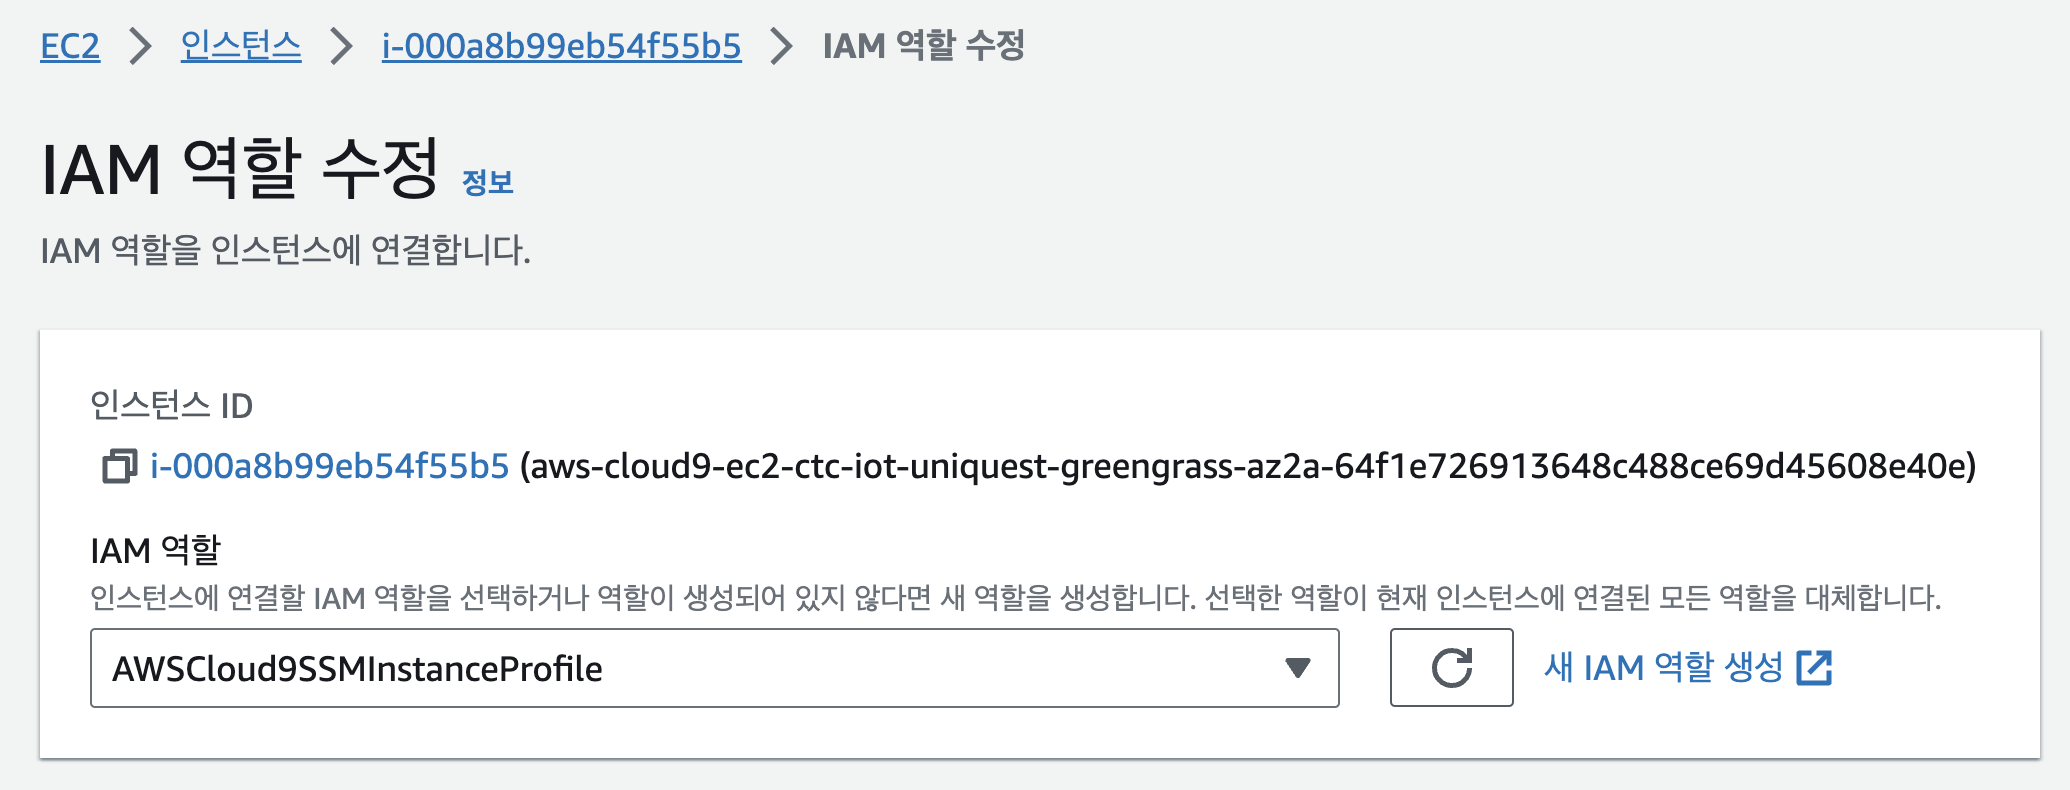
새 IAM 역할 생성을 눌러 다음과 같이 권한을 설정해주자.
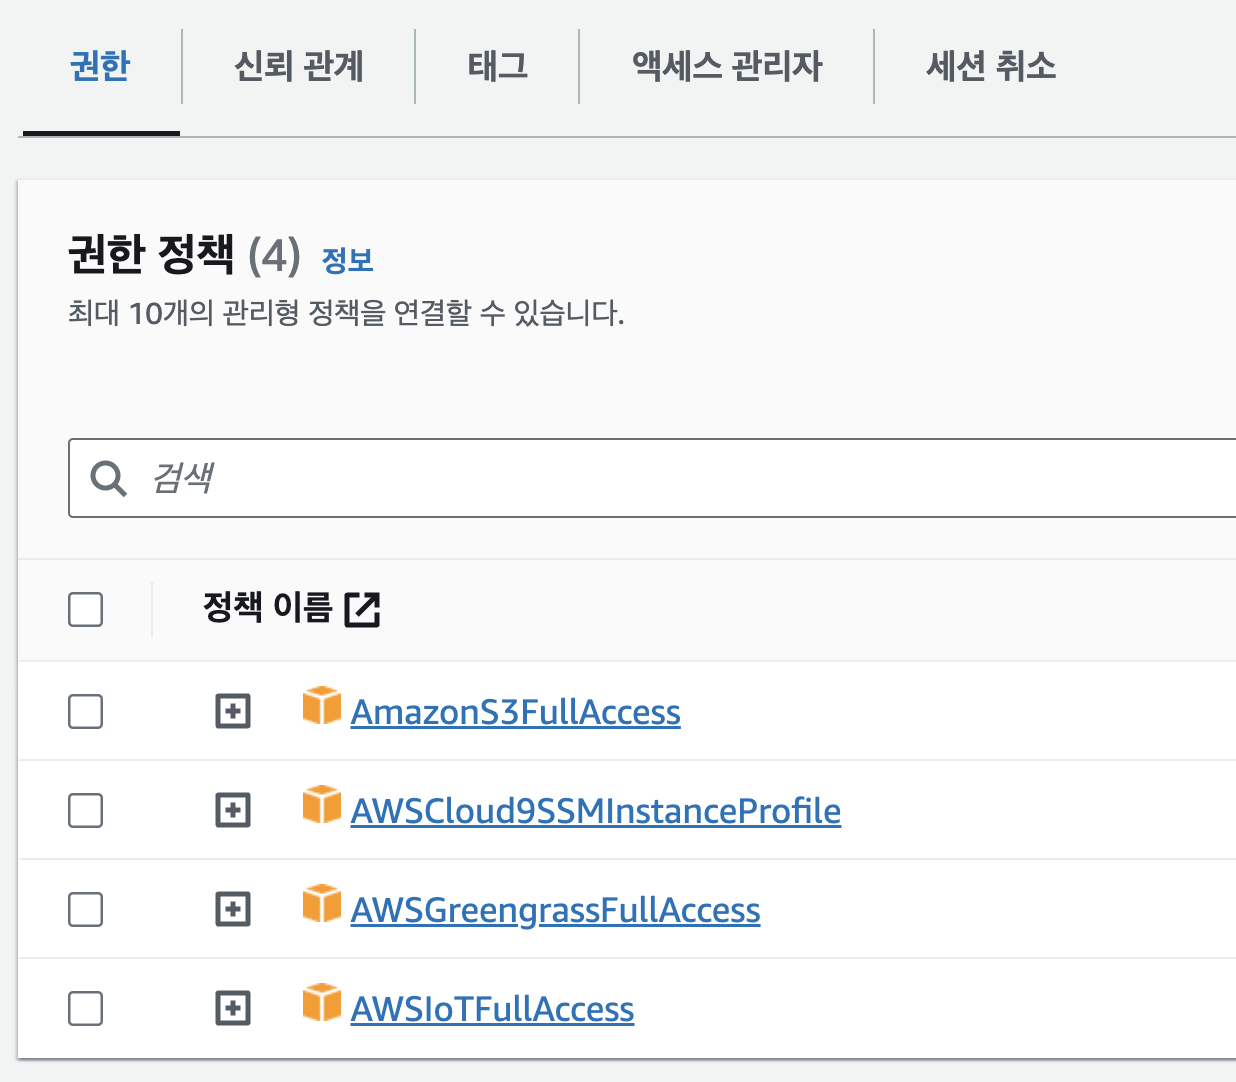
그리고 적용하면 cloud9 세팅은 끝났다.
7. S3
- s3 생성 후 아티팩트를 위해 기본구조는 다음과 같다.
버킷이름/artifacts/com.example.프로젝트이름/1.0.0/프로젝트.py
위 구조대로 폴더를 생성해 두자.
8. code
//프로젝트.py

import datetime
import struct
import json
import awsiot.greengrasscoreipc.clientv2 as clientV2
from awsiot.greengrasscoreipc.model import PublishToTopicRequest, PublishMessage, JsonMessage
from pymodbus.client.sync import ModbusTcpClient
from apscheduler.schedulers.background import BackgroundScheduler
from pytz import timezone

# Constants
MODBUS_HOST = '13.xxx.x.xxx'
MODBUS_PORT = 502
TOPIC = 'uniq/test'

class ModbusReader:
    @staticmethod
    def decode_string(value):
        """Decode a single value to string."""
        return struct.pack('>H', value).decode('utf-8')

    @staticmethod
    def decode_data(data):
        """Decode the full data list into a list of dictionaries."""
        result = []
        for i in range(0, len(data), 2):
            name = ModbusReader.decode_string(data[i])
            value = data[i + 1]
            result.append({"name": name, "value": value})
        return result

    @staticmethod
    def read_data():
        client = ModbusTcpClient(MODBUS_HOST, port=MODBUS_PORT)
        client.connect()
        result = client.read_holding_registers(0, 16)
        data = result.registers
        client.close()
        return ModbusReader.decode_data(data)

class Publisher:
    def __init__(self):
        self.ipc_client = clientV2.GreengrassCoreIPCClientV2()

    def publish(self, data):
        message = {
            "timestamp": str(datetime.datetime.now()),
            "values": data
        }
        payload = json.dumps(message)
        resp = self.ipc_client.publish_to_iot_core(topic_name=TOPIC, qos=1, payload=payload)
        print("Message published successfully!")

def job_to_run():
    publisher = Publisher()
    decoded_data = ModbusReader.read_data()
    publisher.publish(decoded_data)

def main():
    seoul = timezone('Asia/Seoul')
    scheduler = BackgroundScheduler(timezone=seoul)
    scheduler.add_job(job_to_run, 'cron', minute='*')
    scheduler.start()

    try:
        while True:
            pass
    except (KeyboardInterrupt, SystemExit):
        scheduler.shutdown()

if __name__ == "__main__":
    main()
주의해야할 점은 해당 코드는 cloud9에 직접 올리는 것이 아니다.
s3에다가 보관만 하면 된다.
//requirements.txt
awsiotsdk
pymodbus
AWSIoTPythonSDK
apscheduler
해당 파일도 아래 위치에 저장해 놓자.
버킷이름/artifacts/com.example.프로젝트이름/1.0.0/requirements.txt
9. recipe
{
	"RecipeFormatVersion": "2020-01-25",
	"ComponentName": "com.uniquest.modbus.iot",
	"ComponentVersion": "1.0.0",
	"ComponentType": "aws.greengrass.generic",
	"ComponentDescription": "A component designed to execute the modbus_iot.py script on Linux devices.",
	"ComponentPublisher": "test",
	"ComponentConfiguration": {
		"DefaultConfiguration": {
			"accessControl": {
				"aws.greengrass.ipc.mqttproxy": {
					"com.example.ModbusIoT:mqttproxy:1": {
						"policyDescription": "Allows access to publish/subscribe to all topics.",
						"operations": [
							"aws.greengrass#PublishToIoTCore"
						],
						"resources": [
							"*"
						]
					}
				}
			}
		}
	},
	"Manifests": [
		{
			"Platform": {
				"os": "linux"
			},
			"Lifecycle": {
				"Install": "pip3 install --user -r {artifacts:path}/requirements.txt",
				"Run": "python3 -u {artifacts:path}/modbus_iot.py"
			},
			"Artifacts": [
				{
					"Uri": "s3://s3-ctc-uniq-greengrass/artifacts/com.example.ModbusIoT/1.0.0/modbus_iot.py",
					"Permission": {
						"Read": "OWNER",
						"Execute": "OWNER"
					}
				},
				{
					"Uri": "s3://s3-ctc-uniq-greengrass/artifacts/com.example.ModbusIoT/1.0.0/requirements.txt",
					"Permission": {
						"Read": "OWNER",
						"Execute": "OWNER"
					}
				}
			]
		}
	],
	"Lifecycle": {}
}
레시피를 Greengrass 디바이스 > 구성요소 에다가 넣으면 된다.
! 주의사항
코드가 변경될 시, 자동으로 생성되는 Digest 를 삭제해주자.
뭔말이냐. 아래를 봐라,
{
"Uri": "s3://s3-ctc-uniq-greengrass/artifacts/com.example.ModbusIoT/1.0.0/requirements.txt",
"Digest": "52JvLz31y9rYgzzBXlgA95TMSNxz+SbCnONIAbB1qsk=",
"Algorithm": "SHA-256",
"Unarchive": "NONE",
"Permission": {
"Read": "OWNER",
"Execute": "OWNER"
}
}
"구성요소를 생성하면 Digest, Algorithm, Unarchive 가 생성되는 것을 볼 수 있다.
코드 변경해서 다시 s3 업로드 하게 되면 이값이 자동으로 변경되지는 않는다.
따라서 개성할 때, 버전업 1.0.0 이라면 1.1.0 으로 업그레이드 해주면서 해당 값들을 지워줘야한다."
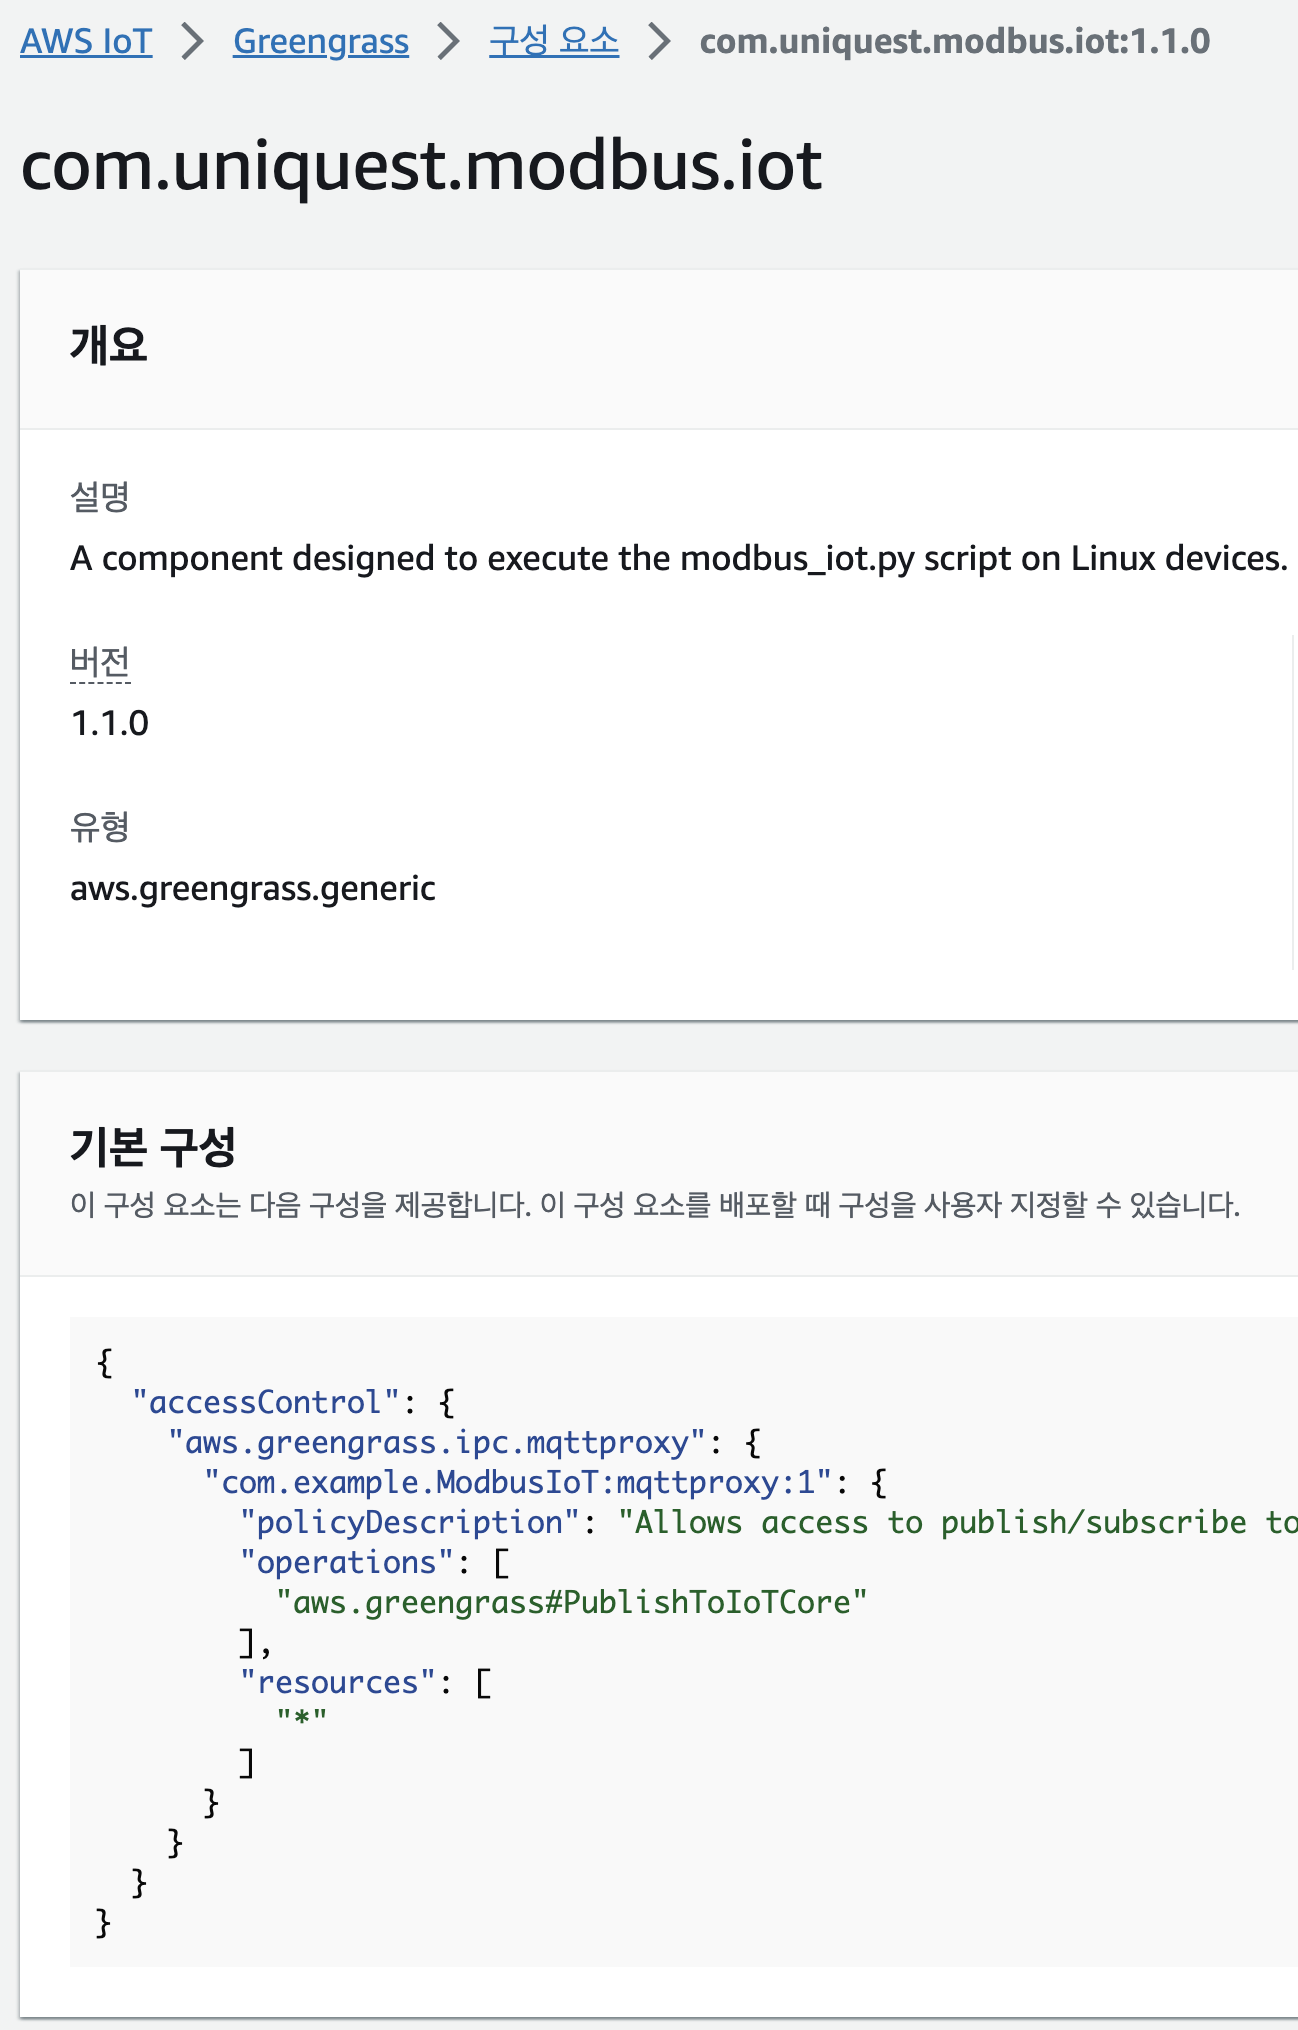
레시피 항목에 잘 봐두어야 할 것이 있다.
"ComponentConfiguration": {
		"DefaultConfiguration": {
			"accessControl":
				"aws.greengrass.ipc.mqttproxy": {
					"com.example.ModbusIoT:mqttproxy:1": {
						"operations": [
							"aws.greengrass#PublishToIoTCore"
						],
바로 accessControl에 "aws.greengrass.ipc.mqttproxy" 과 "com.example.ModbusIoT:mqttproxy:1" 이부분이 중요하다.
local에서 통신할때는 아래와 같다.
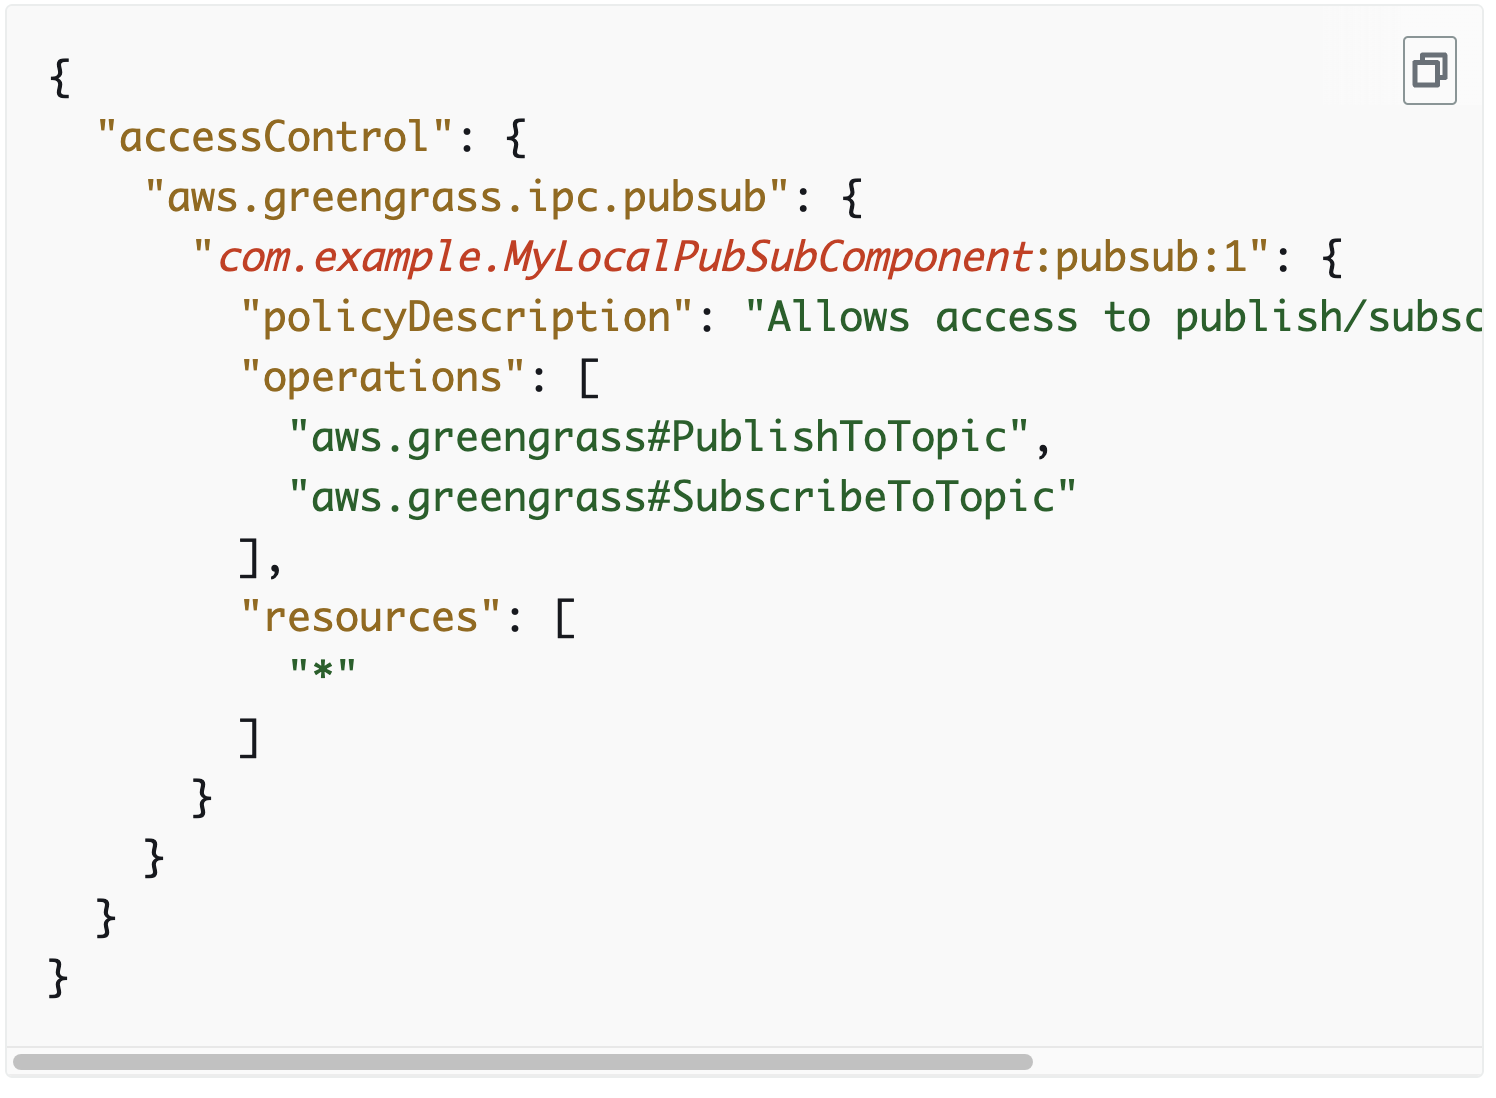
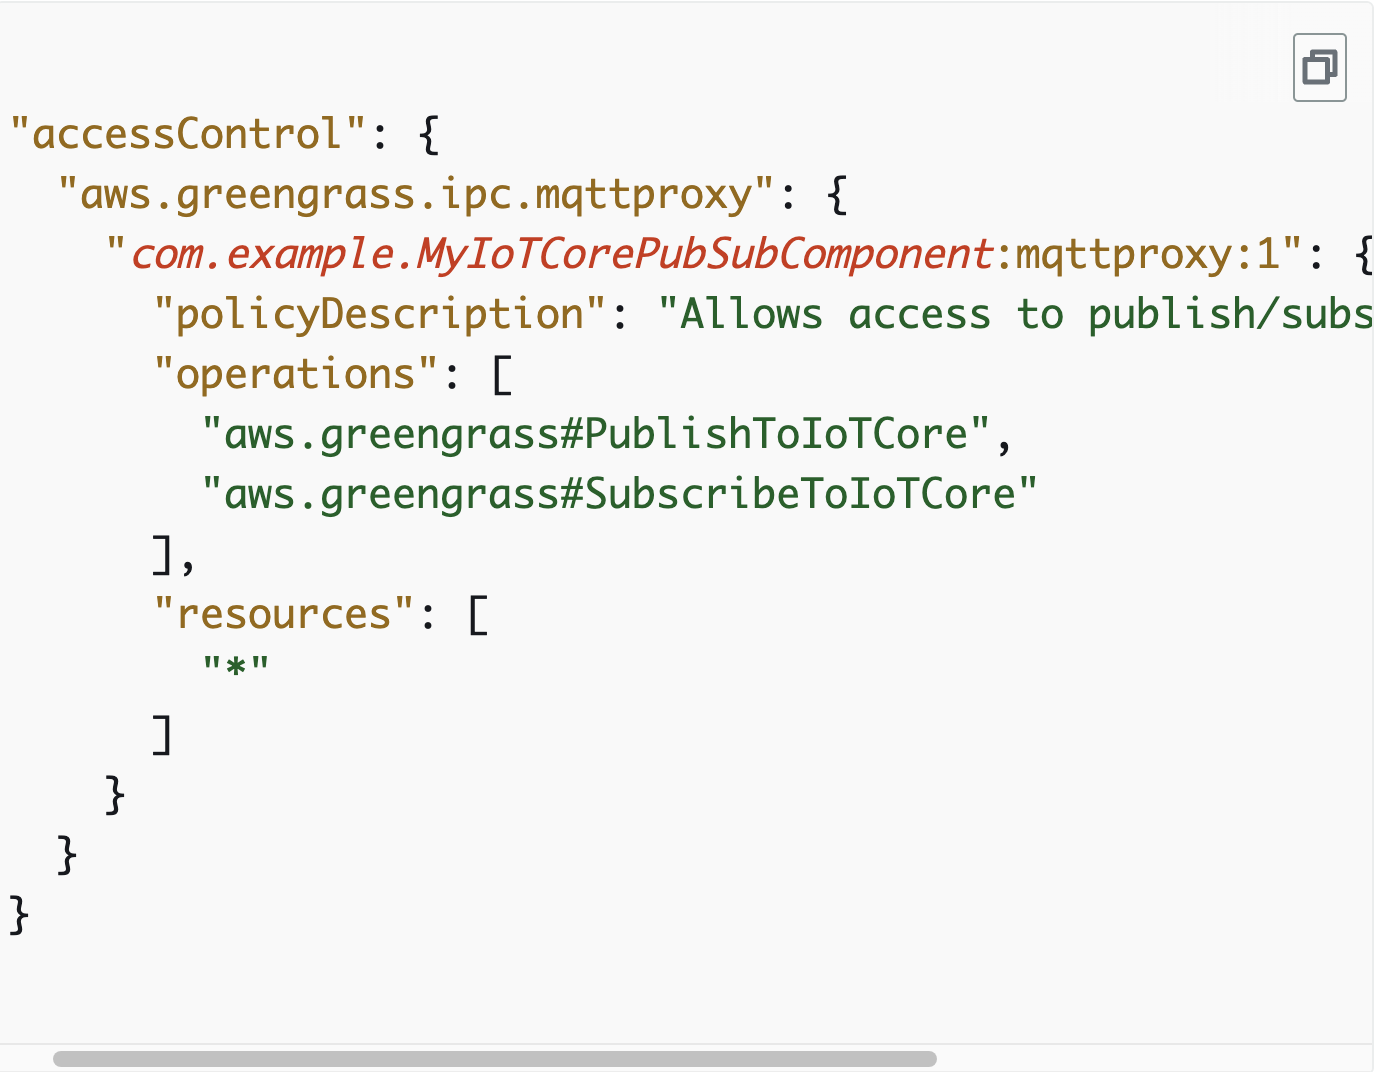
그러나 iot core로 전송하기 위해서는 mqttproxy를 사용해야한다.
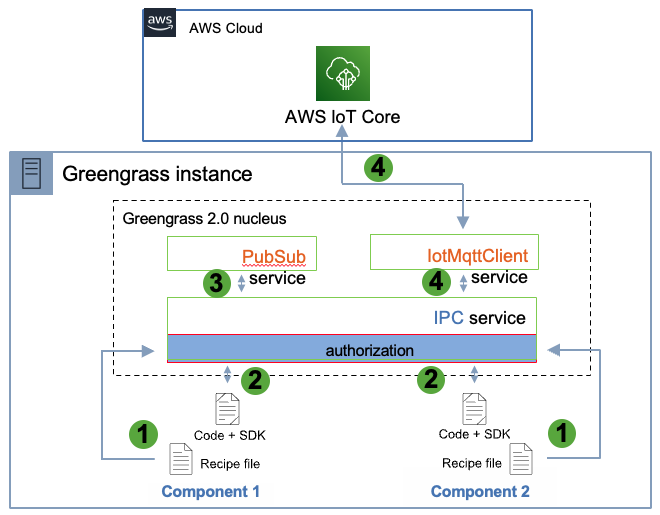
Component와 IoT Core간 통신
Component가 IPC 통신으로 iotMqttClient service로 메시지를 보내면, 이 Topic을 Subscribe하고 있는 IoT Core로 메시지를 보낼 수 있습니다. 아래와 같이 recipe의 ComponentConfiguration에 "aws.greengrass.ipc.mqttproxy"을 설정합니다.
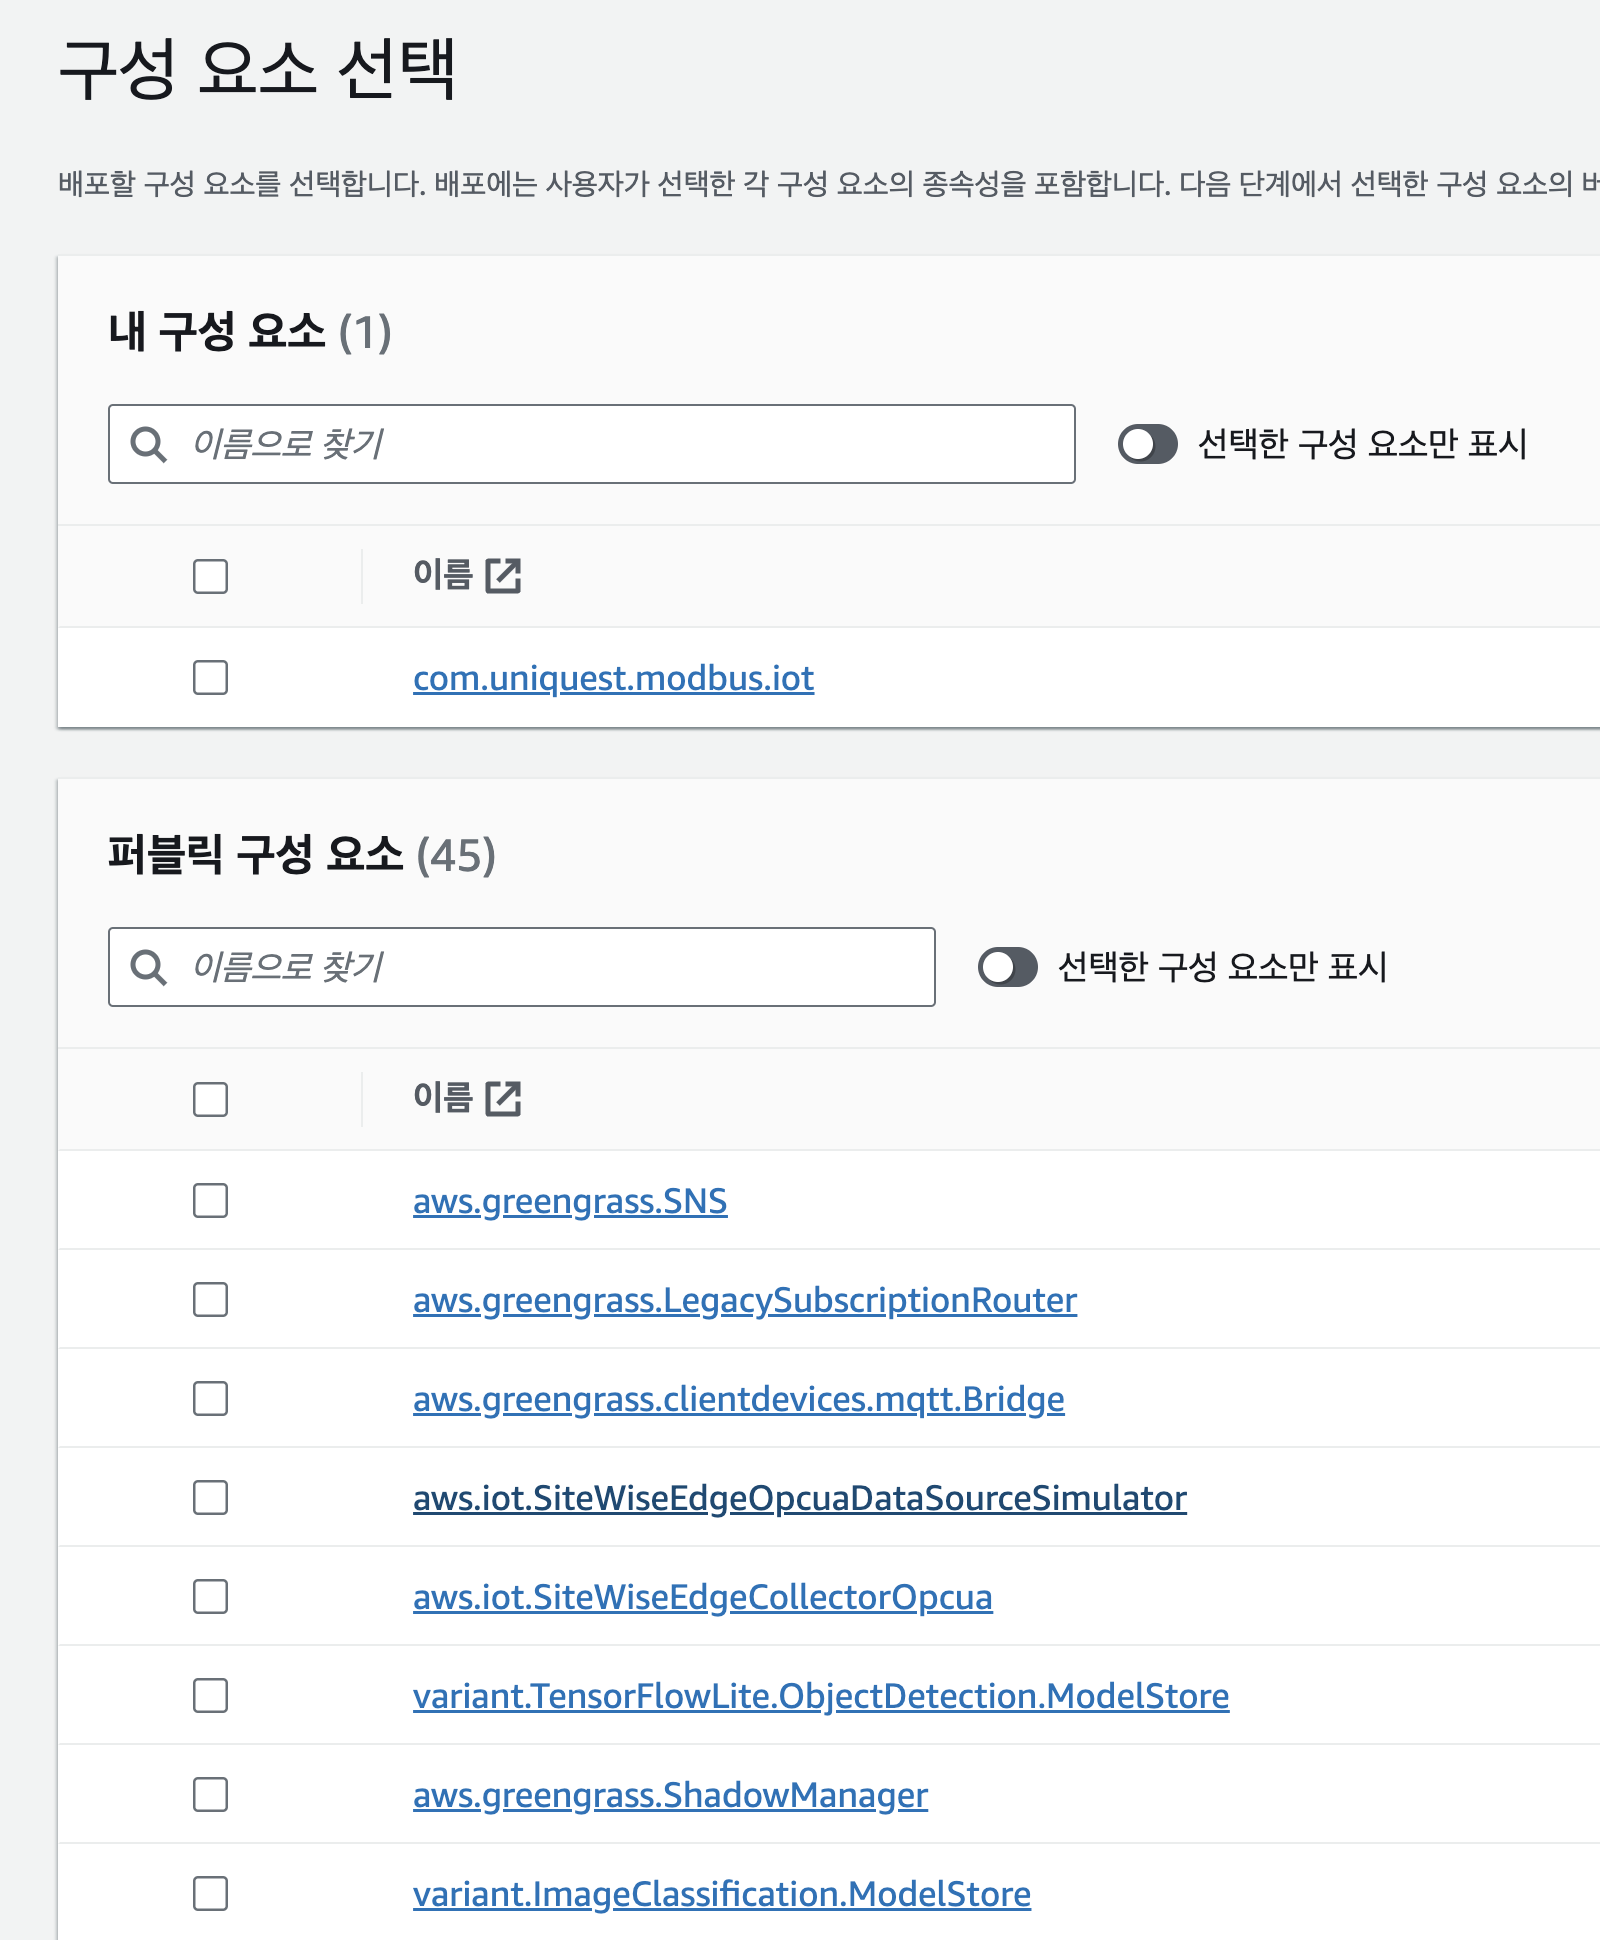
이렇게 레시피를 생성하면 다음과 같이 배포할 준비가 되었다.
10. 배포
greengrass 디바이스 > 배포 > 생성
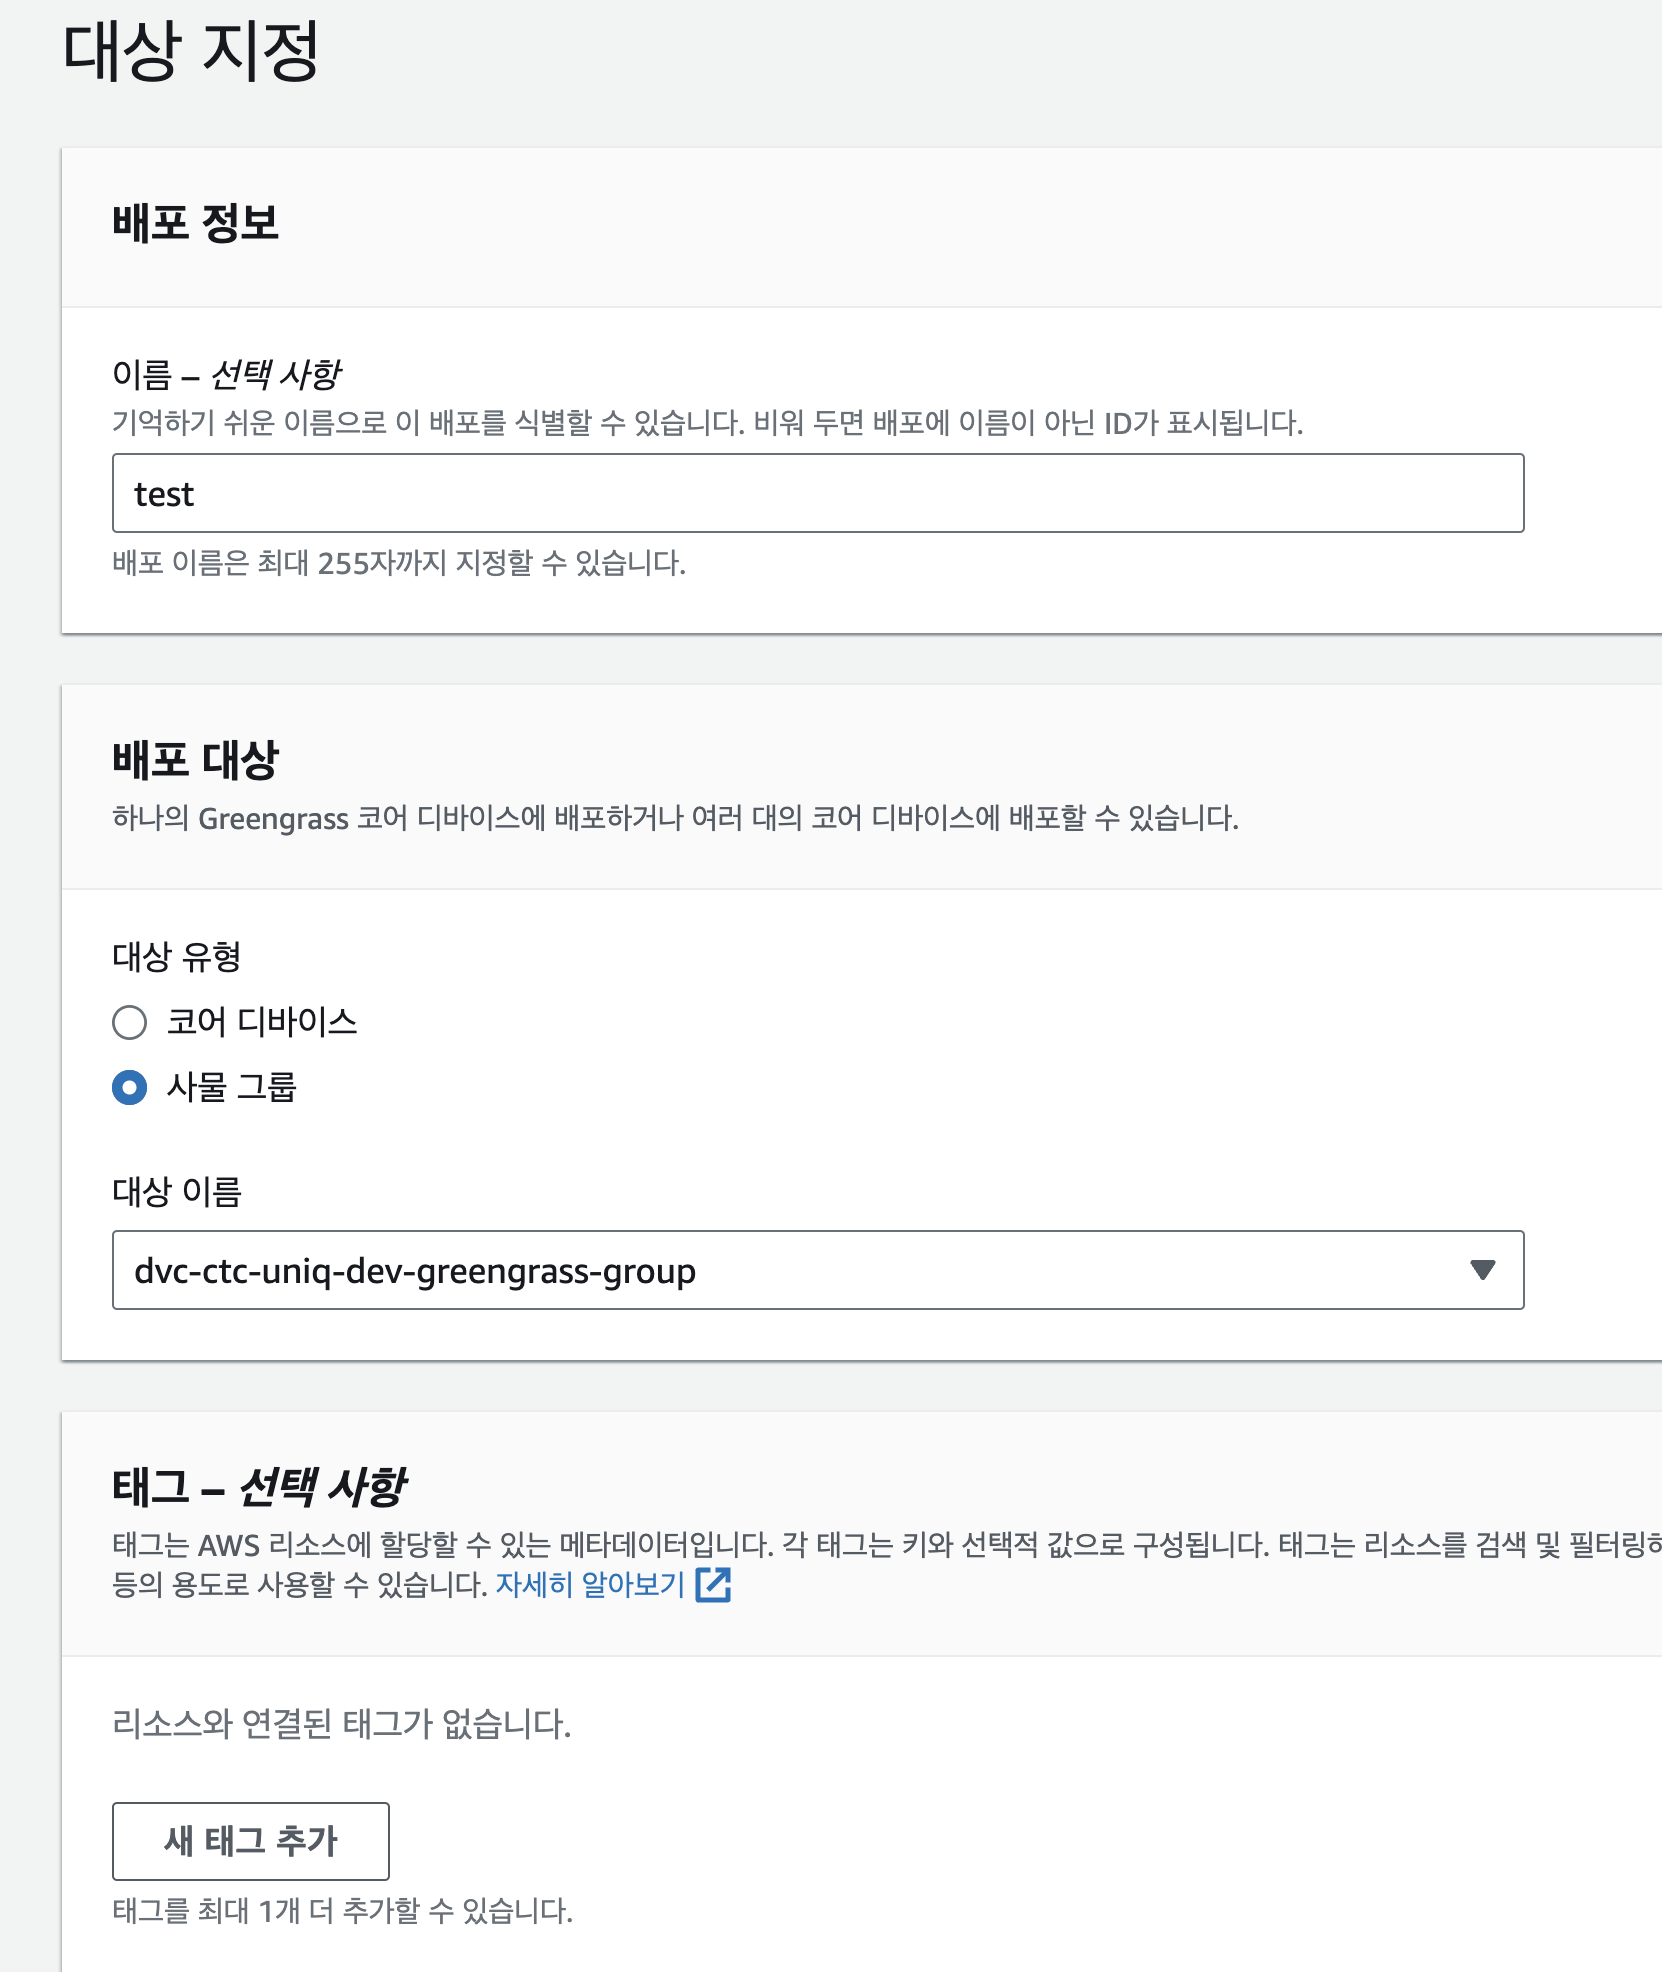
코어 디바이스 이름을 지정해서 1개에다만 배포할 수 있고, 그룹을 지정해서 여러대에다 배포할 수 있다.
중요한 부분이다.
레시피만 배포하면 에러가 뜬다.
KeyError: 'AWS_GG_NUCLEUS_DOMAIN_SOCKET_FILEPATH_FOR_COMPONENT'
답은 aws.greengrass.Nucleus를 같이 배포하면 된다.
그러나 또 에러가 뜨게 되는데,
인증 토큰이 없는 것이므로 아래와 같이 aws.greengras.TokenExchangeService도 같이 넣어서 배포하면 된다.

(cli는 취향껏 넣으면 된다.)
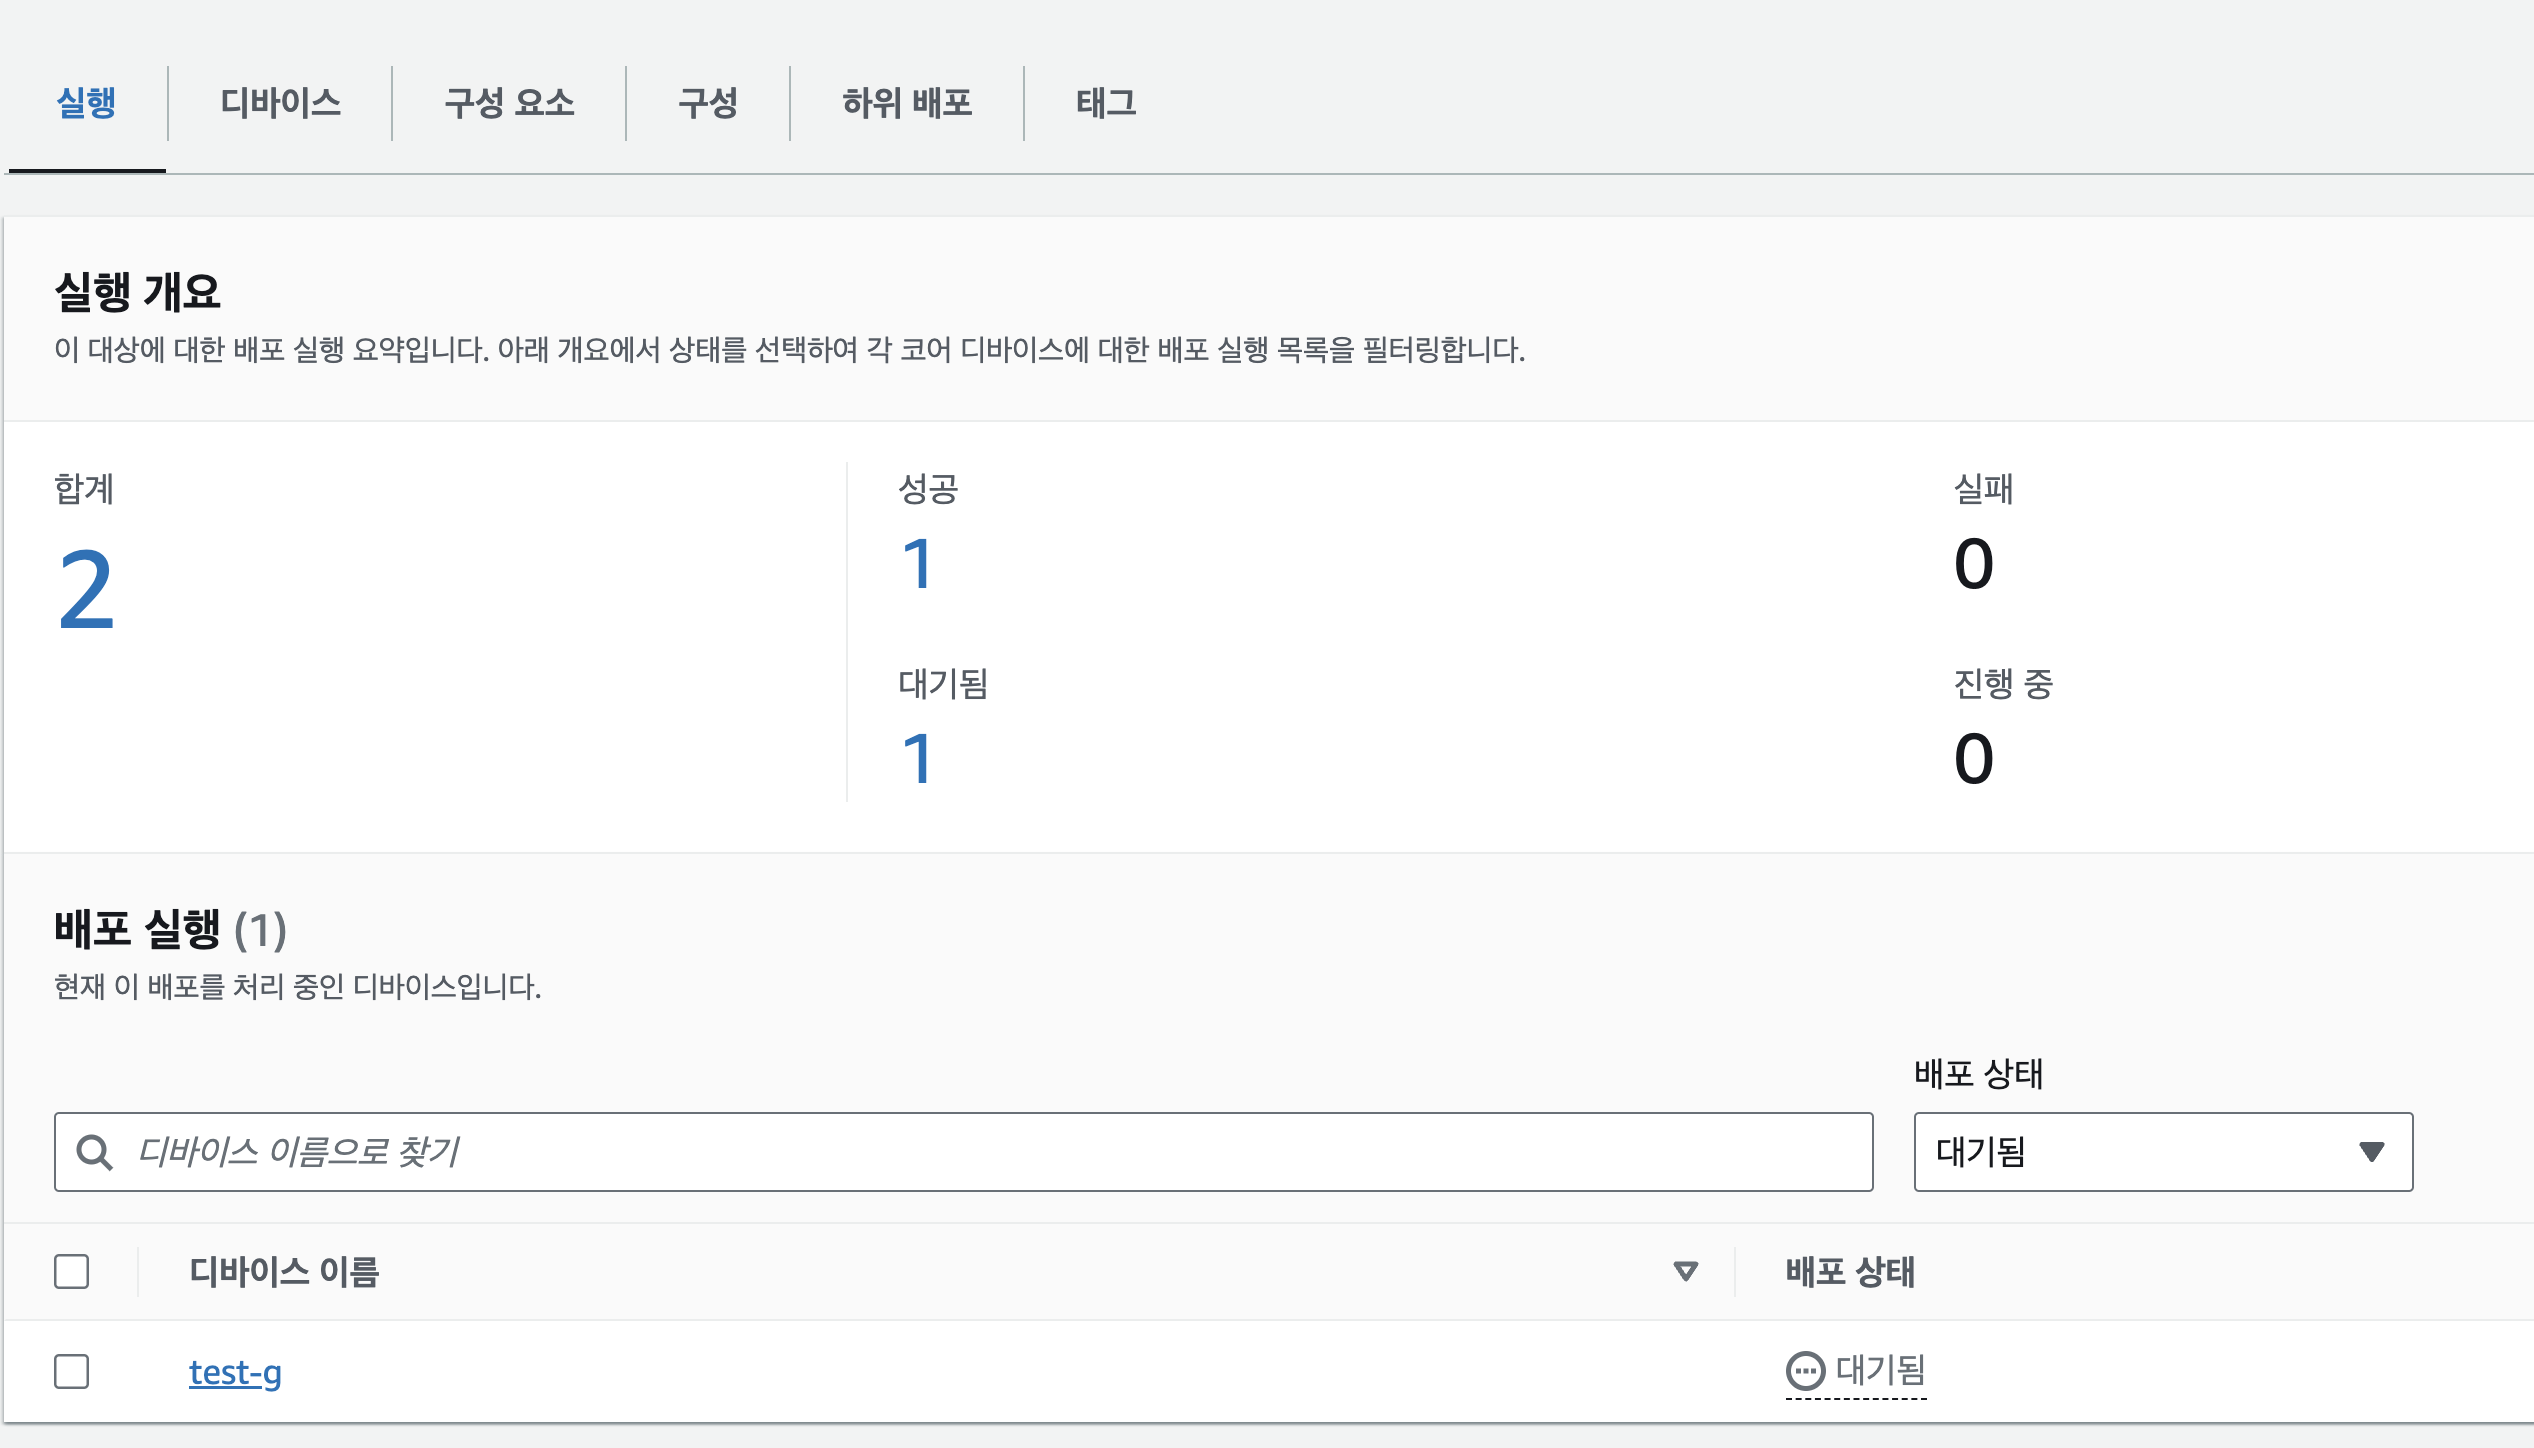
그럼 최종적으로 총 4개가 greengrass를 통해 배포되면 된다.

11. 로그
10-1. 컴포넌트 로그를 확인하는 방법
sudo su -
tail -F /greengrass/v2/logs/logs/com.자신의프로젝트명.log
10-2. greengrass 로그를 확인하는 방법
sudo tail -F /greengrass/v2/logs/greengrass.log10-3. 아티펙트 즉, s3에서 잘 가져왔는지 확인하는 법 (10-1번이나 10-2 번에서 s3 access deny가 뜨면 해당 폴더는 나타나지 않는다.)
sudo su -
cd /greengrass/v2/packages/artifacts/com.프로젝트명/1.1.0(버전)/
12. 에러 정리
- sorry, suer root is not allowed to execute ~
2023-09-10T08:38:56.777Z [INFO] (pool-2-thread-16) simpleSubPub: shell-runner-start. {scriptName=services.simpleSubPub.lifecycle.Install, serviceName=simpleSubPub, currentState=NEW, command=["pip3 install --user awsiotsdk boto3"]}
2023-09-10T08:38:56.810Z [WARN] (Copier) simpleSubPub: stderr. Sorry, user root is not allowed to execute '/bin/sh -c pip3 install --user awsiotsdk boto3' as ggc_user:ggc_group on ip-192-168-30-127.ap-northeast-2.compute.internal.. {scriptName=services.simpleSubPub.lifecycle.Install, serviceName=simpleSubPub, currentState=NEW}
2023-09-10T08:38:56.815Z [WARN] (pool-2-thread-16) simpleSubPub: shell-runner-error. {scriptName=services.simpleSubPub.lifecycle.Install, serviceName=simpleSubPub, currentState=NEW, command=["pip3 install --user awsiotsdk boto3"]}
해결방법
sudo visudo
//맨 밑에 추가
root ALL=(ggc_user:ggc_group) NOPASSWD: ALL
- AWS_GG_NUCLEUS_DOMAIN_SOCKET_FILEPATH_FOR_COMPONENT
해결방법
1. aws.greengrass.Nucleus를 같이 배포
계속 에러가 나면,
export AWS_GG_NUCLEUS_DOMAIN_SOCKET_FILEPATH_FOR_COMPONENT=/greengrass/v2/ipc.socket
- 배포 실패
디바이스가 혼란스러운 상태임. (주로 코드문제)
혼란을 깨워주기 위해서 개정을 통해 "com.개인프로젝트" 배포한 것을 잠시 빼주고, aws.greengrass.Nucleus 만 배포해주고 잠시 기다리면 디바이스가 정상으로 돌아온다. 해당 상태에서 다시 배포해보자.
- TypeError: publish_to_iot_core() takes 1 positional argument but 2 were given.
chat gpt에게 물어지말지어다.
공식문서를 잘 보자.
resp = ipc_client.publish_to_iot_core(topic_name=topic, qos=qos, payload=payload)
인수를 3개나 받고 있다.
학습을 잘 시키자.
참조 :
[1] https://docs.aws.amazon.com/greengrass/v2/developerguide/ipc-iot-core-mqtt.html
[2] https://velog.io/@markyang92/AWS-IoT-Greengrass-SubscribePublish-Component
[3] https://github.com/ACloudGuru-Resources/acg-project-mars-probe/blob/main/src/artifacts/simplePubSub/1.0.0/simplePubSub.py
[4] https://catalog.us-east-1.prod.workshops.aws/workshops/5ecc2416-f956-4273-b729-d0d30556013f/en-US/chapter5-pubsubipc/10-step1
[5] https://github.com/kyopark2014/iot-greengrass