* 목표
이전 포스팅에서는 게시글 등록과 조회 화면을 구현하였다.
본 포스팅에서는 수정과 삭제 화면은 mustache로 구현해보자.
1. 수정하기 구현
게시글 수정 API는 이미 만들었으므로 해당 API로 요청하는 화면을 만들어서 연결해보자.
1) (화면) GET 요청을 보낼 화면 구성
아래 화면을 통해서 수정하기 화면으로 들어가게 만들었다.
수정 기능은 제목(title)을 누르면 들어가도록 구현하였다.
resources/templates/index.mustache
{{>layout/header}}

<h1>스프링부트로 시작하는 웹 서비스 Ver.2</h1>
<div class="col-md-12">
    <div class="row">
        <div class="col-md-6">
            <a href="/posts/save" role="button" class="btn btn-primary">글 등록</a>
        </div>
    </div>
    <br>
    <!-- 목록 출력 영역 -->
    <table class="table table-horizontal table-bordered">
        <thead class="thead-strong">
        <tr>
            <th>게시글번호</th>
            <th>제목</th>
            <th>작성자</th>
            <th>최종수정일</th>
        </tr>
        </thead>
        <tbody id="tbody">
        {{#posts}}
            <tr>
                <td>{{id}}</td>
                <td><a href="/posts/update/{{id}}">{{title}}</a></td>
                <td>{{author}}</td>
                <td>{{modifiedDate}}</td>
            </tr>
        {{/posts}}
        </tbody>
    </table>
</div>

{{>layout/footer}}
각 게시글의 제목(title)을 누르면 /posts/update/{{id}}로 GET 요청을 보낸다.
2) (컨트롤러) GET 요청을 받을 컨트롤러 구성
java/com/spring/book/web/IndexController.java
public class IndexController {

    private final PostsService postsService; //@RequiredArgsConstructor 생성자로 초기화함.
		...

		@GetMapping("/posts/update/{id}")
    public String postsUpdate(@PathVariable Long id, Model model) {
        PostsResponseDto dto = postsService.findById(id);
        model.addAttribute("post", dto);

        return "posts-update";
    }

		...
}
/posts/update/{{id}} 에 대한 GET 요청은 IndexController의 postsUpdate에서 받는다.
GET 요청을 받은 컨트롤러는 서비스에서 id값으로 게시글 정보를 불러온다.
model 객체는 Controller에서 생성한 데이터를 View에 전달할 때 사용하는 객체이다.
model을 통해 화면 단에서 읽을 수 있게 데이터를 변경하여 posts-update.mustache에게 전달한다.
2-1. (서비스) id로 게시글 데이터 조회
java/com/spring/book/service/posts/PostsService.java
public class PostsService {
private final PostsRepository postsRepository;
...
public PostsResponseDto findById(Long id) {
Posts entity = postsRepository.findById(id).orElseThrow(() -> new IllegalArgumentException("해당 게시글이 없습니다. id" + id));
return new PostsResponseDto(entity);
}
...
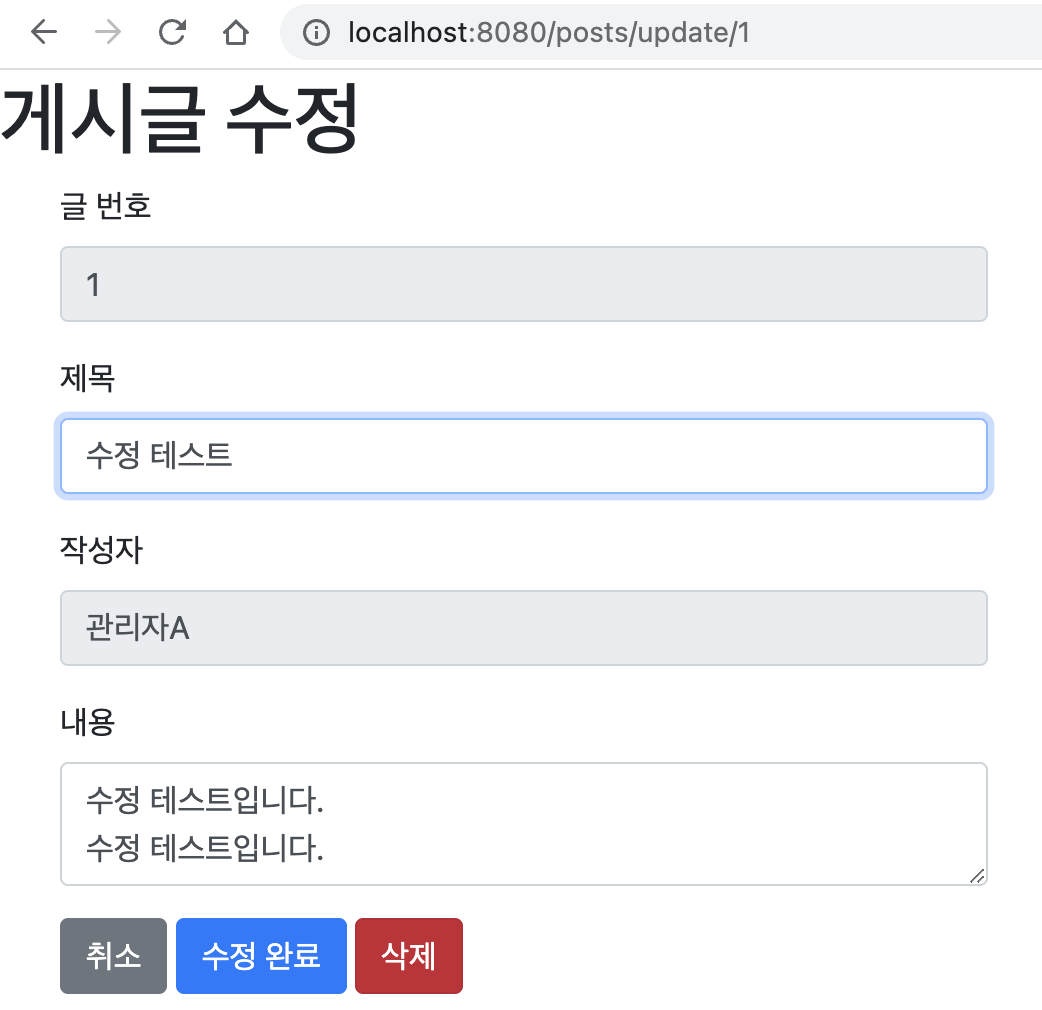
}3) (화면) 컨트롤러에서 전달받은 데이터를 화면에 출력
resources/templates/posts-update.mustache
{{>layout/header}}

 <h1>게시글 수정</h1>

 <div class="col-md-12">
     <div class="col-md-4">
         <form>
             <div class="form-group">
                 <label for="title">글 번호</label>
                 <input type="text" class="form-control" id="id" value="{{post.id}}" readonly>
             </div>
             <div class="form-group">
                 <label for="title">제목</label>
                 <input type="text" class="form-control" id="title" value="{{post.title}}">
             </div>
             <div class="form-group">
                 <label for="author"> 작성자 </label>
                 <input type="text" class="form-control" id="author" value="{{post.author}}" readonly>
             </div>
             <div class="form-group">
                 <label for="content"> 내용 </label>
                 <textarea class="form-control" id="content">{{post.content}}</textarea>
             </div>
         </form>
         <a href="/" role="button" class="btn btn-secondary">취소</a>
         <button type="button" class="btn btn-primary" id="btn-update">수정 완료</button>
         <button type="button" class="btn btn-danger" id="btn-delete">삭제</button>
     </div>
 </div>

 {{>layout/footer}}
id와 author 는 수정하면 안되기 때문에 읽기만 허용하도록 readonly 속성을 넣어준다.
4. (화면) “수정 완료” 버튼을 누르면 /api/v1/posts/{id} 에 수정한 데이터를 PUT 요청을 보내기
resources/static/js/app/index.js
var main = {
    init : function () {
        var _this = this;
        $('#btn-save').on('click', function () {
            _this.save();
        });

        $('#btn-update').on('click', function () {
            _this.update();
        });

        $('#btn-delete').on('click', function () {
            _this.delete();
        });

    },
    save : function () {
        ...
    },
     update : function () {
         var data = {
             title: $('#title').val(),
             content: $('#content').val()
         };

         var id = $('#id').val();

         $.ajax({
             type: 'PUT',
             url: '/api/v1/posts/'+id,
             dataType: 'json',
             contentType:'application/json; charset=utf-8',
             data: JSON.stringify(data)
         }).done(function() {
             alert('글이 수정되었습니다.');
             window.location.href = '/';
         }).fail(function (error) {
             alert(JSON.stringify(error));
         });
     },
    delete : function () {
        ...
    }

};

main.init()
“수정 완료” 버튼을 누르면 index.js에 의해 로직이 실행된다.
index.js에서는 수정된 date를 json 형식으로 변경하여 update 컨트롤러에 PUT 요청을 보낸다.(/api/v1/posts/{id} URL은 update 컨트롤러가 받는다.)
PUT 요청으로 보낸 이유는 API에서 @PutMapping으로 선언했기 때문이다.
참고로 REST 규약에서는 CRUD를 다음과 같이 HTTP Method에 매핑한다.
생성(Create) - POST
읽기(Read) - GET
수정(Update) - PUT
삭제(Delete) - DELETE
4-1. (컨트롤러) /api/v1/posts/{id} 에 대한 PUT 요청을 받고, id와 수정 데이터를 서비스 단으로 return 한다.
java/com/spring/book/web/PostsApiController.java
public class PostsApiController {
...

	@PutMapping("/api/v1/posts/{id}")
  public Long update(@PathVariable Long id, @RequestBody PostsUpdateRequestDto requestDto) {
      return postsService.update(id, requestDto);
  }

...
}
화면에서 받아온 json 형태의 데이터는 @RequestBody에 의해 PostsUpdateRequestDto 타입의 객체로 변환된다.
클라이언트와 서버간에 통신할때 데이터를 xml이나 json 형태로 주고 받는데
서버에서는 @RequestBody 어노테이션을 사용하여 HTTP 요청으로 전달된 json 데이터를 자바 객체로 변환하여 객체에 저장한다.
정리하자면 일반적인 GET/POST 요청에는 필요하지 않지만 서버에서 클라이언트(화면)로 json 형태의 데이터를 객체로 저장할때 사용된다.
4-2. (서비스) 도메인에서 정보를 수정하도록 수정할 데이터를 넘겨준다.
java/com/spring/book/service/posts/PostsService.java
@RequiredArgsConstructor
@Service
public class PostsService {
    private final PostsRepository postsRepository;

		...
		@Transactional
    public Long update(Long id, PostsUpdateRequestDto requestDto) {
        Posts posts = postsRepository.findById(id).orElseThrow(() -> new IllegalArgumentException("해당 게시글이 없습니다. id=" + id));
        posts.update(requestDto.getTitle(), requestDto.getContent());
        return id;
    }

		...
}
서비스에서 수정할 데이터를 도메인의 필드에 반영한다.
서비스단의 @Transactional 어노테이션 덕분에 데이터 수정이 이루어지는 로직이 트랜잭션 성질을 잘 유지할 수 있게 해준다. (트랜잭션 → 정상 여부에 따라 Commit 또는 Rollback 동작을 수행)
@Transactional 는 클래스나 메소드 앞에 선언할 수 있다.
어디에 선언되느냐에 따라 영향 범위가 달라진다.
4-3. (도메인) 변경된 데이터를 update 한다.
java/com/spring/book/domain/posts/Posts.java
@Getter
@NoArgsConstructor
@Entity
public class Posts extends BaseTimeEntity {
		...

		public void update(String title, String content) {
        this.title = title;
        this.content = content;
    }

}
Posts 도메인은 엔티티이기 때문에 필드를 변경하면 DB 테이블에 반영된다.
5. (화면) PUT 요청이 정상적으로 처리되었으면 “/” 페이지를 호출
index.js에서 “수정 완료” 버튼을 눌렀을 때의 마지막 로직으로 “/”페이지를 띄운다.
“/” 는 컨트롤러 index API에서 요청을 받아 index.mustache 페이지를 띄워준다.
* 수정 동작 정리
수정하는 과정은 다음과 같다.
- 수정 화면에서 “수정 완료” 버튼을 누르면 index.js의 update 메소드가 동작한다.
- 게시글의 제목을 눌러 수정 화면을 띄운다.
- 수정된 내용을 json 형태로 변경하여 컨트롤러에 전달한다.
- 컨트롤러에서는 @RequestBody를 통해 json 형태의 데이터를 객체로 변환한다.
- 컨트롤러는 서비스로 객체로 변환된 데이터를 전달한다.
- 서비스에서는 도메인 엔티티의 필드를 변경하여 최종적으로 변경된 데이터를 DB에 반영한다.
2. 삭제하기 구현
1. (화면) 수정하기 화면에서 “삭제” 버튼 입력
resources/templates/posts-update.mustache
{{>layout/header}}

 <h1>게시글 수정</h1>

 <div class="col-md-12">
     <div class="col-md-4">
         <form>
             <div class="form-group">
                 <label for="title">글 번호</label>
                 <input type="text" class="form-control" id="id" value="{{post.id}}" readonly>
             </div>
             <div class="form-group">
                 <label for="title">제목</label>
                 <input type="text" class="form-control" id="title" value="{{post.title}}">
             </div>
             <div class="form-group">
                 <label for="author"> 작성자 </label>
                 <input type="text" class="form-control" id="author" value="{{post.author}}" readonly>
             </div>
             <div class="form-group">
                 <label for="content"> 내용 </label>
                 <textarea class="form-control" id="content">{{post.content}}</textarea>
             </div>
         </form>
         <a href="/" role="button" class="btn btn-secondary">취소</a>
         <button type="button" class="btn btn-primary" id="btn-update">수정 완료</button>
         <button type="button" class="btn btn-danger" id="btn-delete">삭제</button>
     </div>
 </div>

 {{>layout/footer}}
resources/static/js/app/index.js
var main = {
    init : function () {
        var _this = this;
        $('#btn-save').on('click', function () {
            _this.save();
        });

        $('#btn-update').on('click', function () {
            _this.update();
        });

        $('#btn-delete').on('click', function () {
            _this.delete();
        });

    },

    ...

    delete : function () {
        var id = $('#id').val();

        $.ajax({
            type: 'DELETE',
            url: '/api/v1/posts/'+id,
            dataType: 'json',
            contentType:'application/json; charset=utf-8'
        }).done(function() {
            alert('글이 삭제되었습니다.');
            window.location.href = '/';
        }).fail(function (error) {
            alert(JSON.stringify(error));
        });
    }

};

main.init();
삭제 버튼을 누르면 의해 /api/v1/posts/{id} URL로 DELETE 요청을 보낸다.
DELETE 요청시 Posts의 id를 json 형태로 데이터를 전달한다.
2) (컨트롤러) 컨트롤러에서 요청을 받아 서비스로 데이터를 전달
public class PostsApiController {
    private final PostsService postsService;
		...

		@DeleteMapping("/api/v1/posts/{id}")
    public Long delete(@PathVariable Long id) {
        postsService.delete(id);
        return id;
    }
		...
}
데이터로 id를 전달 받아 서비스로 넘겨준다.
3) (서비스) Repository를 통해 id에 해당하는 Posts 객체를 삭제
@RequiredArgsConstructor
@Service
public class PostsService {
    private final PostsRepository postsRepository;

		...
		@Transactional
    public void delete(Long id){
        Posts posts = postsRepository.findById(id).orElseThrow(()-> new IllegalArgumentException("해당 게시글이 없습니다. id=" + id));
        postsRepository.delete(posts);
    }

		public PostsResponseDto findById(Long id) {
        Posts entity = postsRepository.findById(id).orElseThrow(() -> new IllegalArgumentException("해당 게시글이 없습니다. id" + id));
        return new PostsResponseDto(entity);
    }
		...

}
* 삭제 동작 정리
삭제하는 과정은 다음과 같다.
- 게시글 제목을 누른 뒤 “삭제” 버튼을 누른다.
- index.js에서 컨트롤러로 삭제 게시글의 id에 대해 DELETE 요청을 보낸다.
- 컨트롤러에서 DELETE 요청을 받아 서비스로 id를 전달한다.
- 서비스에서 Repository를 이용하여 id에 해당하는 Posts를 삭제한다.
