복습겸 쌩기초 강의에서 알려주는 BMI 계산하는 앱 다시 해보기! 지금 보면 너무 쉬운 내용이지만 다시 봐야지
layout 그리기
res/layout/activity_main.xml
linear layout를 사용한다.
리니어레이아웃은 겹겹이 가로나 세로로 층으로 들어간다.
(사용자가 설정을 해주어야된다)
android:orientation ="vertical" or "horizontal"
layout width 나 height에서 match_parent or wrap_content를 정하는데 match_parent는 상위컴포넌트의 사이즈에 맞춰서 이경우에 리니어 레이아웃의 사이즈 wrap_content는 컨턴츠의 사이즈에 맞춘다.
android:text ="입력할 text"
EditText - 문자열을 입력받는 곳
Design 부분에 여러 요소들을 drag & drop해서 만들수도있는데 체중을 받아줄 거기 때문에 number text를 넣어준다. (number로 만들면 채중항목을 가면 숫자 자판이 자동으로 나온다)
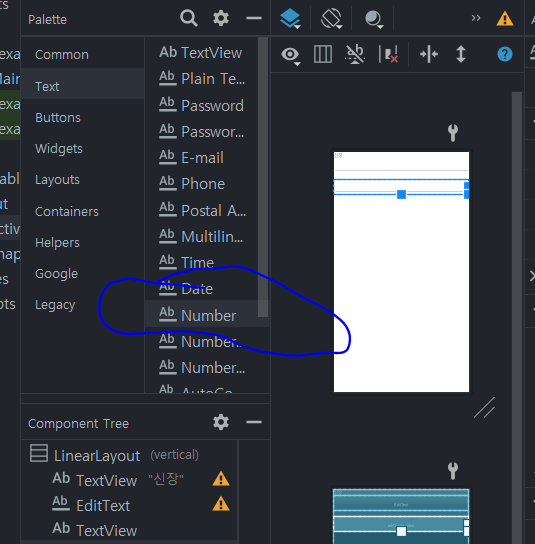
code로 추가할지 drag & drop할지는 취향으로 고르면 된다. 나는 후자가더 좋다.
activity_main.xml
<?xml version="1.0" encoding="utf-8"?>
<LinearLayout xmlns:android="http://schemas.android.com/apk/res/android"
    xmlns:app="http://schemas.android.com/apk/res-auto"
    xmlns:tools="http://schemas.android.com/tools"
    android:layout_width="match_parent"
    android:layout_height="match_parent"
    android:orientation="vertical"
    tools:context=".MainActivity">

    <TextView
        android:layout_width="match_parent"
        android:layout_height="wrap_content"
        android:text="신장"
        />
    <EditText
        android:layout_width="match_parent"
        android:layout_height="wrap_content"
        android:inputType="number"
        />
    <TextView

        android:layout_width="match_parent"
        android:layout_height="wrap_content"
        android:text="채중"
    />

    <EditText
        android:id="@+id/editTextNumber"
        android:layout_width="match_parent"
        android:layout_height="wrap_content"
        android:ems="10"
        android:inputType="number"
        />
    <Button
        android:text="확인하기"
        android:layout_width="match_parent"
        android:layout_height="wrap_content"
        />

</LinearLayout>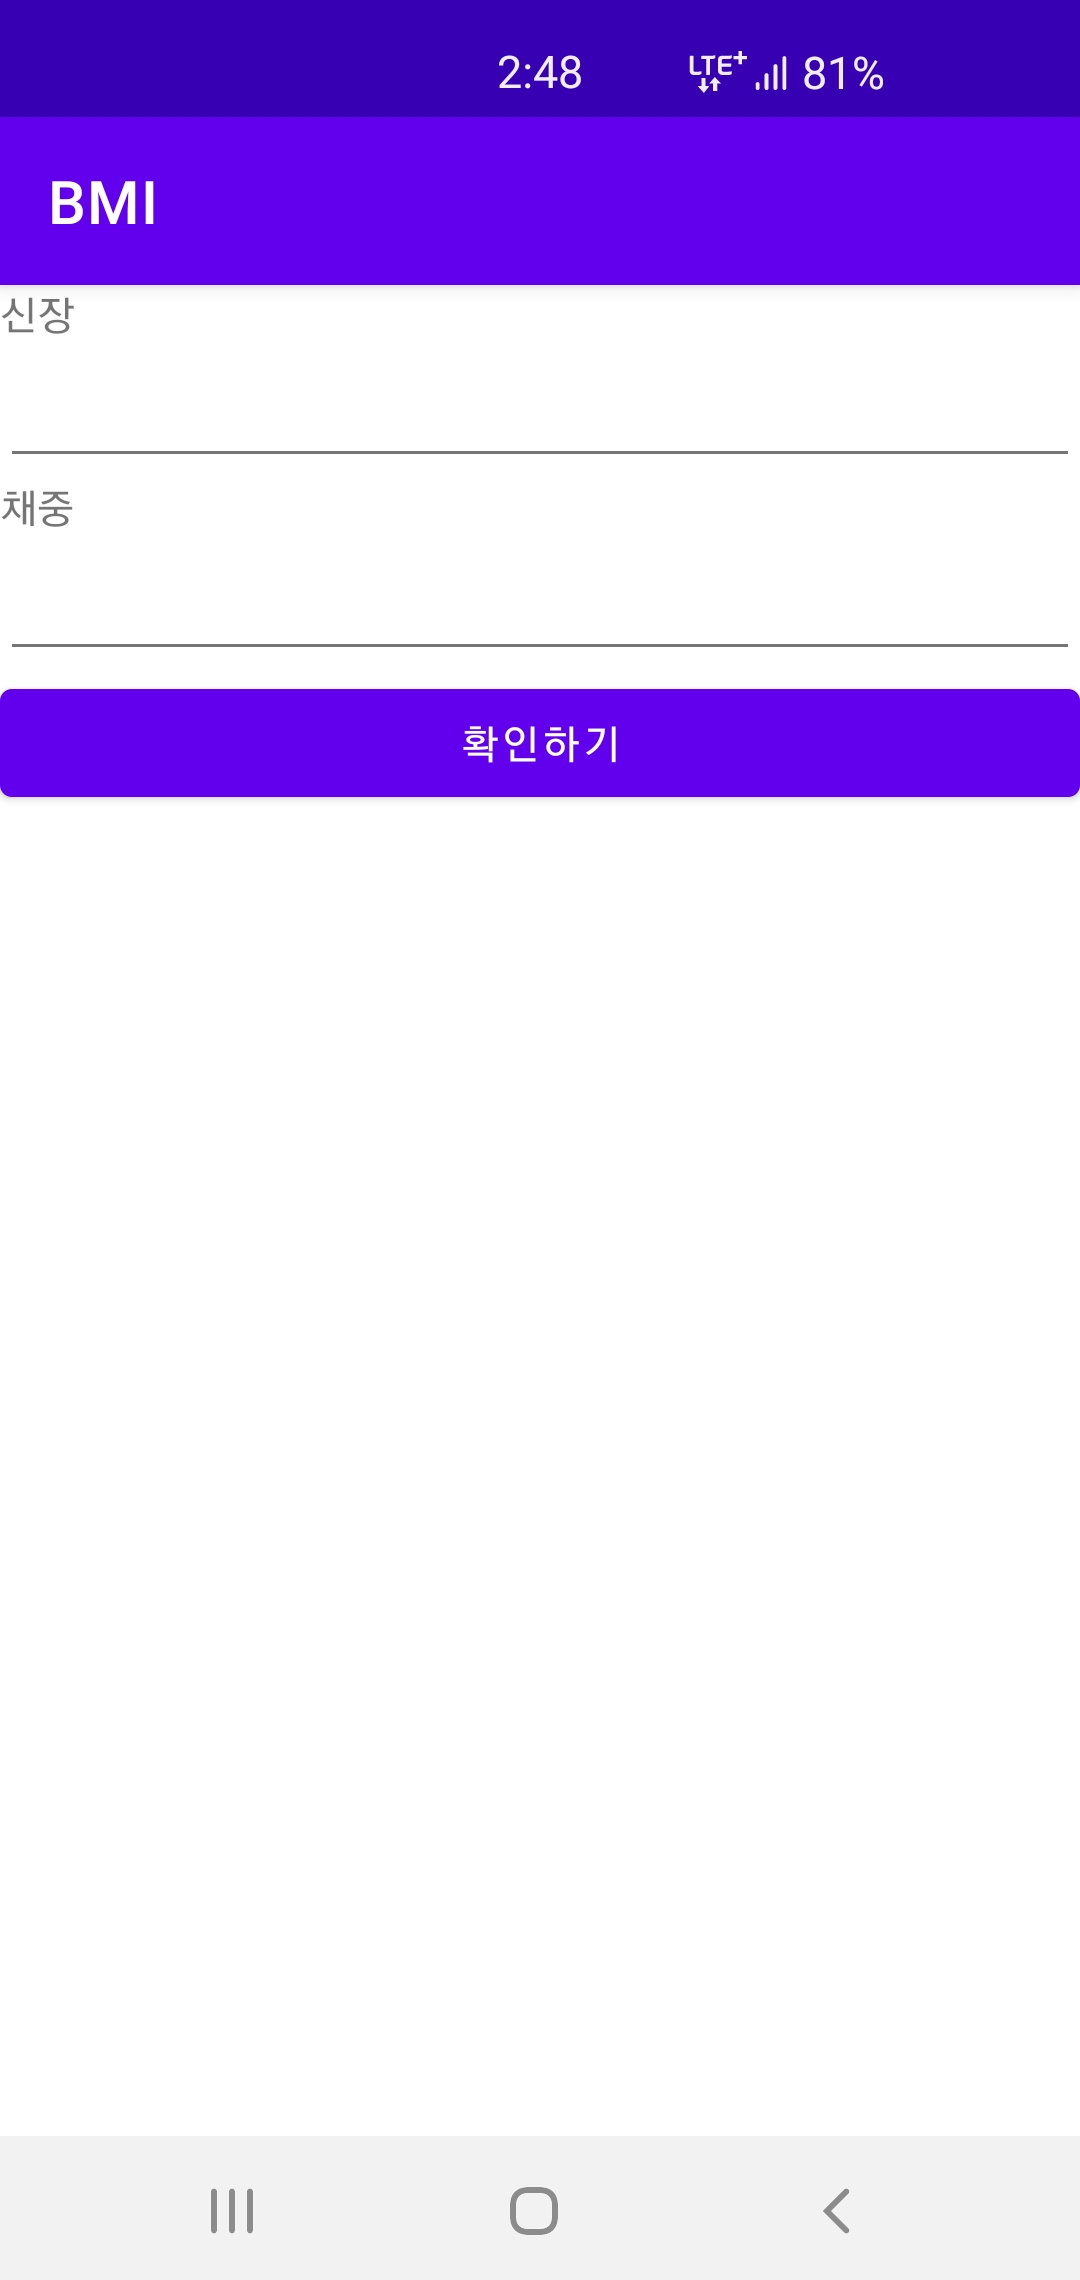
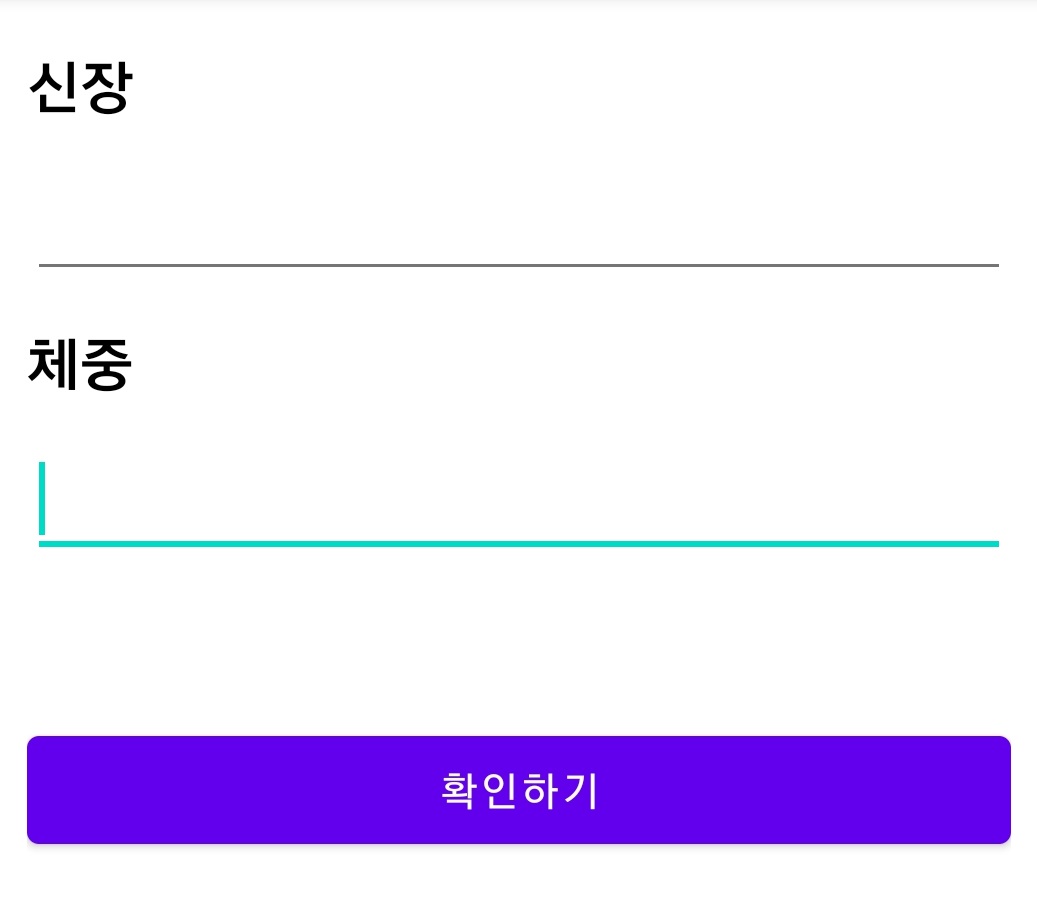
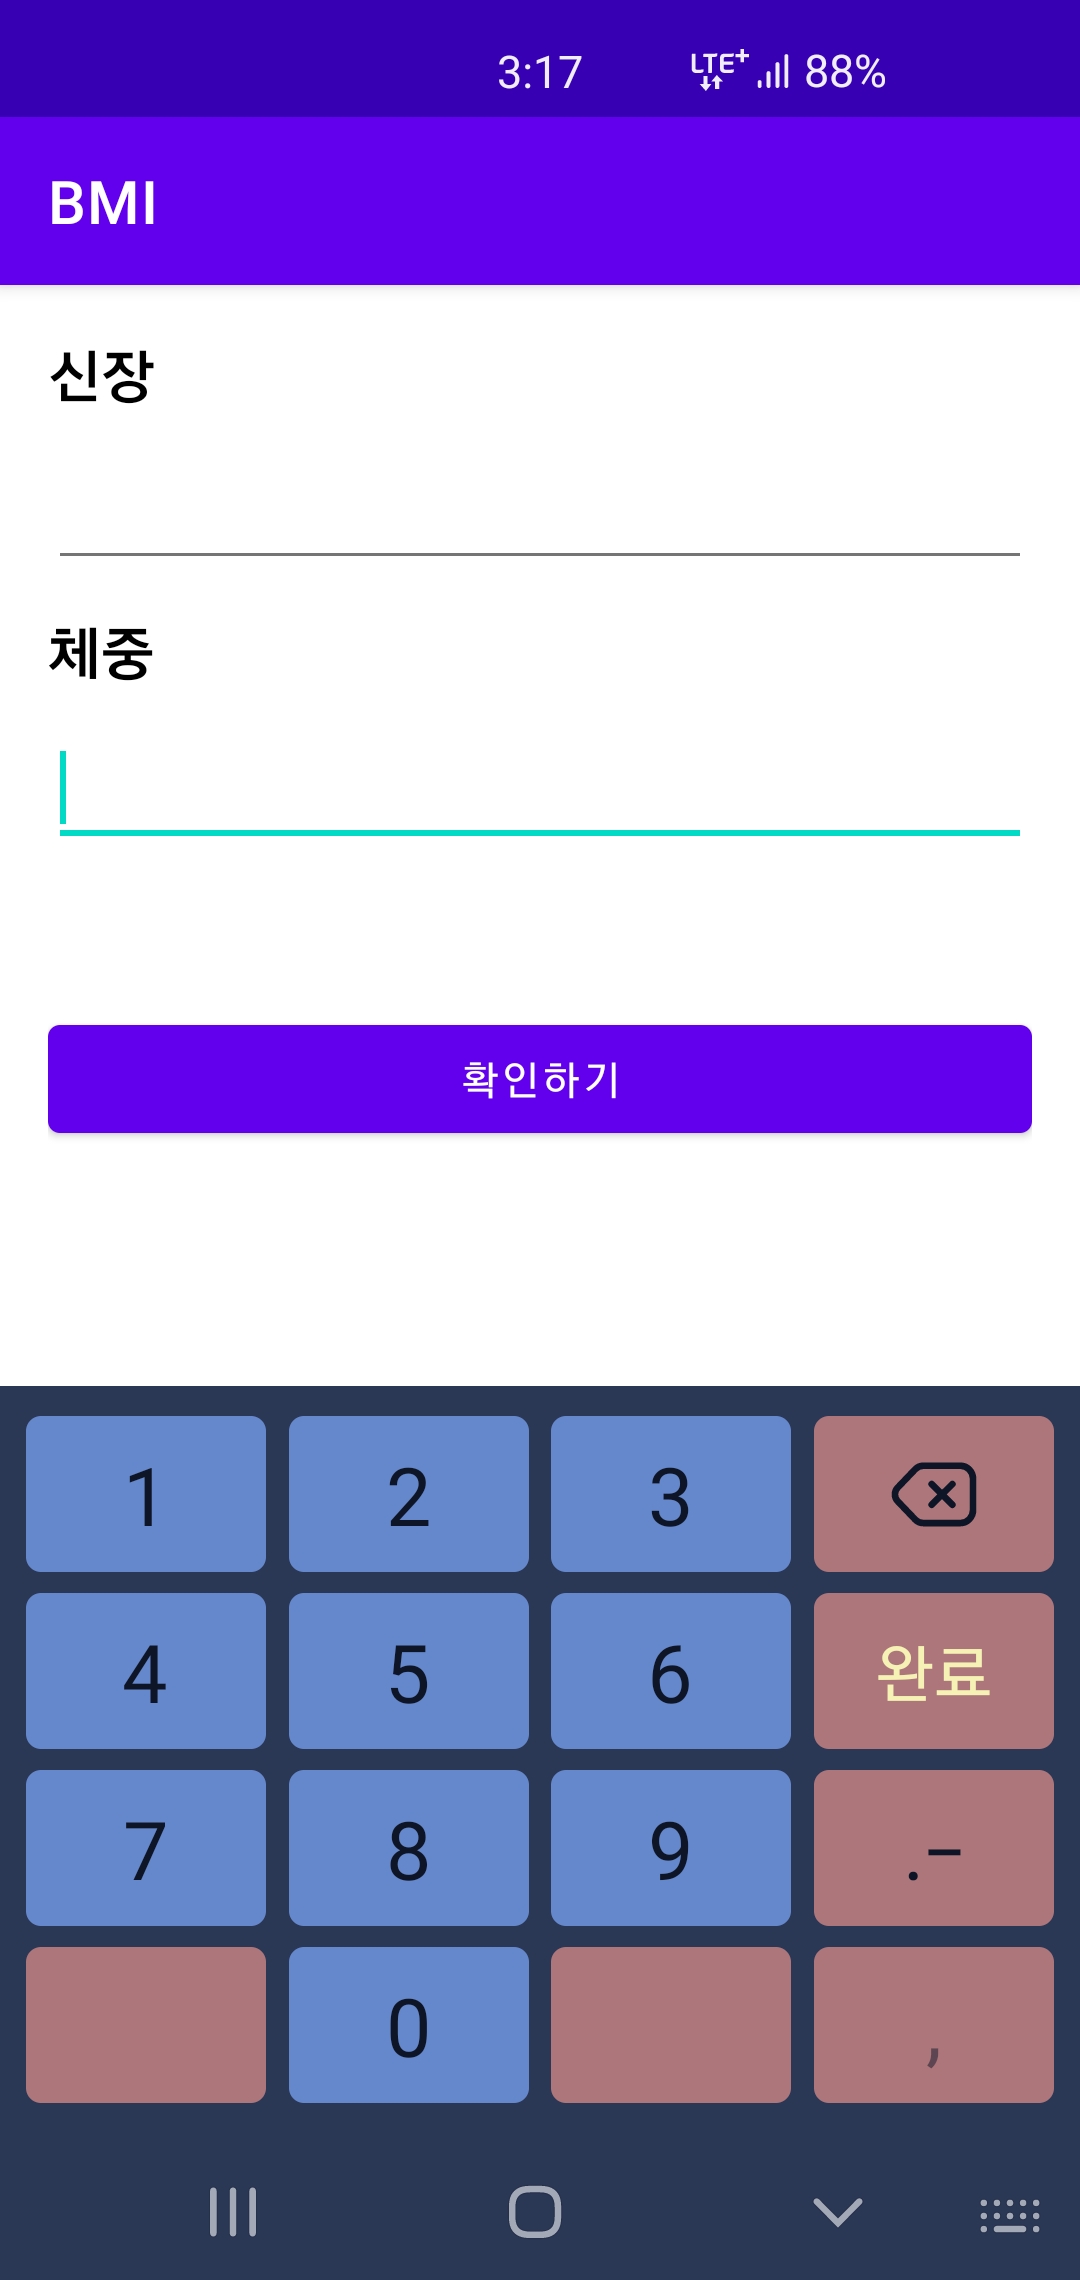
이런식으로 잘 실행된다!
Layout 속성으로 이쁘게 꾸미기
속성들만 그냥 사용하면 위의 사진처럼 이쁘지가 않기때문에 수정이 필요하다
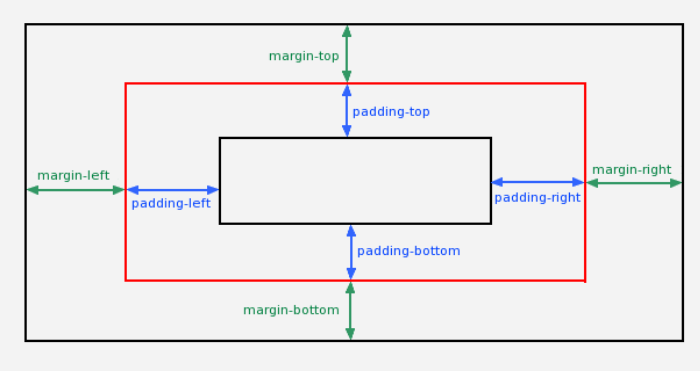
padding과 margin
 -stackoverflow출처-
margin - 마진은 위젯이 부모 레이아웃의 테두리로부터의 여백이다!
padding - 패딩은 윗에이 테두리로부터 위젯 안의 내용 사이의 여백이다!
빨간색이 위젯 검정색이 밖에있는 검정 테두리가 부모 레이아웃 안에있는 검정 테두리가 위젯안의 내용이다. 둘다 상하좌우를 따로따로 줄수있다.
size
dp - 해상도가 다른 화면에서 통합해서 따로 계산이 되서 적용이된다! 수치가
sp - text는 사용자가 핸드폰에서 text사이즈를 바꾸면 같이 바뀌게 할수있다. (사용자가 못바꾸게 고정시킬려면 dp를 사용하면된다)
color
컬러같은 경우는 android:textColor 를사용해서 지정해주는데 컬러값을 직접 입력해줘도 되고 아니면 values/colors.xml 파일에 있는 미리지정된 값(새로지정해줘도된다) 를 android:textColor="@color/black" 이렇게 사용해줄수 있다.
strings
text같은 경우 사용자가 android:text ="ㅇ서ㅐ뱓러" 이런식으로 직접입력해도되지만 공식적으로는 미리지정해둔 string값을 사용하는것을 권장한다.
values/string.xml 파일에 미리지정해서 쓸수있다.
미리 변수선언으로 쓰는게 재사용도 편하고 유지보수도 편하다!
<?xml version="1.0" encoding="utf-8"?>
<LinearLayout xmlns:android="http://schemas.android.com/apk/res/android"
    xmlns:app="http://schemas.android.com/apk/res-auto"
    xmlns:tools="http://schemas.android.com/tools"
    android:layout_width="match_parent"
    android:layout_height="match_parent"
    android:orientation="vertical"
    android:padding="16dp"
    tools:context=".MainActivity">

    <TextView
        android:textStyle="bold"
        android:layout_width="match_parent"
        android:layout_height="wrap_content"
        android:text="@string/height"
        android:textSize="20sp"
        android:textColor="@color/black"
        />
    <EditText
        android:layout_width="match_parent"
        android:layout_height="wrap_content"
        android:inputType="number"
        android:layout_marginTop="10dp"
        />
    <TextView
        android:textStyle="bold"
        android:textSize="20sp"
        android:layout_width="match_parent"
        android:layout_height="wrap_content"
        android:text="@string/weight"
        android:layout_marginTop="10dp"
        android:textColor="@color/black"
    />

    <EditText
        android:id="@+id/editTextNumber"
        android:layout_width="match_parent"
        android:layout_height="wrap_content"
        android:ems="10"
        android:inputType="number"
        android:layout_marginTop="10dp"
        />
    <Button
        android:text="@string/"
        android:layout_width="match_parent"
        android:layout_height="wrap_content"
        android:layout_marginTop="50dp"
        />

</LinearLayout>
약갼 변경된 xml 파일
 이런식으로 정갈하게 바뀐다. (다음에는 사진을조금 줄여서 올려야겠다)
계산 함수 만들기
MainActivity.kt 에서 xml에서 만들어놓은 textView나 버튼들을 사용하려면 걔네들에게 id가 부여되어있어야 id로 접근을 할수 있다.
id로 이름을 지정해주게 되면 R이라는 파일에 이름이 저장이된다.
R - 리소르를 저장해놓는 파일!
activity에서 view연결
class MainActivity : AppCompatActivity() {
    override fun onCreate(savedInstanceState: Bundle?) {
        super.onCreate(savedInstanceState)
        setContentView(R.layout.activity_main)

        val heightEditText: EditText = findViewById(R.id.txt_height)
        val weightEditText = findViewById<EditText>(R.id.txt_weight)
        val resultButton = findViewById<Button>(R.id.btn_result)
	}
이런식으로 일일이 불러와서 연결하는 식으로 강의에서는 알려주었지만 맨 처음 내용이여서 그런것같다. 나중에는 viewBinding을 이용해서 findById를 하지안아도 바로바로 연결해줄 수 있다.
Action 추가하기
버튼에 setOnClickListener()를 추가해준다.
실제로 결과버튼을 눌렀을때 일어나는 일들을 정의해줄수 있다.
Log 사용하기
Log를 띄워주는 함수
Log.d (debug시 띄우는 Log)
Log.d("MainActivitiy","버튼이 눌렸습니다")
앞의 MainActivity는 log의 태그이고 뒤는 log의 출력문이다. 태그를 이용해서 특정 log를 찾을수도 있다.
나중에 많이쓰니깐 잘 알아두잡
Log를 처음 선언하면 import가 되어있지 않기 때문에 alt+enter로 import해주자.
빈값 입력시 예외처리
class MainActivity : AppCompatActivity() {
    override fun onCreate(savedInstanceState: Bundle?) {
        super.onCreate(savedInstanceState)
        setContentView(R.layout.activity_main)

        val heightEditText: EditText = findViewById(R.id.txt_height)
        val weightEditText = findViewById<EditText>(R.id.txt_weight)
        val resultButton = findViewById<Button>(R.id.btn_result)

        resultButton.setOnClickListener {

            if(heightEditText.text.isEmpty() || weightEditText.text.isEmpty()){
                Toast.makeText(this, "빈값이있습니다.",Toast.LENGTH_SHORT).show()
                return@setOnClickListener
            }
            //이 아래로는 절대 빈 값이 절대 올수 없음.
            val height:Int = heightEditText.text.toString().toInt() //빈값이 들어오면 오류가 난다
            val weight:Int = weightEditText.text.toString().toInt()


        }
    }
}
위처럼 키나, 몸무게를 입력받았을때 입력값이 없으면 .toInt()를 수행할때 오류가 나서 어플이 꺼지게 된다.
따라서 위에서 값이 입력되어있지 않을때밑의 변수선언이 되지 않게 예외처리를 해줘야된다. isEmpty()는 값이 있는지 없는지 알려주는 함수이다.
키나 체중중 둘중 하나라도 빈값이 있으면 Toast 메세지를 띄워주고
return 으로 함수를 종료시킨다 이때 중요! return@setOnClickListenr 로 이 setOnClickListner 함수가 종료되는것을 특정지어줘야한다!!! 중중요중요
다른 activity에 BMI결과 띄워주기
신장과 체중을 입력받아서 BMI결과를 보여주는 화면은 다른 액티비티에서 구현하기 때문에 activity를 새로 만들고 그 액티비티의 화면에 해당하는 layout도 만들어주여야한다.
액티비티 전환
MainActivity에서 ResultActivity로 전화할때 Intent라는 것을 사용한다.
val intent= Intent(this,ResultActivity::class.java)
위와 같이 선언해주는데 this는 현재의 activity를 말하는 것이고 ResultActivity가 목표 activity이다
startActivity(intent)
startActivity 함수를 사용해서 Activity가 바뀌게 된다!.
하지만 activity가 AndroidManifest.xml에 추가되어있지 않으면 접근할 수 없다.
AndoridMainifest에 액티비티 추가해주기
 </activity>
        <activity android:name=".ResultActivity"/>
이런식으로 xml 파일에 추가해줘야된다!
Intent로 activity에 값전달해주기
intent가 넘어가면 다음 activity에서 onCreate에 intent가 전달이된다. 시간이
intent에 값을 담는 법
intent.putExtra("height",height)
이런식으로 intent에 값을 담는다. 앞의 "height"는 다음 activity에서 값을 호출할때 쓰는 name값이고 뒤에가 참조하는 키의 값이다.
MainActivity.kt
class MainActivity : AppCompatActivity() {
    override fun onCreate(savedInstanceState: Bundle?) {
        super.onCreate(savedInstanceState)
        setContentView(R.layout.activity_main)

        val heightEditText: EditText = findViewById(R.id.txt_height)
        val weightEditText = findViewById<EditText>(R.id.txt_weight)
        val resultButton = findViewById<Button>(R.id.btn_result)

        resultButton.setOnClickListener {

            if(heightEditText.text.isEmpty() || weightEditText.text.isEmpty()){
                Toast.makeText(this, "빈값이있습니다.",Toast.LENGTH_SHORT).show()
                return@setOnClickListener
            }
            //이 아래로는 절대 빈 값이 절대 올수 없음.
            val height:Int = heightEditText.text.toString().toInt() //빈값이 들어오면 오류가 난다
            val weight:Int = weightEditText.text.toString().toInt()

            val intent= Intent(this,ResultActivity::class.java)

            intent.putExtra("height",height)
            intent.putExtra("weight",weight)
            startActivity(intent)
        }
    }
}
intent로 값을 받는 법
val height= intent.getIntExtra("height",0)
intent.getInt(타입들)Extra로 받아오는데 키와 몸무게를 Int로 지정해줬기 때문에 IntExtra를 사용하고 "height"은 이전 actvitiy에서 지정해준 이름값을 0은 값이 넘어온게 없을때 저장해줄 default값을 말한다.
bmi 계산
val bmi = weight/ (height / 100.0).pow(2.0)
pow함수를 이용해서 계산한다. pow는 double의 값을 받기 때문에 100이아닌 100.0으로 나눠주자.
화면에 결과 보여주기
위에서 activity_result.xml 을 완성하지 만들지 않았기 때문에 만들어준다
tools:text="tools에서만보이는 txt" 앱을 실행하지 않고 결과가 어떤식으로 보여지는지 미리 알수있는 방법이다.
val resultValueTextView = findViewById(R.id.txt_bmi)
val resultStringTextView = findViewById(R.id.txt_result)
resultValueTextView.text = bmi.toString()
resultStringTextView.text = resultText
이런식으로 텍스트뷰를 지정해주고 .text를 이용해서 보여질 text를 설정한다. bmi는 double형태였기 때문에 toString을 해줘야된다.
ResultActivity.kt
class ResultActivity :AppCompatActivity(){
  override fun onCreate(savedInstanceState: Bundle?) {
      super.onCreate(savedInstanceState)
      setContentView(R.layout.activity_result)

      val height= intent.getIntExtra("height",0)
      val weight = intent.getIntExtra("weight",0)

      val bmi = weight/ (height / 100.0).pow(2.0)
      val resultText = when{
          bmi>= 35.0-> "고도 비만"
          bmi>= 30.0-> "중정도 비만"
          bmi>= 25.0-> "경도 비만"
          bmi>= 20.0-> "과제충"
          bmi>= 18.5-> "정상체중"
          else-> "저체중"
      }
      val resultValueTextView = findViewById<TextView>(R.id.txt_bmi)
      val resultStringTextView = findViewById<TextView>(R.id.txt_result)

      resultValueTextView.text = bmi.toString()
      resultStringTextView.text = resultText

  }
}
activity_result.xml
<?xml version="1.0" encoding="utf-8"?>
<LinearLayout xmlns:android="http://schemas.android.com/apk/res/android"
  xmlns:tools="http://schemas.android.com/tools"
  android:id="@+id/activity_result"
  android:layout_width="match_parent"
  android:layout_height="match_parent"
  android:orientation="vertical"
  android:gravity="center">

  <LinearLayout
      android:gravity="center"
      android:layout_width="match_parent"
      android:layout_height="wrap_content"
      android:orientation="horizontal">

      <TextView
          android:text="BMI : "
          android:layout_width="wrap_content"
          android:layout_height="wrap_content"/>
      <TextView
          android:id="@+id/txt_bmi"
          android:text=""
          android:layout_width="wrap_content"
          android:layout_height="wrap_content"
          tools:text="23.111"/>
  </LinearLayout>
  <LinearLayout
      android:gravity="center"
      android:layout_width="match_parent"
      android:layout_height="wrap_content"
      android:orientation="horizontal">

      <TextView
          android:text="결과는 : "
          android:layout_width="wrap_content"
          android:layout_height="wrap_content"/>
      <TextView
          android:id="@+id/txt_result"
          android:text=""
          android:layout_width="wrap_content"
          android:layout_height="wrap_content"/>
  </LinearLayout>
</LinearLayout>
android:gravity="center"
를 이용해서 레이아웃 안에있는 요소들을 정렬해준다.
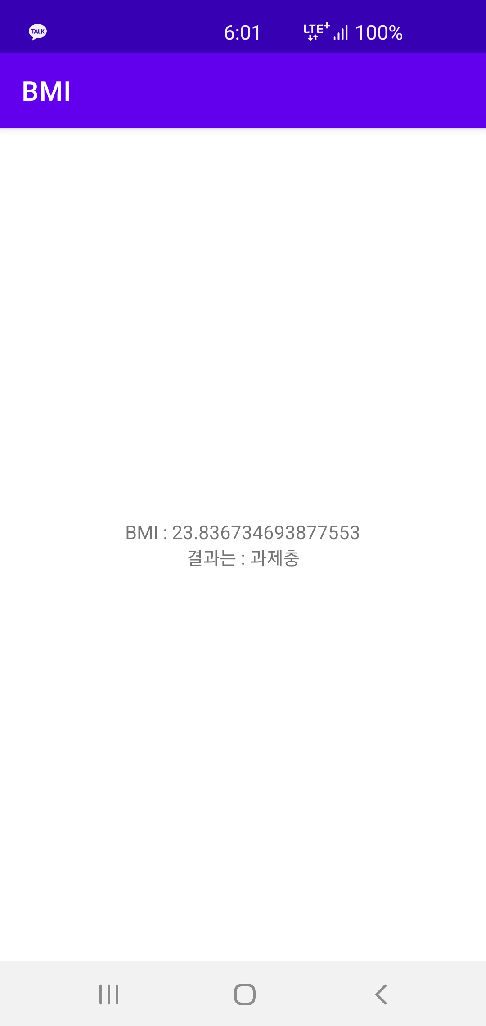
결과는 잘나온다!!!
새로 배운것
사실 졸프로 어플을 만들고있어서 대부분 아는내용이였지만 뭔가 혼자 공부했을때 생길수있는 구멍들을 매꾸고싶어서 다시공부하고 있다. 새로배웠다기보다는 제대로 알게된것들 !
sp - 글자크기 기정할때 sp를 사용하면 안드로이드 글꼴크기가 적용이 된다 !
padding과 margin의 차이
textview에서 inputType
다음 것도 화이팅~