
이번 챕터는 전자액자 앱을 만든다!
사진을 한장한장 사용자가 추가해서 사진을 액자형식으로 볼수 있는 전자액자를 만든다!
배우는 것
- 가로화면 그리기
- 사용자 권한 사용하기
- View Animation 사용
- Content Provider 사용하기 (핸드폰 저장 콘텐츠 접근) SAF 사용!
- 액티비티 생명주기
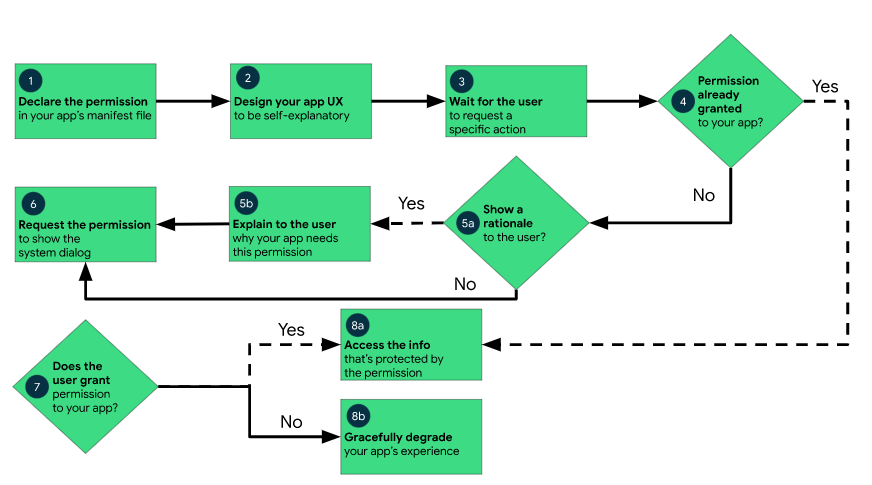
앱 권한요청 기능 워크 플로우이다. 공식문서링크
- 앱에 이미 권한이 부여되었는지 확인.
- 앱에 권한이 필요한 이유 설명
- 권한 요청
이런식의 흐름이 있다.
layout
acitivity_main.xml
<?xml version="1.0" encoding="utf-8"?>
<androidx.constraintlayout.widget.ConstraintLayout xmlns:android="http://schemas.android.com/apk/res/android"
    xmlns:app="http://schemas.android.com/apk/res-auto"
    xmlns:tools="http://schemas.android.com/tools"
    android:layout_width="match_parent"
    android:layout_height="match_parent"
    tools:context=".MainActivity">

    <Button
        android:id="@+id/btn_startFrameMode"
        android:layout_width="0dp"
        android:layout_height="wrap_content"
        android:text="전자액자 실행하기"
        app:layout_constraintBottom_toBottomOf="parent"

        app:layout_constraintEnd_toEndOf="parent"
        app:layout_constraintStart_toStartOf="parent" />

    <Button
        android:id="@+id/btn_addPhoto"
        android:layout_width="0dp"
        android:layout_height="wrap_content"
        android:text="사진 추가하기"
        app:layout_constraintBottom_toTopOf="@id/btn_startFrameMode"
        app:layout_constraintEnd_toEndOf="parent"
        app:layout_constraintStart_toStartOf="parent" />

</androidx.constraintlayout.widget.ConstraintLayout>
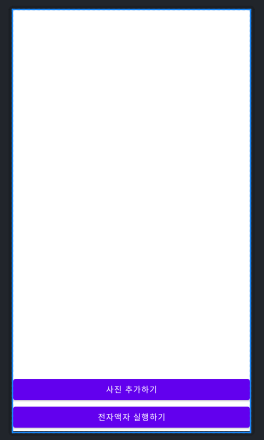
위와같이 화면밑에 사진추가하기와 액자모드 시작하기 버튼을 만들어 준다.
버튼 연결
MainActivity.kt
onCreate에 버튼을 초기화해주는 메소드를 만들어서 실행한다.
이런식으로 메소드로 만들어서 사용하는 이유는 onCreate에 메소드 형식이 아니라 전부 들어가있으면 찾기가 힘들기 때문!
메소드로 같은 기능을 하는 아이들을 감싸서 이름을 주어주고 메소드로 실행하면 어떤 기능을 수행하는지 한눈에 보기 쉽다!!
이런 과정을 코드 추상화라고 한다!
ContextCompat.checkSelfPermission()
권한이 있는지 없는지 확인 인자로는 context와 permission을 받는다.
shouldShowRequestPermissionRationale()
Permission을 인자로 받는 함수.
교육용 팝업을 띄우는 함수 true가 반환되면 교육용 팝업을 확인한다.
requestPermissions()
권한을 요청하는 함수 인자로는 string array를 받는다. array에있는 모든 권한을 요청한다. 두번째 인자로는 requestCode라는 값을 받는다. 추후에 배울 내용
showPermissionContextPopup()
권한이 없어서 필요할때 권한이 필요하다는 팝업창을 실행시켜주는 함수
AltertDialog를 이용한다. 앞에서 다룸! postive 버튼과 negative button에서 dialog와 which는 쓰이지 않기때문에 생략의 의미인 _ 로 대체 하였다.
Manifest에 권한설정
실제로 권한을 부여할려면 manifest에 정의를해줘야한다.
<uses-permission android:name="android.permission.READ_EXTERNAL_STORAGE"/>
    <application
        android:allowBackup="true"
애플리케이션 위에 위와같이 READ_EXTERNAL_STORAGE를 선언해준다.
예전에는 Manifest에 선언하는 것으로 어플을 다운받을때 권한을 부여받았지만 지금은 권한이 필요할때 부여받는것으로 바뀌었다!!
class MainActivity : AppCompatActivity() {

    private val addPhotoButton: Button by lazy {
        findViewById<Button>(R.id.btn_addPhoto)
    }

    private val startPhotoFrameModeButton: Button by lazy {
        findViewById<Button>(R.id.btn_startFrameMode)
    }

    override fun onCreate(savedInstanceState: Bundle?) {
        super.onCreate(savedInstanceState)
        setContentView(R.layout.activity_main)

        initAddPhotoButton()
        initStartPhotoFrameModeButton()
    }

    private fun initAddPhotoButton() {
        addPhotoButton.setOnClickListener {
            when {
                ContextCompat.checkSelfPermission(
                    this,
                    android.Manifest.permission.READ_EXTERNAL_STORAGE
                ) == PackageManager.PERMISSION_GRANTED -> {
                    //권한이 잘 부여되었을때
                }
                shouldShowRequestPermissionRationale(android.Manifest.permission.READ_EXTERNAL_STORAGE) -> {
                    showPermissionContextPopup()
                }
                else -> {
                    requestPermissions(
                        arrayOf(android.Manifest.permission.READ_EXTERNAL_STORAGE),
                        1000
                    )

                }
            }
        }
    }

    private fun showPermissionContextPopup() {
        //권한 팝업을 실행하는 함수
        AlertDialog.Builder(this).setTitle("권한이 필요합니다")
            .setMessage("전자액자 앱에서 사진을 불러오기 위해 권한이 필요합니다")
            .setPositiveButton("동의하기", { _, _ ->
                requestPermissions(
                    arrayOf(android.Manifest.permission.READ_EXTERNAL_STORAGE),
                    1000
                )
            })
            .setNegativeButton("취소하기", { _, _ -> })
            .create()
            .show()
    }

    private fun initStartPhotoFrameModeButton() {

    }
}
위와 같이만들면 사진 추가하기를 누르면 권한을 물어본다 !!
사진을 넣을 화면 만들기
activity_main.xml
사진을 최대로 6개를 넣을건데 리니어 레이아웃 2개를 사용해서 하나당 사진 3개를 넣는 layout을 만든다.
app:layout_constraintDiemsionRatio = "H,3:1"
을 이용해서 비율에 맞춘 layout을 만들수 있다.
H를 사용하면 높이가 가로의 3분의 1의 비율
W, 1:3 을 사용하면 같은 크기의 layout이 만들어진다.
리니어 레이아웃 안에는 3개의 ImageView를 추가하는데 width를 0dp로 주고 layout weight인 가중치를 모두 1로 주면 같은 크기로 알아서 나뉘어 진다.
android:scaleType= "centerCrop"
을 사용하면 ImageView에서 이미지를 알아서 잘라줘서 1대1의 비율이여도 이미지가 부자연스럽게 보여지지 않게 된다.
그리고 위에서 만든 LinearLayout을 복사하고 constraint와 ImageView Id들을 바꿔주자
<androidx.constraintlayout.widget.ConstraintLayout xmlns:android="http://schemas.android.com/apk/res/android"
    xmlns:app="http://schemas.android.com/apk/res-auto"
    xmlns:tools="http://schemas.android.com/tools"
    android:layout_width="match_parent"
    android:layout_height="match_parent"
    tools:context=".MainActivity">

    <LinearLayout
        android:id="@+id/firstRowLinearLayout"
        android:layout_width="0dp"
        android:layout_height="0dp"
        app:layout_constraintDimensionRatio="H,3:1"
        app:layout_constraintEnd_toEndOf="parent"
        app:layout_constraintStart_toStartOf="parent"
        app:layout_constraintTop_toTopOf="parent">

        <ImageView
            android:id="@+id/img_1"
            android:layout_width="0dp"
            android:layout_height="match_parent"
            android:layout_weight="1"
            android:scaleType="centerCrop" />

        <ImageView
            android:id="@+id/img_2"
            android:layout_width="0dp"
            android:layout_height="match_parent"
            android:layout_weight="1"
            android:scaleType="centerCrop" />

        <ImageView
            android:id="@+id/img_3"
            android:layout_width="0dp"
            android:layout_height="match_parent"
            android:layout_weight="1"
            android:scaleType="centerCrop" />
    </LinearLayout>

    <LinearLayout
        android:id="@+id/secondRowLinearLayout"
        android:layout_width="0dp"
        android:layout_height="0dp"
        app:layout_constraintDimensionRatio="H,3:1"
        app:layout_constraintEnd_toEndOf="parent"
        app:layout_constraintStart_toStartOf="parent"
        app:layout_constraintTop_toBottomOf="@id/firstRowLinearLayout">


        <ImageView
            android:id="@+id/img_21"
            android:layout_width="0dp"
            android:layout_height="match_parent"
            android:layout_weight="1"
            android:scaleType="centerCrop" />

        <ImageView
            android:id="@+id/img_22"
            android:layout_width="0dp"
            android:layout_height="match_parent"
            android:layout_weight="1"
            android:scaleType="centerCrop" />

        <ImageView
            android:id="@+id/img_23"
            android:layout_width="0dp"
            android:layout_height="match_parent"
            android:layout_weight="1"
            android:scaleType="centerCrop" />
    </LinearLayout>

    <Button
        android:id="@+id/btn_startFrameMode"
        android:layout_width="0dp"
        android:layout_height="wrap_content"
        android:text="전자액자 실행하기"
        app:layout_constraintBottom_toBottomOf="parent"

        app:layout_constraintEnd_toEndOf="parent"
        app:layout_constraintStart_toStartOf="parent" />

    <Button
        android:id="@+id/btn_addPhoto"
        android:layout_width="0dp"
        android:layout_height="wrap_content"
        android:text="사진 추가하기"
        app:layout_constraintBottom_toTopOf="@id/btn_startFrameMode"
        app:layout_constraintEnd_toEndOf="parent"
        app:layout_constraintStart_toStartOf="parent" />

</androidx.constraintlayout.widget.ConstraintLayout>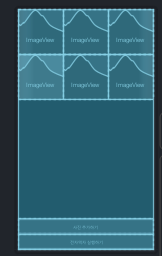
이처럼 layout이 생성이된다.
ImageView 6개 연결하기
MainActivity.kt 에
   private val imageViewList:List<ImageView> by lazy {
        mutableListOf<ImageView>().apply {
            add(findViewById(R.id.img_1))
            add(findViewById(R.id.img_2))
            add(findViewById(R.id.img_3))
            add(findViewById(R.id.img_21))
            add(findViewById(R.id.img_22))
            add(findViewById(R.id.img_23))
        }
    }
로 이미지뷰를 추가!
저번에 이어서 권한이 부여되었거나 되었을때의 상황에 대한 함수 제작!
onRequestPermissionResult()
override 하는 함수로 권한 request에 작동하는 함수이다.
위에서 지정해준 request코드는 1000임으로 이걸 활용하면 된다.
grantResults.isNotEmpty 이고 grantResult가 PERMISSION_GRANTED라면 권한의 부여가 잘된것이기 때문에 이때 갤러리에서 사진을 선택하는 함수를 실행해준다. (함수 만들어야 된다!)
navigatePhotos()
intent를 선언해준다. 이때 Intent는 ACTION_GET_CONTENT를 사용.
이는 SAF기능을 사용해서 컨텐츠를 가져오는 액티비티를 실행한다.
intent의 type은 이미지로!
그리고 startActivityForResult(intent, 2000) 2000은 requestCode로 SAF기능을 실행시킨다.
앱을 실행한다음에 권한을 부여하면 사진들을 접근할수 있다 !!

MainActivity.kt
package com.example.digital_frame

import android.content.Intent
import android.content.pm.PackageManager
import android.media.Image
import androidx.appcompat.app.AppCompatActivity
import android.os.Bundle
import android.widget.Button
import android.widget.ImageView
import android.widget.Toast
import androidx.appcompat.app.AlertDialog
import androidx.core.content.ContextCompat


class MainActivity : AppCompatActivity() {

    private val addPhotoButton: Button by lazy {
        findViewById<Button>(R.id.btn_addPhoto)
    }

    private val startPhotoFrameModeButton: Button by lazy {
        findViewById<Button>(R.id.btn_startFrameMode)
    }

    private val imageViewList: List<ImageView> by lazy {
        mutableListOf<ImageView>().apply {
            add(findViewById(R.id.img_1))
            add(findViewById(R.id.img_2))
            add(findViewById(R.id.img_3))
            add(findViewById(R.id.img_21))
            add(findViewById(R.id.img_22))
            add(findViewById(R.id.img_23))
        }
    }

    override fun onCreate(savedInstanceState: Bundle?) {
        super.onCreate(savedInstanceState)
        setContentView(R.layout.activity_main)

        initAddPhotoButton()
        initStartPhotoFrameModeButton()
    }

    private fun initAddPhotoButton() {
        addPhotoButton.setOnClickListener {
            when {
                ContextCompat.checkSelfPermission(
                    this,
                    android.Manifest.permission.READ_EXTERNAL_STORAGE
                ) == PackageManager.PERMISSION_GRANTED -> {
                    //권한이 잘 부여되었을때
                    navigatePhotos()

                }
                shouldShowRequestPermissionRationale(android.Manifest.permission.READ_EXTERNAL_STORAGE) -> {
                    showPermissionContextPopup()
                }
                else -> {
                    requestPermissions(
                        arrayOf(android.Manifest.permission.READ_EXTERNAL_STORAGE),
                        1000
                    )

                }
            }
        }
    }

    override fun onRequestPermissionsResult(
        requestCode: Int,
        permissions: Array<out String>,
        grantResults: IntArray
    ) {
        super.onRequestPermissionsResult(requestCode, permissions, grantResults)
        when (requestCode) {
            1000 -> {
                if (grantResults.isNotEmpty() && grantResults[0] == PackageManager.PERMISSION_GRANTED) {
                    //권한이 부여가되었다.
                    navigatePhotos()
                } else {
                    Toast.makeText(this, "권한을 거부하셧습니다.", Toast.LENGTH_SHORT).show()
                }
            }
                else -> {
                    //
                }
            }
        }
    private fun navigatePhotos(){
        val intent = Intent(Intent.ACTION_GET_CONTENT)
        intent.type = "image/*"
        startActivityForResult(
            intent,
            2000
        )
    }


    private fun showPermissionContextPopup() {
        //권한 팝업을 실행하는 함수
        AlertDialog.Builder(this).setTitle("권한이 필요합니다")
            .setMessage("전자액자 앱에서 사진을 불러오기 위해 권한이 필요합니다")
            .setPositiveButton("동의하기", { _, _ ->
                requestPermissions(
                    arrayOf(android.Manifest.permission.READ_EXTERNAL_STORAGE),
                    1000
                )
            })
            .setNegativeButton("취소하기", { _, _ -> })
            .create()
            .show()
    }

    private fun initStartPhotoFrameModeButton() {

    }
}
SAF란?
SAF는 Storage Access Framework로 안드로이드 킷켓 이상의 버전부터 지원한다!
공식문서링크
공식문서에 따르면 SAF가 제공하는 기능은
- 사용자가 하나의 앱뿐만이아니라 모든 문서 제공자에서 콘텐츠를 탐색 가능
- 앱이 문서 제공자가 소유한 문서에 장기적, 지속적 액세스 권한을 가질수 있다. 이 권한을 통해 사용자가 제공자에서 파일을 추가, 편집, 저장 및 삭제 가능
- 여러 개의 사용자 계정을 지원, USB저장소 제공자와 같은 임시 루트도 지원 !
아무튼 사용자가 선호하는 문서 저장소 제공자 전체에서, 문서, 이미지 등 각종 다른 파일을 탐색하고 여는 작업을 간편하게 해주는 개꿀~기능이라고 볼 수 있다.!
새로 배운것
권한 설정
shouldShowRequestPermissionRationale() 함수
requestPermissions() 함수
showPermissionContextPopup() 함수등을 이용해서 권한을 부여할 것인지 확인한거나 권한이있는지 확인가능 하다.
또한 override fun onRequestPermissionsResult() 함수로
어떠한 권한이 부여가 되었는지 아닌지를 확인할수있고 그에따른 상황을 정의할 수 있다.
처음이라...어렵다 이건 여러번 해보면서 감을 잡자!!
Linear Layout 비율
app:layout_constraintDiemsionRatio = "H,3:1"
이런식으로 가로세로 layout의 비율을 정할수 있다.
Image View 이미지 비율
android:scaleType= "centerCrop" 를 사용해서 1대1 비율로 비율이 다른 이미지를 잘라서 보여준다. 다른값들도 있으니 천천히 적용해보자
SAF !
뭔가 추후에도 굉장히 많이 쓸것같은 좋은 기능인것 같다.
internal storage에 권한이 있을때
val intent = Intent(Intent.ACTION_GET_CONTENT)
        intent.type = "image/*"
        startActivityForResult(
            intent,
            2000
        )
Intent.ACTION_GET_CONTENT와 startActivityForResult를 사용해서 갤러리 같은 형식의 저장소에 접근을 할 수 있다.
이 저장소에 접근해서 사진을을 어떻게 다시 어플에서 보여주고 이런거는 다음 챕터에서!!
시험이 끝나고 졸업프로젝트 하고 그러느라 강의는 꾸준히 못듣고 있는데 다시 열심히 들어야겠다 !