공부했던 걸 기록하는 차원에서 Windows에서 제공하는 유저 동기화 객체인 CRITICAL_SECTION과 SRW_LOCK의 동작 방식에 대해 간단히 알아봄.
※ 개인적인 생각이 추가되어 정확하지 않은 정보일 수 있다.
테스트
- 스레드 2개를 실행시킨 상황에서 서로 Enter / Leave , 상황에 따라 스레드 pause
#include <iostream>
#include <Windows.h>
#include <thread>

CRITICAL_SECTION g_cs;

void Test()
{
	EnterCriticalSection(&g_cs);
	Sleep(2000);
	LeaveCriticalSection(&g_cs);
}
int main()
{
	InitializeCriticalSection(&g_cs);

	EnterCriticalSection(&g_cs);
	std::thread t1 = std::thread(Test);

	Sleep(10000);

	LeaveCriticalSection(&g_cs);

	if (t1.joinable())
		t1.join();

	DeleteCriticalSection(&g_cs);


}
CRITICAL_SECTION 구조체 구성
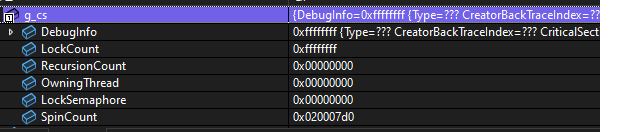
typedef struct _RTL_CRITICAL_SECTION {
    PRTL_CRITICAL_SECTION_DEBUG DebugInfo;

    //
    //  The following three fields control entering and exiting the critical
    //  section for the resource
    //

    LONG LockCount;
    LONG RecursionCount;
    HANDLE OwningThread;        // from the thread's ClientId->UniqueThread
    HANDLE LockSemaphore;
    ULONG_PTR SpinCount;        // force size on 64-bit systems when packed
} RTL_CRITICAL_SECTION, *PRTL_CRITICAL_SECTION;
# InitializeCriticalSection
- 내부에서 사용하는 값에 대한 초기화
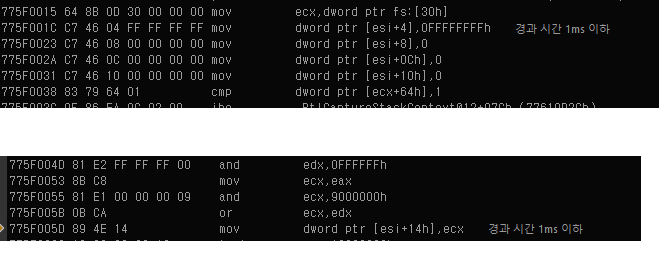
LockCount와 SpinCount를 변경한 뒤 DebugInfo값까지 0xffffffff로 초기화한다. (Debug값 변경은 스크린 샷에 없음)
EnterCriticalSection
스레드가 처음 진입했을 때
- lock btr 명령어를 통해 0번 비트를 0으로 변경한 후 이전 값을 test
(LockCount의 0번째 비트를 0으로 만들고 변경 전 값을 비교) - 해당 스레드가 소유권을 가지면 owner를 세팅한다.
- 해당 RecursionCount (재귀 횟수)를 1증가시킨다 (0->1)
- 리턴
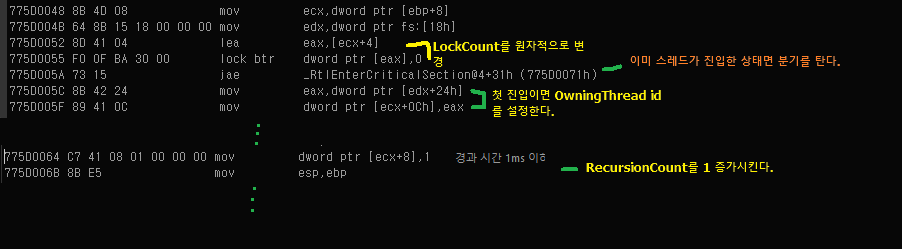
해당 크리티컬 섹션이 사용중일 때 진입하는 경우
-
lock btr 명령어를 통해 0번 비트를 0으로 변경한 후 이전 값을 test -> 위의 그림에서 jae분기를 탄다. (주황색 부분)
-
분기를 타서 현재 CS에 현재 진입한 스레드가 CS를 소유한 스레드와 동일한지 확인하는 작업을 한다.
2-1 (동일할 때) -> CS의 RecursionCount만 1로 증가시키고 종료한다.
2-2 (동일하지 않을 때) -> 다른 스레드가 진입을 시도하려고 하는 것이기 때문에 다른 로직으로 분기를 탄다.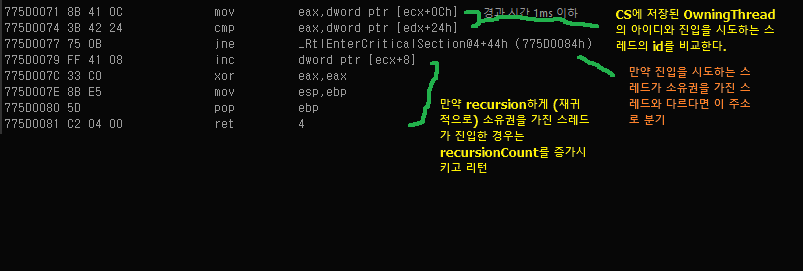
-
RtlpEnterCriticalSectionContended를 함수를 호출..
정확히는 모르겠지만 저장된 SpinCount를 이용해 상단부 / 하단부를 나눠서 eax / ebx에 저장하고 작업을 한다.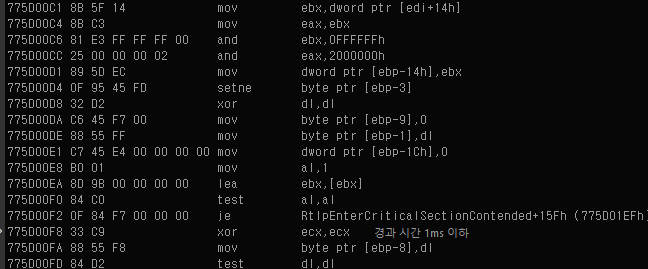
- 일정 횟수만큼 반복하면서 LOCK을 획득하려는 시도를 한다.(이 당시 spin횟수 0x81)
이 경우에 lock을 획득하게 되면 CS의 정보를 현재 스레드 기준으로 설정해준다.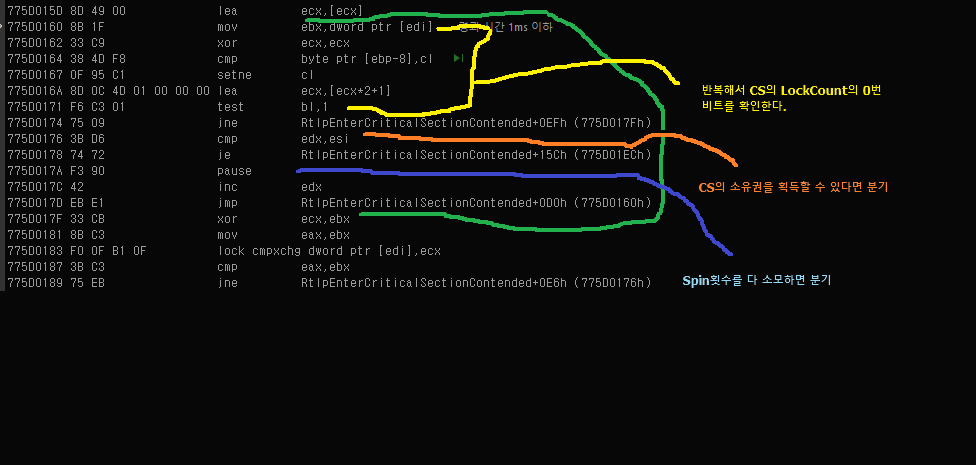
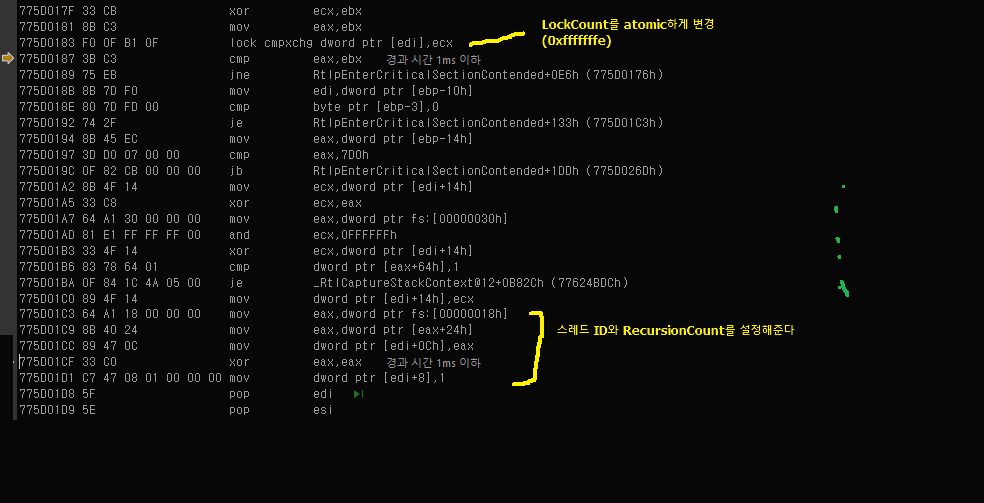
4-2 Spin횟수를 다 소모했음에도 lock을 획득할 수 없는 상태.
RtlWaitOnCriticalSection 함수 내부에서
RtlpWaitOnAddressWithTimeOut 함수 -> _NTWaitForAlertByThreadId (시스템콜) 호출.

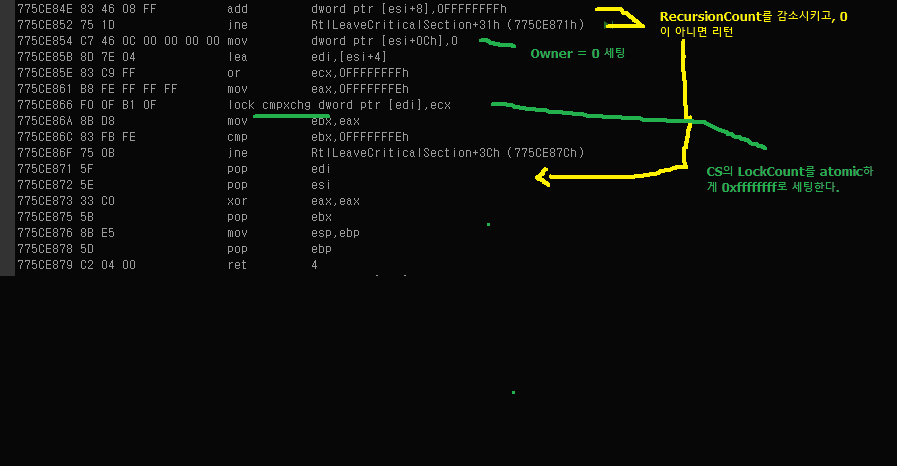
LeaveCriticalSection
-
CS의 RecusionCount를 1감소시키고 0이 아니라면 리턴한다.
-
CS의 스레드 ID를 0으로 초기화하고, atomic하게 LockCount를 0xffffffff로 변경한 후 리턴.
Windows 8 이후의 Windows에서는 세마포어가 아닌 WaitForAddress 방식을 사용한다.라고 알고 있다.
https://learn.microsoft.com/ko-kr/windows/win32/api/synchapi/nf-synchapi-waitonaddress
