

AOP는 왜 필요할까?
객체마다 보안, 로깅, 트랜잭션 등 특정한 기능을 구현한다면 너무나 많은 중복이 발생한다. 핵심 비즈니스 로직에 다양한 관점의 로직을 추가하게 되면 코드가 복잡해지고, 유지보수하기 어려워진다.
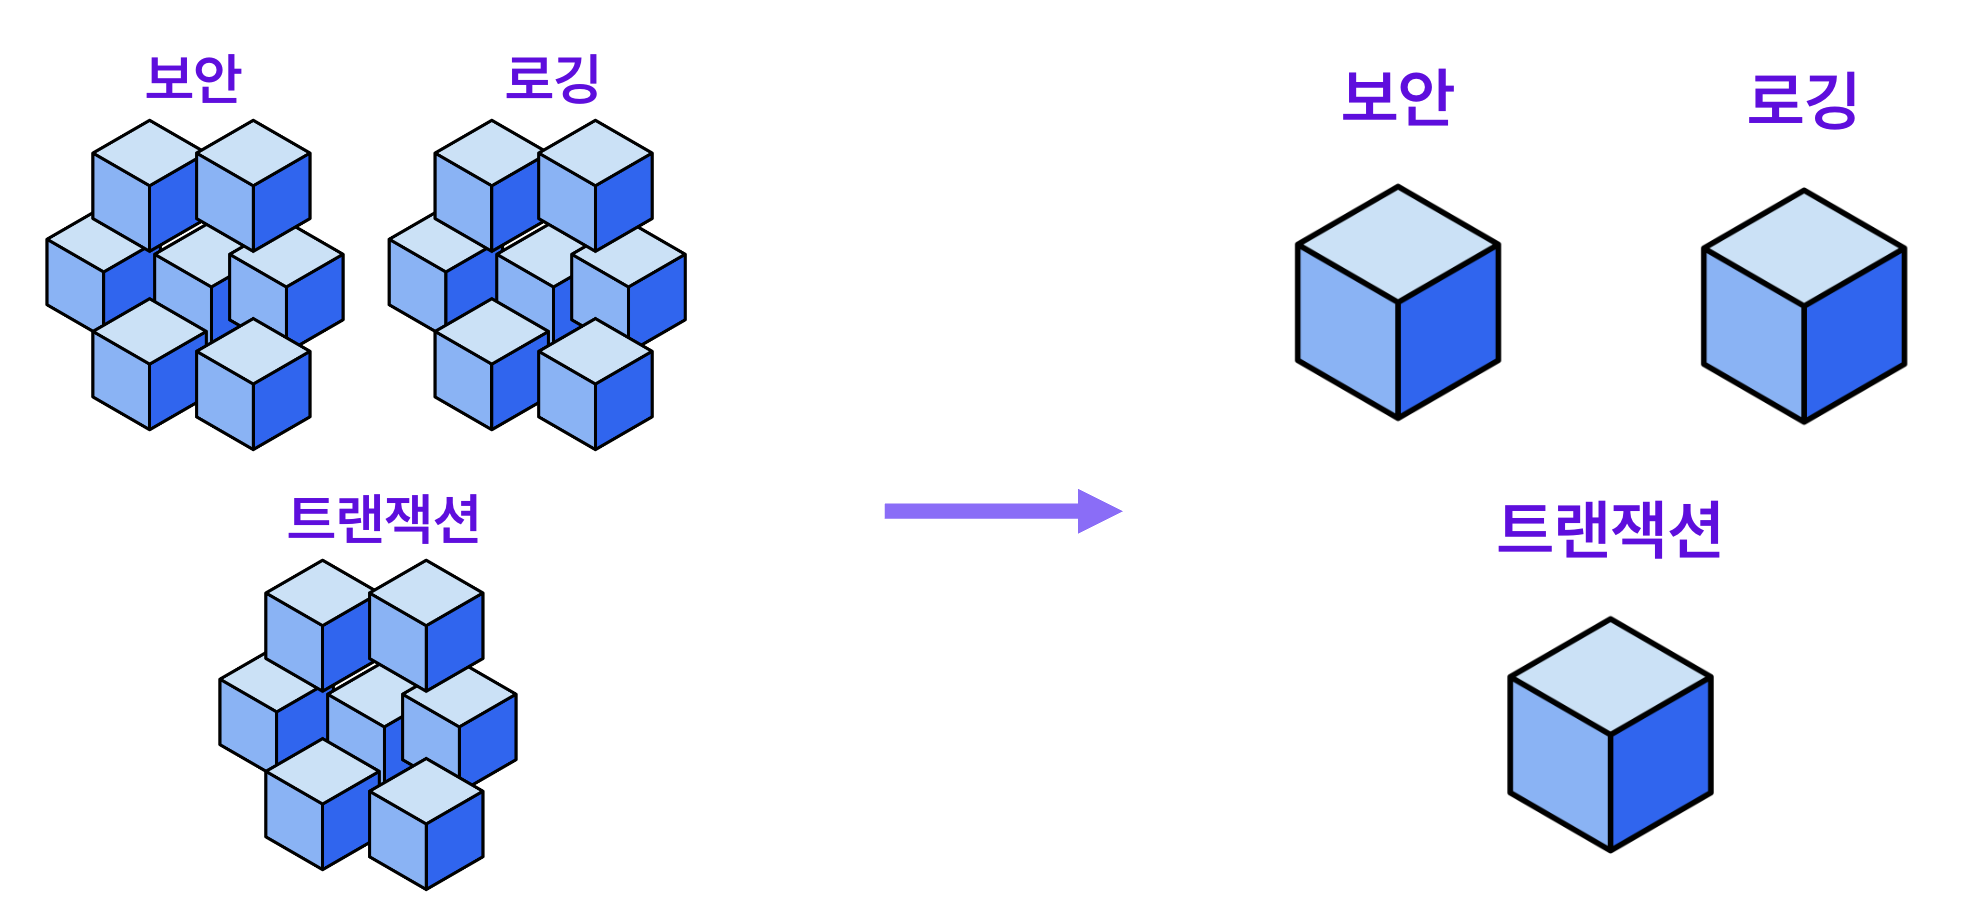
- AOP(Aspect Oriented Programming)는 관점 지향 프로그래밍을 통해 애플리케이션에서 공통 기능을 모듈화하는 기술이다. 이는 핵심 비즈니스과 별개로 부가적인 관점(보안, 로깅, 트랙잭션, ...)을 별도의 로직으로 분리하여 코드의 중복을 줄인다. 이를 흩어진 관심사(Crosscutting Concern)라고 한다.
- 대표적 프레임워크로 Spring AOP와 AspectJ가 있다. Spring AOP는 프록시 기반으로 대상 객체를 감싸서 해당 객체 실행 전후에 특정 작업을 하는 방식이다. 반면 AsepctJ는 컴파일 시점에 특정 작업을 하도록 제어할 수 있기에 좀 더 다양한 기능을 지원할 수 있다. 하지만 그만큼 복잡하다. 여기서는 Spring AOP에 대해 알아보도록 한다.
1. AOP 핵심 개념
1) Aspect
- Aspect는 관점을 의미하며, 다양한 모듈에서 공통으로 사용할 수 있는 기능을 모듈화한 것이다. @Aspect를 사용하여 해당 기능을 구현한 코드(Advice)와 해당 기능이 적용될 위치(Pointcut)을 정의한다.
2) JoinPoint
- JoinPoint는 Advice가 적용되는 지점을 말한다. Spring AOP에서는 joinPoint를 통해 특정 기능을 구현한 클래스 또는 메서드에 대한 정보를 얻을 수 있으며 대상 메서드를 호출(proceed)할 수 있다.
3) Advice
- JoinPoint에서 실제로 실행되는 코드 조각을 말한다. 특정 JoinPoint에서 실행되어야 할 코드를 명시한다.
- Advice는 아래 5가지 어노테이션을 제공한다. 동작순서는 다음과 같다.
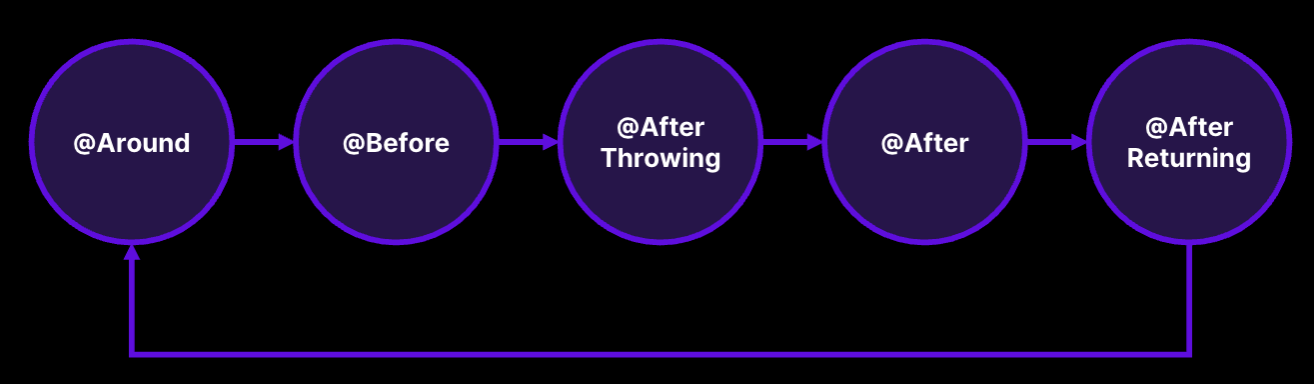
(1) @Before
- JoinPoint가 실행하기 전에 동작한다.
- 입력값 자체는 조작이 불가능하지만 setter와 같은 수정 함수가 있다면 가능하다.
(2) @After
- JoinPoint가 실행된 후에 동작한다.
- JoinPoint 상태(정상 or 예외 상황)와 무관하게 동작한다.
(3) @AfterReturning
- JoinPoint가 정상적으로 완료된 후에 동작한다.
- 반환값 자체를 직접 변경하는 것은 불가능하지만, setter와 같은 수정 함수가 있다면 반환값이 참조하는 객체의 상태를 변경할 수 있다.
(4) @AfterThrowing
- 실제 target Method가 예외를 던지는 경우 동작한다. 예외는 조작이 불가능하다.
(5) @Around
- 지금까지 언급한 4가지 annotation을 모두 포함한다. JoinPoint를 여러 번 실행할 수 있다.
4) Pointcut
- Pointcut은 Advice가 적용될 위치(JoinPoint)를 결정하는 기능이다. Pointcut은 execution, annotation, within, args, target, bean으로 지정될 수 있다. 가장 많이 쓰이는 Execution과 Annotation에 대해 알아본다.
(1) Execution
execution(modifiers-pattern? ret-type-pattern declaring-type-pattern?name-pattern(param-pattern) throws-pattern?)
- 접근제어자, 반환타입, 메소드 선언 타입, 메소드 이름, 메소드 파라미터 타입, 메소드에서 발생시킬 수 있는 예외타입을 지정할 수 있다.
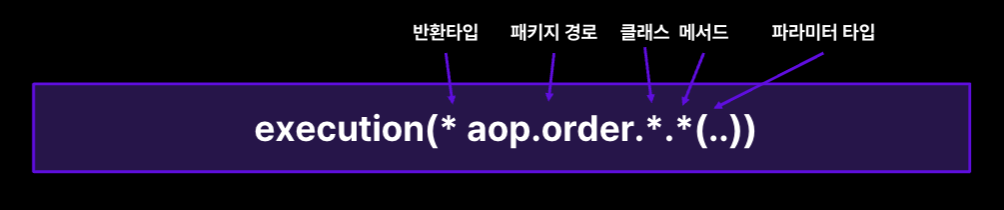
- 모든 반환 타입 허용과 aop.order 패키지에 있는 모든 클래스의 모든 메서드를 허용한다. 그 메서드의 파라미터 타입과 파미터 수와 상관없이 적용 가능하다. 모든 파라미터 타입을 나타낼 때는 ..을 쓴다.
- 파라미터 타입에 (,)로 선언하여 2개의 인자를 갖는 메서드를 호출할 수 있다.
(2) Annotation
@Pointcut("@annotation(com.example.Loggable)")- 사용자 정의 annotation을 생성하여 해당 Aspect클래스에서 annotation 기반 Pointcut을 적용한다. 이는 해당 어노테이션(@Loggable) 어노테이션이 적용된 모든 메서드를 Pointcut 대상으로 손쉽게 지정할 수 있다.
2. AOP 적용하기
1) 간단한 서비스
- 먼저 AOP를 적용하기 위해 간단한 서비스를 구현한다. AdditionalService는 start부터 end까지 더해준다.
@Service
@Slf4j
public class AddtionService {
    private final AdditionStrategy additionStrategy;

    public AddtionService(AdditionStrategy additionStrategy) {
        this.additionStrategy = additionStrategy;
    }

    public int executeAddition(int start, int end) {
        return additionStrategy.addNumbers(start, end);
    }
}- 해당 서비스는 AddtionalStrategy를 선택할 수 있다. 이를 구현한 클래스로는 LoopAddtionalStrategy(For문 덧셈), RecursiveAddtionalStrategy(재귀 덧셈)이 있다. 클라이언트에서 선택한 전략으로 인스턴스를 만들 수 있도록 빈으로 등록한다.
public interface AdditionStrategy {
    int addNumbers(int start, int end);
}
@Component
@Primary
public class LoopAdditionStrategy implements AdditionStrategy {
@Override
public int addNumbers(int start, int end) {
int ret = 0;
for (int i = start; i <= end; ++i) {
ret += i;
}
return ret;
}
}
@Component
public class RecursiveAddtionStrategy implements AdditionStrategy {
@Override
public int addNumbers(int start, int end) {
if (start > end) {
return 0;
}
return start + addNumbers(start + 1, end);
}
}@Configuration
public class AppConfig {
@Bean
public AdditionService loopAdditionService(LoopAdditionStrategy loopAdditionStrategy) {
return new AdditionService(loopAdditionStrategy);
}
@Bean
public AdditionService recursiveAdditionService(RecursiveAddtionStrategy recursiveAddtionStrategy) {
return new AdditionService(recursiveAddtionStrategy);
}
}- AdditionService의 executeAddtion을 테스트한다.
@SpringBootTest
class AopTestApplicationTests {

    @Autowired
    private AdditionService loopAdditionService;

    @Autowired
    private AdditionService recursiveAdditionService;

    @Test
    void executeAdditionTest() {
        int ret1 = loopAdditionService.executeAddition(0, 10);
        int ret2 = recursiveAdditionService.executeAddition(0, 10);

        Assertions.assertThat(ret1).isEqualTo(55);
        Assertions.assertThat(ret2).isEqualTo(55);
    }
}
생성자로 직접 주입하게 되면 Junit5가 @SpringBootTest 어노테이션으로 스프링에 등록된 빈을 가져오는 과정에서 어떤 빈을 가져올 지 몰라 ParameterResolutionException에러가 발생한다. @Autowired로 스프링에 직접 빈을 등록해 주었다.
2) 로깅 AOP 적용하기
테스트는 성공하지만, loopAdditionalService가 LoopAddtionalStrategy의 addNumbers를 호출했는지 미심쩍을 수 있다. 객체마다 로그를 찍어볼 수도 있겠지만, AOP를 적용하면 하나의 관점만 정의하면 된다. 로깅이라는 관점을 여러 객체에서 사용하면 되기 때문이다.
@Aspect
@Component
@Slf4j
public class LoggingAspect {

    @Pointcut("execution(* com.core.*.addNumbers(*,*))")
    private void targetMethod() {};

    @Before("targetMethod()")
    public void logBefore(JoinPoint joinPoint) {
        log.info("[메서드 호출 전] 호출 클래스: " + joinPoint.getTarget().getClass().getSimpleName());
        log.info("[메서드 호출 전] 호출 메서드: " + joinPoint.getSignature().getName());
    }

    @After("targetMethod()")
    public void logAfter(JoinPoint joinPoint) {
        log.info("[메서드 호출 후] 호출 메서드: " + joinPoint.getSignature().getName());
    }
}- @Before, @After를 사용해서 Join Point 실행하기 전과 후에 특정 동작을 정의할 수 있다.
// 실행 결과
INFO 10661 --- [    Test worker] com.core.LoggingAspect     : [메서드 호출 전] 호출 클래스: LoopAdditionStrategy
INFO 10661 --- [    Test worker] com.core.LoggingAspect     : [메서드 호출 전] 호출 메서드: addNumbers
INFO 10661 --- [    Test worker] com.core.LoggingAspect     : [메서드 호출 후] 호출 메서드: addNumbers
INFO 10661 --- [    Test worker] com.core.LoggingAspect     : [메서드 호출 전] 호출 클래스: RecursiveAddtionStrategy
INFO 10661 --- [    Test worker] com.core.LoggingAspect     : [메서드 호출 전] 호출 메서드: addNumbers
INFO 10661 --- [    Test worker] com.core.LoggingAspect     : [메서드 호출 후] 호출 메서드: addNumbers
3) 시간 측정 AOP 적용하기
@Aspect
@Component
@Slf4j
public class TimeAspect {

    @Pointcut("execution(* com.core.*.addNumbers(*,*))")
    private void targetMethod() {};


    @Around("targetMethod()")
    public Object calculateTime(ProceedingJoinPoint joinPoint) throws Throwable {
        long startTime = System.nanoTime();

        Object result = null;
        try {
            result = joinPoint.proceed(); // 메서드 실행 및 반환 값 캡쳐
        } finally {
            long endTime = System.nanoTime();
            Signature signature = joinPoint.getSignature();
            System.out.printf("호출 클래스: %s\n", joinPoint.getTarget().getClass().getSimpleName());
            System.out.printf("실행 시간: %d ns\n", (endTime - startTime));
        }
        return result;
    }
}- @Around를 사용하면 Join Point 실행을 제어할 수 있다. joinPoint.proceed()를 호출하여 대상 메소드를 실제로 실행한다. 특정 시점에 실행할 수도 있고, 여러번 실행할 수도 있다.
호출 클래스: LoopAdditionStrategy
실행 시간: 18208 ns
호출 클래스: RecursiveAddtionStrategy
실행 시간: 4875 ns
4) 트랜잭션 롤백, 재시도, 외부 시스템 예외 변환
1. 트랜잭션 롤백
- 특정 예외가 발생했을 때 트랜잭션을 롤백하기 위해서 @Transactional 어노테이션을 쓴다. 해당 어노테이션은 AOP로 구현되어 있고, 사용자가 직접 정의해서 사용할 수 있다.
@Around("annotation(RollbackOnException)")
public Object rollbackOnException(ProceedingJoinPoint joinPoint) throws Throwable {
	DefaultTransactionDefinition def = new DefaultTransactionDefinition();
    TransactionStatus status = transactionManager.getTransaction(def);

	try {
		Object result = joinPoint.proceed();
    	transactionManager.commit(status);
    	return result;
	} catch (Exception e) {
		transactionManager.rollback(status);
    	throw e;
	}
}
2. 재시도
- 지정된 횟수나 지연 시간 후에 작업을 다시 시작하는 Advice를 작성할 수 있다. 이를 통해 핵심 서비스의 신뢰도를 높인다.
@Around("@annotation(RetryableOperation)")
public Object retryOperation(ProceddingJoinPoint joinPoint) throws Throwable {
	int retryCount = 3;
    while (retryCount > 0) {
    	try {
        	return joinPoint.proceed();
        } catch (Exception e) {
        	log.warn("Operation failed, retrying...");
            retryCount--;
        }
    }
    throw new RuntimeException("Failed after multiple attempts");
}
3. 외부 시스템 예외 변환
- 외부 시스템 예외를 해당 애플리케이션 예외로 처리하고 싶다면 예외를 재정의하여 사용자가 지정한 예외로 변환할 수 있다.
@Around("execution(* com.example.external.ExternalService.*(..))")
public Object translateException(ProceedingJoinPoint joinPoint) throws Throwable {
	try {
    	return joinPoint.proceed();
    } catch (ExternalDependencyException e) {
    	throw new ApplicationSpecificException("An error occured while using external service");
    }
}
3. AOP 동작 과정
위의 로깅 AOP를 적용하는 코드에서 Pointcut을 다음과 같이 수정하여 @Pointcut("execution( com.core.AppConfig.(..))") AppConfig 빈이 설정되는 과정을 볼 수 있다.
INFO 11836 --- [    Test worker] com.core.LoggingAspect     : [메서드 호출 전] 호출 클래스: AppConfig$$SpringCGLIB$$0
INFO 11836 --- [    Test worker] com.core.LoggingAspect     : [메서드 호출 전] 호출 메서드: loopAdditionService
INFO 11836 --- [    Test worker] com.core.LoggingAspect     : [메서드 호출 후] 호출 메서드: loopAdditionService
INFO 11836 --- [    Test worker] com.core.LoggingAspect     : [메서드 호출 전] 호출 클래스: AppConfig$$SpringCGLIB$$0
INFO 11836 --- [    Test worker] com.core.LoggingAspect     : [메서드 호출 전] 호출 메서드: recursiveAdditionService
INFO 11836 --- [ Test worker] com.core.LoggingAspect : [메서드 호출 후] 호출 메서드: recursiveAdditionService- 자세히 보면 AppConfig객체에 CGLIB가 붙어 있다. 이는 Spring AOP가 사용자가 만든 Bean을 직접 사용하는 게 아니라 바이트코드된 프록시 객체를 다룬다는 걸 알 수 있다. 구체적인 동작 과정을 살펴보자.
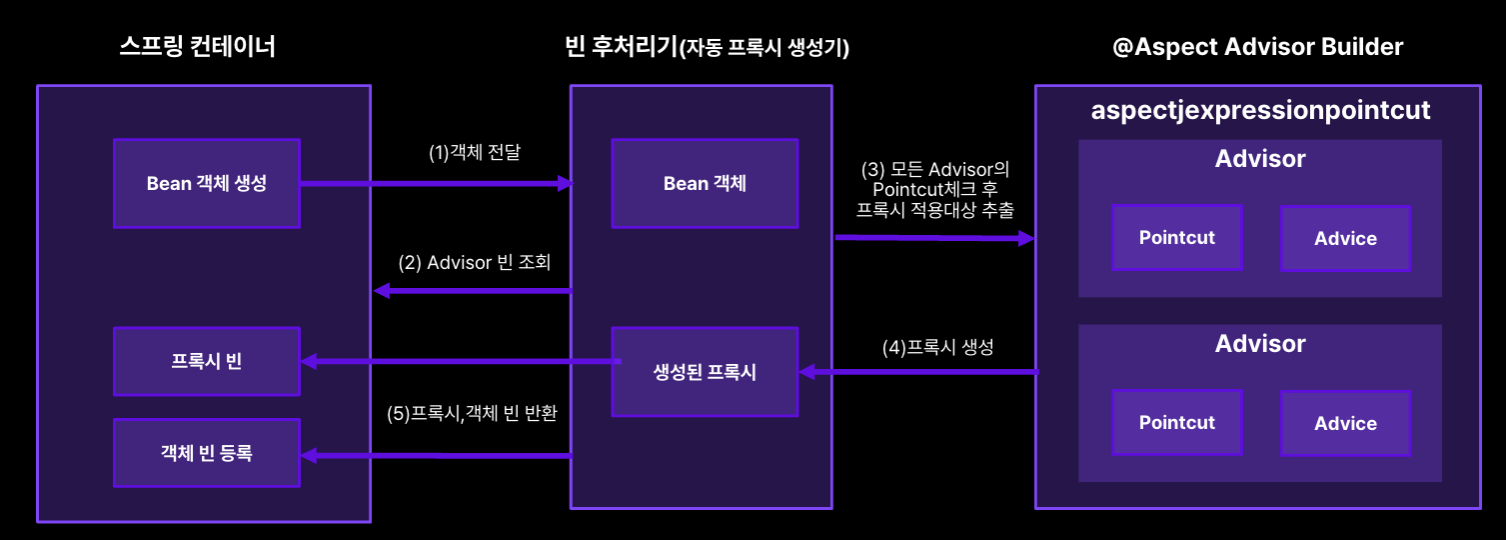
1) 초기 스프링 컨테이너 Bean 객체 생성
- 스프링 애플리케이션 컨텍스트가 시작될 때, 스프링은 설정 파일이나 어노테이션 설정을 읽어 사용할 빈(Bean) 객체를 생성한다. 이 과정에서 의존관계 주입을 통해 의존 객체들을 서로 연결한다.
2) 프록시 생성기가 Advisor 빈 조회 및 Pointcut 체크
- 빈(Bean) 객체들이 생성된 이후 Spring AOP는 AOP 프록시 객체를 생성하기 위해 프록시 생성기(Proxy Factory)는 Advisor 객체들을 조회한다. Advisor 객체란 Advice(실제로 부가 기능을 구현한 코드 조각)와 Pointcut(부가 기능을 어디에 적용할지 정의하는 부분) 정보를 가지고 있다. Pointcut 표현식을 평가해 어떤 빈의 어떤 메소드가 Advice의 적용 대상인지 결정한다.
3) 프록시 생성 및 프록시 객체 반환
- 프록시 생성기는 적용 대상이 된 빈 객체에 대해 프록시 객체를 생성한다. 이는 실제 빈 객체를 감싸는 형태로 해당 빈이 호출될 때 이를 가로채어 Advice에 정의된 부가 기능을 실행할 수 있게 한다. 위의 예시에서는 CGLIB 프록시 객체가 생성된 것을 확인할 수 있다. 프록시 객체는 메소드 호출 시 부가 기능을 실행한 후 실제 빈 객체를 실행하게 된다.
- 위 과정을 그림으로 나타내면 아래와 같다.


꾸준하게