[부스트코스](https://www.boostcourse.org/mo316/lecture/259082?isDesc=false\)
프로젝트명 : MyTab2
외부 프로젝트 추가
강의에서는 design을 추가하는데 버전이 달라서 지금은 material을 추가해주면 된다
File > Project Structure
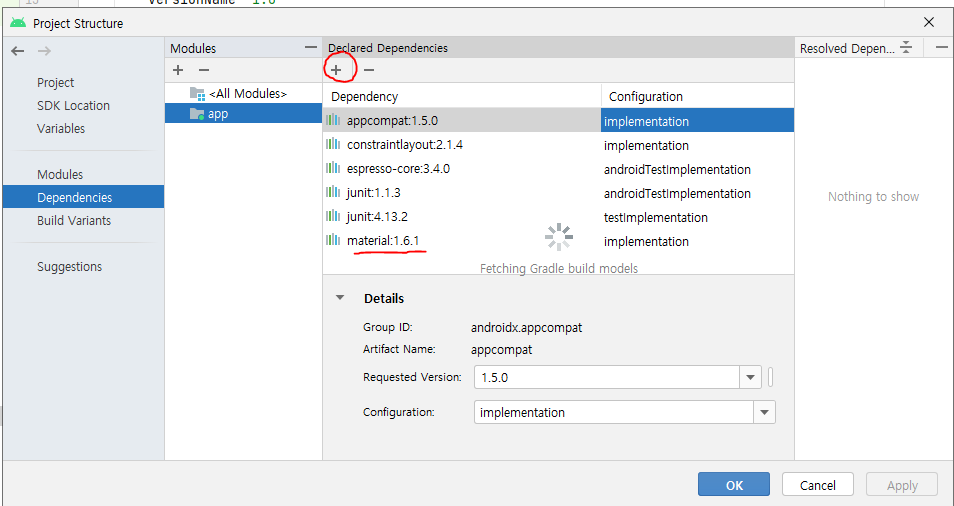
여기서 material이 보이는데 선택하고 ok해주면 된다
activity_main.xml
<?xml version="1.0" encoding="utf-8"?>
<LinearLayout xmlns:android="http://schemas.android.com/apk/res/android"
android:orientation="vertical"
xmlns:tools="http://schemas.android.com/tools"
android:layout_width="match_parent"
android:layout_height="match_parent"
xmlns:app="http://schemas.android.com/apk/res-auto">
<androidx.coordinatorlayout.widget.CoordinatorLayout
android:layout_width="match_parent"
android:layout_height="wrap_content">
<com.google.android.material.appbar.AppBarLayout
android:layout_width="match_parent"
android:layout_height="wrap_content"
android:theme="@style/ThemeOverlay.AppCompat.Dark.ActionBar">
<androidx.appcompat.widget.Toolbar
android:id="@+id/toolbar"
android:layout_width="match_parent"
android:layout_height="wrap_content"
android:background="@color/design_default_color_primary_dark"
android:elevation="1dp"
android:theme="@style/ThemeOverlay.AppCompat.Dark">
</androidx.appcompat.widget.Toolbar>
<com.google.android.material.tabs.TabLayout
android:id="@+id/tabs"
android:layout_width="match_parent"
android:layout_height="wrap_content"
android:background="@android:color/background_light"
android:elevation="1dp"
app:tabGravity="fill"
app:tabMode="fixed"
app:tabSelectedTextColor="@color/black"
app:tabTextColor="@color/design_default_color_primary"
tools:ignore="SpeakableTextPresentCheck">
</com.google.android.material.tabs.TabLayout>
</com.google.android.material.appbar.AppBarLayout>
<!-- <com.google.android.material.tabs.TabLayout-->
<!-- android:id="@+id/tabs"-->
<!-- android:layout_width="match_parent"-->
<!-- android:layout_height="wrap_content"-->
<!-- android:background="@android:color/background_light"-->
<!-- android:elevation="1dp"-->
<!-- app:tabGravity="fill"-->
<!-- app:tabMode="fixed"-->
<!-- app:tabSelectedTextColor="@color/design_default_color_on_primary"-->
<!-- app:tabTextColor="@color/design_default_color_primary"-->
<!-- tools:ignore="SpeakableTextPresentCheck">-->
<!-- </com.google.android.material.tabs.TabLayout>-->
</androidx.coordinatorlayout.widget.CoordinatorLayout>
<FrameLayout
android:id="@+id/container"
android:layout_width="match_parent"
android:layout_height="wrap_content"
app:layout_behavior="@string/appbar_scrolling_view_behavior">
</FrameLayout>
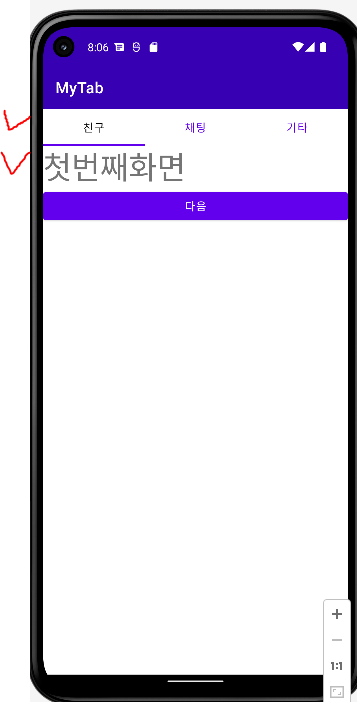
</LinearLayout>coordinatorLayout으로 AppBarLayout을 감싸줘야 페이지 내용과 탭이 메뉴 바가 겹치지 않는다
coordinatorLayout 안에 AppBarLayout을 넣고 안에 ToolBar와 TabLayout을 넣어준다.
그리고 coordinatorLayout 밖에 FrameLayout을 넣어서 페이지 내용을 작성해준다.
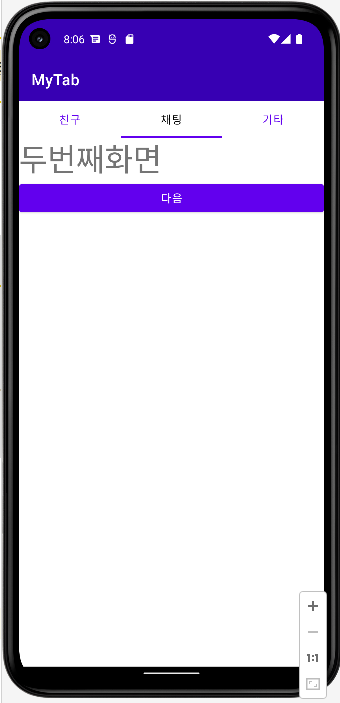
탭 화면은 주로 프래그먼트를 이용해 구성한다.
프래그먼트

이렇게 프래그먼트 xml 파일과 java 파일을 3개씩 만들어서 부분화면을 구성해준다
<?xml version="1.0" encoding="utf-8"?>
<LinearLayout xmlns:android="http://schemas.android.com/apk/res/android"
    android:orientation="vertical"
    android:layout_width="match_parent"
    android:layout_height="match_parent">

    <TextView
        android:layout_width="match_parent"
        android:layout_height="wrap_content"
        android:text="첫번째화면"
        android:textSize="40dp"
        />

    <Button
        android:id="@+id/button"
        android:layout_width="match_parent"
        android:layout_height="wrap_content"
        android:text="다음"
        />

</LinearLayout>
package com.example.mytab;
import android.os.Bundle;
import android.view.LayoutInflater;
import android.view.View;
import android.view.ViewGroup;
import androidx.annotation.NonNull;
import androidx.annotation.Nullable;
import androidx.fragment.app.Fragment;
public class Fragment1 extends Fragment {
@Nullable
@Override
public View onCreateView(@NonNull LayoutInflater inflater, @Nullable ViewGroup container, @Nullable Bundle savedInstanceState) {
ViewGroup rootView = (ViewGroup) inflater.inflate(R.layout.fragment1,container,false);
return rootView;
}
}
내용은 단순하게 구성했다
단순히 xml 파일을 인플레이션 해주면 된다
MainActivity.java
package com.example.mytab;

import androidx.appcompat.app.AppCompatActivity;
import androidx.appcompat.widget.Toolbar;
import androidx.fragment.app.Fragment;

import android.os.Bundle;

import com.google.android.material.tabs.TabLayout;

public class MainActivity extends AppCompatActivity {

    Fragment1 fragment1;
    Fragment2 fragment2;
    Fragment3 fragment3;


    @Override
    protected void onCreate(Bundle savedInstanceState) {
        super.onCreate(savedInstanceState);
        setContentView(R.layout.activity_main);

        fragment1 = new Fragment1();
        fragment2 = new Fragment2();
        fragment3 = new Fragment3();

        Toolbar toolbar = (Toolbar)findViewById(R.id.toolbar);
        setSupportActionBar(toolbar);

        getSupportFragmentManager().beginTransaction().add(R.id.container,fragment1).commit();


        TabLayout tabs = (TabLayout) findViewById(R.id.tabs);
        tabs.addTab(tabs.newTab().setText("친구"));
        tabs.addTab(tabs.newTab().setText("채팅"));
        tabs.addTab(tabs.newTab().setText("기타"));


        tabs.addOnTabSelectedListener(new TabLayout.OnTabSelectedListener() {
            @Override
            public void onTabSelected(TabLayout.Tab tab) {
                int position = tab.getPosition();

                Fragment selected = null;

                if (position==0){
                    selected = fragment1;
                }
                else if (position==1){
                    selected = fragment2;
                }
                else if (position==2){
                    selected = fragment3;
                }

                getSupportFragmentManager().beginTransaction().replace(R.id.container,selected).commit();
            }

            @Override
            public void onTabUnselected(TabLayout.Tab tab) {

            }

            @Override
            public void onTabReselected(TabLayout.Tab tab) {

            }
        });
//        tabs.setOnTabSelectedListener(new TabLayout.OnTabSelectedListener() {
//            @Override
//            public void onTabSelected(TabLayout.Tab tab) {
//                int position = tab.getPosition();
//
//                Fragment selected = null;
//
//                if (position==0){
//                    selected = fragment1;
//                }
//                else if (position==1){
//                    selected = fragment2;
//                }
//                else if (position==2){
//                    selected = fragment3;
//                }
//
//                getSupportFragmentManager().beginTransaction().replace(R.id.container,selected).commit();
//
//
//            }
//
//            @Override
//            public void onTabUnselected(TabLayout.Tab tab) {
//
//            }
//
//            @Override
//            public void onTabReselected(TabLayout.Tab tab) {
//
//            }
//        });


    }
}
각 프래그먼트 객체를 만들어주고 프래그먼트1을 프래그먼트매니저를 이용해서 FrameLayout에 표시해준다.
Toolbar를 findViewById 얻어오고 setSupportActionBar 메소드로 등록해준다.
TabLayout을 findViewById로 얻어오고 addTab을 이용해서 탭을 추가해준다.
tabs.addOnTabSelectedListener(new TabLayout.OnTabSelectedListener() {
            @Override
            public void onTabSelected(TabLayout.Tab tab) {
                int position = tab.getPosition();

                Fragment selected = null;

                if (position==0){
                    selected = fragment1;
                }
                else if (position==1){
                    selected = fragment2;
                }
                else if (position==2){
                    selected = fragment3;
                }

                getSupportFragmentManager().beginTransaction().replace(R.id.container,selected).commit();
            }

            @Override
            public void onTabUnselected(TabLayout.Tab tab) {

            }

            @Override
            public void onTabReselected(TabLayout.Tab tab) {

            }
        });
addOnTabSelectedListener 메소드를 이용해서 리스너를 등록해준다
getPosition을 이용해 선택된 탭 정보를 알 수 있다.
마찬가지로 프래그먼트매니저를 이용해서 FrameLayout의 화면을 바꿔줬다.
이런식으로 작동한다.
강의 버전이 지금과 달라서 처음에 잘 안되서 검색해서 진행했다.
