바로가기 메뉴
화면에서 뭘 보고 있을 때 아이콘을 누르면 왼쪽이나 오른쪽에서 메뉴가 슥 나와서 선택하고 다시 들어가는 메뉴다
그리고 선택한 기능이 실행된다
navigation drawer가 기본으로 제공되서 그걸 이용해서 만드는게 제일 쉽다
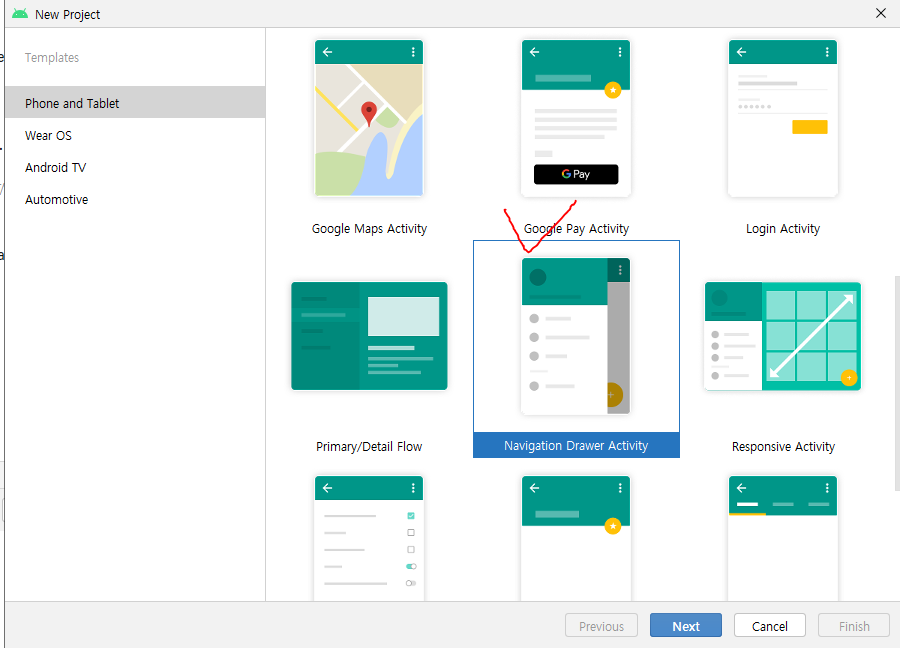
이번에는 프로젝트를 만들때 Navigation Drawer Activity를 선택해준다.
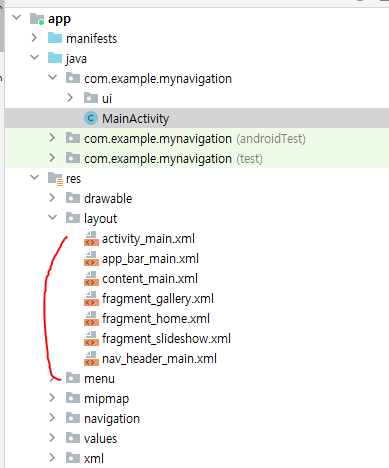
강의에서는 xml파일이 4개 만들어져있는데 나는 7개만들어졌다.
MainAcitvity.java도 강의에서 설명하는 것과 많이 다르다
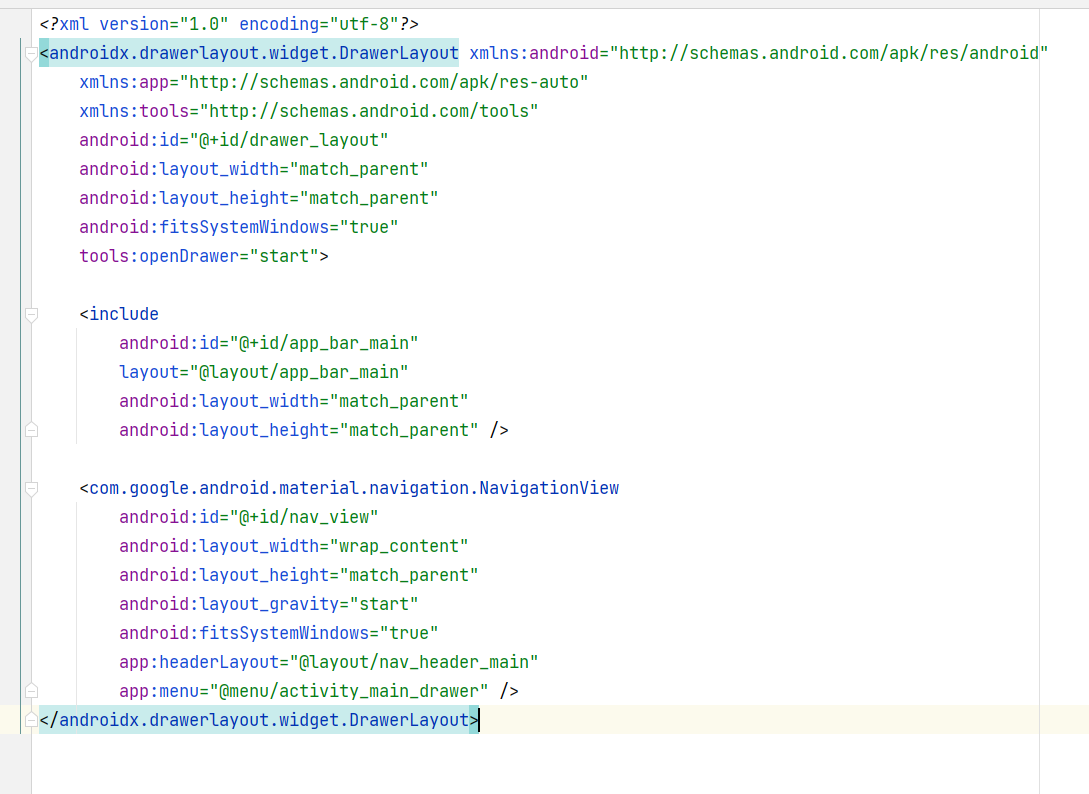
main xml 파일을 보면 DrawerLayout이 최상위 레이아웃으로 구성되어 있다.
DrawerLayout은 다른 레이아웃을 담을 수 있는 레이아웃이다
바로가기 메뉴는 이 DrawerLayout안에 있다.
include는 다른 xml 레이아웃을 포함시키는 역할을 한다
xml 레이아웃이 2개의 xml 레이아웃 안에 중복되어 있다면 하나의 xml 레이아웃을 만들고 각각에서 include 하면 같은 코드를 여려번 입력할 필요 없이 사용 가능하다
app_bar_main이라는 xml 레이아웃을 여기에 포함시킨다
NavigationView가 바로 바로가기 메뉴이다.
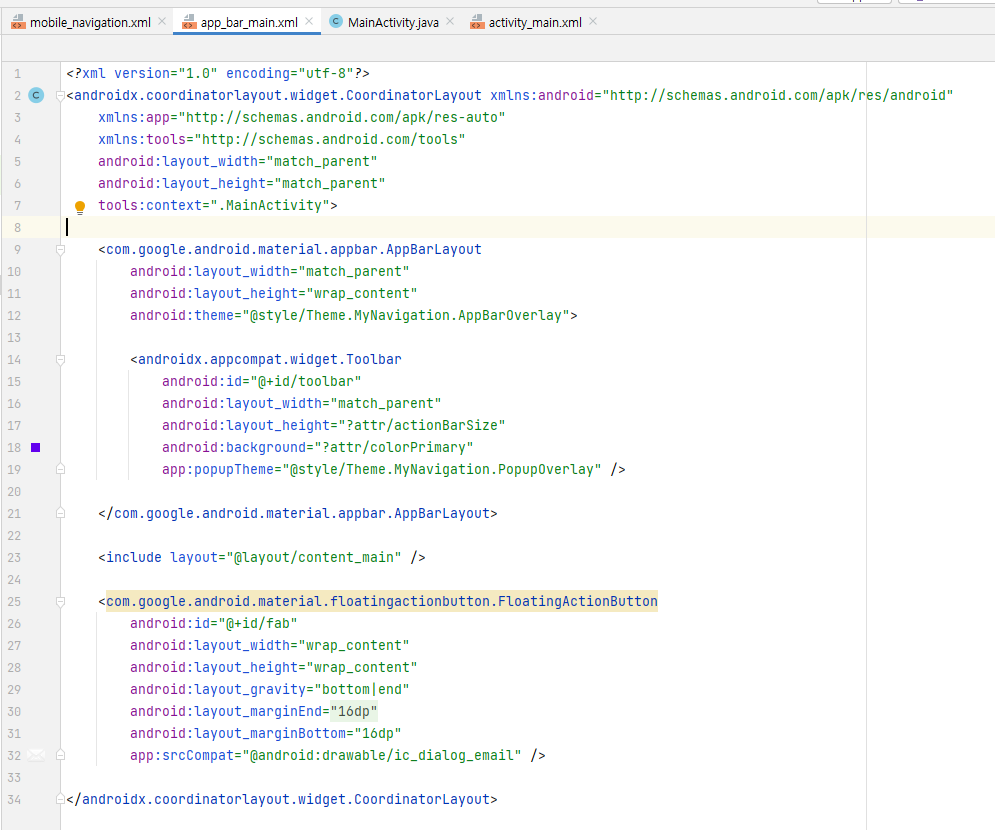
app_bar_main.xml은 다음과 같다
CoordinatorLayout이 최상위 레이아웃이다.
안에 들어가 있는 뷰들의 위치를 맞춰준다
AppBarLayout이 액션 바 부분이고 Toolbar도 있다.
FloatingActionButton은 우측 하단에 추가되는 버튼이다
당장 필요하지는 않아서 지워줬다.
그리고 content_main 레이아웃을 include 태그로 추가해주고 있다.
content_main.xml은 다음과 같다
empty activity를 만들었을 때와 유사하다
이렇게 기본적으로 구성되어 있다.
즉 화면의 상단은 app_bar_main.xml
화면의 내용은 content_main.xml으로 구성되어 있다는 것을 알 수 있다.
먼저 content_main의 최상위레이아웃을 FrameLayout으로 바꿔준다
프래그먼트를 넣기 위해서다.
그리고 TextView를 지워준다 (강의에선 TextView인데 나는 fragment가 이미 들어가 있다.)
activity_main.xml에서 include 된 내용을 그냥 해당 xml을 복사해서 가져온다.
이렇게 include를 사용하지 않으면 다른 xml파일이 필요없다
대신 activity_main.xml이 좀 더 복잡해진다
참고로 layout_behavior가 appbar_scrolling_view_behavior이면 해당 레이아웃이 보여야될 영역에 딱 맞춰저서 보여진다.
    <com.google.android.material.navigation.NavigationView
        android:id="@+id/nav_view"
        android:layout_width="wrap_content"
        android:layout_height="match_parent"
        android:layout_gravity="start"
        android:fitsSystemWindows="true"
        app:headerLayout="@layout/nav_header_main"
        app:menu="@menu/activity_main_drawer" />
activity_main.xml의 NavigationView 의 속성을 보면
headerLayout은 layout 폴더의 nav_header_main
menu는 menu 폴더의 acvtivity_main_drawer로 설정되어 있다.
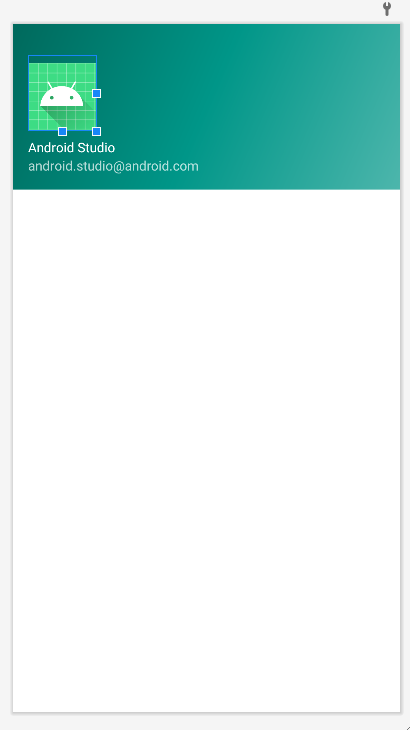
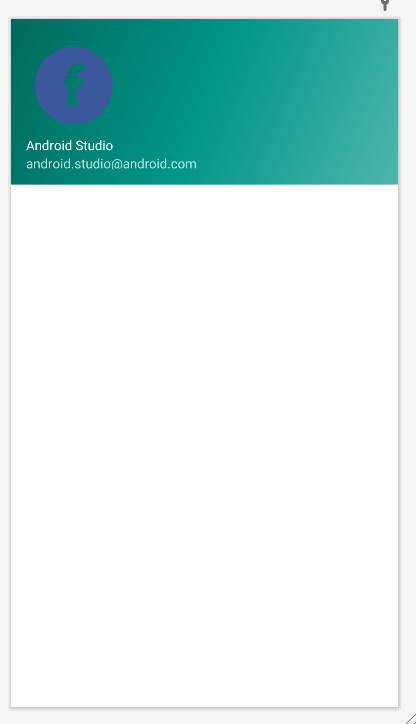
nav_header_main.xml을 보면 이렇게 보인다
사용자 프로필 같은 것을 표시해준다.
<?xml version="1.0" encoding="utf-8"?>
<menu xmlns:android="http://schemas.android.com/apk/res/android"
xmlns:tools="http://schemas.android.com/tools"
tools:showIn="navigation_view">
<group android:checkableBehavior="single">
<item
android:id="@+id/nav_home"
android:icon="@drawable/ic_menu_camera"
android:title="@string/menu_home" />
<item
android:id="@+id/nav_gallery"
android:icon="@drawable/ic_menu_gallery"
android:title="@string/menu_gallery" />
<item
android:id="@+id/nav_slideshow"
android:icon="@drawable/ic_menu_slideshow"
android:title="@string/menu_slideshow" />
</group>
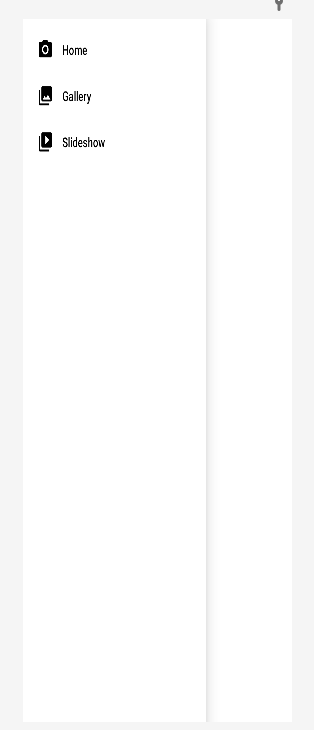
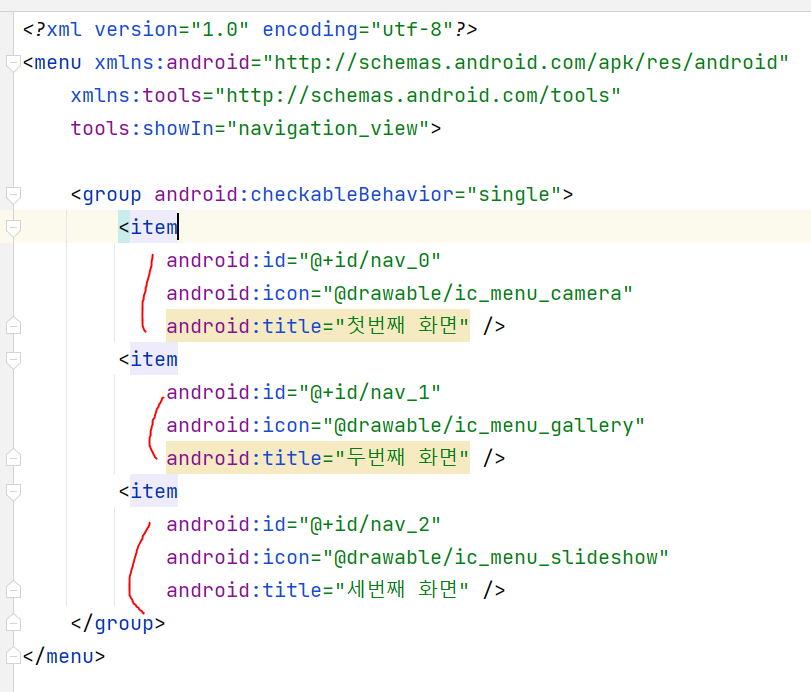
</menu>menu 폴더의 acvtivity_main_drawer는 이렇게 구성된다.
원하면 내용을 수정해서 메뉴의 구성을 바꿀 수 있다.
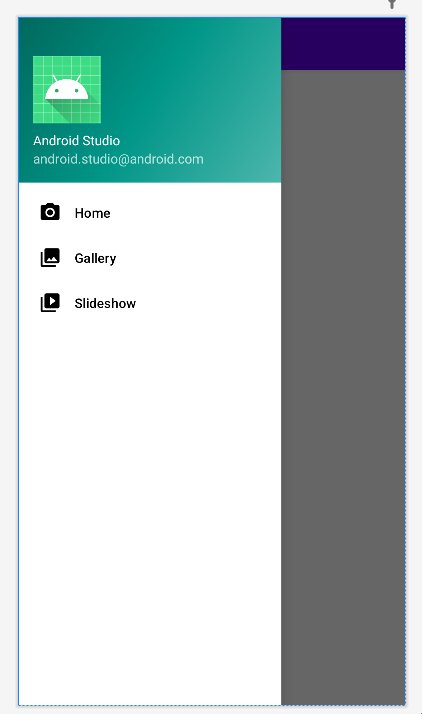
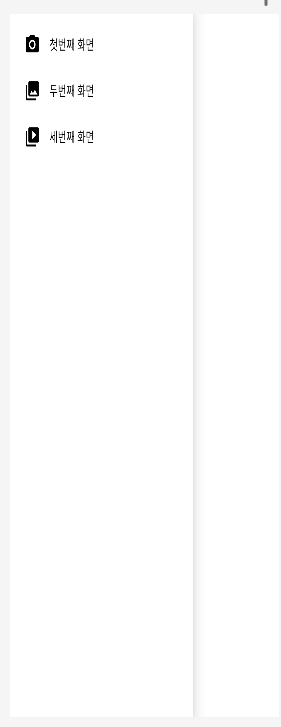
이렇게 2개가 합쳐져서 activity_main.mxl에 이렇게 보이는 것이다.
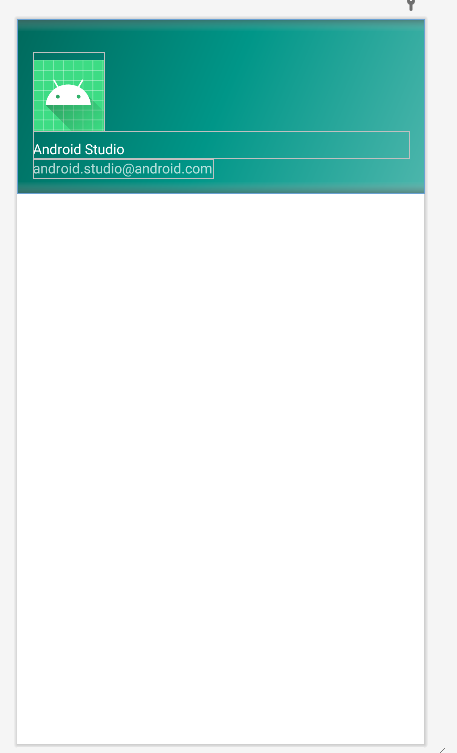
먼저 nav_header_main.xml에서 이미지뷰에 원하는 아이콘을 넣어줬다.
그리고 activity_main_drawer.xml의 내용을 다음과 같이 바꿨다.
아이템의 내용을 바꿔줬다.
이후 강의 내용은 지금이랑 버전이 달라서 코드 내용이 아예 다름
그래서 그냥 프로젝트를 새로 만들어서 내용을 파악하며 혼자 진행해야 한다
누가 블로그에 정리해놔서 참고했다.
그런데 이 블로그 내용도 지금 내 버전이랑 다르다
기본적인 구조
<?xml version="1.0" encoding="utf-8"?>
<androidx.drawerlayout.widget.DrawerLayout xmlns:android="http://schemas.android.com/apk/res/android"
    xmlns:app="http://schemas.android.com/apk/res-auto"
    xmlns:tools="http://schemas.android.com/tools"
    android:id="@+id/drawer_layout"
    android:layout_width="match_parent"
    android:layout_height="match_parent"
    android:fitsSystemWindows="true"
    tools:openDrawer="start">

    <include
        android:id="@+id/app_bar_main"
        layout="@layout/app_bar_main"
        android:layout_width="match_parent"
        android:layout_height="match_parent" />

    <com.google.android.material.navigation.NavigationView
        android:id="@+id/nav_view"
        android:layout_width="wrap_content"
        android:layout_height="match_parent"
        android:layout_gravity="start"
        android:fitsSystemWindows="true"
        app:headerLayout="@layout/nav_header_main"
        app:menu="@menu/activity_main_drawer" />
</androidx.drawerlayout.widget.DrawerLayout>
DrawerLayout 내부에 NavigationView를 추가해서 구성
  app:headerLayout="@layout/nav_header_main"
  app:menu="@menu/activity_main_drawer"
두가지 속성으로 메뉴의 헤더와 메뉴부분을 구성
메뉴의 item을 클릭하면 activity의 fragment를 전환해서 원하는 화면으로 이동
activity_main.xml
<?xml version="1.0" encoding="utf-8"?>
<androidx.drawerlayout.widget.DrawerLayout xmlns:android="http://schemas.android.com/apk/res/android"
    xmlns:app="http://schemas.android.com/apk/res-auto"
    xmlns:tools="http://schemas.android.com/tools"
    android:id="@+id/drawer_layout"
    android:layout_width="match_parent"
    android:layout_height="match_parent"
    android:fitsSystemWindows="true"
    tools:openDrawer="start">

    <include
        android:id="@+id/app_bar_main"
        layout="@layout/app_bar_main"
        android:layout_width="match_parent"
        android:layout_height="match_parent" />

    <com.google.android.material.navigation.NavigationView
        android:id="@+id/nav_view"
        android:layout_width="wrap_content"
        android:layout_height="match_parent"
        android:layout_gravity="start"
        android:fitsSystemWindows="true"
        app:headerLayout="@layout/nav_header_main"
        app:menu="@menu/activity_main_drawer" />
</androidx.drawerlayout.widget.DrawerLayout>
최상위 레이아웃은 DrawerLayout이다
include로 app_bar_main.xml을 포함시킨다
NavigationView에서 headerLayout에 nav_header_main.xml이랑
menu에 activity_main_drawer.xml을 사용한다
이게 nav_header
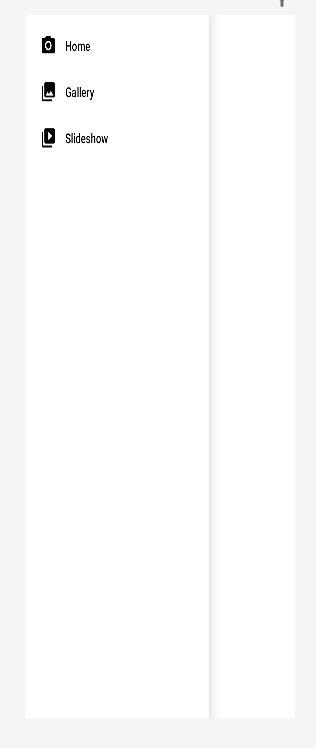
이게 activity_main_drawer
app_bar_main.xml
<?xml version="1.0" encoding="utf-8"?>
<androidx.coordinatorlayout.widget.CoordinatorLayout xmlns:android="http://schemas.android.com/apk/res/android"
    xmlns:app="http://schemas.android.com/apk/res-auto"
    xmlns:tools="http://schemas.android.com/tools"
    android:layout_width="match_parent"
    android:layout_height="match_parent"
    tools:context=".MainActivity">

    <com.google.android.material.appbar.AppBarLayout
        android:layout_width="match_parent"
        android:layout_height="wrap_content"
        android:theme="@style/Theme.MyNavDrawer.AppBarOverlay">

        <androidx.appcompat.widget.Toolbar
            android:id="@+id/toolbar"
            android:layout_width="match_parent"
            android:layout_height="?attr/actionBarSize"
            android:background="?attr/colorPrimary"
            app:popupTheme="@style/Theme.MyNavDrawer.PopupOverlay" />

    </com.google.android.material.appbar.AppBarLayout>

    <include layout="@layout/content_main" />

    <com.google.android.material.floatingactionbutton.FloatingActionButton
        android:id="@+id/fab"
        android:layout_width="wrap_content"
        android:layout_height="wrap_content"
        android:layout_gravity="bottom|end"
        android:layout_marginEnd="@dimen/fab_margin"
        android:layout_marginBottom="16dp"
        app:srcCompat="@android:drawable/ic_dialog_email" />

</androidx.coordinatorlayout.widget.CoordinatorLayout>
맨 위 앱 바를 구성하고
최상위레이아웃은 CoordinatorLayout
AppBarLayout안에 Toolbar
그리고 include로 content_main.xml
그 밑에 FloatingActionButton
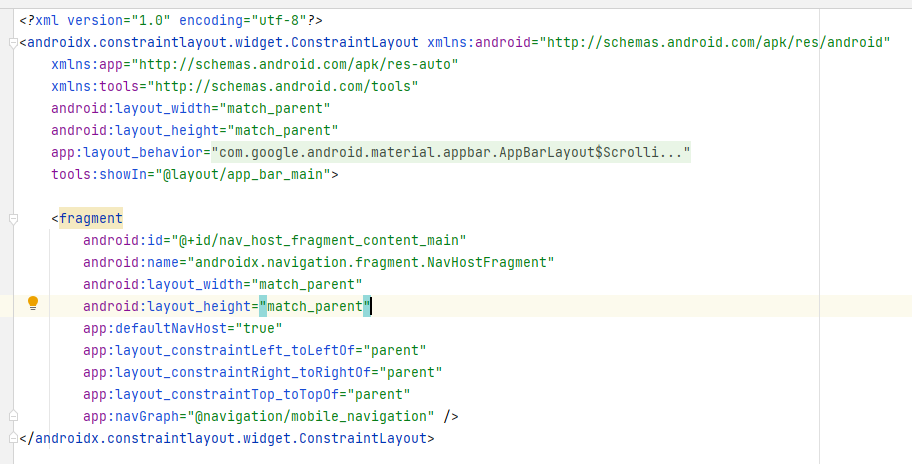
content_main.xml
<?xml version="1.0" encoding="utf-8"?>
<androidx.constraintlayout.widget.ConstraintLayout xmlns:android="http://schemas.android.com/apk/res/android"
    xmlns:app="http://schemas.android.com/apk/res-auto"
    xmlns:tools="http://schemas.android.com/tools"
    android:layout_width="match_parent"
    android:layout_height="match_parent"
    app:layout_behavior="@string/appbar_scrolling_view_behavior"
    tools:showIn="@layout/app_bar_main">

    <fragment
        android:id="@+id/nav_host_fragment_content_main"
        android:name="androidx.navigation.fragment.NavHostFragment"
        android:layout_width="match_parent"
        android:layout_height="match_parent"
        app:defaultNavHost="true"
        app:layout_constraintLeft_toLeftOf="parent"
        app:layout_constraintRight_toRightOf="parent"
        app:layout_constraintTop_toTopOf="parent"
        app:navGraph="@navigation/mobile_navigation" />
</androidx.constraintlayout.widget.ConstraintLayout>
최상위 레이아웃 ConstraintLayout이고 내용물 구성
fragment로 구성
MainActivity.java
package com.example.navdrawer;

import android.os.Bundle;
import android.view.View;
import android.view.Menu;

import com.google.android.material.snackbar.Snackbar;
import com.google.android.material.navigation.NavigationView;

import androidx.navigation.NavController;
import androidx.navigation.Navigation;
import androidx.navigation.ui.AppBarConfiguration;
import androidx.navigation.ui.NavigationUI;
import androidx.drawerlayout.widget.DrawerLayout;
import androidx.appcompat.app.AppCompatActivity;

import com.example.navdrawer.databinding.ActivityMainBinding;

public class MainActivity extends AppCompatActivity {

    private AppBarConfiguration mAppBarConfiguration;
    private ActivityMainBinding binding;

    @Override
    protected void onCreate(Bundle savedInstanceState) {
        super.onCreate(savedInstanceState);

        binding = ActivityMainBinding.inflate(getLayoutInflater());
        setContentView(binding.getRoot());

        setSupportActionBar(binding.appBarMain.toolbar);
        binding.appBarMain.fab.setOnClickListener(new View.OnClickListener() {
            @Override
            public void onClick(View view) {
                Snackbar.make(view, "Replace with your own action", Snackbar.LENGTH_LONG)
                        .setAction("Action", null).show();
            }
        });
        DrawerLayout drawer = binding.drawerLayout;
        NavigationView navigationView = binding.navView;
        // Passing each menu ID as a set of Ids because each
        // menu should be considered as top level destinations.
        mAppBarConfiguration = new AppBarConfiguration.Builder(
                R.id.nav_home, R.id.nav_gallery, R.id.nav_slideshow)
                .setOpenableLayout(drawer)
                .build();
        NavController navController = Navigation.findNavController(this, R.id.nav_host_fragment_content_main);
        NavigationUI.setupActionBarWithNavController(this, navController, mAppBarConfiguration);
        NavigationUI.setupWithNavController(navigationView, navController);
    }

    @Override
    public boolean onCreateOptionsMenu(Menu menu) {
        // Inflate the menu; this adds items to the action bar if it is present.
        getMenuInflater().inflate(R.menu.main, menu);
        return true;
    }

    @Override
    public boolean onSupportNavigateUp() {
        NavController navController = Navigation.findNavController(this, R.id.nav_host_fragment_content_main);
        return NavigationUI.navigateUp(navController, mAppBarConfiguration)
                || super.onSupportNavigateUp();
    }
}