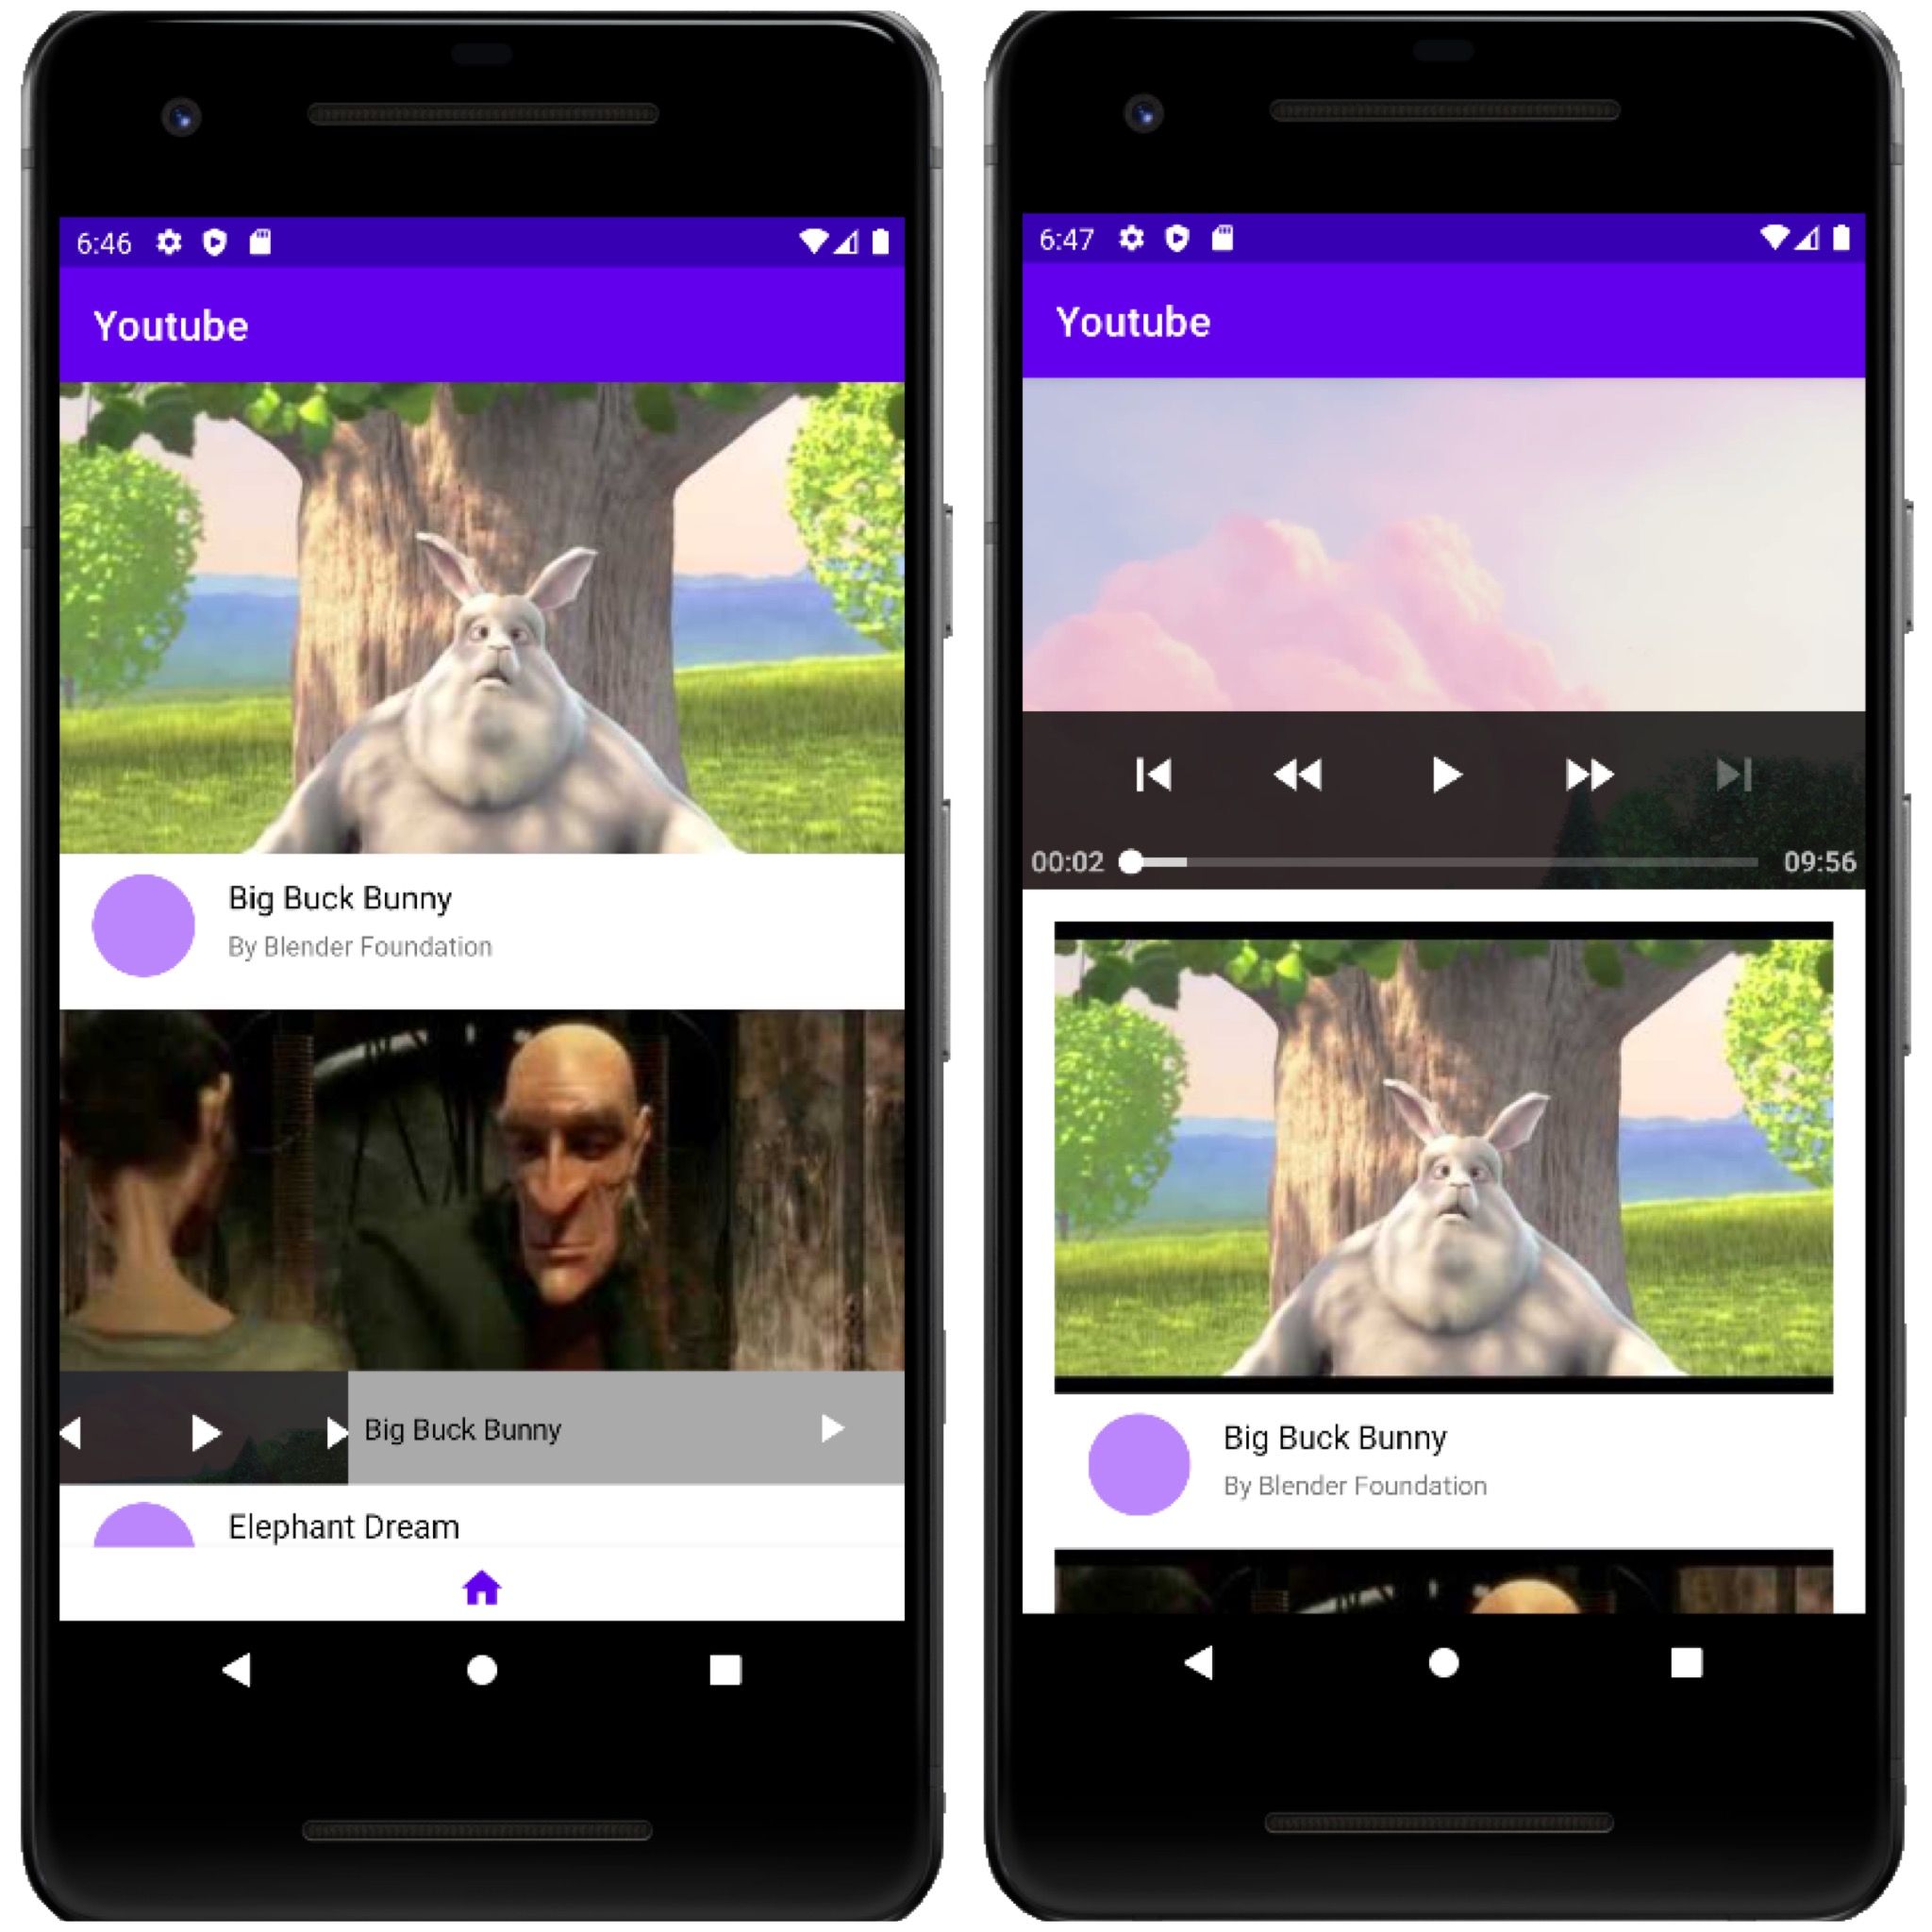
앱 소개
완성 화면
주요 기능
- Retrofit 을 이용해 서버에서 영상 목록을 받아와 보여주기
- Motion Layout 을 이용해 영상 플레이어 화면 전환 애니메이션 구현
- 영상 목록을 클릭하여 ExoPlayer 를 이용해 영상 재생
사용 기술
- MotionLayout
- ExoPlayer
- Retrofit
- Mocky
- viewBinding
기본 레이아웃 구성
activity_main.xml
<?xml version="1.0" encoding="utf-8"?>
<androidx.constraintlayout.widget.ConstraintLayout xmlns:android="http://schemas.android.com/apk/res/android"
    xmlns:app="http://schemas.android.com/apk/res-auto"
    xmlns:tools="http://schemas.android.com/tools"
    android:layout_width="match_parent"
    android:layout_height="match_parent"
    tools:context=".MainActivity">

    <com.google.android.material.bottomnavigation.BottomNavigationView
        android:id="@+id/mainBottomNavigationView"
        android:layout_width="0dp"
        android:layout_height="wrap_content"
        app:layout_constraintBottom_toBottomOf="parent"
        app:layout_constraintEnd_toEndOf="parent"
        app:layout_constraintStart_toStartOf="parent"
        app:menu="@menu/bottom_navi_menu" />

    <androidx.recyclerview.widget.RecyclerView
        android:id="@+id/mainRecyclerView"
        android:layout_width="0dp"
        android:layout_height="0dp"
        app:layout_constraintBottom_toBottomOf="parent"
        app:layout_constraintEnd_toEndOf="parent"
        app:layout_constraintStart_toStartOf="parent"
        app:layout_constraintTop_toTopOf="parent" />

    <FrameLayout
        android:id="@+id/fragmentContainer"
        android:layout_width="0dp"
        android:layout_height="0dp"
        app:layout_constraintBottom_toBottomOf="parent"
        app:layout_constraintEnd_toEndOf="parent"
        app:layout_constraintStart_toStartOf="parent"
        app:layout_constraintTop_toTopOf="parent" />

</androidx.constraintlayout.widget.ConstraintLayout>
메인 액티비티에는 하단 메뉴인 BottomNavigationView, 동영상 리스트를 보여줄 RecycerView, 스크롤 가능한 애니메이션을 주기 위해 프래그먼트를 붙일 수 있는 FrameLayout 으로 구성하였다.
MotionLayout 이용하여 화면 전환
fragment_player.xml
<?xml version="1.0" encoding="utf-8"?>
<androidx.constraintlayout.widget.ConstraintLayout xmlns:android="http://schemas.android.com/apk/res/android"
    xmlns:app="http://schemas.android.com/apk/res-auto"
    xmlns:tools="http://schemas.android.com/tools"
    android:layout_width="match_parent"
    android:layout_height="match_parent"
    tools:context=".MainActivity">

    <androidx.constraintlayout.widget.ConstraintLayout
        android:id="@+id/mainContainerLayout"
        android:layout_width="0dp"
        android:layout_height="250dp"
        android:background="@color/purple_200"
        app:layout_constraintEnd_toEndOf="parent"
        app:layout_constraintStart_toStartOf="parent"
        app:layout_constraintTop_toTopOf="parent" />

    <ImageView
        android:id="@+id/playerView"
        android:layout_width="0dp"
        android:layout_height="0dp"
        app:layout_constraintBottom_toBottomOf="@id/mainContainerLayout"
        app:layout_constraintStart_toStartOf="@id/mainContainerLayout"
        app:layout_constraintTop_toTopOf="@id/mainContainerLayout" />

    <ImageView
        android:id="@+id/bottomPlayerControlButton"
        android:layout_width="wrap_content"
        android:layout_height="wrap_content"
        android:layout_marginEnd="24dp"
        app:layout_constraintBottom_toBottomOf="@id/mainContainerLayout"
        app:layout_constraintEnd_toEndOf="@id/mainContainerLayout"
        app:layout_constraintTop_toTopOf="@id/mainContainerLayout" />

    <TextView
        android:id="@+id/bottomTitleTextView"
        android:layout_width="0dp"
        android:layout_height="wrap_content"
        android:layout_marginStart="8dp"
        android:layout_marginEnd="12dp"
        android:ellipsize="end"
        android:maxLines="1"
        android:singleLine="true"
        app:layout_constraintBottom_toBottomOf="@id/bottomPlayerControlButton"
        app:layout_constraintEnd_toStartOf="@id/bottomPlayerControlButton"
        app:layout_constraintStart_toEndOf="@id/playerView"
        app:layout_constraintTop_toTopOf="@id/bottomPlayerControlButton" />

    <androidx.recyclerview.widget.RecyclerView
        android:id="@+id/fragmentRecyclerView"
        android:layout_width="0dp"
        android:layout_height="0dp"
        android:background="@color/white"
        app:layout_constraintBottom_toBottomOf="parent"
        app:layout_constraintEnd_toEndOf="parent"
        app:layout_constraintStart_toStartOf="parent"
        app:layout_constraintTop_toBottomOf="@id/mainContainerLayout" />

</androidx.constraintlayout.widget.Constraintlayout>
프래그먼트 영역 뷰를 잡아주기 위해 fragment_player.xml 레이아웃을 생성했다. (추후 모션 레이아웃 변환시 맨 위에 MotionLayout이 생성될 것임)
동영상 플레이어와 하단으로 접었을 때 보여줄 재생/일시정지 버튼을 표시할 ImageView, 제목을 표시할 TextView 그리고 펼쳤을 때 보여줄 동영상 리스트를 위한 recyclerView를 추가해주었다.
Design > Contraint > Convert to MotionLayout > Convert
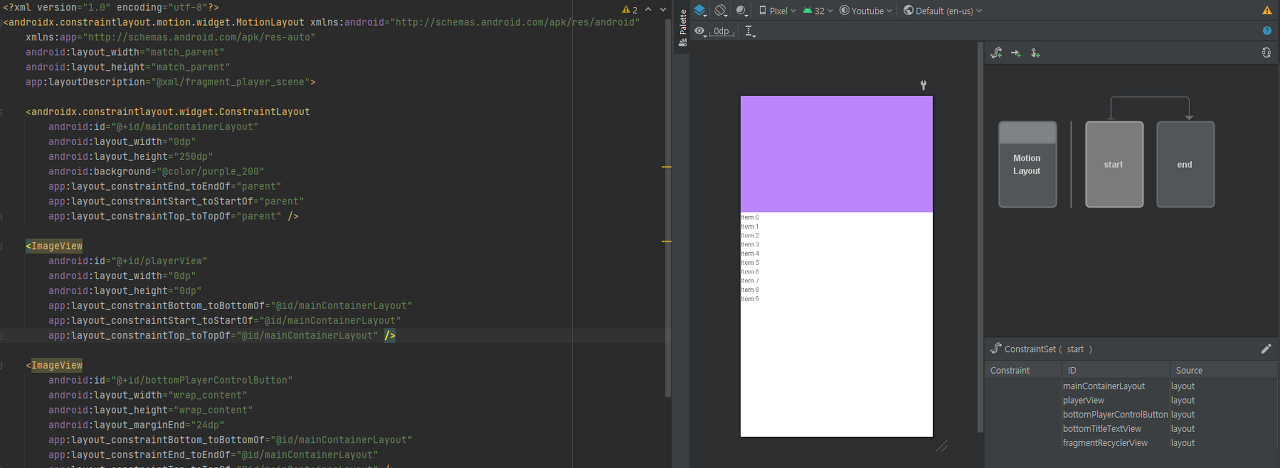
모션 레이아웃으로 변환해주면 자동으로 xml 폴더가 생성되고 fragment_player_scene.xml 파일이 생성된다. 이후 해당 파일에 애니메이션에 대한 정보를 입력해준다.
모션 레이아웃을 정의했다면 Contraint를 추가해 start에서 end로 가는 애니메이션을 정의하게 되는데 해당 프로젝트에서는 start를 접힌 상태, end를 펼친 상태로 생각해주고 정의하였다.
start와 end 에서의 create Contraint를 통해 각각 속성을 추가한 뒤 값을 설정해준다.
xml/fragment_player_scene.xml
<ConstraintSet android:id="@+id/start">
        <Constraint
            android:id="@+id/fragmentRecyclerView"
            android:layout_width="0dp"
            android:layout_height="0.1dp"
            android:layout_marginBottom="66dp"
            motion:layout_constraintBottom_toBottomOf="parent"
            motion:layout_constraintEnd_toEndOf="parent"
            motion:layout_constraintStart_toStartOf="parent"
            motion:layout_constraintTop_toBottomOf="@id/mainContainerLayout"
            motion:layout_constraintVertical_bias="1.0" />

        <Constraint
            android:id="@+id/mainContainerLayout"
            android:layout_width="0dp"
            android:layout_height="56dp"
            android:layout_marginBottom="66dp"
            motion:layout_constraintBottom_toBottomOf="parent"
            motion:layout_constraintEnd_toEndOf="parent"
            motion:layout_constraintStart_toStartOf="parent"
            motion:layout_constraintTop_toTopOf="parent"
            motion:layout_constraintVertical_bias="1.0" />

        <Constraint
            android:id="@+id/playerView"
            android:layout_width="0dp"
            android:layout_height="0dp"
            motion:layout_constraintBottom_toBottomOf="@id/mainContainerLayout"
            motion:layout_constraintDimensionRatio="H, 1:2.5"
            motion:layout_constraintStart_toStartOf="@id/mainContainerLayout"
            motion:layout_constraintTop_toTopOf="@id/mainContainerLayout" />
    </ConstraintSet>

    <ConstraintSet android:id="@+id/end">
        <Constraint
            android:id="@+id/playerView"
            android:layout_width="0dp"
            android:layout_height="0dp"
            motion:layout_constraintEnd_toEndOf="@id/mainContainerLayout"
            motion:layout_constraintBottom_toBottomOf="@id/mainContainerLayout"
            motion:layout_constraintTop_toTopOf="@id/mainContainerLayout"
            motion:layout_constraintStart_toStartOf="@id/mainContainerLayout" />

        <Constraint
            android:id="@+id/mainContainerLayout"
            motion:layout_constraintEnd_toEndOf="parent"
            android:layout_width="0dp"
            android:layout_height="250dp"
            motion:layout_constraintTop_toTopOf="parent"
            motion:layout_constraintStart_toStartOf="parent" />

        <Constraint
            android:id="@+id/fragmentRecyclerView"
            motion:layout_constraintEnd_toEndOf="parent"
            android:layout_width="0dp"
            android:layout_height="0dp"
            motion:layout_constraintBottom_toBottomOf="parent"
            motion:layout_constraintTop_toBottomOf="@id/mainContainerLayout"
            motion:layout_constraintStart_toStartOf="parent" />
    </ConstraintSet>
start(아래로 접힌) 상태에서 동영상 목록을 나타내는 recyclerView 는 0.1dp로 거의 보이지 않도록 설정하고, mainContraintLayout의 높이를 56dp로 줄이고 vertical_bias 를 1.0 을 주어 하단에 붙여주었다.
.png)
접힌 상태에서 Drag Up 을 해주면 화면이 펼쳐지게끔 하기 위해 swipe handler를 눌러 start -> end 방향을 지정해주고 어떻게 모션이 이루어질지 제약을 추가해주었다.
하단메뉴 모션
activity_main.scene.xml
<ConstraintSet android:id="@+id/start">
        <Constraint
            android:id="@+id/mainBottomNavigationView"
            android:layout_width="0dp"
            android:layout_height="wrap_content"
            motion:layout_constraintBottom_toBottomOf="parent"
            motion:layout_constraintEnd_toEndOf="parent"
            motion:layout_constraintStart_toStartOf="parent" />
    </ConstraintSet>

    <ConstraintSet android:id="@+id/end">
        <Constraint
            android:id="@+id/mainBottomNavigationView"
            android:layout_width="0dp"
            android:layout_height="wrap_content"
            android:translationY="56dp"
            motion:layout_constraintBottom_toBottomOf="parent"
            motion:layout_constraintEnd_toEndOf="parent"
            motion:layout_constraintStart_toStartOf="parent" />
    </ConstraintSet>
translationY="56dp" 값을 줘서 하단메뉴가 아래로 내려가 화면상에서 보이지 않게 만들어준다.
Main MotionLayout 과 Fragment MotionLayout 연동
MainActivity
class MainActivity : AppCompatActivity() {

    override fun onCreate(savedInstanceState: Bundle?) {
        super.onCreate(savedInstanceState)
        setContentView(R.layout.activity_main)

        supportFragmentManager.beginTransaction()
            .replace(R.id.fragmentContainer, PlayerFragment())
            .commit()
    }
}
FrameLayout에 Fragment를 attach 해주기 위해 supportFragmentManager를 열어 붙여주었다.
메인 화면에서의 bottomNavigationView(하단 홈메뉴) 걸어두었던 무션을 정상적으로 작동시키기 위해서는 둘을 연결해주는 작업이 필요하다.
PlayerFragment
import android.os.Bundle
import android.view.View
import androidx.constraintlayout.motion.widget.MotionLayout
import androidx.fragment.app.Fragment
import com.example.youtube.databinding.FragmentPlayerBinding
import kotlin.math.abs

class PlayerFragment : Fragment(R.layout.fragment_player) {

    private var binding: FragmentPlayerBinding? = null

    override fun onViewCreated(view: View, savedInstanceState: Bundle?) {
        super.onViewCreated(view, savedInstanceState)

        val fragmentPlayerBinding = FragmentPlayerBinding.bind(view)
        binding = fragmentPlayerBinding

        initMotionLayoutEvent(fragmentPlayerBinding)
    }

    private fun initMotionLayoutEvent(fragmentPlayerBinding: FragmentPlayerBinding) {
        fragmentPlayerBinding.playerMotionLayout.setTransitionListener(object : MotionLayout.TransitionListener {
            override fun onTransitionStarted(motionLayout: MotionLayout?, startId: Int, endId: Int) {}

            override fun onTransitionChange(motionLayout: MotionLayout?, startId: Int, endId: Int, progress: Float) {
                binding?.let {
                    (activity as MainActivity).also { mainActivity ->
                        // mainActivity 로 치환해서 형변환
                        mainActivity.findViewById<MotionLayout>(R.id.mainMotionLayout).progress = abs(progress)
                    }
                }
            }

            override fun onTransitionCompleted(motionLayout: MotionLayout?, currentId: Int) {}

            override fun onTransitionTrigger(motionLayout: MotionLayout?, triggerId: Int, positive: Boolean, progress: Float) {}
        })
    }

    override fun onDestroy() {
        super.onDestroy()

        binding = null  // onDestroy 될 때 binding 해제
    }
}
PlayerFragment 의 최상단 뷰인 MotionLayout에 TransitionListener를 설정해준다. onTransitionChange를 재정의하여 트랜지션이 바뀔 때 메인 액티비티의 MotionLayout의 progress도 PlayerFragment의 progress와 동일하게 연동해준다.
프래그먼트는 단독으로 존재할 수 없기 때문에 액티비티가 존재할 수밖에 없다. 따라서 액티비티를 가져오면 해당 프래그먼트가 attach 되어있는 액티비티를 가져온다.
뷰에 비해 프래그먼트 수명이 길기 때문에 뷰가 제거될 때 호출되는 onDestroy에서 바인딩 클래스의 인스턴스를 정리해주었다.
영상 목록 API 만들고 Retrofit 으로 데이터 받아오기
recyclerView 에 채워줄 영상을 받아올 수 있는 api를 mocky 서비스를 이용해 서버로부터 영상 목록을 받아온다.
https://gist.github.com/deepakpk009/99fd994da714996b296f11c3c371d5ee 에서 api를 받아와 조금 수정해주었다.
VideoModel
data class VideoModel(
    val title: String,
    val sources: String,
    val subtitle: String,
    val thumb: String,
    val description: String
)
VideoService
import com.example.youtube.dto.VideoDto
import retrofit2.Call
import retrofit2.http.GET

interface VideoService {
    @GET("/v3/cbb293eb-e8b2-4079-ba82-472d1c0419d1")
    fun listVideos(): Call<VideoDto>
}
만든 api를 토대로 model 만들고, VideoModel을 가진 video 리스트 형식의 array 전체가 dto로 담기게 해준다. retrofit을 이용해서 메인 액티비티에서 제대로 api를 불러오는지 확인하기 위해 VideoService 인터페이스로 만들어 준다.
MainActivity
private fun getVideoList() {
        val retrofit = Retrofit.Builder()
            .baseUrl("https://run.mocky.io/")
            .addConverterFactory(GsonConverterFactory.create())
            .build()

        retrofit.create(VideoService::class.java).also {
            it.listVideos()
                .enqueue(object : Callback<VideoDto> {
                    override fun onResponse(call: Call<VideoDto>, response: Response<VideoDto>) {
                        if (response.isSuccessful.not()) {
                            Log.d("MainActivity", "response fail")
                            return
                        }

                        response.body()?.let { videoDto ->
                            Log.d("MainActivity", videoDto.toString())
                        }
                    }
                    override fun onFailure(call: Call<VideoDto>, t: Throwable) {
                        // 예외처리
                    }
                })
        }
    }
메인 액티비티에 retrofit 구현체를 만들고 VideoService 인터페이스를 enqueue 해서 dto를 가져온다. 로그캣으로 데이터가 잘 받아와지는지 확인해주었다.
레트로핏 사용하기 위해서는 인터넷 퍼미션 추가해주는 것 잊지말기!!
response.body()?.let { } 에서 람다를 it으로 해주고 로그캣을 찍으면 데이터가 안 받아와지고 response fail이 떠서 람다에 videoDto으로 해주고 로그캣을 찍으니까 잘 받아와졌다.
영상 목록 기본 구조 만들기
가져온 데이터를 메인 액티비티와 프래그먼트에 있는 recyclerView에 뿌려주기 위해 어댑터를 생성했다.
VideoAdapter
import com.example.youtube.model.VideoModel

class VideoAdapter(val callback: (String, String) -> Unit) : ListAdapter<VideoModel, VideoAdapter.ViewHolder>(diffUtil) {

    inner class ViewHolder(private val view: View) : RecyclerView.ViewHolder(view) {

        fun bind(item: VideoModel) {
            val titleTextView = view.findViewById<TextView>(R.id.titleTextView)
            val subTitleTextView = view.findViewById<TextView>(R.id.subTitleTextView)
            val thumbnailImageView = view.findViewById<ImageView>(R.id.thumbnailImageView)

            titleTextView.text = item.title
            subTitleTextView.text = item.subtitle

            Glide.with(thumbnailImageView.context)
                .load(item.thumb)
                .into(thumbnailImageView)

            view.setOnClickListener{
                callback(item.sources, item.title)
            }
        }
    }

    override fun onCreateViewHolder(parent: ViewGroup, viewType: Int): ViewHolder {
        return ViewHolder(LayoutInflater.from(parent.context).inflate(R.layout.item_video, parent, false))
    }

    override fun onBindViewHolder(holder: ViewHolder, position: Int) {
        return holder.bind(currentList[position])
    }

    companion object {
        val diffUtil = object : DiffUtil.ItemCallback<VideoModel>() {
            override fun areItemsTheSame(oldItem: VideoModel, newItem: VideoModel): Boolean {
                return oldItem == newItem
            }

            override fun areContentsTheSame(oldItem: VideoModel, newItem: VideoModel): Boolean {
                return oldItem == newItem
            }

        }
     }
}
layout/item_video.xml
<?xml version="1.0" encoding="utf-8"?>
<androidx.constraintlayout.widget.ConstraintLayout xmlns:android="http://schemas.android.com/apk/res/android"
    xmlns:app="http://schemas.android.com/apk/res-auto"
    xmlns:tools="http://schemas.android.com/tools"
    android:layout_width="match_parent"
    android:layout_height="wrap_content">

    <ImageView
        android:id="@+id/thumbnailImageView"
        android:layout_width="0dp"
        android:layout_height="230dp"
        android:scaleType="centerCrop"
        app:layout_constraintEnd_toEndOf="parent"
        app:layout_constraintStart_toStartOf="parent"
        app:layout_constraintTop_toTopOf="parent" />

    <TextView
        android:id="@+id/titleTextView"
        android:layout_width="0dp"
        android:layout_height="wrap_content"
        android:layout_marginStart="16dp"
        android:layout_marginEnd="16dp"
        android:ellipsize="end"
        android:maxLines="1"
        android:singleLine="true"
        android:textColor="@color/black"
        android:textSize="16sp"
        app:layout_constraintEnd_toEndOf="parent"
        app:layout_constraintStart_toEndOf="@id/logoImageView"
        app:layout_constraintTop_toTopOf="@id/logoImageView"
        tools:text="유튜브 제목" />

    <TextView
        android:id="@+id/subTitleTextView"
        android:layout_width="0dp"
        android:layout_height="wrap_content"
        android:layout_marginTop="4dp"
        android:ellipsize="end"
        android:maxLines="1"
        android:singleLine="true"
        android:textSize="13sp"
        app:layout_constraintEnd_toEndOf="@id/titleTextView"
        app:layout_constraintStart_toStartOf="@id/titleTextView"
        app:layout_constraintTop_toBottomOf="@id/titleTextView"
        tools:text="유튜브 소제목" />

    <ImageView
        android:id="@+id/logoImageView"
        android:layout_width="50dp"
        android:layout_height="50dp"
        android:layout_marginStart="16dp"
        android:layout_marginTop="10dp"
        android:layout_marginBottom="16dp"
        android:src="@drawable/shape_circle"
        app:layout_constraintBottom_toBottomOf="parent"
        app:layout_constraintStart_toStartOf="parent"
        app:layout_constraintTop_toBottomOf="@id/thumbnailImageView" />

</androidx.constraintlayout.widget.ConstraintLayout>.png)
MainActivity
class MainActivity : AppCompatActivity() {

    private lateinit var videoAdapter: VideoAdapter

    override fun onCreate(savedInstanceState: Bundle?) {
        super.onCreate(savedInstanceState)
        setContentView(R.layout.activity_main)

        supportFragmentManager.beginTransaction()
            .replace(R.id.fragmentContainer, PlayerFragment())
            .commit()

        videoAdapter = VideoAdapter()

        findViewById<RecyclerView>(R.id.mainRecyclerView).apply {
            adapter = videoAdapter
            layoutManager = LinearLayoutManager(context)
        }

        getVideoList()
    }

    private fun getVideoList() {
        val retrofit = Retrofit.Builder()
            .baseUrl("https://run.mocky.io/")
            .addConverterFactory(GsonConverterFactory.create())
            .build()

        retrofit.create(VideoService::class.java).also {
            it.listVideos()
                .enqueue(object : Callback<VideoDto> {
                    override fun onResponse(call: Call<VideoDto>, response: Response<VideoDto>) {
                        if (response.isSuccessful.not()) {
                            Log.d("MainActivity", "response fail")
                            return
                        }

                        response.body()?.let { videoDto ->
                            videoAdapter.submitList(videoDto.videos)
                        }
                    }
VideoAdapter 를 메인 액티비티에 연결시켜 서버에서 가져온 영상 목록이 뷰에 보여지도록 하였다.
MotionLayout과 RecyclerView 사이에 스크롤 가능 구현
프레임레이아웃에 붙어있는 프래그먼트에 있는 MotionLayout이 터치를 다 가져가버려서 뒤에 있는 recyclerView가 터치되지 않는 문제점이 있다. 따라서 커스터마이징하여 mainContainerView 영역에 터치한 경우에만 motionLayout이 정상적으로 터치가 동작하도록 하고, 그 외 영역을 터치한 경우 터치이벤트를 무시하게 만들어줬다.
CustomMotionLayout
class CustomMotionLayout(context: Context, attributeSet: AttributeSet? = null) : MotionLayout(context, attributeSet) {

    private var motionTouchStarted = false
    private val mainContainerView by lazy {
        findViewById<View>(R.id.mainContainerLayout)
    }
    private val hitRect = Rect()

    init {
        setTransitionListener(object : TransitionListener {
            override fun onTransitionStarted(motionLayout: MotionLayout?, startId: Int, endId: Int) {}

            override fun onTransitionChange(motionLayout: MotionLayout?, startId: Int, endId: Int, progress: Float) {}

            override fun onTransitionCompleted(motionLayout: MotionLayout?, currentId: Int) {
                motionTouchStarted = false
            }

            override fun onTransitionTrigger(motionLayout: MotionLayout?, triggerId: Int, positive: Boolean, progress: Float) {}
        })
    }

    override fun onTouchEvent(event: MotionEvent): Boolean {
       // ACTION_UP 과 ACTION_CANCEL 은 필요 없어서 when 문으로 motionTouchStarted 값을 false로 주었다.
        when (event.actionMasked) {
            MotionEvent.ACTION_UP, MotionEvent.ACTION_CANCEL -> {
                motionTouchStarted = false
                return super.onTouchEvent(event)
            }
        }

        if (!motionTouchStarted) {
            mainContainerView.getHitRect(hitRect)
            motionTouchStarted = hitRect.contains(event.x.toInt(), event.y.toInt())
        }

        return super.onTouchEvent(event) && motionTouchStarted
    }

    private val gestureListener by lazy {
        object : GestureDetector.SimpleOnGestureListener() {
            override fun onScroll(e1: MotionEvent, e2: MotionEvent, distanceX: Float, distanceY: Float): Boolean {
                mainContainerView.getHitRect(hitRect)
                return hitRect.contains(e1.x.toInt(), e1.y.toInt())
            }
        }
    }

    private val gestureDetector by lazy {
        GestureDetector(context, gestureListener)
    }

    override fun onInterceptTouchEvent(event: MotionEvent?): Boolean {
        return gestureDetector.onTouchEvent(event)
    }
}
커스터마이징 해주고 fragment_player.xml 모션레이아웃 속성을 커스터마이징한 모션레이아웃으로 바꿔준다.
fragment_player.xml
android:nestedScrollingEnabled="false"
android:padding="16dp"
android:clipToPadding="false"
recyclerView에 nestedScrollingEnabled 속성을 false 로 주어 스크롤이 사용자가 느끼기에 정상적으로 동작하도록 해주었고, 꽉 찬 동영상 화면을 패딩을 주어 사이즈를 줄여주고 제일 윗 영역에만 패딩을 주고 아래 영역에 패딩값을 주지 않게 하기 위해 clipToPadding 속성을 주었다.
VideoAdapter
class VideoAdapter(val callback: (String, String) -> Unit) : ListAdapter<VideoModel, VideoAdapter.ViewHolder>(diffUtil) {

    inner class ViewHolder(private val view: View) : RecyclerView.ViewHolder(view) {

        fun bind(item: VideoModel) {
            val titleTextView = view.findViewById<TextView>(R.id.titleTextView)
            val subTitleTextView = view.findViewById<TextView>(R.id.subTitleTextView)
            val thumbnailImageView = view.findViewById<ImageView>(R.id.thumbnailImageView)

            titleTextView.text = item.title
            subTitleTextView.text = item.subtitle

            Glide.with(thumbnailImageView.context)
                .load(item.thumb)
                .into(thumbnailImageView)

            view.setOnClickListener {
                callback(item.sources, item.title)
            }
        }
    }
비디오를 눌렀을 때 프래그먼트에 이벤트를 전달하도록 하기 위해서 VideoAdapter 에 클릭 리스너를 추가해주고, 클릭 리스너가 바깥으로 나갈 수 있도록 바깥에서 callback 이라는 이름으로 람다를 받아온다.
MainActivity
videoAdapter = VideoAdapter(callback = { url, title ->
            supportFragmentManager.fragments.find {it is PlayerFragment}?.let {
                (it as PlayerFragment).play(url, title)
            }
        })
PlayerFragment
private fun initRecyclerView(fragmentPlayerBinding: FragmentPlayerBinding) {

        videoAdapter = VideoAdapter(callback = { url, title ->
            play(url, title)
        })

        fragmentPlayerBinding.fragmentRecyclerView.apply {
            adapter = videoAdapter
            layoutManager = LinearLayoutManager(context)
        }
    }

fun play(url: String, title: String) {
        binding?.let {
            it.playerMotionLayout.transitionToEnd()
            it.bottomTitleTextView.text = title
        }
    }
메인 액티비티와 PlayerFragment의 videoAdapter를 초기화해주는 부분에서 callback 함수를 정의해주고 url과 title이 넘어왔을 때 프래그먼트에 url과 title을 업데이트 해주도록 구현하였다.
ExoPlayer 이용해 동영상 재생하기
ExoPlayer는 구글이 안드로이드 SDK와는 별도로 배포되는 오픈소스 프로젝트로 오디오 및 동영상 재생, 재생 관련 기능들을 포함하고 있는 라이브러리이다. 다른 설정 없이도 네트워크로부터 미디어를 스트리밍 형태로 불러와 재생할 수도 있고 다양한 포맷들을 지원하며, 커스터마이징도 지원한다. ExoPlayer를 사용한 대표적인 서비스로는 유튜브가 있다.
앱수준 build.gradle
implementation 'com.google.android.exoplayer:exoplayer:2.16.'fragment_player.xml
<com.google.android.exoplayer2.ui.PlayerView
        android:id="@+id/playerView"
        android:layout_width="0dp"
        android:layout_height="0dp"
        app:resize_mode="fill"
        app:layout_constraintBottom_toBottomOf="@id/mainContainerLayout"
        app:layout_constraintStart_toStartOf="@id/mainContainerLayout"
        app:layout_constraintTop_toTopOf="@id/mainContainerLayout" />
임시로 ImageView 로 설정해둔 동영상 영역이 될 뷰를 PlayerView 로 변경해주고 각각 다른 동영상 사이즈를 resize_mode="fill" 속성을 통해 맞춰주었다.
PlayerFragment
private var player: SimpleExoPlayer? = null

private fun initPlayer(fragmentPlayerBinding: FragmentPlayerBinding) {
        context?.let {
            // SimpleExoPlayer 인스턴스
            player = SimpleExoPlayer.Builder(it).build()
        }

        fragmentPlayerBinding.playerView.player = player
    }

	fun play(url: String, title: String) {

        	context?.let {
            	val dataSourceFactory = DefaultDataSourceFactory(it)
            	val mediaSource = ProgressiveMediaSource.Factory(dataSourceFactory)
                    // MediaItem 을 만들고
                	.createMediaSource(MediaItem.fromUri(Uri.parse(url)))
            	// MediaSource 를 연결
            	player?.setMediaSource(mediaSource)
            	// player 준비
            	player?.prepare()
            	// player 재생
            	player?.play()

        	binding?.let {
            	it.playerMotionLayout.transitionToEnd()
            	it.bottomTitleTextView.text = title
        	}
    	}
영상 리스트에서 영상을 클릭하여 재생할 때 플레이어가 포함된 프래그먼트 뷰가 펼쳐지면서 영상이 재생되도록 구현했다.
PlayerFragment
private fun initPlayer(fragmentPlayerBinding: FragmentPlayerBinding) {
        context?.let {
            player = SimpleExoPlayer.Builder(it).build()
        }

        fragmentPlayerBinding.playerView.player = player

        binding?.let {
            player?.addListener(object : Player.EventListener {
                override fun onIsPlayingChanged(isPlaying: Boolean) {
                    super.onIsPlayingChanged(isPlaying)

                    if (isPlaying) {
                        it.bottomPlayerControlButton.setImageResource(R.drawable.ic_baseline_pause_24)
                    } else {
                        it.bottomPlayerControlButton.setImageResource(R.drawable.ic_baseline_play_arrow_24)
                    }
                }
            })
        }
    }

private fun initControlButton(fragmentPlayerBinding: FragmentPlayerBinding) {
        fragmentPlayerBinding.bottomPlayerControlButton.setOnClickListener {
            val player = this.player ?: return@setOnClickListener

            if (player.isPlaying) {
                player.pause()
            } else {
                player.play()
            }
        }
    }
플레이 버튼을 눌렀을 때 영상이 재생됨과 동시에 일시정지 버튼이 뜨고, 일시정지 버튼을 눌렀을 때 영상이 멈춤과 동시에 플레이 버튼이 뜨도록 코드를 작성하였다.
하지만 실행해보면 모션레이아웃을 아래로 내리거나 위로 올릴 때 영상 플레이어 뷰의 크기가 점점 커지는 것이 아니라 하단 부분에서 너비를 꽉 차게 채워주면서 모션이 일어나고, 플레이어 버튼이 엉뚱한 곳에 위치한 것을 볼 수 있다.
이를 해결해주기 위해 모션 레이아웃을 추가해준다.
MottionLayout 추가
xml/fragment_player_scene.xml
<KeyFrameSet>
        <KeyAttribute
             android:alpha="0"
             motion:framePosition="10"
             motion:motionTarget="@+id/bottomTitleTextView" />

        <KeyAttribute
             android:alpha="0"
             motion:framePosition="10"
             motion:motionTarget="@+id/bottomPlayerControlButton" />

        <KeyPosition
             motion:curveFit="linear"  // 곡선이 아닌 선형으로 진행될 수 있도록
             motion:framePosition="0"
             motion:keyPositionType="deltaRelative"
             motion:motionTarget="@+id/playerView"
             motion:percentWidth="1"
             // 값을 1로 주어 플레이어 뷰를 중앙으로 배치
             motion:percentX="1" />
</KeyFrameSet>
0에서 10%가 됐을 때 titleTextView 와 controlButton 의 투명도가 100%가 되어 보이지 않도록 하고, playerView 의 경우 너비를 다 채워 10% 위치에서는 너비가 꽉 찰 수 있도록 하였다.
xml/fragment_player_scene.xml
<ConstraintSet android:id="@+id/end">
     <Constraint
            android:id="@+id/bottomPlayerControlButton"
            android:alpha="0"/>
</ConstraintSet>
fragment_player.xml
<androidx.constraintlayout.widget.ConstraintLayout
        android:id="@+id/mainContainerLayout"
        <!--background="@color/purple_200" 지우고 -->
        android:background="#AAAAAA" />

<TextView
        android:textColor="@color/black" />
생명주기에 따른 재생 컨트롤
override fun onStop() {
        super.onStop()

        player?.pause()
    }

    override fun onDestroy() {
        super.onDestroy()

        binding = null
        player?.release()
    }
홈 화면으로 나가는 등의 화면 전환이 이루어질 때 영상 재생을 일시정지 하도록 설정해주기 위해 onDestroy() 시 release 를 통해 메모리를 해제 시켜주고 onStop() 시 pause 해주었다.
