스프링 부트가 제공하는 핵심기능들을 정리해보겠습니다. Spring MVC가 제공하는지 Spring Boot가 제공하는지 가끔 헤갈릴 때가 있습니다. 이번에 스프링부트가 제공해주는 것들을 제대로 이해해보겠습니다.
스프링 부트 핵심 기능 목차
SpringApplicationClass- 외부설정 (Property 설정 방법과 각각 방식의 적용 우선순위)
- Profile
- Logging
- Test (다른 글 에서 정리)
Spring-Dev-Tools의존성
SpringApplication Class
SpringApplication class는 main() 메소드에서 실행될 스프링 어플리케이션을 시작하는 편리한 방법을 제공합니다.
@SpringBootApplication
public class BootApplication {
  public static void main(String[] args) {
      SpringApplication.run(BootApplication.class, args);
  }
}
SpringApplicaiton을 통해 사용할 수 있는 기능들은 많지만 간단히 몇가지만 살펴보겠습니다.
- Startup Failure 에러발생시 에러 처리방법
- Banner Customizing
- Fluent Builder API
- Application Event and Listener
- WebApplication Type
- Application Argument 사용
ApplicationRunner를 이용해서 어플리케이션 실행 후 작업 추가
Startup Failure
***************************
APPLICATION FAILED TO START
***************************

Description:

Embedded servlet container failed to start. Port 8080 was already in use.

Action:

Identify and stop the process that's listening on port 8080 or configure this application to listen on another port.
만약 어플리케이션이 시작을 실패한다면, 등록된 FailureAnalyzer들은 관련 error message 들과 문제를 해결하기 위한 해결법들을 제공해줍니다. Spring Boot는 많은 FailterAnalyer 구현체를 제고하지만 우리들만의 구현체를 정의해서 등록할 수도 있습니다.
Banner Customizing
크게 중요한 내용은 아니지만 위와 같이 어플리케이션을 시작하면 SPRING이라는 배너가 나오는데 이부분을 커스터마이징하는 기능을 제공하기도합니다. 자세한 내용은 공식 문서로 대체합니다.
Fluent Builder API
new SpringApplicationBuilder()
        .sources(Parent.class)
        .child(Application.class)
        .bannerMode(Banner.Mode.OFF)
        .run(args);
위와 같이 SpringApplicationBuilder를 통해 어플리케이션을 설정할 수도 있습니다.
Application Event and Listener
Spring Application 은 몇가지의 어플리케이션 이벤트를 발생시킵니다.

이러한 이벤트를 처리해주는 리스너를 추가해서 알맞은 이벤트를 처리할 수 있습니다.
주의할 점은 Ioc 컨테이너인 ApplicationContext이 생성되기전에 발생하는 이벤트들이 있습니다.
ApplicationStartingEvent가 이에 해당합니다.
만약 Listener들을 @Component로 즉, Bean으로 등록되는 방식을 선택하면 ApplicationContext이 생성되기전에 발생하는 이벤트를 처리할 수가 없습니다.
이러한 이벤트들을 처리하기 위해서는 SpringApplication.addListeners(…)를 사용해서 직접 리스너를 등록해서 이벤트를 처리할 수 있습니다.
public class CustomApplicationStartingListener implements ApplicationListener {
    @Override
    public void onApplicationEvent(ApplicationEvent applicationEvent) {
        System.out.println("================");
        System.out.println("Application Starting");
        System.out.println("================");
    }
}

@SpringBootApplication
public class BootApplication {
    public static void main(String[] args) {
        SpringApplication application = new SpringApplication(BootApplication.class);
        application.addListeners(new CustomApplicationStartingListener());
        application.run(args);
    }
}
setWebApplicationType를 이용한 Application Type 변경
Spring Boot를 3가지 다른 종류의 어플리케이션으로 실행할 수 있도록 설정이 가능합니다.
- Servlet 기반의 서버 어플리케이션
- Reactive 기반의 서버 어플리케이션
- None (서버가 아닌 어플리케이션)
@SpringBootApplication
public class BootApplication {
    public static void main(String[] args) {
        SpringApplication application = new SpringApplication(BootApplication.class);
        application.setWebApplicationType(WebApplicationType.NONE);
//        application.setWebApplicationType(WebApplicationType.SERVLET);
//        application.setWebApplicationType(WebApplicationType.REACTIVE);
        application.run(args);
    }
}
간단한 예제 테스트를 할때는 None으로 실행해서 더 빠르게 테스트를 해볼 수 있습니다.
ApplicationRunner를 이용한 Application 실행 후 작업
ApplicationRunner interface를 구현한 Bean을 추가해주면 Application 추가 후 작업을 추가해 줄 수 있습니다. 예제를 간단한 설정을 테스트할 때 따로 Controller를 실행하지않고 Runner를 활용하면 도움이 됩니다.
@Component
public class ExampleRunner implements ApplicationRunner {
    @Override
    public void run(ApplicationArguments args) throws Exception {
        System.out.println("==================");
        System.out.println("Application Running");
        System.out.println("==================");
    }
}
외부 설정 - Property
Property는 코드 밖 외부에서 어플리케이션의 설정에 관여하는 Key-Value의 메타 데이터입니다.
Spring Boot에서는 설정만으로 어플리케이션의 동작을 제어할 수 있도록 여러가지 Property와 Property 설정방식을 제공합니다.
Property를 설정하는 방법에는 아래와 같은 방법들이 있습니다.
- properties
- YAML
- 환경변수
- 커맨드 라인 아규먼트
Property를 설정하는 방법들은 매우 다양하지만 각각의 방법이 실제 적용되는 property에 중복이 있을 경우, 우선 순위가 있습니다.
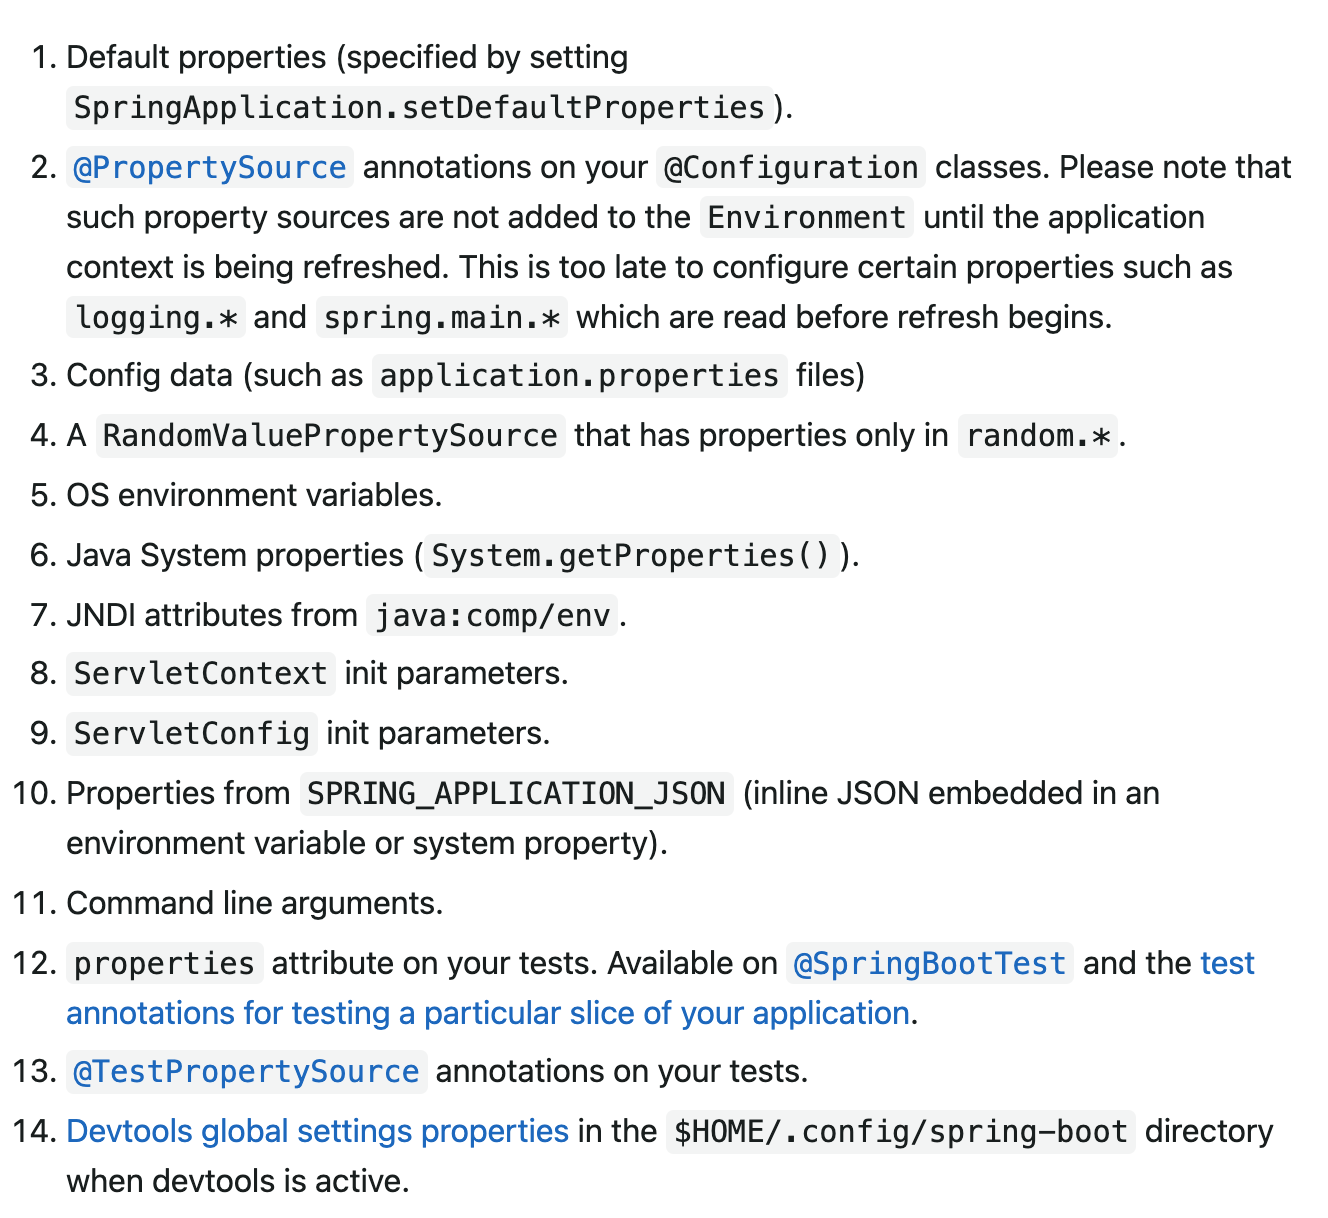
모든 Property 설정 방법을 모두 살펴보기보단 주로 사용하는 방법 위주로 정리해보겠습니다.
application.properties 파일 경로에 따른 우선 순위
프로젝트에서 application.properties들이 여러가지 있을 경우 특정 위치에 따른 우선 순위에 의해 property가 결정됩니다.
우선순위 순서대로
1. file:./config/
2. file:./
3. classpath:/config/
4. classpath:/
@Value() 어노테이션을 활용한 Property 처리
application.properties
test.name=peanut
test.age=28- ApplicationRunner
@Component
@Order(Ordered.HIGHEST_PRECEDENCE)
public class FirstExampleRunner implements ApplicationRunner {

    @Value("${test.name}")
    String name;

    @Value("${test.age}")
    String age;

    @Override
    public void run(ApplicationArguments args) throws Exception {
        System.out.println("In application.properties, Name = " + name);
        System.out.println("In application.properties, Age = " + age);
    }
}
@Value annotation을 이용해서 Property를 가져와서 활용할 수 있습니다.
@ConfigurationProperties을 적용해서 POJO형태로 Property를 처리한 후 Bean으로 등록해서 활용하기
개인적으로 활용도가 가장 높기도하고 Spring Boot 관련 코드 내부를 살펴볼때도 많이 적용되어 있는 것을 확인할 수 있습니다. 이런식으로 properties를 처리하면 Type Safe한 설정 값들을 읽어올 수 있습니다.
대표적으로 내장 웹서버의 설정을 바꾸기 위해 @ConfigurationProperties를 활용해서 코드가 아닌 Property로 내장 웹서버의 값을 변경합니다.
server.port=80와 같은 식으로 서버 포트를 변경할 수 있습니다.
org.springframework.boot.autoconfigure.web속 ServerProperties 를 정의하고
@ConfigurationProperties(
    prefix = "server",
    ignoreUnknownFields = true
)
public class ServerProperties {
    private Integer port;
    ...
}org.springframework.boot.autoconfigure.web.servlet.ServletWebServerFactoryAutoConfiguration에서@EnableConfigurationProperties어노테이션을 활용해서 properties를 처리할 수 있도록 하는 Spring Boot 자동 설정 코드를 볼 수 있습니다.
...
@EnableConfigurationProperties({ServerProperties.class})
...
public class ServletWebServerFactoryAutoConfiguration { ... }@ConfigurationProperties를 등록하는 방법
@ConfigurationProperties를 적용한 Properties POJO Class 정의 (getter, setter 필수)
@ConfigurationProperties(prefix = "test")
public class ExampleProperties {
    private String name;
    private int age;

    public String getName() {
        return name;
    }

    public void setName(String name) {
        this.name = name;
    }

    public int getAge() {
        return age;
    }

    public void setAge(int age) {
        this.age = age;
    }
}- Property 객체를 properties에서 가져오겠다는 등록
2가지 방식으로 Property를 객체로 읽어오는 방식이 있습니다.
@EnableConfigurationProperties으로 빈 등록
@Component
@EnableConfigurationProperties({ExampleProperties.class})
@Order(Ordered.HIGHEST_PRECEDENCE)
public class FirstExampleRunner implements ApplicationRunner {

    @Autowired
    ExampleProperties exampleProperties;

    @Override
    public void run(ApplicationArguments args) throws Exception {
        System.out.println("In application.properties, Name = " + exampleProperties.getName());
        System.out.println("In application.properties, Age = " + exampleProperties.getAge());
    }
}
@EnableConfigurationProperties({ExampleProperties.class})으로 등록할 수 있습니다.
@Componentannnotation으로 빈 등록
@Configuration
@ConfigurationProperties(prefix = "test")
public class ExampleProperties {...}
간단히 @Component로 등록해서 컴포넌트 스캔에 의해 빈이 등록되도록 할 수도 있습니다.
읽어 오는 property 값을 검증할 수도 있습니다.
JSR-303 스팩을 활용해서 property들의 값을 원하는대로 검증할 수 있습니다.
@Configuration
@ConfigurationProperties(prefix = "test")
@Validated
public class ExampleProperties {
    @NotEmpty
    private String name;

    private int age;
	...
}
위와 같이 @Validated을 추가해서 Property 값을 검증할 수 있습니다.
Profile
profile은 Spring Core에서 제공해주는 기능이지만 Property를 이용해서 손쉽게 등록가능합니다.
spring.profiles.active=[profile1],[profile2] 와 같은 프로퍼티를 등록해서 Bean들의 그릅의 profile로 관리가능합니다.
spring.profiles.active=test로 test Profile이 등록시 Bean등록을 하는 Component를 아래와 같이 만들어 사용할 수 있습니다.
@Profile("test")
@Configuration
public class TestConfig {
    @Bean
    public StoreService storeService() {
        return new TestStoreService();
    }
}
profile관련된 설명은 문서에 잘 나와 있기 때문에 추가적으로 설명은 남기지 않겠습니다.
https://docs.spring.io/spring-boot/docs/current/reference/html/features.html#features.profiles
Logging
Logging Facade 인 SLF4j와 Commons Logging이 있습니다. Logging Facade는 직접적으로 로깅을 하는 구현체는 아니고 로깅을 하는 구현체인 Logger들 JUL, Log4J2, Logback의 API들을 추상화해주는 것들입니다. 이러한 추상화된 Logging Facade를 Spring Boot 가 사용하는 이유는 선호에 맞게 알맞는 로깅 구현체를 바꿔 끼울 수 있도록 해주기 위해서 입니다.
Spring Boot Starter를 사용하면 default Logging Facade는 Commons Loggin이며 default Logger로는 Logback을 사용하고 있습니다.
다른 로거를 사용하고 싶으면 간단히 기존 의존성을 exclusions을 활용해서 새로운 Logger dependency를 추가해주면 됩니다.
There are a lot of logging frameworks available for Java. Do not worry if the above list seems confusing. Generally, you do not need to change your logging dependencies and the Spring Boot defaults work just fine.
자바를 위한 너무 많은 로깅 프레임워크들 때문에 너무 혼란스럽다면 걱정하지 않아도 됩니다. 일반적으로 Logging 의존성을 바꿀 필요는 없습니다. Spring Boot의 default로 충분할 때가 많습니다.
Logging format
2019-03-05 10:57:51.112  INFO 45469 --- [           main] org.apache.catalina.core.StandardEngine  : Starting Servlet Engine: Apache Tomcat/7.0.52
2019-03-05 10:57:51.253  INFO 45469 --- [ost-startStop-1] o.a.c.c.C.[Tomcat].[localhost].[/]       : Initializing Spring embedded WebApplicationContext
2019-03-05 10:57:51.253  INFO 45469 --- [ost-startStop-1] o.s.web.context.ContextLoader            : Root WebApplicationContext: initialization completed in 1358 ms
2019-03-05 10:57:51.698  INFO 45469 --- [ost-startStop-1] o.s.b.c.e.ServletRegistrationBean        : Mapping servlet: 'dispatcherServlet' to [/]
2019-03-05 10:57:51.702  INFO 45469 --- [ost-startStop-1] o.s.b.c.embedded.FilterRegistrationBean  : Mapping filter: 'hiddenHttpMethodFilter' to: [/*]
default Logging 포맷은 위와 같습니다.
Date and Time: Millisecond precision and easily sortable.Log Level: ERROR, WARN, INFO, DEBUG, or TRACE.Process ID.A --- separator to distinguish the start of actual log messages.Thread name: Enclosed in square brackets (may be truncated for console output).Logger name: This is usually the source class name (often abbreviated).The log message.
Spring Boot Logging 레벨 변경
Spring Boot에서 debug=true property를 추가하면 어떤 Bean들이 추가되는지 자세히 볼 수 있습니다. 일부 핵심 라이브러리들을 debug 레벨의 로깅을 확인할 수 있습니다.
만약 원하는 Bean등록에 실패하면 Debug로 확인해보시면 될 것 같습니다.
빈 등록 중@ConditionalOnXXX와 같은 어노테이션에 의해 등록되지 않는 경우들을 확인할 수 있습니다.
trace=true property를 추가하면 전체 라이브러리를 debug모드로 실행할 수 있습니다.
Logging 파일 출력
대부분 실제 서비스들은 꼭 로깅을 해놔야지 버그가 발생시 디버깅이 가능합니다. 특히 간헐적 버그라면 로그없이 해결하기 어려울 수 있습니다.
Spring Boot는 아주 편하게 이러한 로그를 파일로 관리하도록 하는 방법을 제공해줍니다. 여기서도 property를 이용해서 설정할 수 있습니다.
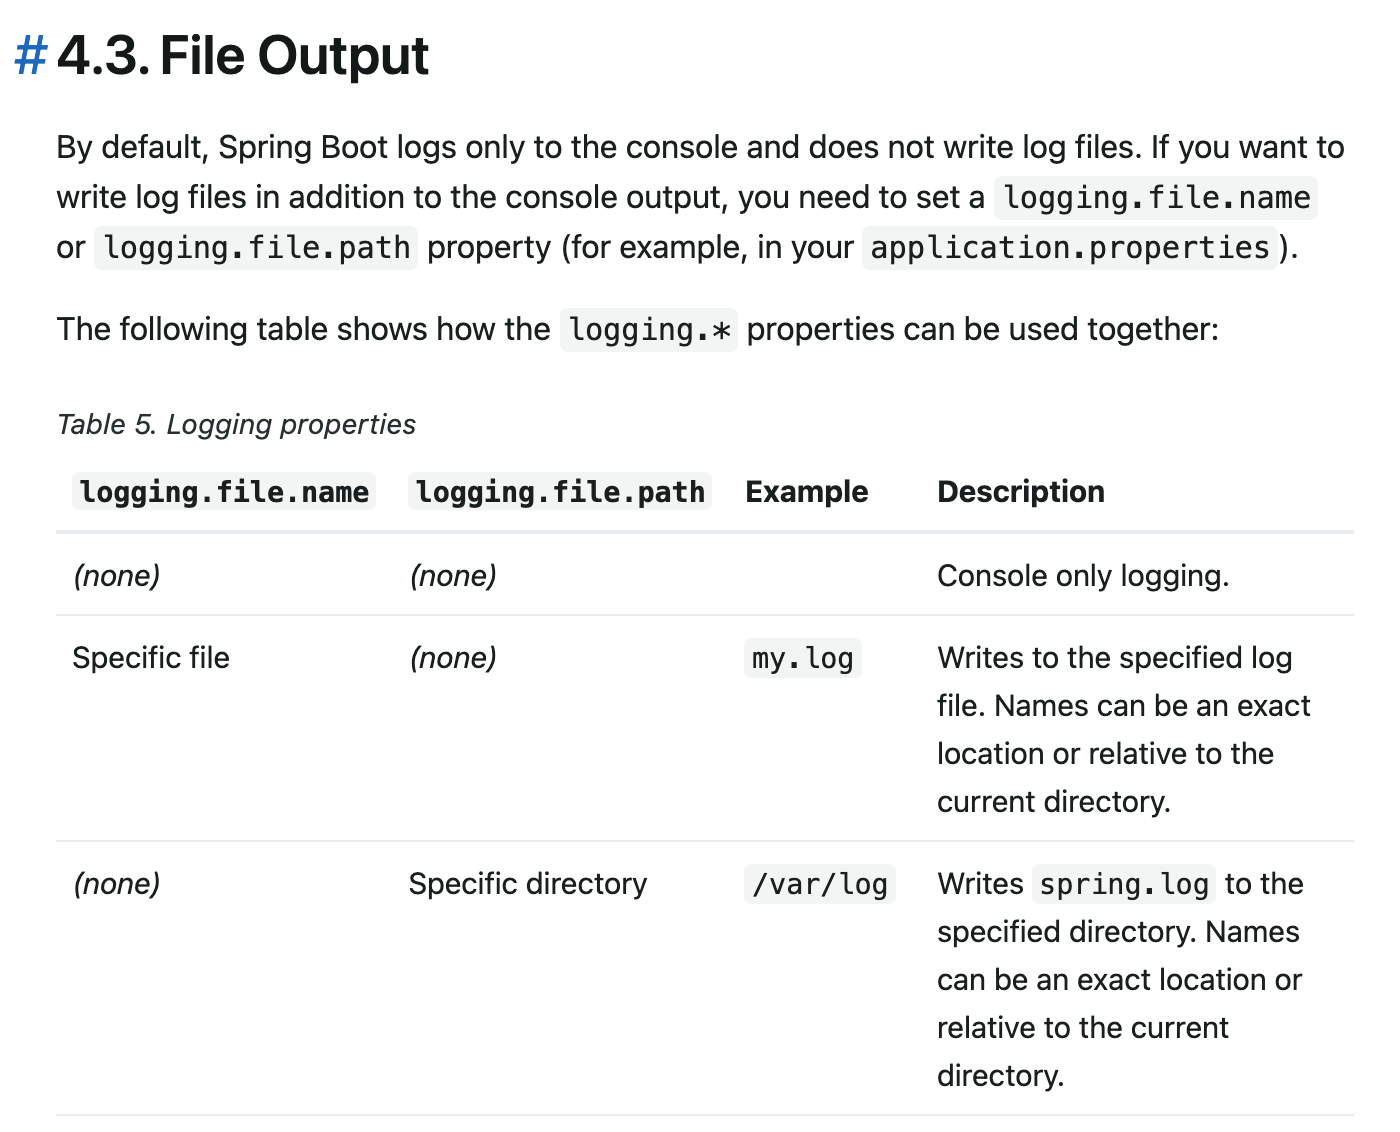
logging.file property 특정 파일의 이름을 쓸 수도 있고 loggin.path로 특정 디렉토리를 지정할 수도 있습니다.
로그 파일들은 10MB에 도달할 경우 rotate됩니다. 기본적으로 INFO, WARN, ERROR 레벨의 메세지와 console output이 로깅됩니다.
Logback에서 로그 파일들의 rotate 관련 설정들도 Property를 지정할 수도 있습니다.
Package 별 Log Level 설정
logging.level.root=warn
logging.level.org.springframework.web=debug
logging.level.org.hibernate=error
logging.level.[package path]의 property에 log level을 지정하면 해당 로그 수준의 메세지들만 출록하도록 할 수 있습니다.