챕터 2로 넘어왔습니다. 지금까지 해왔던 내용은 매우 기초적이고 ThreeJS 어플리케이션이 어떻게 만들어질지 대충 알아봤습니다. 지금부터는 조금더 깊게 공부해보겠습니다.
ThreeJS를 만들 때 사용할 주요 컴포넌트
복습겸 Scene에 무엇을 보여줄 때 필요한 4가지 요소를 정리해보겠습니다.
| Component | Description |
|---|---|
Camera | 화면에 무엇이 렌더링될 지를 결정하는 것 |
Light | material들이 어떻게 나타나는지에 대한 effect를 가지고 있고 그림자 효과를 만들어 낼 때 사용됩니다. |
Object | 카메라의 관점에서 보여질 주요 Object들입니다. cube, sphere, points |
Renderer | camera와 scene에서 얻은 정보를 이용해 screen에 output을 그려내는 역할을 합니다. |
THREE.Scene is a structure that is sometimes also called a scene graph. A scene graph is a structure that can hold all the necessary information of a graphical scene. In Three.js, this means that THREE.Scene contains all the objects, lights, and other objects necessary for rendering. It is interesting to note that a scene graph, as the name implies, isn't just an array of objects; a scene graph consists of a set of nodes in a tree structure. Each object you can add to the scene in Three.js, and even THREE.Scene itself, extends from a base object named THREE.Object3D. A THREE.Object3D object can also have its own children, which you can use to create a tree of objects that Three.js will interpret and render.
THREE.Scene 은 그래프구조로 렌더링에 필요한 모든 객체(light, other objects)를 포함하고 있습니다. 모두 THREE.Object3D 을 상속하는 객체입니다. THREE.Scene자체도 마찬가지입니다.그리고 THREE.Object3D는 그것들의 자신을 가질 수 있다고합니다. 즉 하나의 객체내에 모두 포함 시킬수 있다는 것이죠.
The basic funcitonality of the Scene
예시를 보면서 각 함수의 기능을 되짚어보겠습니다.
var scene = new THREE.Scene();
var camera = new THREE.PerspectiveCamera(45, window.innerWidth
/ window.innerHeight, 0.1, 100);
scene.add(camera);
...
var planeGeometry = new THREE.PlaneGeometry(60,40,1,1);
var planeMaterial = new THREE.MeshLambertMaterial({color: 0xffffff});
var plane = new THREE.Mesh(planeGeometry,planeMaterial);
...
scene.add(plane);
var ambientLight = new THREE.AmbientLight(0x3c3c3c);
scene.add(ambientLight);
...
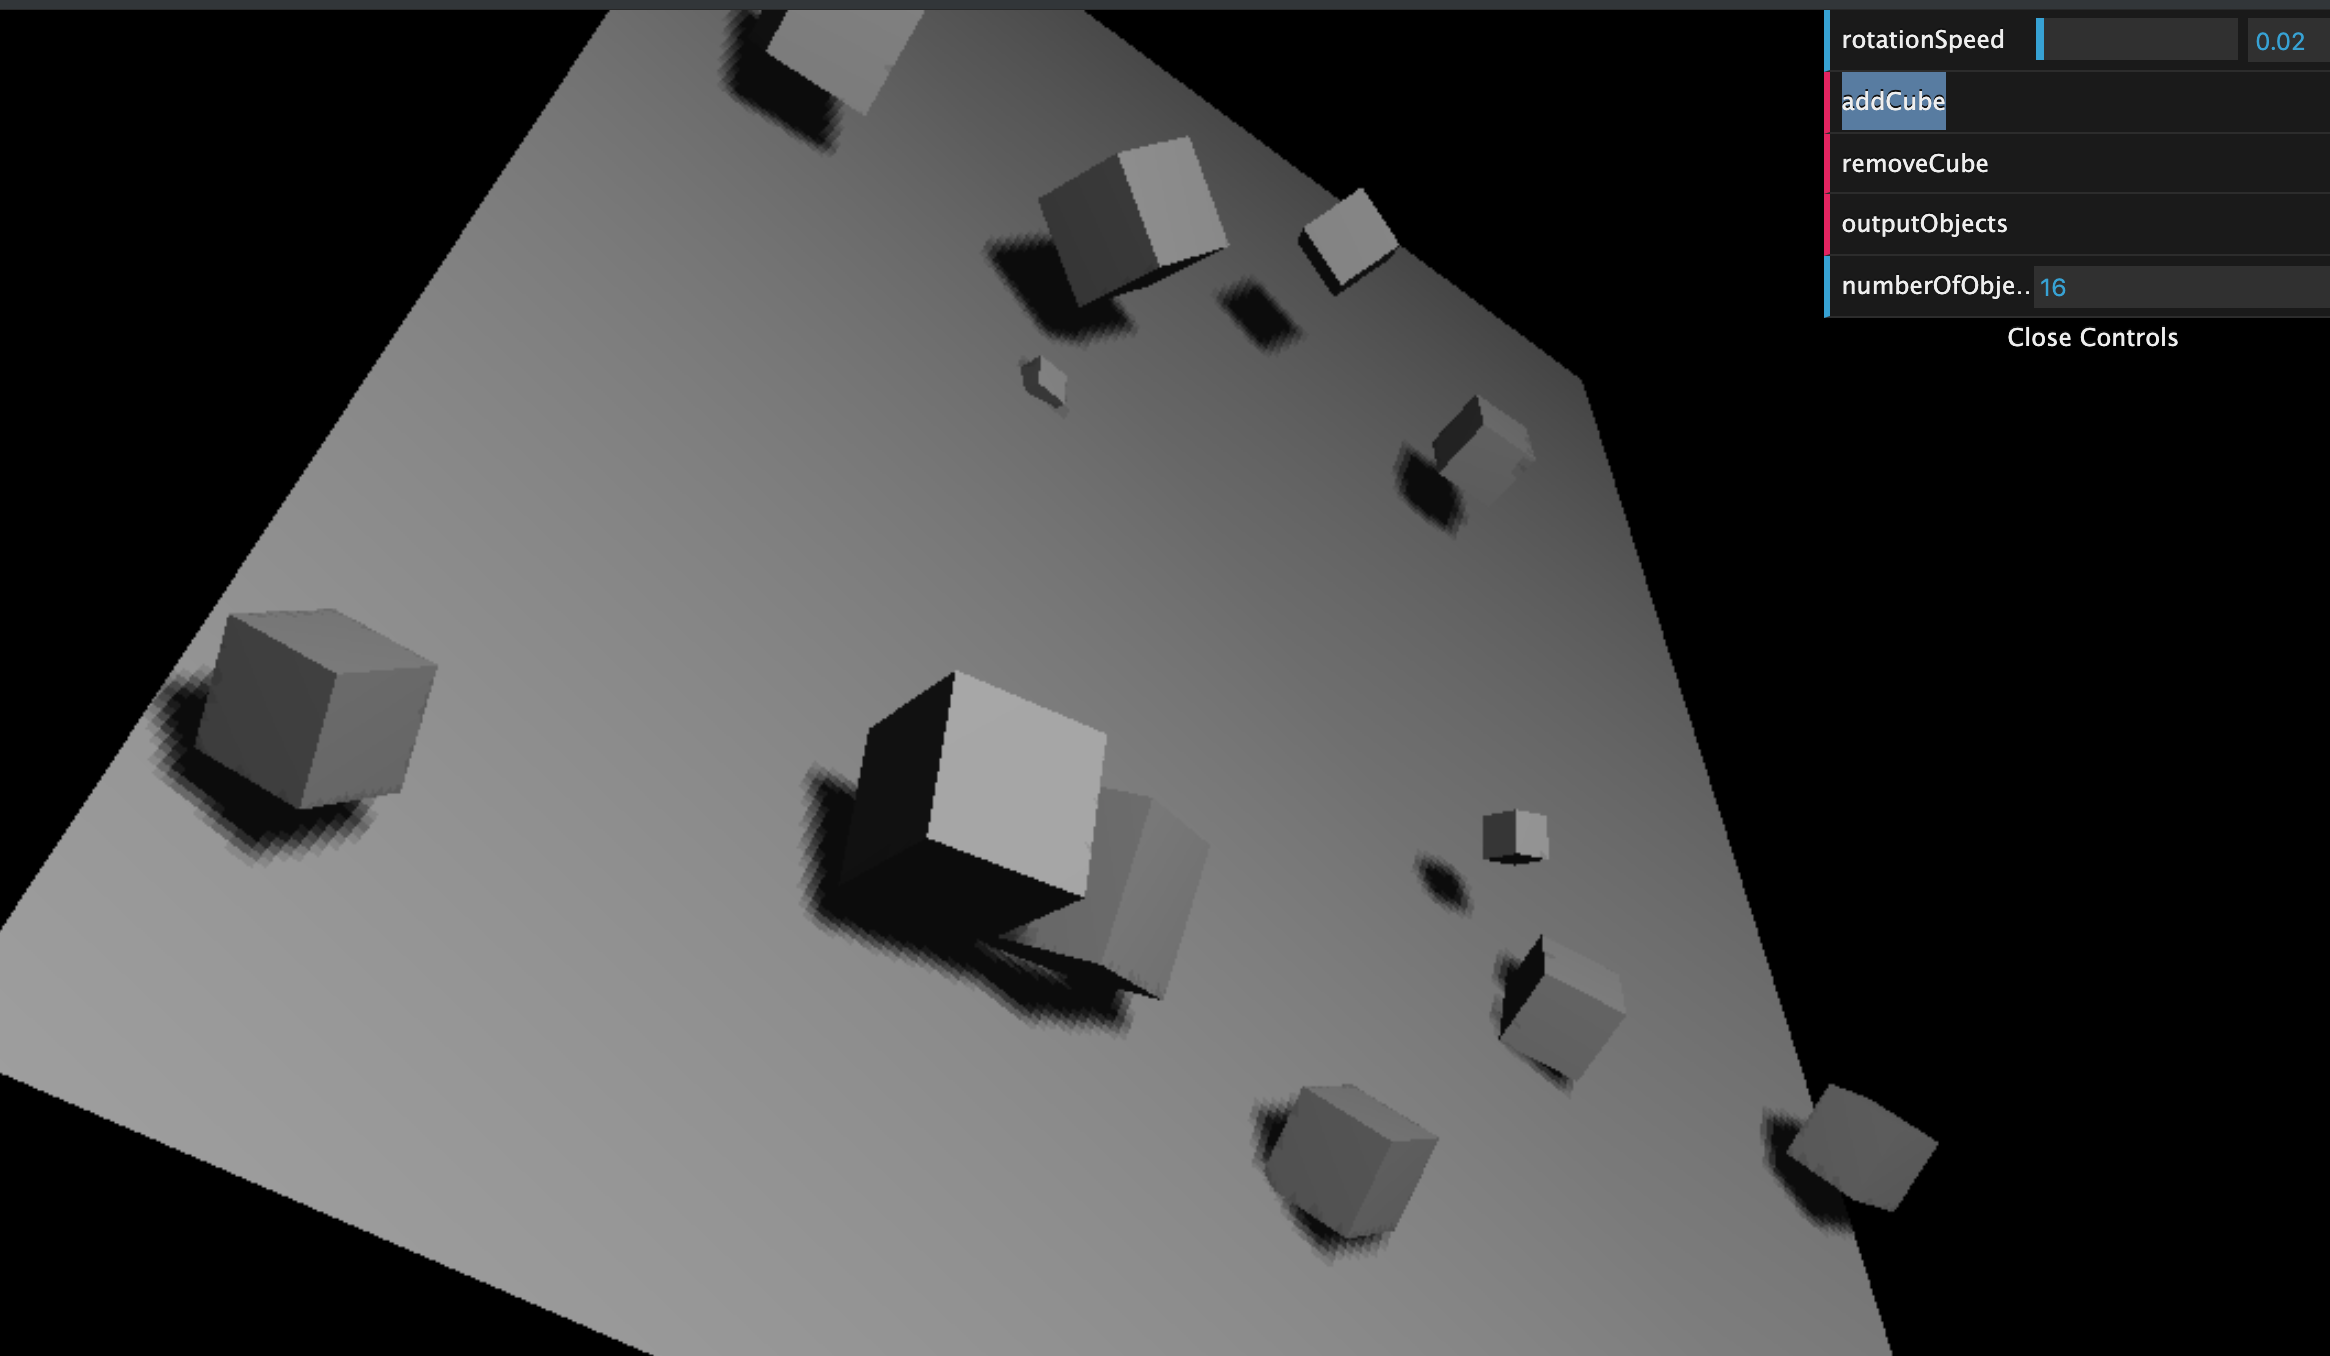
this.removeCube = function() {
var allChildren = scene.children;
var lastObject = allChildren[allChildren.length-1];
if (lastObject instanceof THREE.Mesh) {
scene.remove(lastObject);
this.numberOfObjects = scene.children.length;
}
}
this.outputObjects = function() {
console.log(scene.children);
}THREE.Scene의 주요 함수들과 프로퍼티를 한번 알아보겠습니다.
Three.js에서는 scene의 자식요소들을 리스트형태로 저장합니다.
그래서 놀랍지않게 add, remove 함수와 children 프로퍼티를 제공합니다.
- (function) THREE.Scene.add(Object)
- (function) THREE.Scene.remove(Object)
- (property) THREE.Scene.children : list
add 한 순서대로 children에 각 Object들이 들어가 있습니다. - (function) THREE.Scene.getObjectByName
object의name프로퍼티를 등록해두면 해당 object를 scene에서 찾아낼 수 있습니다. 디버깅용으로 매우 유용한 함수
- (function) THREE.Scene.traverse(function)
function render() {
     stats.update();
     scene.traverse(function(obj) {
       if (obj instanceof THREE.Mesh && obj != plane ) {
         obj.rotation.x+=controls.rotationSpeed;
         obj.rotation.y+=controls.rotationSpeed;
         obj.rotation.z+=controls.rotationSpeed;
} });
     requestAnimationFrame(render);
     renderer.render(scene, camera);
   }
traverse 함수는 scene내부의 모든 object를 순회하면서 인자로 들어간 콜백함수를 실행시킵니다. 자식 object의 자식까지 재귀적으로 모두 순회합니다.
Adding fog to Scene
fog 효과가 무엇일까요?
검색해보니 카메라로부터 멀리 있는 Object들에 대해 희미하게 보이는 효과를 의미하는 것 같습니다. 시야로부터 멀어질수록 아래와 같은 효과를 볼 수 있을 것입니다.
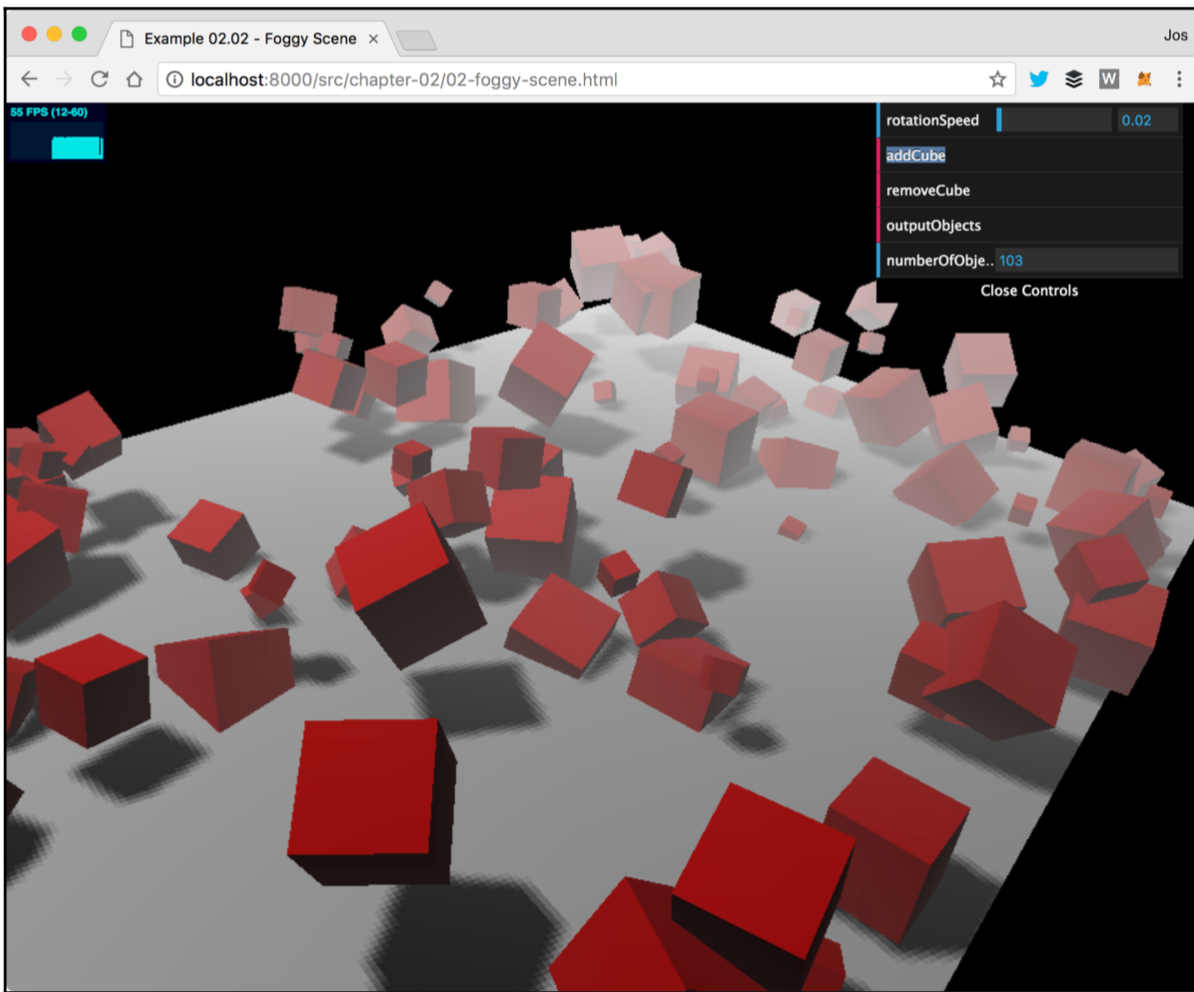
Three.js에서 fog effect를 생성하는 것은 매우 간단합니다.
  // scene.fog = new THREE.FogExp2(0xffffff, 0.015);
  scene.fog = new THREE.Fog(0xffffff, 10, 100);
간단히 위와같이 THREE.Scene.fog에 THREE.Fog객체를 생성해서 할당해주면 됩니다.
THREE.Fog의 첫번째인자는 Fog의 색을 의미합니다. 현재는 흰색의 fog를 생성해줬습니다. 이어지는 두개의 인자는 near, far입니다. mist가 어떻게 나타나는지를 조절하기 위해 사용되는 값입니다. 이 두개의 프로퍼티를 가지고 저희는 안개가 어디서 시작되고 얼마나빠르게 안개가 밀집해지는지를 조절할 수 있습니다.
카메라로부터의 near만큼의 거리에서 시작해서 far까지의 거리까지 서서히 안개의 밀도가 증가한다는 것을 의미합니다.
하지만 이렇게 할 경우, 선형적으로(linearly) 안개가 짙어질 것입니다. 대게 좀더 현실적인 느낌을 주기 위해서는 지수적으로(exponentially)해야할 경우가 많습니다.
scene.fog = new THREE.FogExp2( 0xffffff, 0.01 );THREE.FogExp2 을 사용하면 안개의 색과 안개의 밀도만 조절하게되고(near, far 설정 없이) 거리에 따라 지수적으로(expontentially) 증가하는 변화를 느낄 수 있습니다.
Override Material property
저희가 마지막으로 볼 Scene의 property는 overrideMaterial 입니다.
overrideMaterial 속성을 사용할 때, 이 Scene에 있는 모든 objects는 overrideMaterial에 set된 Material을 사용하게 됩니다. 그리고 object 각각 개별적으로 설정된 Material들은 무시됩니다.이 속성은 scene에서 같은 material을 공유하는 object의 집합을 다룰때 유용합니다.Three.js가 하나의 material만 관리하게되서 성능이 향상되기 때문이죠.
그러나 사실 이 속성을 사용할 일은 많지않습니다.
scene.overrideMaterial = new THREE.MeshLambertMaterial({color: 0xffffff});위와 같이 해당 property에 Material을 할당해주면 됩니다.
위와 같이 모든 Object들이 같은 Material을 공유하는 것을 확인할 수 있습니다.
정리
THREE.Scene 의 주요개념을 살펴봤습니다.
기억해야할 것은 scene은 우리가 렌더링하기 원하는 모든 object와 lights를 담는 container라는 것입니다. THREE.Scene의 중요한 function, attribute를 요약하고 마무리하겠습니다.
add(object)
Scene에 객체를 추가할 때 사용. return 값은 추가된 object를 돌려줍니다.
children
This returns a list of all the objects that have been added to the scene, including the camera and lights.
getObjectByName(name, recursive)
object를 생성할 때 개별이름을 부여가능 합니다.(name attribute) 이 함수를 이용하면 명시적인 이름으로 Scene내에서 있는 해당 object를 얻을 수 있습니다. 또한, recursive 인자를 true로 넣어줄 경우, 재귀적으로 해당 object를 찾아낼 것입니다. 이 함수를 이용해서 특정 object를 찾은 후 remove(object)를 통해 scene에서 해당 object를 제거할 수 도 있습니다.
traverse(function)
The children property returns a list of all the children in the scene. With the traverse function, we can also access these children. With traverse, all the children are passed into the supplied function one by one.
remove(object)
If you have a reference to an object in the scene, you can also remove it from the scene using this function.
fog
This property allows you to set the fog for the scene. The fog will render a haze that hides faraway objects.
overrideMaterial
With this property, you can force all the objects in the scene to use the same material