2-1. JSX란?
1) JSX란?
HTML + Javascript
JAVASCRIPT를 확장한 문법 (Javascript XML)
- JavaScript 코드 안에서 HTML과 유사한 문법을 사용할 수 있음
- React는 이 JSX를 이용하여 화면을 그림(컴포넌트)
[Jsx]
const element = <h1>Hello, world!</h1>;
위 코드는 React.createElement 함수를 호출하는 형태로 변환
[Javascript]
const element = React.createElement('h1', null, 'Hello, World!');
JSX의 특징
JSX에서 사용되는 태그의 속성 이름이 HTML과 조금 다름class -> className
for -> htmlFor
onclick -> onClick태그를 명시적으로 닫아줘야 함
하나의 태그로 감싸져 있어야 함
[React 컴포넌트와 JSX의 관계]
React 컴포넌트는 JSX를 반환하며, JSX는 React 컴포넌트 내부에서 사용
2) JSX 실습
#1
import ReactDOM from 'react-dom';

const element = <h1>Hello, world!</h1>;

ReactDOM.render(
  element,
  document.getElementById('root')
);
#2
import ReactDOM from 'react-dom';

const element = <button>Hello, world!</button>;

ReactDOM.render(
  element,
  document.getElementById('root')
);
#3
import ReactDOM from 'react-dom';
const element = <button>Hello, world!</button><h1>test</h1>;
/*이 경우에는 오류 발생*/
/*JSX의 경우 하나의 태그로만 감싸져 있어야 함*/
ReactDOM.render(
element,
document.getElementById('root')
);#4
import ReactDOM from 'react-dom';
const element = <div><button>Hello, world!</button><h1>test</h1></div>;
/*<div> 태그를 사용하면 오류 발생 X */
ReactDOM.render(
element,
document.getElementById('root')
);#5
import ReactDOM from 'react-dom';
const element = <div><button>Hello, world!</button><input type = "text"></div>;
/*이 경우에는 오류 발생*/
/*태그를 닫아줘야 함*/
ReactDOM.render(
element,
document.getElementById('root')
);#6
import ReactDOM from 'react-dom';
const element = <div><button>Hello, world!</button><input type = "text"></input></div>;
/* <input type = "text" /> 이렇게 해도 오류 발생 X */
ReactDOM.render(
element,
document.getElementById('root')
);#7
import ReactDOM from 'react-dom';
const element = <div class ="container"><button>Hello, world!</button><input type = "text"></input></div>;
/* react에서는 class로 쓰면 안됨 */
ReactDOM.render(
element,
document.getElementById('root')
);#8
import ReactDOM from 'react-dom';
const element = <div className ="container"><button>Hello, world!</button><input type = "text"></input></div>;
/* class -> className으로 작성 */
ReactDOM.render(
element,
document.getElementById('root')
);2-2. JSX에서 Javascript 사용하기
import ReactDOM from 'react-dom';
let text = 'Hello, world!';
const num = 15;
const obj = { key: 0, a: 1, b: 2 };
const arr = ['a', 'b', 'c'];
const imageUrl =
'https://dst6jalxvbuf5.cloudfront.net/static/img/logo/logo.svg';
const element = (
<div>
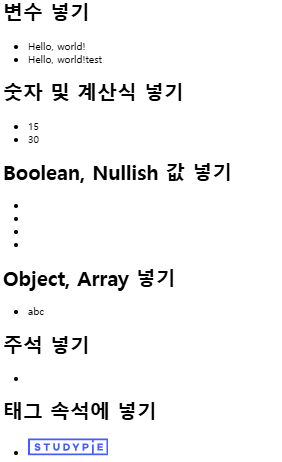
<h1>변수 넣기</h1>
<ul> //순서가 필요하지 않은 경우에는 ul 사용, 순서가 필요한 경우 ol 사용
<li>{text}</li>
<li>{text + 'test'}</li>
</ul>
<h1>숫자 및 계산식 넣기</h1>
<ul>
<li>{num}</li>
<li>{num + 15}</li>
</ul>
<h1>Boolean, Nullish 값 넣기</h1>
<ul>
<li>{true}</li>
<li>{false}</li>
<li>{undefined}</li>
<li>{null}</li>
</ul>
<h1>Object, Array 넣기</h1>
<ul>
{/* <li>{obj}</li> */}
<li>{arr}</li>
</ul>
<h1>주석 넣기</h1>
<ul>
<li>{/* 주석입니다. */}</li>
</ul>
<h1>태그 속석에 넣기</h1>
<ul>
<li>
<img src={imageUrl} alt="logo" />
</li>
</ul>
</div>
);
ReactDOM.render(
element,
document.getElementById('root')
);
2-3. JSX에서의 조건문
import ReactDOM from 'react-dom';

const arr = [1, 2, 3];
const text = '';

const element = (
  <div>
    <h1>삼항연산자</h1>
    <ul>
      <li>
        {1 + 1 === 2
          ? '참입니다.'
          : '거짓입니다.'}
      </li>
    </ul>

    <h1>AND 연산자</h1>
   /* 앞에 따라 결과가 달라짐. 앞이 참이면 글씨가 나오고 참이 아니면 글씨가 나오지 않음 */
    <ul>
      <li>{1 + 1 === 2 && 'AND 연산자1'}</li>
      <li>{arr.length && 'AND 연산자2'}</li>
    </ul>

    <h1>OR 연산자</h1>
    /* 앞이 참이면 뒤를 출력 X , 앞이 참이 아니면 뒤를 출력 */
    <ul>
      <li>{1 + 1 !== 2 || 'OR 연산자1'}</li>
      <li>{text || 'OR 연산자2'}</li>
    </ul>

    <h1>IF문 (즉시실행함수)</h1>
    <ul>
      <li>
        {(() => {
          if (1 + 1 === 2) return 'IF';
          else return 'ELSE';
        })()}
      </li>
      <li>
        {(() => {
          const data = '즉시실행함수';

          /* 어떤 연산이든 추가 가능 */
          /* 일반적으로는 이렇게 즉시실행함수가
         미리 위에서 가공하여 전달 */

          return data;
        })()}
      </li>
    </ul>
  </div>
);

ReactDOM.render(
  element,
  document.getElementById('root')
);
2-4. JSX에서의 반복문
import ReactDOM from 'react-dom';
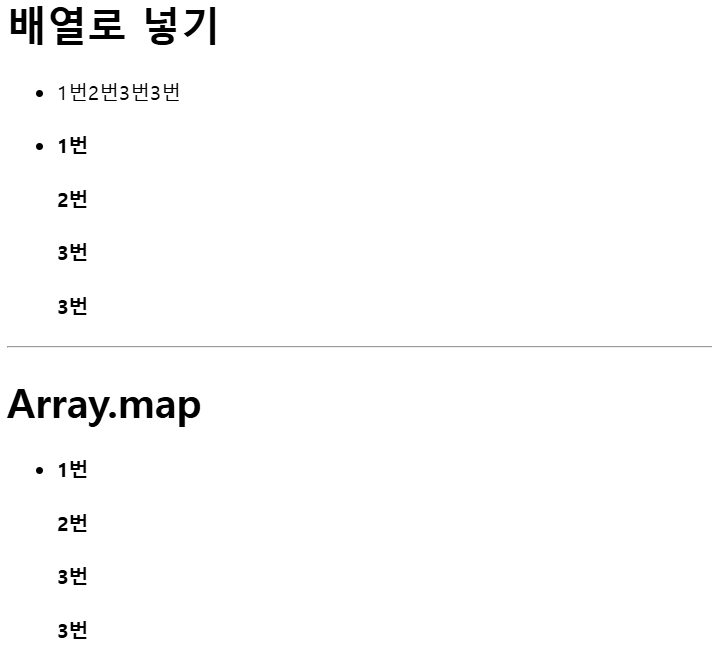
const arr = ['1번', '2번', '3번', '3번'];
const arr2 = [];
for (let i = 0; i < arr.length; i++) {
arr2.push(<h4 key={i}>{arr[i]}</h4>);
// = [<h4>1번</h4>, <h4>2번</h4>, <h4>3번</h4>]
}
const element = (
<div>
<h1>배열로 넣기</h1>
<ul>
<li>{arr}</li>
<li>{arr2}</li>
</ul>
<hr />
<h1>Array.map</h1>
<ul>
<li>
{arr.map((item, index) =>
return <h4 key={'${item}-${index}'}>{item}</h4>;
/* key는 JSX 요소들을 반복을 할 때 넣어줘야하는 값으로 React에서 값이 나열이 되었을 때 내부적으로 구분하기 위해 사용되는 아이디. 즉, 원래 리스트에서 새로운 리스트로 변경되었을 때 어떠한 값이 변경되었는 지 key를 통해 정확하게 알 수 있음
/* return <h4 key={item}>{item}</h4>;으로도 가능하지만 예를 들어 item 속성 중 3번이 2개 있으면 안됨 */
/* {'${item}-${index} 이렇게 작성하여 똑같은 값이 있어도 구별되도록 할 수 있음 */
})}
</li>
</ul>
</div>
);
ReactDOM.render(
element,
document.getElementById('root')
);
2-5. JSX 스타일링
[index.js]
import './index.css';
//이 코드를 통해 css 정보 사용 가능

import ReactDOM from 'react-dom';

// 2. style 재활용
const roundBoxStyle = {
  position: 'absolute',
  top: 50,
  left: 50,
  width: '50%',
  height: '200px',
  padding: 20,
  background: 'rgba(162,216,235,0.6)',
  // 3. 속성은 camelCase
  borderRadius: 50
  backgroundColor : '#fff'

  //border-radius:50,
  //background-Color: '#fff'
};

const element = {
  <div
  	style ="position:relative;width:400px"
    style={
    {
      // 1. Object로 css 작성
      position: 'relative',
      width: 400,
      height: 1000,
      background: '#f1f1f1'
    }
  }
  >
    <div style={roundBoxStyle}>Hello1</div>

    <div style={{ ...roundBoxStyle, top: 350 }}>
      {/* 4. className을 통한 스타일링 (CSS-in-JS) */}
      <div className="highlight">Hello2</div>
      //<div className={"highlight"}>Hello2</div>
    </div>

    <div style={{ ...roundBoxStyle, top: 650 }}>
      {/* 5. 조건적 스타일 */}
      <div
        className={
          1 + 1 === 2 ? 'highlight' : false
          //앞에 내용이 참이면 highlight 출력하고 참이 아니면 false
          // 1+1 === 2 $=&& 'highlight' and 연산자 사용 - 이렇게 해도 똑같음
        }
      >
        Hello3
      </div>
    </div>
  </div>
);

ReactDOM.render(
  element,
  document.getElementById('root')
);
[index.css]
.highlight {
  color: #fff;
  font-weight: bold;
  font-size: 36px;
}
2.6. JSX로 구구단 출력하기
import ReactDOM from 'react-dom';

const num = [1, 2, 3, 4, 5, 6, 7, 8, 9];

const element = (
  <div style={{ display: 'flex' }}>
    {num.map(
    	(n) =>
        	n >= 2 &&
            n !== 5 && (
            	<div
                	style={{
                    	padding:10,
                        color:n % 2 === 1 ? 'blue' : 'black'
                        //color:n % 2 ? 'blue' : 'black' 나머지가 0이면 false로 받아드려 black으로 출력
                    }}
                 >
                 	{num.map((m) => (
                    	<div>
                        	{n} X {m} = {n * m}
                        </div>
                    ))}
                 </div>
             )
      )}
  </div>
);

ReactDOM.render(
  element,
  document.getElementById('root')
);
예비 개발자