Spring Boot 일정 관리 API 과제 정리 (Step0 ~ Step4)
이번 과제는 Spring Boot + JPA + MySQL로 일정(Schedule) CRUD API를 만드는 것이 목표였다.
처음에는 프로젝트 구조부터 헷갈렸고, 의존성/DB 연결/DTO/예외 처리까지 한 번에 하려니까 계속 막혔다.
그래서 Step을 나눠서 “하나씩 구현 -> Postman으로 확인 -> 다음 단계” 방식으로 진행했다.
개발 환경
- Java 17
- Spring Boot
- Spring Data JPA
- MySQL
- Gradle
- Postman
Step0. API 명세 및 ERD 작성
과제 시작 전에 먼저 무슨 API를 만들 건지부터 정리했다.
처음엔 구현부터 들어가고 싶었는데, API와 DB 구조를 먼저 잡아두니까 중간에 덜 흔들렸다.
ERD
Schedule 단일 엔티티로 진행했다.
| 컬럼명 | 타입 | 설명 |
|---|---|---|
| id | BIGINT | PK, 자동 증가 |
| title | VARCHAR | 일정 제목 |
| content | VARCHAR | 일정 내용 |
| author | VARCHAR | 작성자 |
| password | VARCHAR | 수정/삭제 검증용 비밀번호 |
API 명세
요청/응답은 JSON 형태로 통일했고, 응답에는 비밀번호를 포함하지 않도록 DTO로 분리했다.
1) 일정 생성
- Method: POST
- URL:
/api/schedules
Request
{
  "title": "첫 일정",
  "content": "공부하기",
  "author": "지민",
  "password": "1234"
}
Response
{
  "id": 1,
  "title": "첫 일정",
  "content": "공부하기",
  "author": "지민"
}
2) 전체 일정 조회
- Method: GET
- URL:
/api/schedules
Response
[
  {
    "id": 1,
    "title": "첫 일정",
    "content": "공부하기",
    "author": "지민"
  }
]
3) 단건 일정 조회
- Method: GET
- URL:
/api/schedules/{id}
성공 Response (200)
{
  "id": 1,
  "title": "첫 일정",
  "content": "공부하기",
  "author": "지민"
}
실패 Response (404)
해당 일정이 없습니다.4) 일정 수정
- Method: PUT
- URL:
/api/schedules/{id}
Request
{
  "title": "수정한 제목",
  "content": "수정한 내용",
  "password": "1234"
}
Response
{
  "id": 1,
  "title": "수정한 제목",
  "content": "수정한 내용",
  "author": "지민"
}
5) 일정 삭제
- Method: DELETE
- URL:
/api/schedules/{id}
Request
{
  "password": "1234"
}
Response
삭제 완료Step1. 일정 생성 (Create)
Step1 목표는 DB에 저장되고, Postman에서 응답이 오는 것이었다.
여기서 가장 먼저 막혔던 건 의존성 설정과 MySQL 연결이었다.
1) 의존성 설정 (Gradle)
처음에는 spring-boot-starter만 들어있어서 Web/JPA/MySQL이 전부 안 됐다.
그래서 아래처럼 web + jpa + mysql connector + lombok을 추가했다.
dependencies {
    implementation 'org.springframework.boot:spring-boot-starter-web'
    implementation 'org.springframework.boot:spring-boot-starter-data-jpa'

    runtimeOnly 'com.mysql:mysql-connector-j'

    compileOnly 'org.projectlombok:lombok'
    annotationProcessor 'org.projectlombok:lombok'

    testImplementation 'org.springframework.boot:spring-boot-starter-test'
}
이 단계에서 중요한 포인트는 Gradle Reload였다.
build.gradle을 수정해도 리로드를 안 하면 계속 빨간 줄이 남아 있었다.
2) MySQL 설정 (application.yml)
spring:
  datasource:
    driver-class-name: com.mysql.cj.jdbc.Driver
    url: jdbc:mysql://localhost:3306/scheduleapp?serverTimezone=Asia/Seoul&characterEncoding=UTF-8
    username: root
    password: 비밀번호

  jpa:
    hibernate:
      ddl-auto: update
    show-sql: true
MySQL에서 DB가 없으면 연결이 안 되기 때문에 먼저 생성했다.
CREATE DATABASE scheduleapp;서버 실행 시 콘솔에 create table schedules ...가 찍히면 성공이다.
3) Entity 작성 (Schedule)
Step1에서는 createdAt/updatedAt은 아직 붙이지 않고 필드만 먼저 만들었다.
@Entity
@Table(name = "schedules")
@Getter
@NoArgsConstructor
public class Schedule {

    @Id
    @GeneratedValue(strategy = GenerationType.IDENTITY)
    private Long id;

    @Column(nullable = false)
    private String title;

    @Column(nullable = false)
    private String content;

    @Column(nullable = false)
    private String author;

    @Column(nullable = false)
    private String password;

    public Schedule(String title, String content, String author, String password) {
        this.title = title;
        this.content = content;
        this.author = author;
        this.password = password;
    }

    public void update(String title, String content) {
        this.title = title;
        this.content = content;
    }
}
여기서 실수했던 부분:
- 클래스명/파일명을 소문자로 만들어서 인식이 이상해졌던 적이 있었다.
- lombok이 설치되어 있는데도 빨간 줄이 사라지지 않아 annotation processing을 켜야 했다.
4) Repository 작성
public interface ScheduleRepository extends JpaRepository<Schedule, Long> {
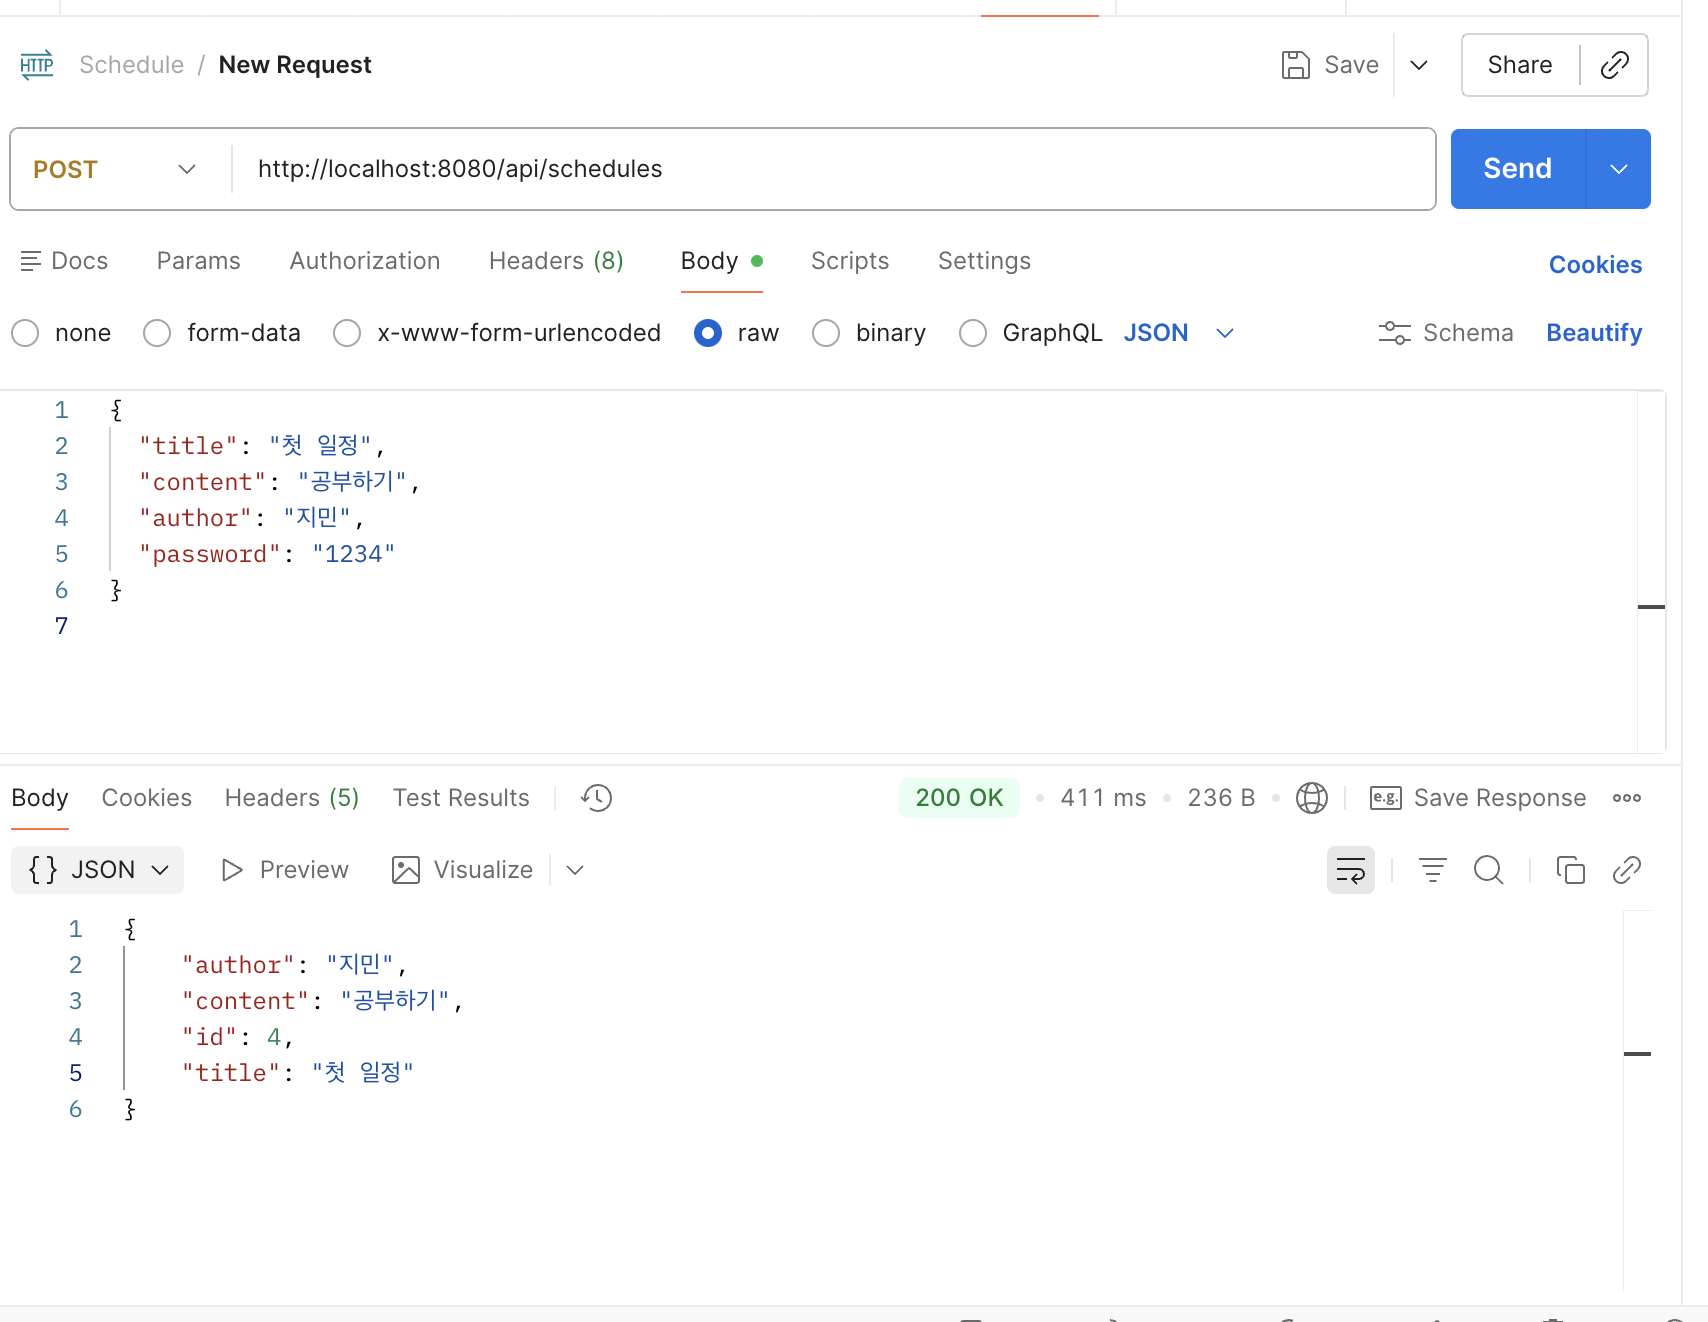
}5) 일정 생성 API (POST)
초기에는 엔티티를 그대로 응답으로 내보내서 password가 노출됐다.
과제 조건이 응답에서 비밀번호 제외라서 Response DTO를 만들었다.
Response DTO
@Getter
public class ScheduleResponseDto {
    private Long id;
    private String title;
    private String content;
    private String author;

    public ScheduleResponseDto(Schedule schedule) {
        this.id = schedule.getId();
        this.title = schedule.getTitle();
        this.content = schedule.getContent();
        this.author = schedule.getAuthor();
    }
}
Controller (POST)
@PostMapping
public ResponseEntity<ScheduleResponseDto> create(@RequestBody Schedule request) {
    Schedule saved = scheduleRepository.save(
            new Schedule(
                    request.getTitle(),
                    request.getContent(),
                    request.getAuthor(),
                    request.getPassword()
            )
    );
    return ResponseEntity.ok(new ScheduleResponseDto(saved));
}
Step2. 일정 조회 (Read)
Step2는 전체 조회와 단건 조회를 구현했다.
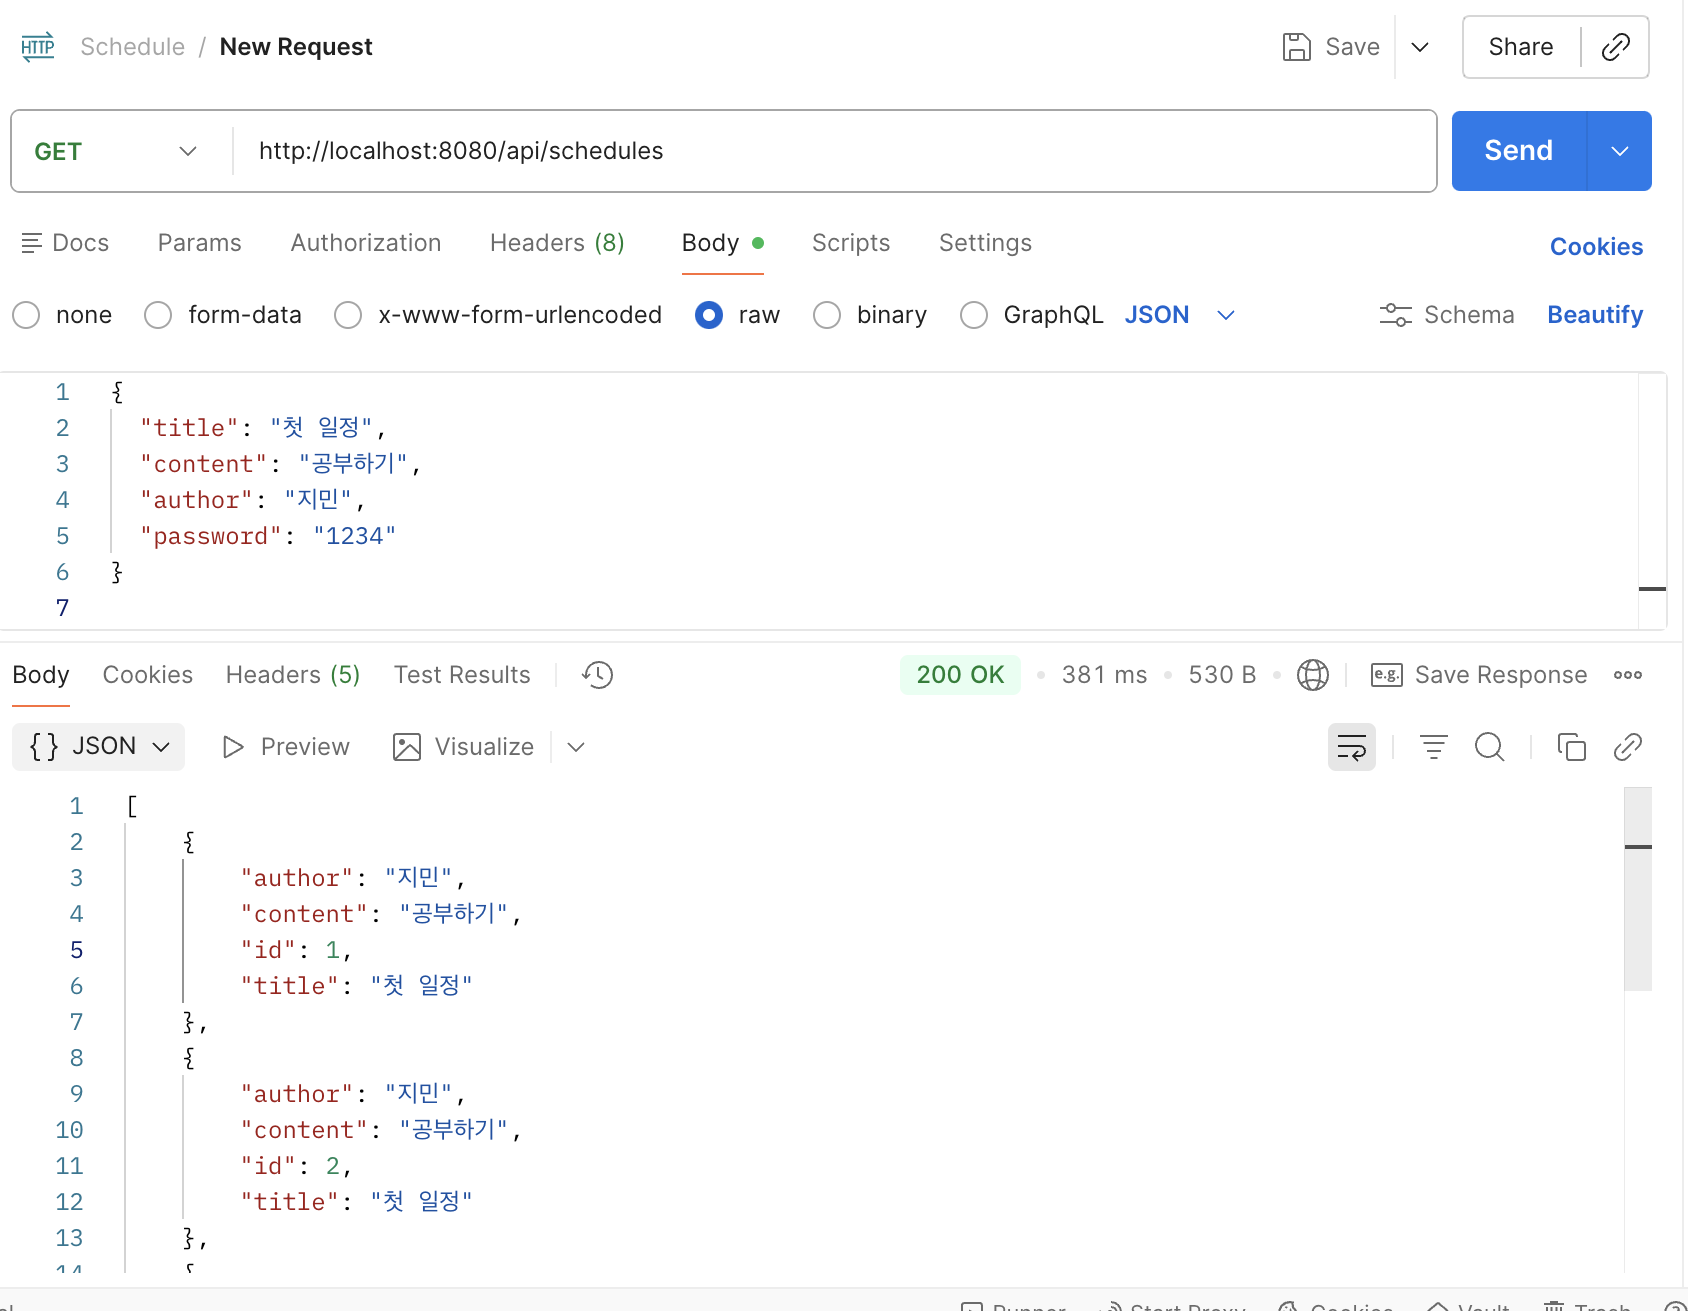
1) 전체 일정 조회 (GET /api/schedules)
@GetMapping
public ResponseEntity<List<ScheduleResponseDto>> findAll() {
    List<Schedule> schedules = scheduleRepository.findAll();

    List<ScheduleResponseDto> response = schedules.stream()
            .map(ScheduleResponseDto::new)
            .toList();

    return ResponseEntity.ok(response);
}
여기서 stream을 쓴 이유:
- entity 리스트를 DTO 리스트로 변환하는 로직이 깔끔해진다.
- 반복문으로 해도 되지만, 변환 목적이 명확하게 보였다.
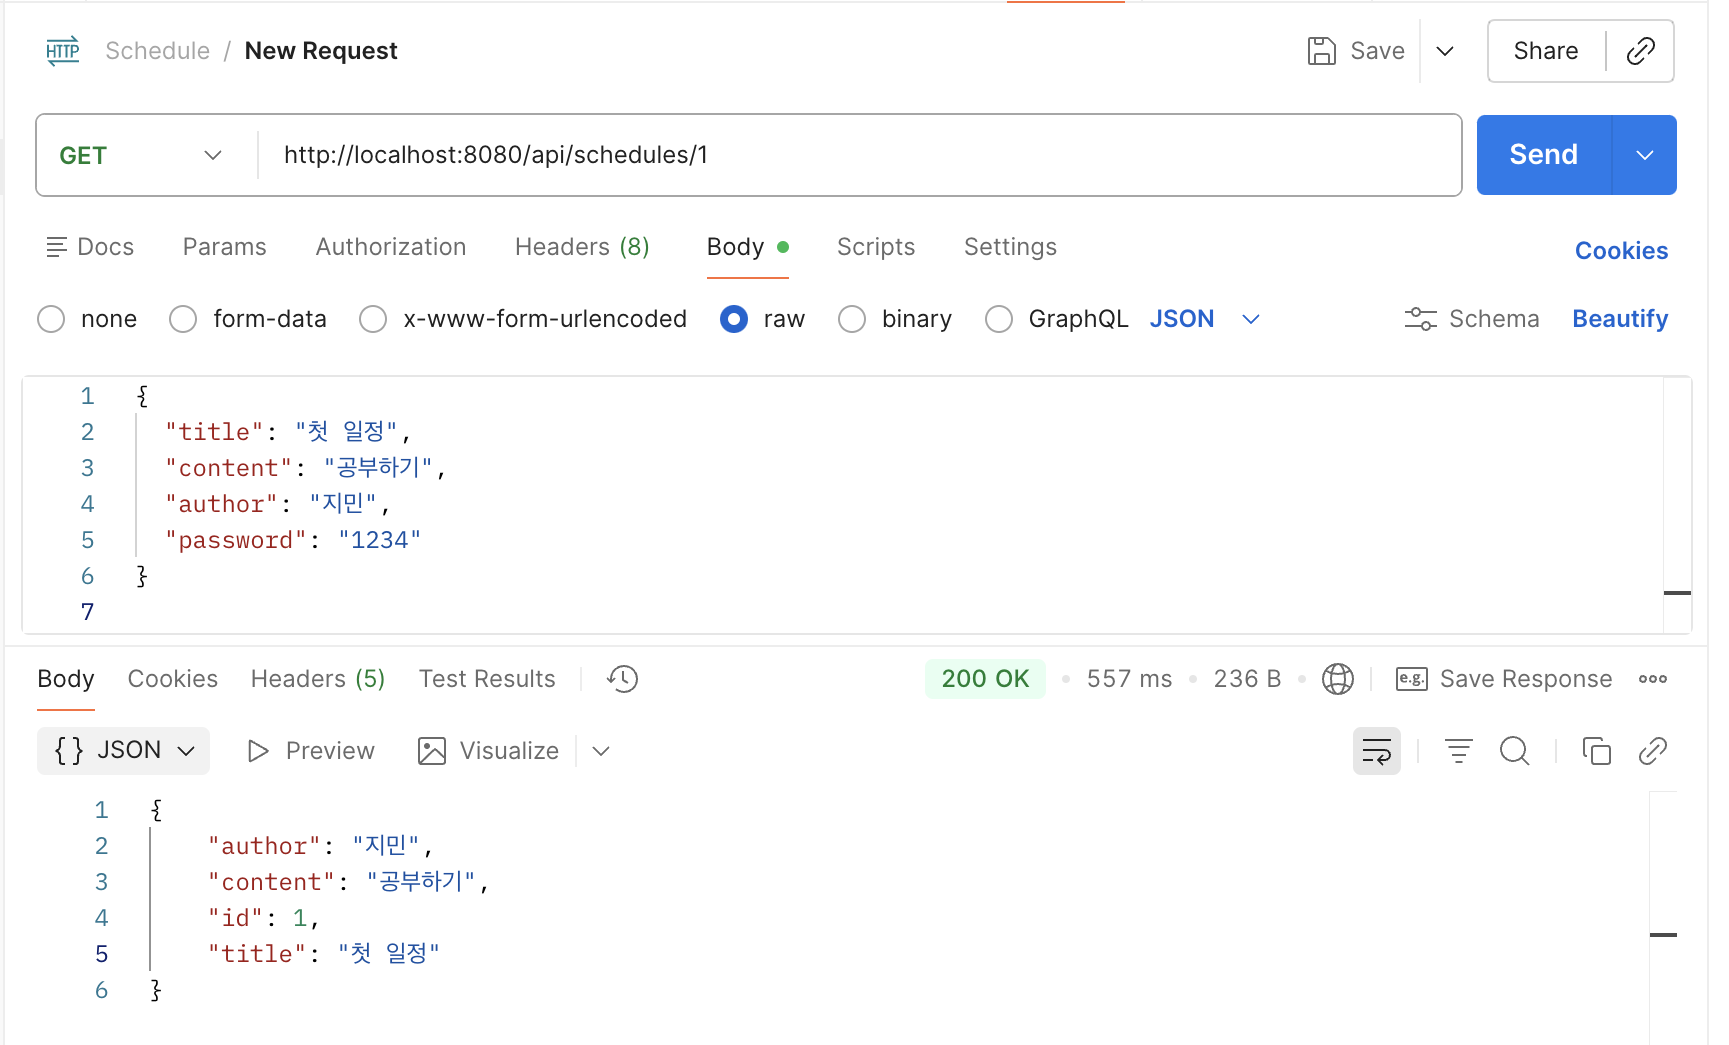
2) 단건 일정 조회 (GET /api/schedules/{id})
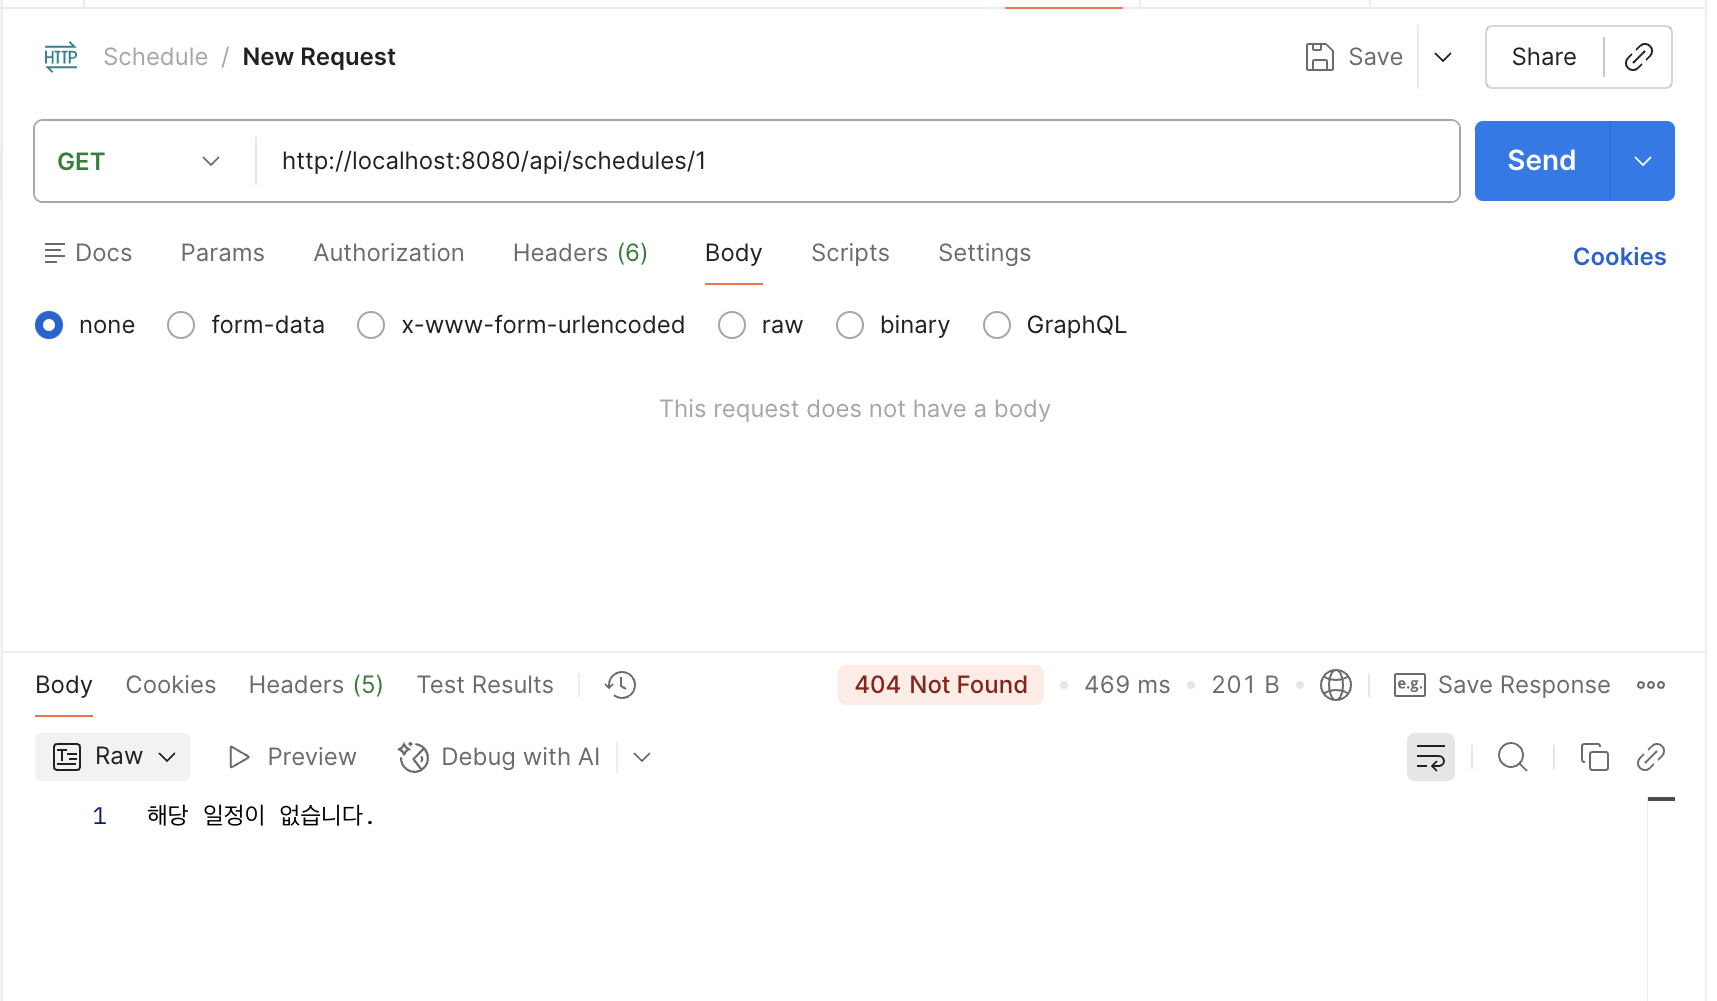
처음에는 orElseThrow()로 예외를 던졌는데, 삭제된 id 조회 시 500이 떠서 별로였다.
없는 자원은 클라이언트 요청이 틀린 것이므로 404가 자연스럽다고 판단해서 응답 코드를 직접 분기했다.
@GetMapping("/{id}")
public ResponseEntity<?> findOne(@PathVariable Long id) {
    return scheduleRepository.findById(id)
            .<ResponseEntity<?>>map(schedule ->
                    ResponseEntity.ok(new ScheduleResponseDto(schedule))
            )
            .orElseGet(() ->
                    ResponseEntity.status(404).body("해당 일정이 없습니다.")
            );
}
이때 자바 제네릭 타입 추론 때문에 컴파일 에러가 났는데,
.<ResponseEntity<?>>map(...) 형태로 반환 타입을 고정해서 해결했다.
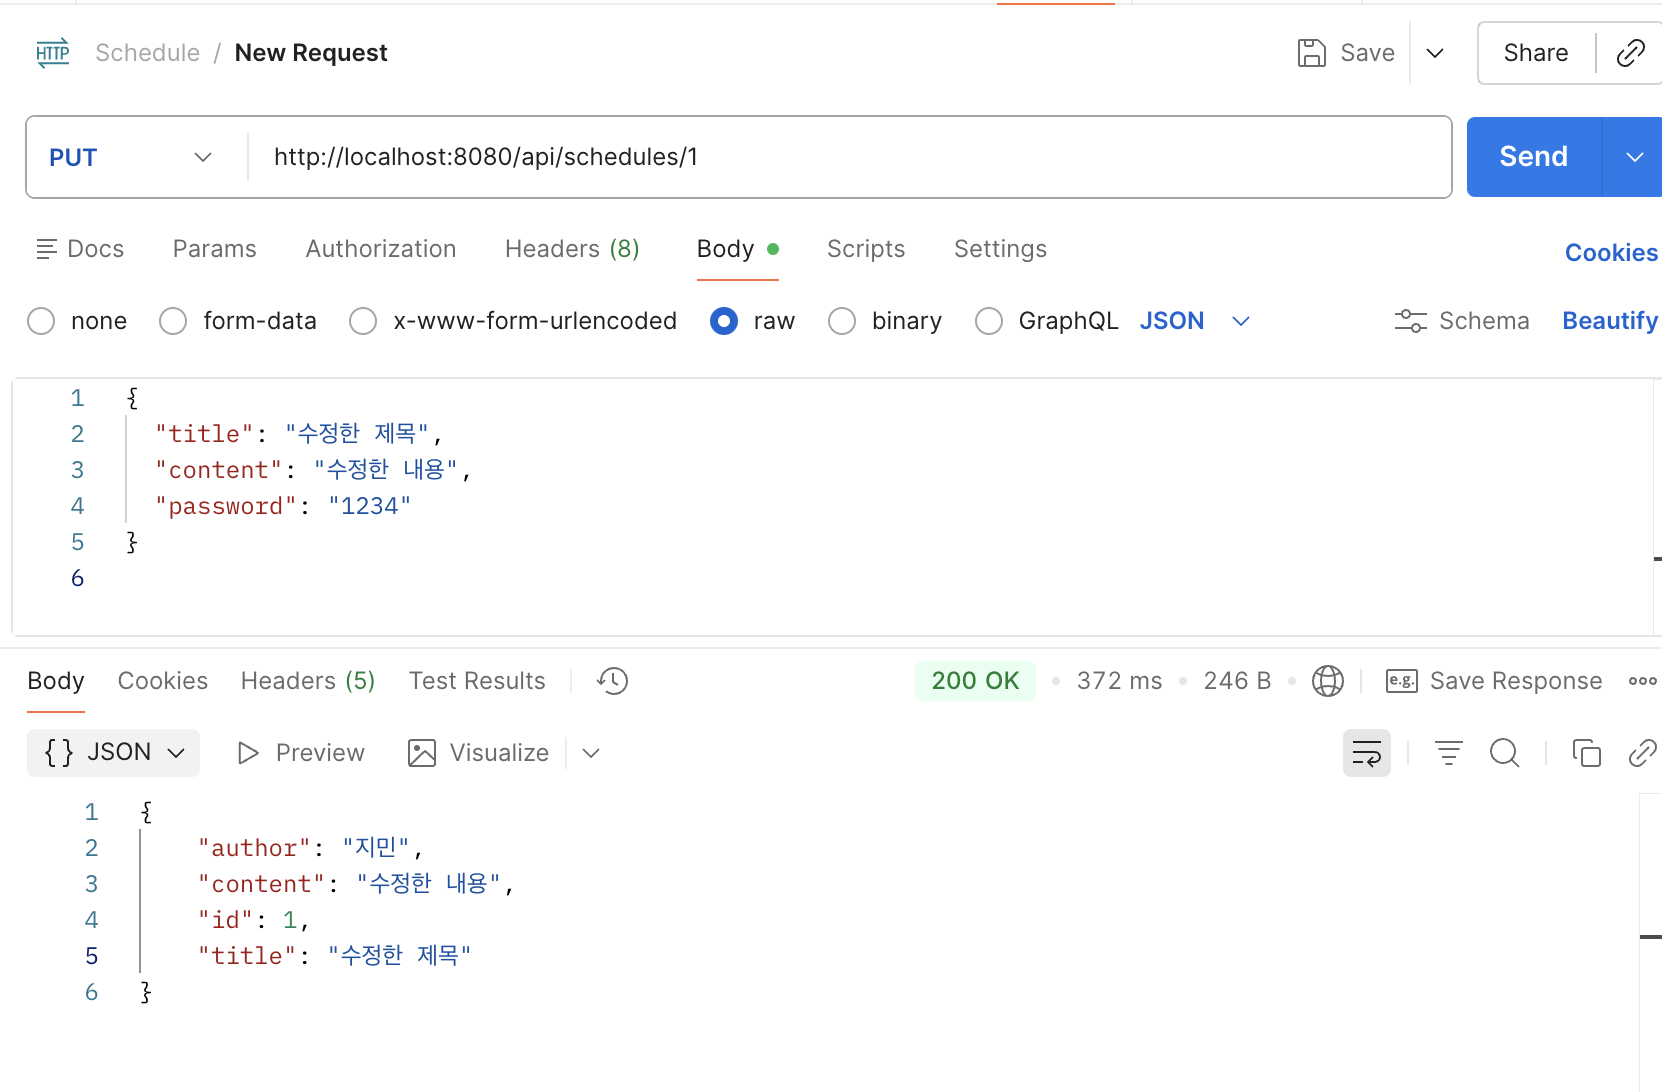
Step3. 일정 수정 (Update)
수정은 비밀번호가 맞을 때만 수정이 핵심이었다.
수정 요청 DTO
@Getter
@NoArgsConstructor
public class ScheduleUpdateRequestDto {
    private String title;
    private String content;
    private String password;
}
수정 API (PUT /api/schedules/{id})
@PutMapping("/{id}")
public ResponseEntity<ScheduleResponseDto> update(
        @PathVariable Long id,
        @RequestBody ScheduleUpdateRequestDto request
) {
    Schedule schedule = scheduleRepository.findById(id)
            .orElseThrow(() -> new IllegalArgumentException("해당 일정이 없습니다."));

    if (!schedule.getPassword().equals(request.getPassword())) {
        throw new IllegalArgumentException("비밀번호가 일치하지 않습니다.");
    }

    schedule.update(request.getTitle(), request.getContent());
    Schedule saved = scheduleRepository.save(schedule);

    return ResponseEntity.ok(new ScheduleResponseDto(saved));
}- 수정 전에 반드시 기존 데이터를 조회한다.
- 비밀번호 검증을 통과해야 update 메서드가 실행된다.
- 응답은 DTO로 반환해서 password 노출을 막는다.
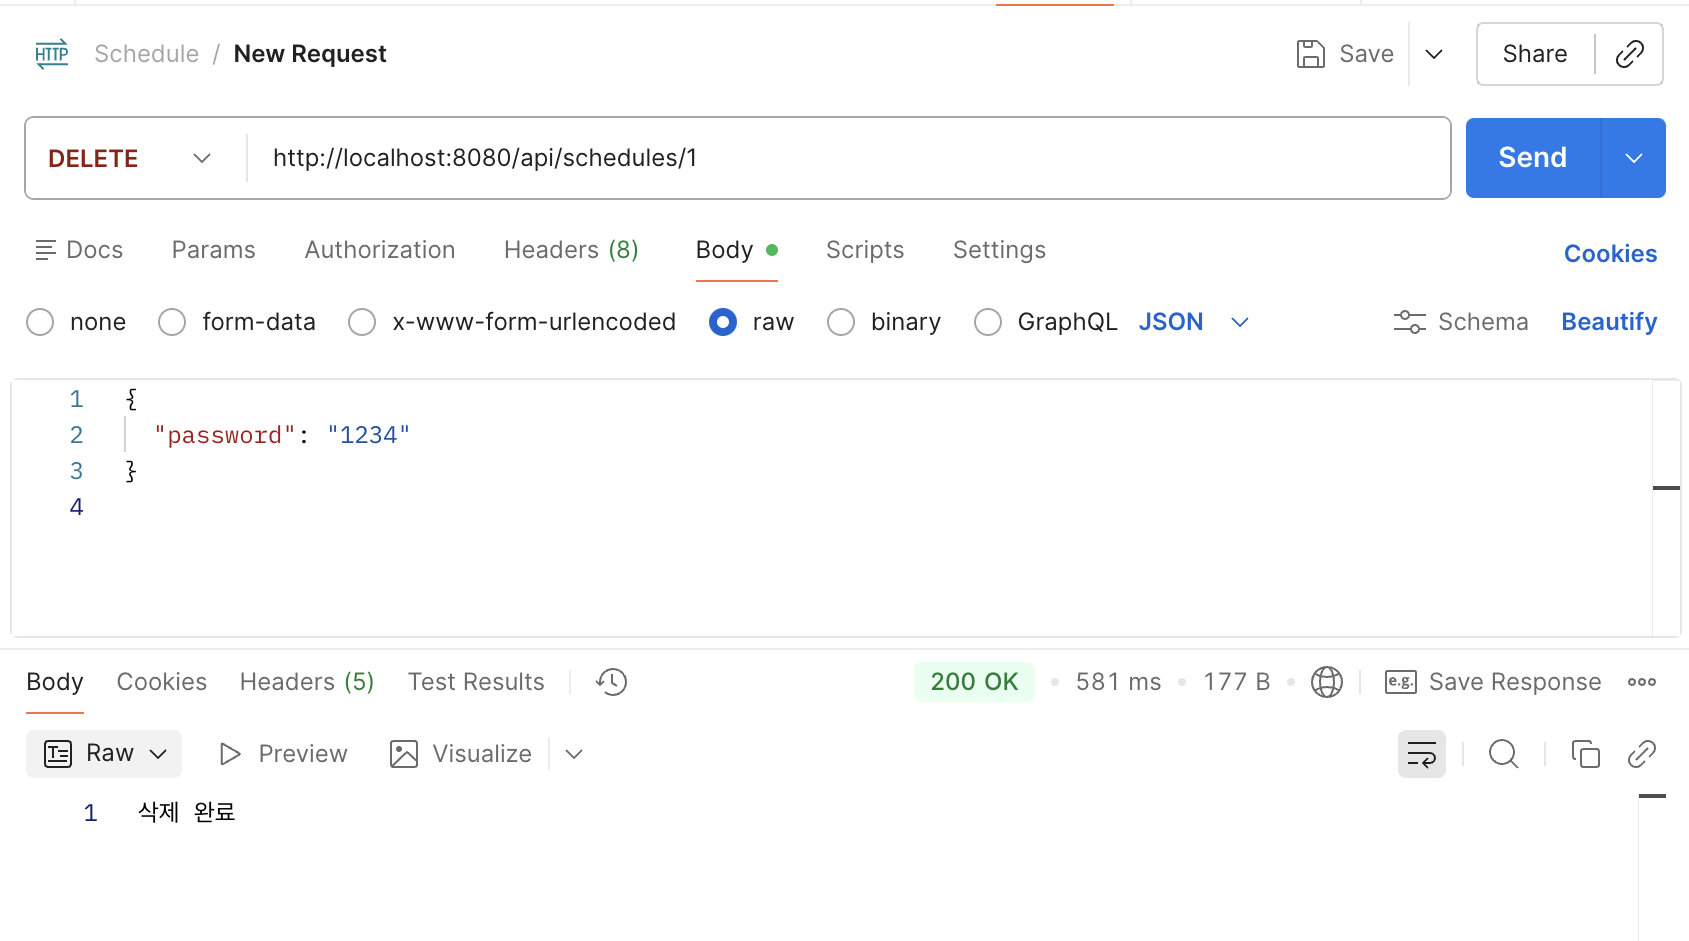
Step4. 일정 삭제 (Delete)
삭제도 수정과 똑같이 비밀번호 검증이 핵심이었다.
삭제 요청 DTO
@Getter
@NoArgsConstructor
public class ScheduleDeleteRequestDto {
    private String password;
}
삭제 API (DELETE /api/schedules/{id})
@DeleteMapping("/{id}")
public ResponseEntity<String> delete(
        @PathVariable Long id,
        @RequestBody ScheduleDeleteRequestDto request
) {
    Schedule schedule = scheduleRepository.findById(id)
            .orElseThrow(() -> new IllegalArgumentException("해당 일정이 없습니다."));

    if (!schedule.getPassword().equals(request.getPassword())) {
        throw new IllegalArgumentException("비밀번호가 일치하지 않습니다.");
    }

    scheduleRepository.delete(schedule);
    return ResponseEntity.ok("삭제 완료");
}
삭제 후 단건 조회 확인
삭제 후에 같은 id를 조회했을 때 404가 내려오는지 확인했다.
트러블슈팅
1) Lombok 빨간 줄이 안 없어짐
- build.gradle에 Lombok 의존성을 추가해도 빨간 줄이 계속 남았다.
- IntelliJ에서 annotation processing을 켜고, Lombok 플러그인을 활성화하니 해결됐다.
2) 의존성이 부족해서 JPA/Web이 동작하지 않음
- 처음엔
spring-boot-starter만 있어서@Entity,JpaRepository, Controller가 전부 제대로 동작하지 않았다. starter-web,data-jpa,mysql-connector추가 후 해결.
3) 삭제된 id 조회 시 500 응답
orElseThrow()예외가 그대로 올라가면서 500이 떴다.- 없는 자원은 404가 맞기 때문에, ResponseEntity로 404를 직접 내려주도록 수정했다.
회고
처음엔 CRUD니까 금방 끝나겠지라고 생각했는데, 실제로 해보니 구현 자체보다 환경 설정과 흐름 이해에서 시간이 많이 걸렸다.
특히 DTO를 왜 써야 하는지, 예외를 던지면 왜 500이 되는지 같은 부분은 직접 부딪혀봐야 감이 왔다.
또, Postman으로 매 단계마다 결과를 확인한 것이 도움이 많이 됐다.
코드만 보고 될 것 같은데?가 아니라 실제 요청/응답을 보면서 어디가 잘못됐는지 바로 판단할 수 있었다.
이번 과제를 진행하면서 독감 이슈로 몸 상태가 좋지 않아 도전과제까지 완성한 후 제출하지 못해 아쉬움이 많이 남는다.
시간 내에 도전과제까지 제출은 못하였지만 따로 개인 학습시간에 계속 해볼 생각이다.