[Flutter] TIL07
#1
void main() {
  Car myCar = Car(drive: slowDrive);

  myCar.drive();   //drive slowly!

  myCar.drive = fastDrive;

  myCar.drive();    //drive fast!

}

class Car {
  Car ({required this.drive});
  Function drive;

}

void slowDrive(){
  print('drive slowly!');
}

void fastDrive(){
  print('drive fast!');
}
slowDrive()와 fastDrive()은 Car class와 아무런 연관이 없다.
또한 Car의 drive 속성은 Fuction형이기 때문에 Car myCar = Car(drive: 🐯); 에서 🐯부분은 int형, String형 등이 아닌 Function형이 들어가야 한다. 따라서 slowDrive와 fastDrive가 들어갈 수 있겠다. 위 코드를 보면 Car myCar = Car(drive: slowDrive);에서 slowDrive()가 아닌 slowDrive 즉, 함수의 이름으로 전달된걸 볼 수 있다. 이처럼 함수를 통해 클래스 변수의 속성 값을 변경할 수 있다.
위의 성질을 이용해서 중복되는 widget을 class 내 Fuction형 field를 선언해서 리팩토링할 수 있다.
Expanded(
                  child: GestureDetector(
                    onTap: () {
                      setState(() {
                        selectedGender = GenderType.male;
                      });
                    },
                    child: ReusableCard(
                      color: selectedGender == GenderType.male
                          ? activeCardColor
                          : inActiveCardColor,
                      child: const IconContentWidget(
                        label: 'MALE',
                        icon: FontAwesomeIcons.mars,
                      ),
                    ),
                  ),
),GestureDetector가 감싸고 있는 형태가 여러번 중복되고 있다고 가정해보자. 비슷한 형식이 중복되고 있으니 점점 코드가 길어질 수 밖에 없다. 그럼 애초에 ReusableCard위젯 속성으로 onTap을 입력받으면 되지 않을까?
[reusableCard.dart]
class ReusableCard extends StatelessWidget {
final Function()? onTap; ==> 이부분 주목!
final Color color;
final Widget? child;
const ReusableCard({
Key? key,
this.onTap,
required this.color,
this.child,
}) : super(key: key);
Widget build(BuildContext context) {
return GestureDetector(
onTap: onTap,
child: Container(
margin: const EdgeInsets.all(15.0),
decoration: BoxDecoration(
color: color,
borderRadius: BorderRadius.circular(10.0),
),
child: child,
),
);
}
}
[main.dart]

Expanded(
                  child: ReusableCard(
                    onTap: () {   ===> 처음 코드와 동일한 기능을 함
                      setState(() {
                        selectedGender = GenderType.male;
                      });
                    },
                    color: selectedGender == GenderType.male
                        ? activeCardColor
                        : inActiveCardColor,
                    child: const IconContentWidget(
                      label: 'MALE',
                      icon: FontAwesomeIcons.mars,
                    ),
                  ),
                ),
#2
특정 파일의 style을 다른 파일들에서도 동일하게 쓰고싶다면?
- 많이 쓰이기 쉬운 변수들은 상수화 시켜서 하나의 파일을 통해서 사용할 수 있도록 한다.
같은 const style들을 하나의 상수로 만들기 때문에 같은 코드를 중복해서 작성할 필요 없이 상수를 쓰면 된다.
[constants.dart]
/// 모든 상수를 한 곳에 모아서 모든 파일에서 참조가 가능하다.
/// 다른 파일에서 해당 상수들을 사용하고 싶을때는 이 dart파일을 import하면 된다.
/// 상수 앞에 'k'를 써야 나중에 상수를 사용할때 드롭다운으로 모든 상수들이 나타나서 사용하기 쉽다.

const kBottomContainerHeight = 80.0;
const kBottomContainerColor = Color(0xFFEB1555);
const kActiveCardColor = Color(0xFF1D1E33);
const kInActiveCardColor = Color(0xFF111328);

const kContentTextStyle = TextStyle(
  fontSize: 18.0,
  color: Color(0xFF8D8E98),
);
[main.dart]
Expanded(
            child: ReusableCard(
              color: kActiveCardColor,
              child: Column(
                children: const [
                  Text(
                    'HEIGHT',
                    style: kContentTextStyle,
                  ),
                ],
              ),
            ),
          ),
#3
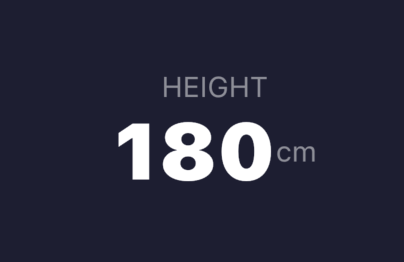
'cm'을 가운데가 아닌 아래쪽에 위치하도록 하고 싶다면?
기준선이 일치하도록 교차축을 따라 자식을 배치해야하므로, CrossAxisAlignment.baseline을 사용한다.
mainAxisAlignment: MainAxisAlignment.center,
crossAxisAlignment: CrossAxisAlignment.baseline,
하지만 이렇게만 써버리면

이런 에러가 뜬다. 기준선에 정렬하려면 실제로 text 기준선 속성을 무언가로 설정해야한다. 현재 에러가 났던 이유는 그 text 기준선 속성이 null로 되어 있기 때문이다. textBaseline을 이용해 기준선을 정해주자!
mainAxisAlignment: MainAxisAlignment.center,
crossAxisAlignment: CrossAxisAlignment.baseline,
textBaseline: TextBaseline.alphabetic
그럼 기준선에 맞게 아주 잘 정렬된걸 볼 수 있다!