해당 문서는 tailwind css v4 기준입니다.
https://tailwindcss.com/docs/font-family
https://tailwindcss.com/docs/theme#customizing-your-theme
0. 개요
v4에 관한 문서가 거의 없어서 내가 만들었다... gpt에게 물어봐도 똥꼬쇼만 하고 있길래 ㅠㅠ
1. 폰트 다운받기
pretendard 폰트로 진행했다. variable 파일이 있으면 더 좋다.
https://cactus.tistory.com/306
2. global.css에 폰트 불러오기
@font-face {
  font-family: 'Pretendard';
  font-weight: 100 900;
  font-display: swap;
  src: url('../assets/fonts/PretendardVariable.woff2') format('woff2');
}
다음과 같이 asset에 저장해놓은 파일을 가져오면 된다.
gpt는 계속 v3기준으로 알려주는데 v4 기준으로 config.js, ts 파일은 지원하지 않으니 global.css에 모두 정의하면 된다.
font-weight: 최소 최대
font-display: 폰트 전환시 끊김없게 해줌
format -> 확장자를 입력해주면 된다.
3. global.css body 태그에 넣어주기
body {
  background: var(--background);
  color: var(--foreground);
  font-family: 'Pretendard', Arial;
}
next.js 기준 html 다음의 최상위 태그는 body이기 때문에 이 태그에 적용하면 모든 하위 태그에 폰트가 적용될것이다.
font-family는 상단에 정의한 이름과 같게 해주면 된다.
4. 피그마에서 만들었던 커스텀 스타일 적용하기
대부분 디자인에서는 텍스트 스타일을 정의해두고 쓴다.
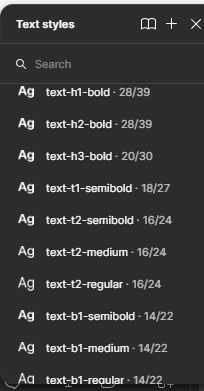
요런 느낌...
그래서 이제 이걸 프론트 프로젝트에 그대로 구현해야된다! (아니면 일일히 써야되는 노가다를...)
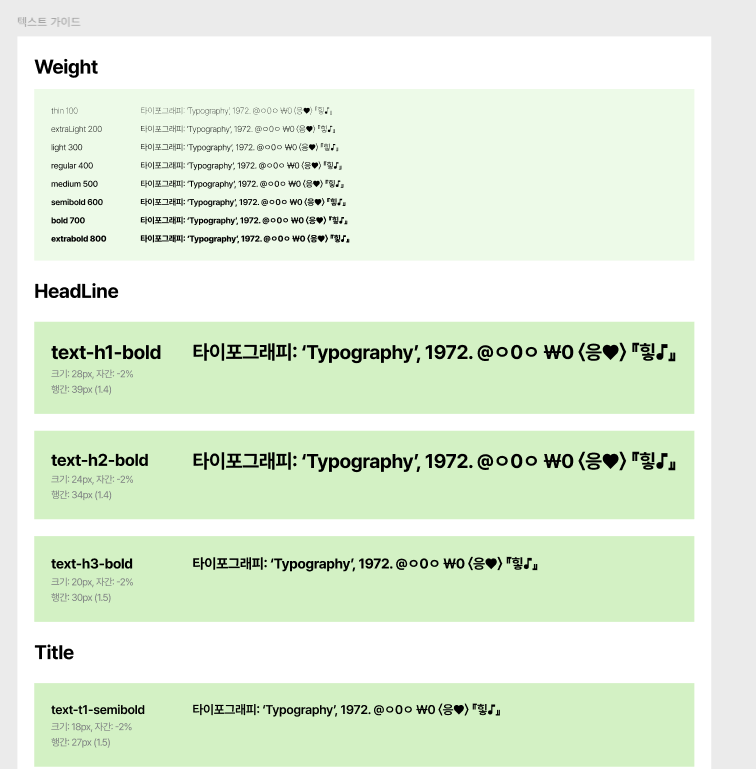
@theme {
  --text-h1-bold: 1.563rem;
  --text-h1-bold--leading: 2.438rem;
  --text-h1-bold--font-weight: 700;
  --text-h1-bold--letter-spacing: -0.02em;

  --text-h2-bold: 1.5rem;
  --text-h2-bold--leading: 2.125rem;
  --text-h2-bold--font-weight: 700;
  --text-h2-bold--letter-spacing: -0.02em;

  --text-h3-bold: 1.25rem;
  --text-h3-bold--leading: 1.875rem;
  --text-h3-bold--font-weight: 700;
  --text-h3-bold--letter-spacing: -0.02em;

  --text-t1-semibold: 1.125rem;
  --text-t1-semibold--leading: 1.6875rem;
  --text-t1-semibold--font-weight: 600;
  --text-t1-semibold--letter-spacing: -0.02em;

  --text-t2-semibold: 1rem;
  --text-t2-semibold--leading: 1.5625rem;
  --text-t2-semibold--font-weight: 600;
  --text-t2-semibold--letter-spacing: -0.02em;

  --text-t2-medium: 1rem;
  --text-t2-medium--leading: 1.5rem;
  --text-t2-medium--font-weight: 500;
  --text-t2-medium--letter-spacing: -0.02em;

  --text-t2-regular: 1rem;
  --text-t2-regular--leading: 1.5rem;
  --text-t2-regular--font-weight: 400;
  --text-t2-regular--letter-spacing: -0.02em;

  --text-b1-semibold: 0.875rem;
  --text-b1-semibold--leading: 1.375rem;
  --text-b1-semibold--font-weight: 600;
  --text-b1-semibold--letter-spacing: -0.02em;

  --text-b1-medium: 0.875rem;
  --text-b1-medium--leading: 1.375rem;
  --text-b1-medium--font-weight: 500;
  --text-b1-medium--letter-spacing: -0.02em;

  --text-b1-regular: 0.875rem;
  --text-b1-regular--leading: 1.375rem;
  --text-b1-regular--font-weight: 400;
  --text-b1-regular--letter-spacing: -0.02em;

  --text-b2-semibold: 0.75rem;
  --text-b2-semibold--leading: 1.1875rem;
  --text-b2-semibold--font-weight: 600;
  --text-b2-semibold--letter-spacing: -0.02em;

  --text-b2-medium: 0.75rem;
  --text-b2-medium--leading: 1.1875rem;
  --text-b2-medium--font-weight: 500;
  --text-b2-medium--letter-spacing: -0.02em;

  --text-b2-regular: 0.75rem;
  --text-b2-regular--leading: 1.1875rem;
  --text-b2-regular--font-weight: 400;
  --text-b2-regular--letter-spacing: -0.02em;

  --text-c1-regular: 0.625rem;
  --text-c1-regular--leading: 1rem;
  --text-c1-regular--font-weight: 400;
  --text-c1-regular--letter-spacing: -0.02em;
}
global.css에 다음과 같이 넣어주면된다. 공식 문서를 참고했다.
.text-b1-medium {
  @apply text-[.875rem] leading-[1.375rem] font-medium;
  letter-spacing: -0.02em;
}
이런식으로 쓸수도 있지만, 이렇게 쓰게 되면 자동완성이 안된다.
5. 실제 예시
<div className="text-h1-bold">welcome</div>6. 참고
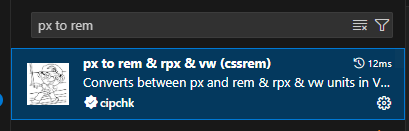
피그마에서는 rem을 지원하지 않기 때문에 px단위를 쓴다. vscode에 'px to rem'이라는 확장 프로그램을 지원하고 있으니 px단위로 써주면
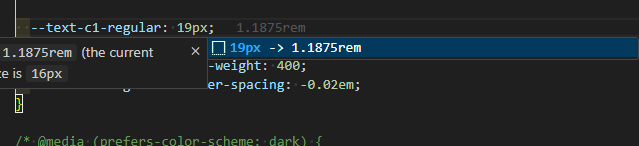
다음과 같이 변환해준다!
css파일이나 inline styles에서 바로 변환을 지원하고 jsx에서 classname으로 적으면 지원은 안하고 옆에 보여준다....