Java는 Collection Framework를 지원한다.
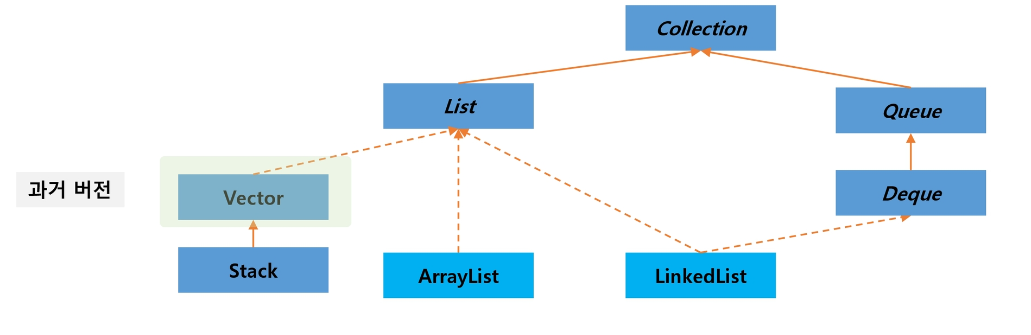
다양한 자료구조를 지원하기 위해서이다. Collection의 클래스 관계도는 아래와 같다.

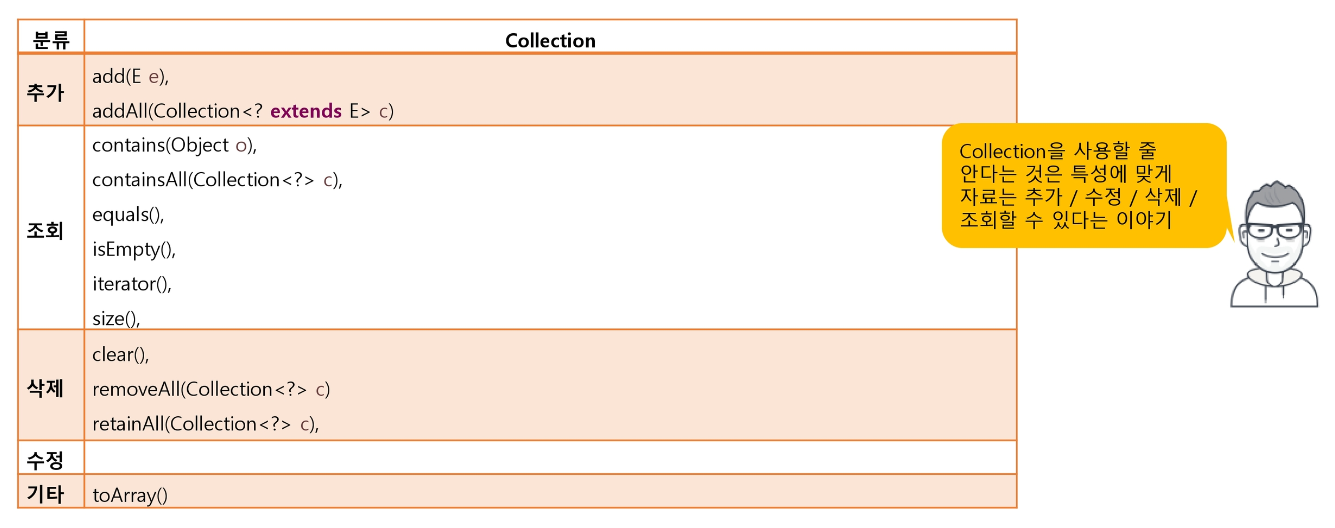
Collection 관련 핵심 인터페이스는 아래와 같다.
- List : 순서가 있는 데이터의 집합. 데이터 중복 허용.
Ex) ArrayList, LinkedList- Set : 순서가 없는 데이터의 집합. 데이터 중복 금지.
Ex) HashSet, TreeSet- Map : Key와 Value의 쌍으로 데이터를 관리하는 순서가 없는 데이터의 집합.
Key는 중복 금지, Value는 중복 허용
Ex) HashMap, TreeMap
Collection의 주요 메서드는 아래와 같다.
Java의 Collection 프레임워크는 List를 지원한다.
List의 클래스 관계도는 아래와 같다.
실선은 상속, 점선은 구현을 의미한다.
Collection에서 확장된 메서드는 아래와 같다.

List를 구현한 클래스는 ArrayList와 LinkedList가 있다.
ArrayList는 배열을 확장하는 형식으로,
LinkedList는 값과 주소를 가지는 노드를 연결하는 형식으로 List를 구현한다.
따라서 작업 시간의 이점을 가지기 위해 순차적으로 데이터를 다루거나 조회 시 ArrayList를, 랜덤하게 데이터를 다루거나 추가, 삭제 시 LinkedList를 사용한다.
아래 코드는 ArrayList를 활용해 friends List를 만든 사례이다.
public class ListTest {
    // 문자열을 저장할 List, 구현체는 ArrayList
    List<String> friends = new ArrayList<>();

    public static void main(String[] args) {

        ListTest alt = new ListTest();
        alt.createTest();
        alt.retrieveTest();
        alt.updateTest();
        alt.deleteTest();
    }

    public void createTest() {
        // TODO: friends에 여러명의 친구를 등록해보자.
        friends.add("홍길동");
        friends.add("장길산");
        friends.add("홍길동");
        friends.add("임꺽정");
        friends.add(0, "이몽룡");
        System.out.println("추가 후 내용 출력 : " + friends);
        System.out.println();
    }

    public void retrieveTest() {
        // TODO: 다양한 조회 기능을 사용해보자.
        System.out.println("List의 size : " + friends.size());

    	for (int i = 0; i < friends.size(); i++) {
        	System.out.print(friends.get(i) + " ");
        }
        System.out.println();

    	System.out.print(friends.contains("임꺽정") + " ");
    	System.out.println(friends.contains("조성찬"));

    	System.out.print(friends.indexOf("임꺽정") + " ");
    	System.out.println(friends.indexOf("조성찬"));
    	System.out.println();
    }

    public void updateTest() {
        // TODO: 홍길동이 있다면 값을 율도국 왕으로 변경해보자.
        int idx = friends.indexOf("홍길동");

        if (idx >= 0) {
        	friends.set(idx, "율도국왕");
        }

        System.out.println("수정 후 : " + friends);
        System.out.println();
    }

    public void deleteTest() {
        // TODO: 0번째 친구와 율도국 왕을 삭제하시오.
        friends.remove(0);
        friends.remove(friends.indexOf("율도국왕"));
        System.out.println("삭제 후 : " + friends);
        friends.clear();// 리스트 초기화
        System.out.println("초기화 후 : " + friends);
        System.out.println();
    }
}
출력 결과는 아래와 같다.
추가 후 내용 출력 : [이몽룡, 홍길동, 장길산, 홍길동, 임꺽정]
List의 size : 5
이몽룡 홍길동 장길산 홍길동 임꺽정
true false
4 -1수정 후 : [이몽룡, 율도국왕, 장길산, 홍길동, 임꺽정]
삭제 후 : [장길산, 홍길동, 임꺽정]
초기화 후 : []
Java의 Collection 프레임워크는 Set을 지원한다.
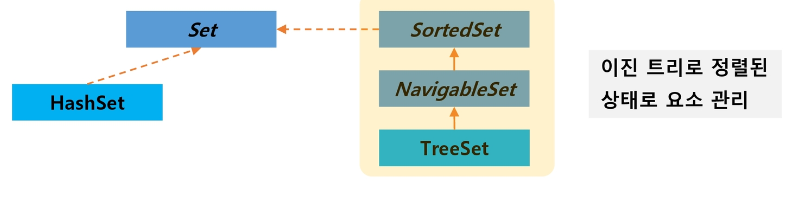
Set은 List와 달리 중복을 허가하지 않는다. Set의 클래스 관계도는 아래와 같다.
Hash Set은 기본 자료형이나 사전에 정의된 객체는 중복이 정의되어 있다.
하지만 새로 만든 객체는 중복을 정의해야 한다. 이 때, equals랑 hashCode 메서드를 사용한다.
아래는 중복을 검사하는 SmartPhone 객체이다.
public class SmartPhone {
    String number;

    public SmartPhone(String number) {
        this.number = number;
    }

    public String toString() {
        return "전화 번호: " + number;
    }

 // TODO: 동일한 번호의 SmartPhone이면 하나만 추가될 수 있도록 처리하시오.
  	@Override
	public boolean equals(Object obj) {
		if (obj != null && obj instanceof SmartPhone) {
			SmartPhone other = (SmartPhone) obj;
			return this.number.equals(other.number);
		}
		return false;
  	}

  	@Override
  	public int hashCode() {
  		return number.hashCode();
  	}
}
import java.util.HashSet;
import java.util.Set;
public class SetTest {
Set<Object> friends = new HashSet<Object>();
private void addMethod() {
friends.add(Integer.valueOf(1));
friends.add("Hello");
friends.add("Hello"); // 동일한 데이터 추가 확인
friends.add(1); // 기본형은 wrapper를 통해 추가
// TODO: SmartPhone 타입의 객체를 추가해보자.
friends.add(new SmartPhone("010"));
friends.add(new SmartPhone("010"));
System.out.println("데이터 추가 결과: " + friends);
}
private void retrieveMethod() {
System.out.println("데이터 개수: " + friends.size());
for (Object sobj : friends) {
System.out.println("데이터 조회: " + sobj);
}
}
private void removeMethod() {
friends.remove("Hello");
System.out.println("데이터 삭제 결과: " + friends);
}
public static void main(String[] args) {
SetTest test = new SetTest();
test.addMethod();
System.out.println();
test.retrieveMethod();
System.out.println();
test.removeMethod();
}
}출력 결과는 아래와 같다.
데이터 추가 결과: [1, Hello, 전화 번호: 010]
데이터 개수: 3
데이터 조회: 1
데이터 조회: Hello
데이터 조회: 전화 번호: 010데이터 삭제 결과: [1, 전화 번호: 010]
이때, HashSet은 순서가 없기 때문에 데이터 출력 결과는 랜덤이다.
Java는 Map을 지원한다.
Map은 중복을 허용하지 않는 Key와 중복을 허용하는 Value를 Entry로 묶어 관리한다.
Map의 클래스 관계도는 아래와 같다.

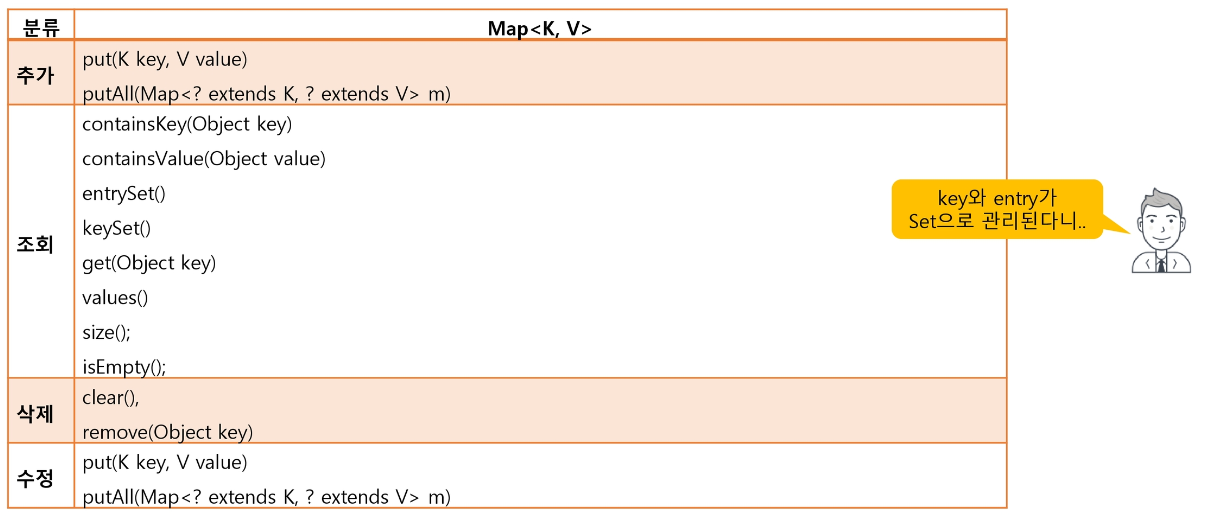
Map의 주요 메서드는 아래와 같다.
아래 코드는 Map을 활용해 entry를 만든 사례이다.
public class MapTest {
    Map<String, String> hMap = new HashMap<>();

    private void addMethod() {
        System.out.println("추가 성공: " + hMap.put("andy", "1234"));
        // 동일한 키의 사용 결과는?
        System.out.println("추가 성공: " + hMap.put("andy", "4567"));
        hMap.put("kate", "9999");
        // 기존에 해당 키에 대한 값이 없을 때만 추가하기
        hMap.putIfAbsent("kate", "1234");

        hMap.put("henry", "4567"); // 동일한 값

        hMap.put("hong", "1234");
        System.out.println("추가 결과: " + hMap);
    }

    private void retrieveMethod() {
        // TODO: kate의 전화번호가 있나요?
        String num = hMap.get("kate");
        System.out.println("kate 번호 : " + num);
        num = hMap.get("박상진");
        System.out.println("박상진 번호 : "+ num);

        // TODO: map이 가지고 있는 key와 거기에 연결된 value를 출력하시오.
        Set<String> keys = hMap.keySet();

        for (String key : keys) {
        	System.out.print(key + " : " + hMap.get(key) + " ");
        }
        System.out.println();

        Set<Entry<String, String>> entries = hMap.entrySet();

        for (Entry<String, String> entry : entries) {
        	System.out.print(entry.getKey() + " : " + entry.getValue() + " ");
        }
        System.out.println();

        // TODO: 값이 4567인 사람의 이름은?
        // END:
        for (Entry<String, String> entry : entries) {
        	if (entry.getValue() == "4567") {
        		System.out.print(entry.getKey() + " ");
        	}
        }
        System.out.println();
    }

    private void removeMethod() {
        // TODO: andy의 자료를 삭제하고 출력하시오.
        hMap.remove("andy");

        Set<Entry<String, String>> entries = hMap.entrySet();

        for (Entry<String, String> entry : entries) {
        	System.out.print(entry.getKey() + " : " + entry.getValue() + " ");
        }
    }

    public static void main(String[] args) {
        MapTest hmt = new MapTest();
        hmt.addMethod();
        System.out.println();
        hmt.retrieveMethod();
        System.out.println();
        hmt.removeMethod();
    }
}
출력 결과는 아래와 같다.
추가 성공: null
추가 성공: 1234
추가 결과: {hong=1234, henry=4567, kate=9999, andy=4567}kate 번호 : 9999
박상진 번호 : null
hong : 1234 henry : 4567 kate : 9999 andy : 4567
hong : 1234 henry : 4567 kate : 9999 andy : 4567
henry andyhong : 1234 henry : 4567 kate : 9999
Java는 Comparable 인터페이스를 사용해 정렬을 수행한다.
객체 간 값 비교를 원하는 클래스는 Comparable 인터페이스를 상속받는다.
그리고 해당 인터페이스의 compareTo 함수를 구현하여 객체 간 값 비교를 수행하고,
결과값을 이용해 정렬을 수행한다.
아래 코드를 보며 이해해보자. TreeSet은 기본적으로 정렬을 수행한다.
import java.util.Set;
import java.util.TreeSet;

public class BTest {

	public BTest() {
		Set<String> set1 = new TreeSet<>();
		set1.add("banana");
		set1.add("apple");
		set1.add("clear");

		for (String s : set1) {
			System.out.print(s + " ");
		}
	}

	public static void main(String[] args) {
		new BTest();
	}
}
String 클래스는 compareTo 함수가 기본적으로 구현되어 있다.
따라서 출력 결과는 아래처럼 오름차순 정렬이 이뤄진다.
apple banana clear
그러나 내가 만든 객체에 대한 정렬은 사전에 구현이 불가능하다.
따라서 Comparable 인터페이스를 구현받아 compareTo 함수 구현이 필요하다.
compareTo 함수의 특징은 아래와 같다.
- 리턴값이 양수면 두 요소 위치를 바꾼다.
- 리턴값이 음수면 아무 일도 하지 않는다.
- 리턴값이 0이면 같은 값이라고 알고만 있고 아무 일도 하지 않는다.
그럼 실제로 compareTo 함수를 구현해보자.
import java.util.Set;
import java.util.TreeSet;

class DataS implements Comparable<DataS> {
	int num;

	DataS (int num) {
		this.num = num;
	}

	@Override
	public int compareTo(DataS o) {
		return this.num - o.num;
	}

	@Override
	public String toString() {
		return "DataS [num=" + num + "]";
	}
}
public class BTest {
public BTest() {
Set<DataS> set2 = new TreeSet<>();
set2.add(new DataS(3));
set2.add(new DataS(1));
set2.add(new DataS(2));
for (DataS d : set2) {
System.out.print(d + " ");
}
}
public static void main(String[] args) {
new BTest();
}
}그러면 DataS의 num을 이용하여 오름차순 정렬이 이뤄진다. 출력 결과는 아래와 같다.
DataS [num=1] DataS [num=2] DataS [num=3]
내림차순을 하고 싶으면 아래처럼 compareTo의 리턴값에 마이너스를 붙여준다.
@Override
public int compareTo(DataS o) {
	return -(this.num - o.num);
}
그러면 출력 결과는 아래와 같다.
DataS [num=3] DataS [num=2] DataS [num=1]
이번엔 좀 더 복잡한 정렬을 구현해보자.
class DataZ implements Comparable<DataZ> {
	int num;
	int score;

	public DataZ(int num, int score) {
		this.num = num;
		this.score = score;
	}

	@Override
	public int compareTo(DataZ o) {
		if (this.score == o.score) {
			return this.num - o.num;
		}

		return -(this.score - o.score);
	}

	@Override
	public String toString() {
		return "DataZ [num=" + num + ", score=" + score + "]";
	}
}
public class BTest {
public BTest() {
List<DataZ> list = new ArrayList<>();
list.add(new DataZ(2, 40));
list.add(new DataZ(3, 70));
list.add(new DataZ(1, 70));
Collections.sort(list); // 정렬을 수행하는 함수
for (DataZ z : list) {
System.out.print(z + " ");
}
}
public static void main(String[] args) {
new BTest();
}
}해당 코드는 score에 대해 내림차순을 실시하고,
score가 같을 경우 num에 대해 오름차순을 실시한다.
따라서 출력 결과는 아래와 같다.
DataZ [num=1, score=70] DataZ [num=3, score=70] DataZ [num=2, score=40]
Java는 Comparator 인터페이스를 사용해 정렬을 수행한다.
그렇다면 Java 기본 자료형의 내림차순은 어떻게 수행할 수 있을까?
compareTo 함수를 사용한다면 Java 내부 코드를 수정해야 할 것이다.
이를 막기 위해 Java는 Comparator 인터페이스를 내부적으로 지원한다. 아래 코드를 살펴보자.
import java.util.Arrays;
import java.util.Comparator;

public class CTest {

	public CTest() {
		Integer[] arr = {1, 6, 3, 8, 2}; // Comparator는 객체가 필요하므로 Integer

		System.out.println(Arrays.toString(arr));

        // 오름차순
		Arrays.sort(arr);
		System.out.println(Arrays.toString(arr));

		// 내림차순
		Arrays.sort(arr, Comparator.reverseOrder());
		System.out.println(Arrays.toString(arr));
	}

	public static void main(String[] args) {
		new CTest();
	}

}
출력 결과는 아래와 같다.
[1, 6, 3, 8, 2]
[1, 2, 3, 6, 8]
[8, 6, 3, 2, 1]
자체적으로 Comparator 인터페이스를 상속받아 compare 함수를 구현할 수도 있다.
아래 코드를 살펴보자.
import java.util.Arrays;
import java.util.Comparator;

class MyComparator implements Comparator<Integer> {

	@Override
	public int compare(Integer o1, Integer o2) {
		return o1 - o2;
	}
}
public class CTest {
public CTest() {
Integer[] arr = {1, 6, 3, 8, 2};
Comparator myComparator = new MyComparator();
Arrays.sort(arr, myComparator);
System.out.println(Arrays.toString(arr));
public static void main(String[] args) {
new CTest();
}
}출력 결과는 아래와 같다.
[1, 2, 3, 6, 8]
Java는 Anonymous Inner Class를 지원한다.
위 단락처럼 compare 함수를 구현하여 정렬을 구현할 수 있다.
하지만 해당 함수를 일회성으로만 쓴다면 구현하는 비용이 너무 많이 든다.
이를 해결하기 위해 Anonymous Inner Class를 사용한다. 아래 코드를 살펴보자.
public class CTest {

	public CTest() {
		Integer[] arr = {1, 6, 3, 8, 2};

		Arrays.sort(arr, new Comparator<Integer>() { // 일회성
			@Override
			public int compare(Integer o1, Integer o2) {
				return o1 - o2;
			}
		});
		System.out.println(Arrays.toString(arr));
	}

	public static void main(String[] args) {
		new CTest();
	}
}
이 표현은 마치 인터페이스로 new 연산자를 사용할 수 있는 것처럼 보인다.
new (class ??? implements) Comparator<Integer> 중 ()가 생략된 형태임을 명심하자.
출력 결과는 아래와 같다.
[1, 2, 3, 6, 8]
자바는 람다를 지원한다.
멤버 변수가 없고 멤버 메서드가 단 한 개인 인터페이스는 람다라는 특별한 표현이 가능하다.
아래 인터페이스와 m1 함수를 살펴보자.
@FunctionalInterface
interface MyInfo {
	int f1();
}

void m1(MyInfo info) {

}
MyInfo 인터페이스는 멤버 변수가 없고 멤버 메서드가 단 한 개이다.
그럼 밑의 과정을 거쳐 람다로 표현이 가능하다.
- Anonymous Inner Class
public CTest() {
	m1(new MyInfo() {
		@Override
  		public int f1() {
			return 0;
		}
	});
}- m1에 쓰이는 클래스는 고정된다. 따라서 클래스 이름을 생략할 수 있다.
public CTest() {
	m1(
		@Override
		public int f1() {
  			return 0;
		}
	);
}- m1에 멤버 함수는 하나 뿐이다. 따라서 함수 이름을 생략할 수 있다.
public CTest() {
	m1(
		() -> {
			return 0;
		}
	);
}- -> 키워드를 더하고 코드를 정리할 수 있다.
public CTest() {
	m1(() -> {
			return 0;
  	});
}
이번엔 리턴이 없는 경우를 알아보자. 이번엔 인터페이스가 아래와 같다.
@FunctionalInterface
interface MyInfo {
	void f1();
}

void m1(MyInfo info) {

}
그럼 위 과정을 모두 거치면 아래와 같이 표현할 수 있다.
public CTest() {
	m1(() -> {
			System.out.println("abc");
  	});
}
만약 출력이 단 한 줄일 때는 {}를 생략할 수 있다.
즉, 아래와 같이 표현할 수 있다.
public CTest() {
	m1(() -> System.out.println("abc"));
}
※ 매개 변수가 있을 때를 생각해보자.
@FunctionalInterface
interface MyInfo {
	void f1(int a);
}

void m1(MyInfo info) {
}
그럼 아래와 같이 표현 가능하다.
public CTest() {
	m1((int a) -> System.out.println("abc"));
}
이때, 매개변수의 자료형을 생략할 수 있다. 즉, 아래와 같이 표현 가능하다.
public CTest() {
	m1((a) -> System.out.println("abc"));
}
이번엔 return 값이 있는 경우를 생각해보자.
@FunctionalInterface
interface MyInfo {
	int f1(int a);
}

int m1(MyInfo info) {
}
그럼 아래와 같이 표현 가능하다.
public CTest() {
  	m1((a) -> {
  			return 0;
  	});
}
이때, 중괄호를 없애려만 return을 삭제해줘야 한다. 즉, 아래와 같이 표현 가능하다.
public CTest() {
  	m1((a) -> 0);
}
특수한 경우로, 매개 변수가 단 하나일 때 ()를 생략할 수 있다. 즉, 아래와 같이 표현 가능하다.
public CTest() {
	m1(a -> System.out.println("abc"));
}