Java에선 공공데이터를 활용할 수 있다.
공공데이터는 CSV, XML, JSON 형태로 저장된다.
XML의 특징은 아래와 같다.
- 태그를 이용하여 문서나 데이터의 구조를 표현하는 마크업 언어이다.
- 문서의 시작은 < ?xml version="1.0" encoding="UTF-8"? >로 한다.
- 반드시 root element가 존재한다.
- 시작 태그와 종료 태그는 일치해야 한다.
- 태그는 대소문자를 구별한다.
아래는 XML 예시이다.
<?xml version="1.0" encoding="UTF-8"?>
<!DOCTYPE korea SYSTEM "./student.dtd">
<korea>
	<student no="12345">
		<name>홍길동</name>
		<loc>광주</loc>
		<phone>010-222-3333</phone>
	</student>

	<student no="23456">
		<name>장길산</name>
		<loc>서울</loc>
		<phone>010-333-4444</phone>
	</student>

	<student no="34567">
		<name>임꺽정</name>
		<loc>대전</loc>
	</student>
</korea>
작성자의 의도대로 XML을 잘 작성하면 valid 하다고 한다. 이를 확인하기 위해 DTD를 사용한다.
아래는 DTD의 예시이다. 알아두기만 하자.
<?xml version="1.0" encoding="UTF-8"?>
<!ELEMENT korea (student*)>
<!ELEMENT student (name, loc, phone?)>
<!ELEMENT name (#PCDATA)>
<!ELEMENT loc (#PCDATA)>
<!ELEMENT phone (#PCDATA)>
<!ATTLIST student no CDATA "0">
Java는 Parser를 지원한다.
문서에서 필요한 정보를 얻기 위해 태그를 구별하고 내용을 추출하는 과정을 파싱이라고 한다.
Parser는 문서를 읽어가며 이벤트 기반으로 처리하는 SAX Parser,
메모리에 문서를 모두 올려서 처리하는 DOM parser가 존재한다.
SAX Parser는 아래와 같이 구동한다.
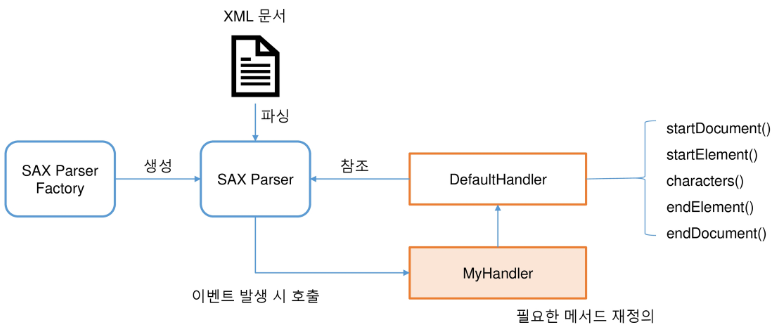
개발자는 DefaultHandler를 상속받아 MyHandler를 작성해 파싱에 사용한다.
SAX Parser를 사용하는 과정은 아래와 같다.
- XML에서 필요한 정보를 뽑아 클래스를 구성한다.
- MyHandler를 작성한다.
- Main 함수를 실행한다.
예시를 천천히 따라가보자. 아래는 원본 XML의 일부를 보여준다.
<dailyBoxOffice>
	<rnum>1</rnum>
	<rank>1</rank>
	<rankInten>0</rankInten>
	<rankOldAndNew>OLD</rankOldAndNew>
	<movieCd>20192696</movieCd>
	<movieNm>발신제한</movieNm>
	<openDt>2021-06-23</openDt>
	<salesAmt>302667090</salesAmt>
	<salesShare>27.5</salesShare>
	<salesInten>-8840840</salesInten>
	<salesChange>-2.8</salesChange>
	<salesAcc>4641205070</salesAcc>
	<audiCnt>32113</audiCnt>
	<audiInten>-13952</audiInten>
	<audiChange>-30.3</audiChange>
	<audiAcc>499902</audiAcc>
	<scrnCnt>822</scrnCnt>
	<showCnt>3012</showCnt>
</dailyBoxOffice>
이 중 등수, 영화제목, 개봉일, 누적 관객 수를 저장할 클래스를 작성한다.
public class BoxOffice {
    private Integer rank; // 등수
    private String movieNm; // 영화제목
    private Date openDt; // 개봉일
    private Integer audiAcc;// 누적 관객 수

    ... // Get, Set 함수 & toString 함수
    }
}
그리고 이를 다룰 Handler를 작성한다.
public class BoxOfficeSaxParser extends DefaultHandler {
    private final File xml = new File("./parse/boxoffice.xml");
    // 파싱된 내용을 저장할 List
    private List<BoxOffice> list = new ArrayList<>();
    // 현재 파싱하고 있는 대상 객체
    private BoxOffice current;
    // 방금 읽은 텍스트 내용
    private String content;

    public List<BoxOffice> getBoxOffice() {
        // TODO: SAXParser를 구성하고 boxoffice.xml을 파싱하시오.
    	try {
		    SAXParserFactory factory = SAXParserFactory.newInstance();
		    SAXParser parser = factory.newSAXParser();
		    parser.parse(xml, this);
    	} catch (IOException | ParserConfigurationException | SAXException e) {
    		e.printStackTrace();
    	}

        return list;
    }

    // TODO: 필요한 매서드를 재정의 하여 boxOffice.xml을 파싱하시오.
	@Override
	public void startDocument() throws SAXException {
		System.out.println("문서 파싱 시작");
	}

	@Override
	public void endDocument() throws SAXException {
		// TODO Auto-generated method stub
		System.out.println("문서 파싱 종료");
	}

	@Override
	public void startElement(String uri, String localName, String qName, Attributes attributes) throws SAXException {
		if (qName.equals("dailyBoxOffice")) {
			current = new BoxOffice();
		}
	}

	@Override
	public void characters(char[] ch, int start, int length) throws SAXException {
		this.content = new String(ch, start, length);
	}

	@Override
	public void endElement(String uri, String localName, String qName) throws SAXException {
		if (qName.equals("dailyBoxOffice")) {
			list.add(current);
			current = null;
		} else if (qName.equals("rank")) {
			this.current.setRank(Integer.parseInt(content));
		} else if (qName.equals("movieNm")) {
			this.current.setMovieNm(content);
		} else if (qName.equals("openDt")) {
			this.current.setOpenDt(current.toDate(content));
		} else if (qName.equals("audiAcc")) {
			this.current.setAudiAcc(Integer.parseInt(content));
		}
	}
}
마지막으로 메인 함수를 실행한다.
public class SaxParserTest {

    public static void main(String[] args) {
        BoxOfficeSaxParser handler = new BoxOfficeSaxParser();

        List<BoxOffice> list = handler.getBoxOffice();
        for (BoxOffice boxOffice : list) {
            System.out.println(boxOffice);
        }
    }
}
출력 결과는 아래와 같다.
[rank=1, movieNm=발신제한, openDt=Wed Jun 23 00:00:00 KST 2021, audiAcc=499902]
...
DOM Parser는 아래와 같이 구동한다.
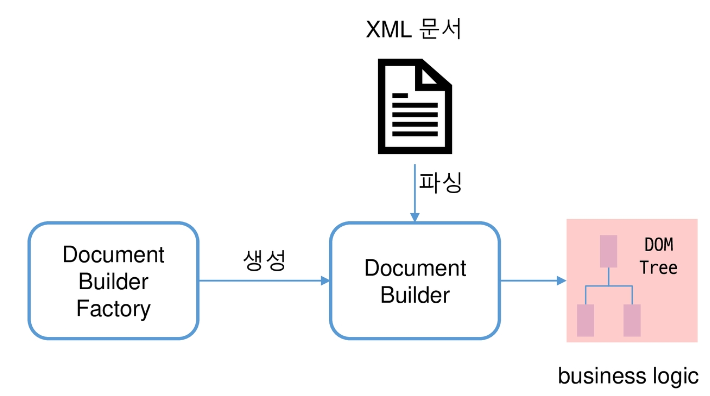
DOM Parser를 사용하는 과정은 SAX Parser와 비슷하다. 아래 코드를 따라가보자.
public class BoxOfficeDomParser {
    private final File xml = new File("./parse/boxoffice.xml");
    private List<BoxOffice> list = new ArrayList<>();

    public List<BoxOffice> getBoxOffice() {
        try {
            DocumentBuilderFactory factory = DocumentBuilderFactory.newInstance();
            DocumentBuilder builder = factory.newDocumentBuilder();
            // 문서 로딩 완료 --> 원하는 요소들 골라내기
            Document doc = builder.parse(xml);
            // 최 상위 element
            Element root = doc.getDocumentElement();
            parse(root);
        } catch (IOException | ParserConfigurationException | SAXException e) {
            e.printStackTrace();
        }
        return list;
    }

    private void parse(Element root) {
        // TODO: root에서 dailyBoxOffice를 추출한 후 BoxOffice를 생성해 list에 저장하시오.
        NodeList boxOffices = root.getElementsByTagName("dailyBoxOffice");
        for (int i = 0; i < boxOffices.getLength(); i++) {
        	// 하나 하나의 boxoffice 접수!!
        	Node child = boxOffices.item(i);
        	list.add(getBoxOffice(child));
        }
    }

    private static BoxOffice getBoxOffice(Node node) {
        BoxOffice boxOffice = new BoxOffice();
        // TODO: node 정보를 이용해서 BoxOffice를 구성하고 반환하시오.
        NodeList childs = node.getChildNodes();
        for (int i = 0; i < childs.getLength(); i++) {
        	Node child = childs.item(i);

    		if (child.getNodeName().equals("rank")) {
    			boxOffice.setRank(Integer.parseInt(child.getTextContent()));
    		} else if (child.getNodeName().equals("movieNm")) {
    			boxOffice.setMovieNm(child.getTextContent());
    		} else if (child.getNodeName().equals("openDt")) {
    			boxOffice.setOpenDt(boxOffice.toDate(child.getTextContent()));
    		} else if (child.getNodeName().equals("audiAcc")) {
    			boxOffice.setAudiAcc(Integer.parseInt(child.getTextContent()));
    		}
        }
        return boxOffice;
    }
}
public class DomParserTest {
public static void main(String[] args) {
BoxOfficeDomParser parser = new BoxOfficeDomParser();
List<BoxOffice> list = parser.getBoxOffice();
for (BoxOffice info : list) {
System.out.println(info);
}
}
}출력 결과는 아래와 같다.
[rank=1, movieNm=발신제한, openDt=Wed Jun 23 00:00:00 KST 2021, audiAcc=499902]
...
Java는 JSON Parsing을 지원한다.
자바스크립트에서의 객체 표현법을 JSON이라 하며, 현재 이 기종 간 데이터 교환에 광범위하게 쓰이고 있다.
아래는 JSON의 일부를 보여준다.
{
	"boxOfficeResult": {
		"boxofficeType": "일별 박스오피스",
		"showRange": "20120101~20120101",
		"dailyBoxOfficeList": [
			{
				"rnum": "1",
				"rank": "1",
				"rankInten": "0",
				"rankOldAndNew": "OLD",
				"movieCd": "20112207",
				"movieNm": "미션임파서블:고스트프로토콜",
				"openDt": "2011-12-15",
				"salesAmt": "2776060500",
				"salesShare": "36.3",
				"salesInten": "-415699000",
				"salesChange": "-13",
				"salesAcc": "40541108500",
				"audiCnt": "353274",
				"audiInten": "-60106",
				"audiChange": "-14.5",
				"audiAcc": "5328435",
				"scrnCnt": "697",
				"showCnt": "3223"
			},
            {
				"rnum": "2",
				"rank": "2",
				"rankInten": "1",
				"rankOldAndNew": "OLD",
				"movieCd": "20110295",
				"movieNm": "마이 웨이",
				"openDt": "2011-12-21",
				"salesAmt": "1189058500",
				"salesShare": "15.6",
				"salesInten": "-105894500",
				"salesChange": "-8.2",
				"salesAcc": "13002897500",
				"audiCnt": "153501",
				"audiInten": "-16465",
				"audiChange": "-9.7",
				"audiAcc": "1739543",
				"scrnCnt": "588",
				"showCnt": "2321"
			},
            ...
        ]
	}
}
이를 Parsing하는 방법은 jackson, gson 두 가지가 존재하며, 둘 다 라이브러리 등록이 필요하다.
첫 번째로 jackson을 사용하는 방법을 알아보자.
@JsonIgnoreProperties(ignoreUnknown=true)
public class BoxOffice {
    private Integer rank; // 등수
    private String movieNm; // 영화제목
    private Date openDt; // 개봉일
    private Integer audiAcc;// 누적 관객 수

    ... // get & set, toString() 함수
}
public class UseJson {
private final File json = new File("./parse/boxoffice.json");
private List<BoxOffice> list = new ArrayList<>();
@SuppressWarnings({ "unchecked", "rawtypes" })
public List<BoxOffice> getBoxOffice() {
ObjectMapper mapper = new ObjectMapper();
// 날짜 변경과 관련된 룰 지정
mapper.setDateFormat(new SimpleDateFormat("yyyy-MM-dd"));
// TODO: json을 파싱해서 list를 구성하시오.
try {
Map<String, Map<String, Object>> result = mapper.readValue(json, Map.class);
List<Map<String, Object>> list = (List) (result.get("boxOfficeResult").get("dailyBoxOfficeList"));
for (Map<String, Object> item: list) {
this.list.add(mapper.convertValue(item, BoxOffice.class));
}
} catch (JsonParseException | JsonMappingException e) {
e.printStackTrace();
} catch (IOException e) {
e.printStackTrace();
}
return list;
}
}public class JsonParserTest {
public static void main(String[] args) {
UseJson parser = new UseJson();
List<BoxOffice> list = parser.getBoxOffice();
for (BoxOffice info : list) {
System.out.println(info);
}
}
}출력 결과는 아래와 같다.
[rank=1, movieNm=미션임파서블:고스트프로토콜, openDt=Thu Dec 15 00:00:00 KST 2011, audiAcc=5328435]
...
두 번째로 gson을 사용하는 방법을 알아보자. 아래 방법으로 객체 하나를 다룰 수 있다.
public class Person {
	private int age;
	private String name;
	private Date birth;

	public Person() {

	}

	public Person(int age, String name, Date birth) {
		this.age = age;
		this.name = name;
		this.birth = birth;
	}

	... // Get, Set 함수 & toString 함수
}
public class PersonTest {
public PersonTest() {
Person p = new Person();
p.setAge(11);
p.setName("chang");
p.setBirth(new Date());
Gson gson = new Gson();
String json = gson.toJson(p);
System.out.println(json);
Person p2 = gson.fromJson(json, Person.class);
System.out.println(p2);
}
public static void main(String[] args) {
new PersonTest();
}
}출력 결과는 아래와 같다.
{"age":11,"name":"chang","birth":"Jan 30, 2023 5:42:48 PM"}
{ "age": 11, "name": "chang", "birth": "Mon Jan 30 17:42:48 KST 2023" }
아래 방법으로 객체 배열도 다룰 수 있다.
public class PersonListResult {
	// 서순에 따라 gson이 알아서 순서에 맞게 바꿔줌.
	String status;
	int count;
	private ArrayList<Person> list;

	... // Get, Set 함수 & toString 함수
}
public class PersonTest {
public PersonTest() {
ArrayList<Person> list = new ArrayList<>();
list.add(new Person(12, "HE1", new Date()));
list.add(new Person(15, "HE2", new Date()));
list.add(new Person(21, "HE3", new Date()));
list.add(new Person(35, "HE4", new Date()));
list.add(new Person(47, "HE5", new Date()));
PersonListResult personList = new PersonListResult();
personList.setList(list);
personList.count = 5;
personList.status = "success";
String jsonList2 = gson.toJson(personList);
System.out.println(jsonList2);
PersonListResult returnPersonList = gson.fromJson(jsonList2, PersonListResult.class);
System.out.println(returnPersonList);
}
public static void main(String[] args) {
new PersonTest();
}
}출력 결과는 아래와 같다.
{"status":"success","count":5,"list":[{"age":12,"name":"HE1","birth":"Jan 30, 2023 5:47:04 PM"}, ...]}
PersonListResult [status=success, count=5, list=[{ "age": 12, "name": "HE1", "birth": "Mon Jan 30 17:48:13 KST 2023" }, ...]]